EOS Rebel Ti manual
Page 4
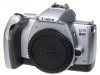
... shutter curtains are present. (10) If the camera has not been used for an extended period or if the camera is to be used for an extended period, remove the battery. If the camera gets really wet, promptly consult your nearest Canon Service Center. Use only a blower to blow ...air too forcefully on the lens, eyepiece, mirror, focusing screen, and film compartment. If the camera has been exposed to salty air, ...
... shutter curtains are present. (10) If the camera has not been used for an extended period or if the camera is to be used for an extended period, remove the battery. If the camera gets really wet, promptly consult your nearest Canon Service Center. Use only a blower to blow ...air too forcefully on the lens, eyepiece, mirror, focusing screen, and film compartment. If the camera has been exposed to salty air, ...
EOS Rebel Ti manual
Page 5
... panel. Lithium Batteries (1) The camera operates on the lens caps or put on two CR2 lithium batteries. Check the battery level in high-temperature places or short circuit the battery contacts or toss a battery into a fire. (4) Although the batteries work at room temperature. However, when the battery level is not displayed, a proper exposure can resume by a Canon Service Center...
... panel. Lithium Batteries (1) The camera operates on the lens caps or put on two CR2 lithium batteries. Check the battery level in high-temperature places or short circuit the battery contacts or toss a battery into a fire. (4) Although the batteries work at room temperature. However, when the battery level is not displayed, a proper exposure can resume by a Canon Service Center...
EOS Rebel Ti manual
Page 6
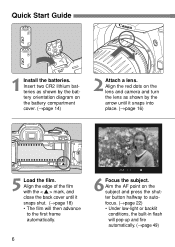
Insert two CR2 lithium batteries as shown by the battery orientation diagram on the subject and press the shutter button halfway to autofocus. (→page 22) • Under low-light...advance to the first frame automatically. 6 6Focus the subject. Aim the AF point on the battery compartment cover. (→page 14) 2 Attach a lens. Align the red dots on the lens and camera and turn the lens as shown by the arrow until it snaps into place. (→page...8594;page 18) • The film will pop-up and fire automatically. (→page 49) Quick Start Guide 1 Install the batteries.
Insert two CR2 lithium batteries as shown by the battery orientation diagram on the subject and press the shutter button halfway to autofocus. (→page 22) • Under low-light...advance to the first frame automatically. 6 6Focus the subject. Aim the AF point on the battery compartment cover. (→page 14) 2 Attach a lens. Align the red dots on the lens and camera and turn the lens as shown by the arrow until it snaps into place. (→page...8594;page 18) • The film will pop-up and fire automatically. (→page 49) Quick Start Guide 1 Install the batteries.
EOS Rebel Ti manual
Page 8
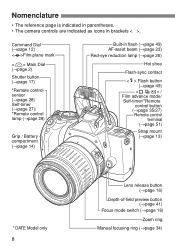
Nomenclature • The reference page is indicated in parentheses. • The camera controls are indicated as icons in flash (→page 49) AF-assist beam (→.../ Self-timer/*Remote control button (→page 35/27) Remote control terminal (→page 51) Strap mount (→page 13) * DATE Model only 8 Lens release button (→page 16) Depth-of-field preview button (→page 41) Focus mode switch (→page ...sensor (→page 28) Self-timer (→page 27)/ *Remote control lamp (→page 28) Grip / Battery compartment (→page 14) Built-in brackets < >.
Nomenclature • The reference page is indicated in parentheses. • The camera controls are indicated as icons in flash (→page 49) AF-assist beam (→.../ Self-timer/*Remote control button (→page 35/27) Remote control terminal (→page 51) Strap mount (→page 13) * DATE Model only 8 Lens release button (→page 16) Depth-of-field preview button (→page 41) Focus mode switch (→page ...sensor (→page 28) Self-timer (→page 27)/ *Remote control lamp (→page 28) Grip / Battery compartment (→page 14) Built-in brackets < >.

EOS Rebel Ti manual
Page 9
...page 18) LCD panel (→page 10) Tripod socket < > Midroll rewind button (→page 20) < > LCD panel illumination button (→page 51) * DATE Model only < > Exposure compensation (→page 45) Manual aperture setting (→page 42) *SET button (→page 30) < > AE lock (→page 44... button (→page 32) Back cover < > Function button (→page 19, 26, 29, 46, 48, 50, 51) Guide hole Battery compartment cover Battery compartment release lever (→page 14) Take off the eyecup, then slide the dioptric adjustment lever left or right until the AF point in...
...page 18) LCD panel (→page 10) Tripod socket < > Midroll rewind button (→page 20) < > LCD panel illumination button (→page 51) * DATE Model only < > Exposure compensation (→page 45) Manual aperture setting (→page 42) *SET button (→page 30) < > AE lock (→page 44... button (→page 32) Back cover < > Function button (→page 19, 26, 29, 46, 48, 50, 51) Guide hole Battery compartment cover Battery compartment release lever (→page 14) Take off the eyecup, then slide the dioptric adjustment lever left or right until the AF point in...

EOS Rebel Ti manual
Page 10
.... 10 Nomenclature Shutter speed ( - , FE lock ( ) ISO film speed ( Date LCD Panel ) - ) DATE Model Shooting mode < > Manual focus Aperture ( - ) Red-ey reduction setting ( , ) Beeper setting ( , ) AEB amount ( - ) Date AF point mark Film advance mode < > Single frame < > Continuous shooting < > Self-timer/ Remote control Battery level mark < > Date < > ISO film speed < > Red-eye reduction < > Beeper < > Multiple exposures...
.... 10 Nomenclature Shutter speed ( - , FE lock ( ) ISO film speed ( Date LCD Panel ) - ) DATE Model Shooting mode < > Manual focus Aperture ( - ) Red-ey reduction setting ( , ) Beeper setting ( , ) AEB amount ( - ) Date AF point mark Film advance mode < > Single frame < > Continuous shooting < > Self-timer/ Remote control Battery level mark < > Date < > ISO film speed < > Red-eye reduction < > Beeper < > Multiple exposures...

EOS Rebel Ti manual
Page 13
Then pass it does not slip out of the strap through the strap's buckle as shown in the illustration. Pull the strap to make sure it through the camera's strap mount from the bottom. Before You Start Installing the Batteries and Checking the Battery Level 14 Mounting and Detaching a Lens 16 How the Shutter Button Works 17 Loading and Unloading Film 18 Midroll Rewind 20 Holding the Camera 20 1 2 1 Attaching the Strap Pass the end of the buckle. • The eyepiece cover is also attached to the strap. 3 4 Eyepiece cover 13
Then pass it does not slip out of the strap through the strap's buckle as shown in the illustration. Pull the strap to make sure it through the camera's strap mount from the bottom. Before You Start Installing the Batteries and Checking the Battery Level 14 Mounting and Detaching a Lens 16 How the Shutter Button Works 17 Loading and Unloading Film 18 Midroll Rewind 20 Holding the Camera 20 1 2 1 Attaching the Strap Pass the end of the buckle. • The eyepiece cover is also attached to the strap. 3 4 Eyepiece cover 13
EOS Rebel Ti manual
Page 14
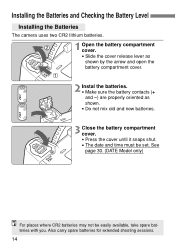
See page 30. (DATE Model only) For places where CR2 batteries may not be set. Also carry spare batteries for extended shooting sessions. 14 Installing the Batteries and Checking the Battery Level Installing the Batteries The camera uses two CR2 lithium batteries. 2 1 1 Open the battery compartment cover. • Slide the cover release lever as shown by the arrow and open...
See page 30. (DATE Model only) For places where CR2 batteries may not be set. Also carry spare batteries for extended shooting sessions. 14 Installing the Batteries and Checking the Battery Level Installing the Batteries The camera uses two CR2 lithium batteries. 2 1 1 Open the battery compartment cover. • Slide the cover release lever as shown by the arrow and open...

EOS Rebel Ti manual
Page 15
... The battery life shown in the table is based on the Canon's testing conditions with new batteries. • If nothing is low. Keep spare batteries handy. : The batteries will display one of rolls that can be completely exhausted. : Replace the batteries. (→page 5) Battery Life Temperature... At 20˚C At -10˚C 0% Flash Use 67 rolls 44 rolls 50% Flash Use 30 rolls 20 rolls (With 24-ex. When not using the camera. Checking the Battery Level Check the battery level after replacing the batteries and before using the camera...
... The battery life shown in the table is based on the Canon's testing conditions with new batteries. • If nothing is low. Keep spare batteries handy. : The batteries will display one of rolls that can be completely exhausted. : Replace the batteries. (→page 5) Battery Life Temperature... At 20˚C At -10˚C 0% Flash Use 67 rolls 44 rolls 50% Flash Use 30 rolls 20 rolls (With 24-ex. When not using the camera. Checking the Battery Level Check the battery level after replacing the batteries and before using the camera...
EOS Rebel Ti manual
Page 28
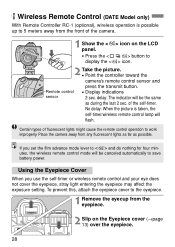
... cover the eyepiece, stray light entering the eyepiece may affect the exposure setting. Wireless Remote Control (DATE Model only) With Remote Controller RC-1 (optional), wireless operation is taken, the self-timer/wireless ... • Display indications sensor 2-sec. of fluorescent lights might cause the remote control operation to save battery power. Certain types of the self-timer. delay: The indicator will be canceled automatically to work improperly... icon. 2 Take the picture. • Point the controller toward the camera's remote control sensor and press the transmit button.
... cover the eyepiece, stray light entering the eyepiece may affect the exposure setting. Wireless Remote Control (DATE Model only) With Remote Controller RC-1 (optional), wireless operation is taken, the self-timer/wireless ... • Display indications sensor 2-sec. of fluorescent lights might cause the remote control operation to save battery power. Certain types of the self-timer. delay: The indicator will be canceled automatically to work improperly... icon. 2 Take the picture. • Point the controller toward the camera's remote control sensor and press the transmit button.
EOS Rebel Ti manual
Page 30
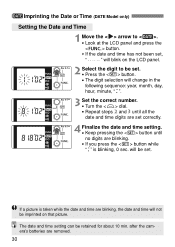
... the < > button until no digits are blinking. • If you press the < > button while " " is taken while the date and time are removed. 30 after the camera's batteries are blinking, the date and time will not be imprinted on the LCD panel. 2 Select the digit to < >. • Look at the LCD panel... and press the < > button. The date and time setting can be set , " " will blink on that picture. If the date and time has ...
... the < > button until no digits are blinking. • If you press the < > button while " " is taken while the date and time are removed. 30 after the camera's batteries are blinking, the date and time will not be imprinted on the LCD panel. 2 Select the digit to < >. • Look at the LCD panel... and press the < > button. The date and time setting can be set , " " will blink on that picture. If the date and time has ...

EOS Rebel Ti manual
Page 47
...recommended for night scenes, fireworks, astronomical photography, etc. 1 Turn the Command Dial to < >. 2 Set the shutter speed to set of batteries, the maximum bulb exposure time (at 20˚C) will be taken with wireless remote control (optional). Press the transmit button to start the ...exposure, and press it again to stop the exposure. (DATE Model only) • With a new set the desired aperture. 4 Start the bulb exposure. • Press and hold down the shutter button. •...
...recommended for night scenes, fireworks, astronomical photography, etc. 1 Turn the Command Dial to < >. 2 Set the shutter speed to set of batteries, the maximum bulb exposure time (at 20˚C) will be taken with wireless remote control (optional). Press the transmit button to start the ...exposure, and press it again to stop the exposure. (DATE Model only) • With a new set the desired aperture. 4 Start the bulb exposure. • Press and hold down the shutter button. •...
EOS Rebel Ti manual
Page 56
... shutter button halfway. (→page 17) Remove the batteries and reload it. (→page 14) If the blinking < > icon does not turn off, consult your nearest Canon Service Center. Set the lens focus mode to your nearest Canon Service Center. The picture looks blurred. A misoperation has... this Troubleshooting Guide. Using the camera with a flash unit (equipped with new ones. (→page 14) the LCD panel. Replace with new ones. (→page 14) The batteries have been installed incorrectly. When using an external flash unit, an EOS-dedicated Speedlite is displayed on the...
... shutter button halfway. (→page 17) Remove the batteries and reload it. (→page 14) If the blinking < > icon does not turn off, consult your nearest Canon Service Center. Set the lens focus mode to your nearest Canon Service Center. The picture looks blurred. A misoperation has... this Troubleshooting Guide. Using the camera with a flash unit (equipped with new ones. (→page 14) the LCD panel. Replace with new ones. (→page 14) The batteries have been installed incorrectly. When using an external flash unit, an EOS-dedicated Speedlite is displayed on the...

EOS Rebel Ti manual
Page 58
... Approx. 54 dB • Date imprinting (DATE Model only) Automatic dating Automatic calender to 2099 Power source Uses camera power • Power source Power source Two CR2 lithium batteries Battery life page 15) Battery check Automatic • Dimensions (W...RC-5 (DATE Model only) • Flash Built-in • Weight 365 g/12.9 oz (body only, excluding batteries) • All the specifications above are based on Canon's testing ...sec. Flash coverage: 28 mm lens angle covered Red-eye reduction: Lamp External EOS-dedicated flash E-TTL / A-TTL / TTL autoflash • Film transport Film...
... Approx. 54 dB • Date imprinting (DATE Model only) Automatic dating Automatic calender to 2099 Power source Uses camera power • Power source Power source Two CR2 lithium batteries Battery life page 15) Battery check Automatic • Dimensions (W...RC-5 (DATE Model only) • Flash Built-in • Weight 365 g/12.9 oz (body only, excluding batteries) • All the specifications above are based on Canon's testing ...sec. Flash coverage: 28 mm lens angle covered Red-eye reduction: Lamp External EOS-dedicated flash E-TTL / A-TTL / TTL autoflash • Film transport Film...
EOS Rebel Ti manual
Page 59
...flash 49 Bulb exposures 47 C Command Dial 12 Continuous shooting 35 Creative Zone 12, 31 D Date/time 29 Depth- If such changes or modifications should be made, you could be determined by ... AF point 32 AI Focus AF 55 AI Servo AF 55 Aperture 52 B Basic Zone 12, 21 Batteries 14 Beeper 51 Built-in a particular installation. of the equipment. field AE 41, 52 Dioptric adjustment ... speed manually 50 ISO speed 52 Flash 23 Focus lock 33 Full Auto mode 22 H Holding the camera 20 L LCD panel 10 illumination 51 Lens mounting / detaching 16 M Manual focusing 34 Metering modes ...
...flash 49 Bulb exposures 47 C Command Dial 12 Continuous shooting 35 Creative Zone 12, 31 D Date/time 29 Depth- If such changes or modifications should be made, you could be determined by ... AF point 32 AI Focus AF 55 AI Servo AF 55 Aperture 52 B Basic Zone 12, 21 Batteries 14 Beeper 51 Built-in a particular installation. of the equipment. field AE 41, 52 Dioptric adjustment ... speed manually 50 ISO speed 52 Flash 23 Focus lock 33 Full Auto mode 22 H Holding the camera 20 L LCD panel 10 illumination 51 Lens mounting / detaching 16 M Manual focusing 34 Metering modes ...

