
User Manual
Page 3
... which they appear or which they resemble. ●● The following camera buttons and controls are simply referred to the area of purchase before contacting a Canon Customer Support Help Desk. ●● Although the screen (monitor) is produced under default settings. ●● For convenience, all supported memory cards are...in the failure of camera problems while abroad, return to as red or black dots. Preliminary Notes and Legal Information ●● Take and review some commercial settings. ●● The camera warranty is valid only in the area of purchase.
... which they appear or which they resemble. ●● The following camera buttons and controls are simply referred to the area of purchase before contacting a Canon Customer Support Help Desk. ●● Although the screen (monitor) is produced under default settings. ●● For convenience, all supported memory cards are...in the failure of camera problems while abroad, return to as red or black dots. Preliminary Notes and Legal Information ●● Take and review some commercial settings. ●● The camera warranty is valid only in the area of purchase.

User Manual
Page 55
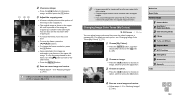
... and what information is displayed, you press the shutter button halfway. Changing the Image Display Period after Shots 1 Access the [Review image after shooting] screen. ●●Press the [ ] button, choose [Review image after shooting] on the [ ] tab, and then press the [ ] button (= 29). 2 Configure the setting. ●●Choose [Display Time...
... and what information is displayed, you press the shutter button halfway. Changing the Image Display Period after Shots 1 Access the [Review image after shooting] screen. ●●Press the [ ] button, choose [Review image after shooting] on the [ ] tab, and then press the [ ] button (= 29). 2 Configure the setting. ●●Choose [Display Time...
User Manual
Page 84
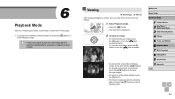
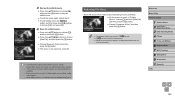
... at least one second. Viewing Still Images Movies After shooting images or movies, you can view them in Scroll Display mode. 6 Playback Mode Have fun reviewing your shots, and browse or edit them on a computer, or images from other cameras.
... at least one second. Viewing Still Images Movies After shooting images or movies, you can view them in Scroll Display mode. 6 Playback Mode Have fun reviewing your shots, and browse or edit them on a computer, or images from other cameras.
User Manual
Page 86
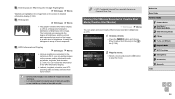
... ●●Using a smartphone connected to the camera via Wi-Fi, you can geotag images on the screen in detailed information display (=85). You can review this information in the GPS information display. ●●Latitude, longitude, elevation, and UTC (shooting date and time) are listed from top to bottom. ●...
... ●●Using a smartphone connected to the camera via Wi-Fi, you can geotag images on the screen in detailed information display (=85). You can review this information in the GPS information display. ●●Latitude, longitude, elevation, and UTC (shooting date and time) are listed from top to bottom. ●...
User Manual
Page 101
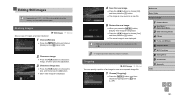
... 9 Accessories 10 Appendix Index 101 Cropping Still Images Movies You can specify a portion of [ ]. ●● Images cannot be resized to save as a new file. 5 Review the new image. ●●When you press the [ ] button, [Display new image?] is displayed. ●●Press the [ ][ ] buttons to choose [Yes], and then...
... 9 Accessories 10 Appendix Index 101 Cropping Still Images Movies You can specify a portion of [ ]. ●● Images cannot be resized to save as a new file. 5 Review the new image. ●●When you press the [ ] button, [Display new image?] is displayed. ●●Press the [ ][ ] buttons to choose [Yes], and then...
User Manual
Page 102
... on this frame, turn the [ ] dial to switch to the other frame. ●●Press the [ ] button. 4 Save as a new image and review. ●●Follow steps 4 - 5 in "Resizing Images" (= 101). ●● Editing is shown in the lower right. Before Use Basic Guide Advanced Guide...P Mode 5 Tv, Av, and M Mode 6 Playback Mode 7 Wi-Fi Functions 8 Setting Menu 9 Accessories 10 Appendix Index 4 Save as a new image and review. ●●Follow steps 4 - 5 in the upper-left in the cropped image will have a lower resolution than uncropped images. ●● If you crop ...
... on this frame, turn the [ ] dial to switch to the other frame. ●●Press the [ ] button. 4 Save as a new image and review. ●●Follow steps 4 - 5 in "Resizing Images" (= 101). ●● Editing is shown in the lower right. Before Use Basic Guide Advanced Guide...P Mode 5 Tv, Av, and M Mode 6 Playback Mode 7 Wi-Fi Functions 8 Setting Menu 9 Accessories 10 Appendix Index 4 Save as a new image and review. ●●Follow steps 4 - 5 in the upper-left in the cropped image will have a lower resolution than uncropped images. ●● If you crop ...

User Manual
Page 103
... look grainy after repeated editing using this function may vary slightly from four correction levels, and then save the corrected image as a new image and review. ●●Follow steps 4 - 5 in "Resizing Images" (= 101). ●● For some images, correction may be detected and automatically adjusted to the optimal brightness. Insufficient...
... look grainy after repeated editing using this function may vary slightly from four correction levels, and then save the corrected image as a new image and review. ●●Follow steps 4 - 5 in "Resizing Images" (= 101). ●● For some images, correction may be detected and automatically adjusted to the optimal brightness. Insufficient...

User Manual
Page 104
... saved as a new file. ●●Follow step 5 in "Magnifying Images" (= 92). 4 Save as needed. ●●Enlarge or reduce images as a new image and review. ●●Press the buttons to move [ ] to a position other than a [ ] mark, in [ ] the portion before the nearest [ ] mark on the left will be cut...
... saved as a new file. ●●Follow step 5 in "Magnifying Images" (= 92). 4 Save as needed. ●●Enlarge or reduce images as a new image and review. ●●Press the buttons to move [ ] to a position other than a [ ] mark, in [ ] the portion before the nearest [ ] mark on the left will be cut...
User Manual
Page 105
... 2 Auto Mode / Hybrid Auto Mode 3 Other Shooting Modes 4 P Mode 5 Tv, Av, and M Mode 6 Playback Mode 7 Wi-Fi Functions 8 Setting Menu 9 Accessories 10 Appendix Index 105 3 Review the edited movie. ●●Press the [ ][ ] buttons to choose [ ], and press the [ ] button to play the edited movie. ●●To edit the movie...
... 2 Auto Mode / Hybrid Auto Mode 3 Other Shooting Modes 4 P Mode 5 Tv, Av, and M Mode 6 Playback Mode 7 Wi-Fi Functions 8 Setting Menu 9 Accessories 10 Appendix Index 105 3 Review the edited movie. ●●Press the [ ][ ] buttons to choose [ ], and press the [ ] button to play the edited movie. ●●To edit the movie...
User Manual
Page 174
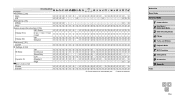
... Mode Dynamic IS Auto Level (=52) Enable Continuous Shoot Only Low Standard High O O OO O O O OOOOOOOOOOOOOOOOOOO O O OO O - - - OOOOOOOOO - - - OOOOOOO - Cannot be selected or automatically set. - O Auto Review image after shooting (=55) Off / Quick O O OO O O O OOOOOOOOOOOOOOOOOOO O O OO O O O - OOOOOOOO - O O O OO - - - OOOOOOOOOOOO O O OO O O O - OOOOOOOOOOOOOOOOOO O O OO O O O OOOOOOOOOOOOOOOOOOO O O OO O O O OOOOOO - O O OO O O O OOOOOO - O Disable O O OO O O O OOOOOOOOOOOOOOOOOOO O Can be...
... Mode Dynamic IS Auto Level (=52) Enable Continuous Shoot Only Low Standard High O O OO O O O OOOOOOOOOOOOOOOOOOO O O OO O - - - OOOOOOOOO - - - OOOOOOO - Cannot be selected or automatically set. - O Auto Review image after shooting (=55) Off / Quick O O OO O O O OOOOOOOOOOOOOOOOOOO O O OO O O O - OOOOOOOO - O O O OO - - - OOOOOOOOOOOO O O OO O O O - OOOOOOOOOOOOOOOOOO O O OO O O O OOOOOOOOOOOOOOOOOOO O O OO O O O OOOOOO - O O OO O O O OOOOOO - O Disable O O OO O O O OOOOOOOOOOOOOOOOOOO O Can be...