
User Guide
Page 4
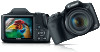
... ] button (13) [ (ISO speed)] / Up button (14) [ (Manual focus)] / [ (Macro)] / Left button (15) FUNC./SET button (16) [ (Flash)] / Right button (17) [ (Display)] / Down button Before Use Basic Guide Advanced Guide 1 Camera Basics 2 Auto Mode / Hybrid Auto Mode 3 Other Shooting Modes 4 ... (9) (10) (11) (1) Zoom lever Shooting: [ (telephoto)] / [ (wide angle)] Playback: [ (magnify)] / [ (index)] (2) Shutter button (3) Front dial (4) Strap mount (5) Flash (6) Lamp (7) Speaker (8) Lens (9) Lens hood/filter adapter mount (10) [ (Framing Assist - Seek)] button (11) [ (Framing Assist -
... ] button (13) [ (ISO speed)] / Up button (14) [ (Manual focus)] / [ (Macro)] / Left button (15) FUNC./SET button (16) [ (Flash)] / Right button (17) [ (Display)] / Down button Before Use Basic Guide Advanced Guide 1 Camera Basics 2 Auto Mode / Hybrid Auto Mode 3 Other Shooting Modes 4 ... (9) (10) (11) (1) Zoom lever Shooting: [ (telephoto)] / [ (wide angle)] Playback: [ (magnify)] / [ (index)] (2) Shutter button (3) Front dial (4) Strap mount (5) Flash (6) Lamp (7) Speaker (8) Lens (9) Lens hood/filter adapter mount (10) [ (Framing Assist - Seek)] button (11) [ (Framing Assist -

User Guide
Page 8
... Servo AF 66 Changing the Focus Setting 67 Shooting with the AF Lock 67 Flash 68 Changing the Flash Mode 68 Auto 68 On 68 Slow Synchro 68 Off 68 Adjusting the Flash Exposure Compensation 69 Shooting with the FE Lock 69 Other Settings 70 Changing the ...Specific Shutter Speeds ([Tv] Mode 71 Specific Aperture Values ([Av] Mode 72 Specific Shutter Speeds and Aperture Values ([M] Mode)...... 72 Adjusting the Flash Output 73 6 Playback Mode 74 Viewing 74 Switching Display Modes 75 Overexposure Warning (for Image Highlights 76 Histogram 76 Viewing Short Movies Created When ...
... Servo AF 66 Changing the Focus Setting 67 Shooting with the AF Lock 67 Flash 68 Changing the Flash Mode 68 Auto 68 On 68 Slow Synchro 68 Off 68 Adjusting the Flash Exposure Compensation 69 Shooting with the FE Lock 69 Other Settings 70 Changing the ...Specific Shutter Speeds ([Tv] Mode 71 Specific Aperture Values ([Av] Mode 72 Specific Shutter Speeds and Aperture Values ([M] Mode)...... 72 Adjusting the Flash Output 73 6 Playback Mode 74 Viewing 74 Switching Display Modes 75 Overexposure Warning (for Image Highlights 76 Histogram 76 Viewing Short Movies Created When ...
User Guide
Page 9
... Checking Certification Logos 99 Display Language 99 Adjusting Other Settings 100 Restoring Defaults 100 8 Accessories 101 System Map 101 Optional Accessories 102 Power Supplies 102 Flash Unit 103 Other Accessories 103 Printer 103 Using Optional Accessories 104 Playback on a TV 104 Playback on a High-Definition TV 104 Playback on a Standard-Definition...
... Checking Certification Logos 99 Display Language 99 Adjusting Other Settings 100 Restoring Defaults 100 8 Accessories 101 System Map 101 Optional Accessories 102 Power Supplies 102 Flash Unit 103 Other Accessories 103 Printer 103 Using Optional Accessories 104 Playback on a TV 104 Playback on a High-Definition TV 104 Playback on a Standard-Definition...

User Guide
Page 10
... Shooting (Information Display 123 Battery Level 124 Playback (Detailed Information Display 124 Summary of Shots per Memory Card 135 Recording Time per Memory Card 135 Flash Range 135 Shooting Range 136 Continuous Shooting Speed 136 Shutter Speed 136 Aperture 136 Battery Pack NB-6LH 136 Battery Charger CB-2LY/CB-2LYE...
... Shooting (Information Display 123 Battery Level 124 Playback (Detailed Information Display 124 Summary of Shots per Memory Card 135 Recording Time per Memory Card 135 Flash Range 135 Shooting Range 136 Continuous Shooting Speed 136 Shutter Speed 136 Aperture 136 Battery Pack NB-6LH 136 Battery Charger CB-2LY/CB-2LYE...

User Guide
Page 11
...) Monochrome (= 54) ●● While adjusting image settings (Live View Control) -- =48 ●● Focus on faces -- =29, =50, =65 ●● Without using the flash (Flash Off) -- =29, =68 ●● Include yourself in the shot (Self-Timer) -- =39, =55 ●● Add a date stamp -- =40 ●● Movie clips and...
...) Monochrome (= 54) ●● While adjusting image settings (Live View Control) -- =48 ●● Focus on faces -- =29, =50, =65 ●● Without using the flash (Flash Off) -- =29, =68 ●● Include yourself in the shot (Self-Timer) -- =39, =55 ●● Add a date stamp -- =40 ●● Movie clips and...
User Guide
Page 12
...is used correctly. ●● The safety precautions noted here are intended to prevent you and other persons from infants when using the flash. ●● Store this equipment out of the reach of the product if it emits smoke or a strange smell, or otherwise behaves...6 Playback Mode 7 Setting Menu 8 Accessories 9 Appendix Index 12 Warning Denotes the possibility of serious injury or death. ●● Do not trigger the flash in asphyxiation. ●● Use only recommended power sources. ●● Do not disassemble, alter, or apply heat to the product. ●●...
...is used correctly. ●● The safety precautions noted here are intended to prevent you and other persons from infants when using the flash. ●● Store this equipment out of the reach of the product if it emits smoke or a strange smell, or otherwise behaves...6 Playback Mode 7 Setting Menu 8 Accessories 9 Appendix Index 12 Warning Denotes the possibility of serious injury or death. ●● Do not trigger the flash in asphyxiation. ●● Use only recommended power sources. ●● Do not disassemble, alter, or apply heat to the product. ●●...
User Guide
Page 13
...batteries. ●● Do not place the battery pack/batteries near or in the following precautions. -- Exercise adequate caution when using the flash, be careful not to attach these accessories firmly. Caution Denotes the possibility of the electrical outlet or wiring accessories. This could lead to ...result in a manner that has collected on a clear day or an intense artificial light source. This may cause the battery pack/batteries to the flash. ●● Avoid using a dry cloth, wipe away any dust and dirt that exceeds the rated capacity of injury. ●● ...
...batteries. ●● Do not place the battery pack/batteries near or in the following precautions. -- Exercise adequate caution when using the flash, be careful not to attach these accessories firmly. Caution Denotes the possibility of the electrical outlet or wiring accessories. This could lead to ...result in a manner that has collected on a clear day or an intense artificial light source. This may cause the battery pack/batteries to the flash. ●● Avoid using a dry cloth, wipe away any dust and dirt that exceeds the rated capacity of injury. ●● ...
User Guide
Page 14
... close the screen (so that it to the product. terminals reversed. This may cause malfunctions or damage the screen. The heat emitted from the flash may cause product damage. ●● Before you are not using the camera on a sandy beach or at intense light sources, such as ...the sun on the flash with the lowering flash. Any battery leakage that hard objects do not come into contact with the + and - This could cause leakage, overheating, or explosion, resulting...
... close the screen (so that it to the product. terminals reversed. This may cause malfunctions or damage the screen. The heat emitted from the flash may cause product damage. ●● Before you are not using the camera on a sandy beach or at intense light sources, such as ...the sun on the flash with the lowering flash. Any battery leakage that hard objects do not come into contact with the + and - This could cause leakage, overheating, or explosion, resulting...

User Guide
Page 16
If you have raised the flash, do not attach the charger or cord to other end into a power outlet. ●●The charging lamp turns orange, and charging begins. ●●...
If you have raised the flash, do not attach the charger or cord to other end into a power outlet. ●●The charging lamp turns orange, and charging begins. ●●...

User Guide
Page 20
...shoots, a shutter sound is displayed. 2 Enter [ ] mode. ●●Set the mode dial to the shooting screen. If you have raised the flash, it toward [ ] (wide angle). 4 Shoot. Trying the Camera Out Still Images Movies Follow these instructions to turn the camera on . ●●...Icons representing the scene and image stabilization mode are displayed to indicate image areas in focus. ●●If [Raise the flash] is displayed, lift the flash with your finger to prepare it for specific scenes, simply let the camera determine the subject and shooting conditions. 1 Turn...
...shoots, a shutter sound is displayed. 2 Enter [ ] mode. ●●Set the mode dial to the shooting screen. If you have raised the flash, it toward [ ] (wide angle). 4 Shoot. Trying the Camera Out Still Images Movies Follow these instructions to turn the camera on . ●●...Icons representing the scene and image stabilization mode are displayed to indicate image areas in focus. ●●If [Raise the flash] is displayed, lift the flash with your finger to prepare it for specific scenes, simply let the camera determine the subject and shooting conditions. 1 Turn...

User Guide
Page 30
...indicate image areas in focus. ●●Several AF frames are displayed when multiple areas are in low-light conditions when you have raised the flash, it fires automatically. ●●Keep the camera still until the shutter sound ends. ●●After displaying your shot, the camera ...once as needed. ●●To resize the subject, repeat the operations in focus. ●●If [Raise the flash] is displayed, lift the flash with your finger to prepare it for use the flash, push it down . ●●As the camera shoots, a shutter sound is played, and in focus. 9...
...indicate image areas in focus. ●●Several AF frames are displayed when multiple areas are in low-light conditions when you have raised the flash, it fires automatically. ●●Keep the camera still until the shutter sound ends. ●●After displaying your shot, the camera ...once as needed. ●●To resize the subject, repeat the operations in focus. ●●If [Raise the flash] is displayed, lift the flash with your finger to prepare it for use the flash, push it down . ●●As the camera shoots, a shutter sound is played, and in focus. 9...
User Guide
Page 32
... Audio is recorded in low-light conditions. ●● A blinking [ ] icon displayed when you press the shutter button halfway. Leaving the flash raised, or blocking the microphone may prevent audio from being recorded or may determine the focus, brightness, and colors used. ●● You ... after shots (= 46). Be careful not to allow for correction of significant camera shake. For details on the focusing range (shooting range), see "Flash Range" (= 135). ●● The subject may be blurred by the camera will no longer sound. Still Images ●● A blinking ...
... Audio is recorded in low-light conditions. ●● A blinking [ ] icon displayed when you press the shutter button halfway. Leaving the flash raised, or blocking the microphone may prevent audio from being recorded or may determine the focus, brightness, and colors used. ●● You ... after shots (= 46). Be careful not to allow for correction of significant camera shake. For details on the focusing range (shooting range), see "Flash Range" (= 135). ●● The subject may be blurred by the camera will no longer sound. Still Images ●● A blinking ...

User Guide
Page 39
... shutter release until about 10 seconds after you start the self-timer, the lamp will blink and the camera will remain lit in case the flash fires.) ●●To cancel shooting after you have triggered the self-timer, press the [ ] button. ●●To restore the original setting, choose [ ] in...
... shutter release until about 10 seconds after you start the self-timer, the lamp will blink and the camera will remain lit in case the flash fires.) ●●To cancel shooting after you have triggered the self-timer, press the [ ] button. ●●To restore the original setting, choose [ ] in...

User Guide
Page 40
... Playback Mode 7 Setting Menu 8 Accessories 9 Appendix Index 40 However, note that date stamps cannot be edited or removed. Shooting will remain lit in case the flash fires.) Adding a Date Stamp Still Images Movies The camera can specify the delay (0 - 30 seconds) and number of images. ●●To restore the ... the [ ][ ] buttons to choose a value, and then press the [ ] button. ●●Once the setting is complete, [ ] is required between shots when the flash fires or when you specify multiple shots, image brightness and white balance are determined by the first shot.
... Playback Mode 7 Setting Menu 8 Accessories 9 Appendix Index 40 However, note that date stamps cannot be edited or removed. Shooting will remain lit in case the flash fires.) Adding a Date Stamp Still Images Movies The camera can specify the delay (0 - 30 seconds) and number of images. ●●To restore the ... the [ ][ ] buttons to choose a value, and then press the [ ] button. ●●Once the setting is complete, [ ] is required between shots when the flash fires or when you specify multiple shots, image brightness and white balance are determined by the first shot.

User Guide
Page 41
Use camera DPOF print settings (=114) to shoot continuously. Print using printer functions (=110) -- Use the software downloaded from the Canon website (=107) to images that already have one as follows. However, adding a date stamp this way to print Continuous Shooting Still ...the [ ] button. ●●Once the setting is complete, [ ] is displayed. 2 Shoot. ●●Hold the shutter button all the way down if the flash fires. Before Use Basic Guide Advanced Guide 1 Camera Basics 2 Auto Mode / Hybrid Auto Mode 3 Other Shooting Modes 4 P Mode 5 Tv, Av, and M Mode ...
Use camera DPOF print settings (=114) to shoot continuously. Print using printer functions (=110) -- Use the software downloaded from the Canon website (=107) to images that already have one as follows. However, adding a date stamp this way to print Continuous Shooting Still ...the [ ] button. ●●Once the setting is complete, [ ] is displayed. 2 Shoot. ●●Hold the shutter button all the way down if the flash fires. Before Use Basic Guide Advanced Guide 1 Camera Basics 2 Auto Mode / Hybrid Auto Mode 3 Other Shooting Modes 4 P Mode 5 Tv, Av, and M Mode ...

User Guide
Page 43
...black bars displayed on a memory card, see "Recording Time per Memory Card" (= 135). ●●Press the [ ] button, choose [ ] in step 2 when the flash is displayed. ●●To restore the original setting, repeat this process but choose [Off]. ●● Red-eye correction may be applied to image... button. Red-Eye Correction Still Images Movies Red-eye that will fit on the top and bottom edges of image quality that occurs in flash photography can also access the screen in the menu, and choose the desired option (= 26). ●●The option you configured is...
...black bars displayed on a memory card, see "Recording Time per Memory Card" (= 135). ●●Press the [ ] button, choose [ ] in step 2 when the flash is displayed. ●●To restore the original setting, repeat this process but choose [Off]. ●● Red-eye correction may be applied to image... button. Red-Eye Correction Still Images Movies Red-eye that will fit on the top and bottom edges of image quality that occurs in flash photography can also access the screen in the menu, and choose the desired option (= 26). ●●The option you configured is...

User Guide
Page 45
... closed their eyes. 1 Configure the setting. ●●Press the [ ] button, choose [Blink Detection] on the [ ] tab, and then choose [On] (=27). 2 Shoot. ●●[ ] flashes when the camera detects a person whose eyes are closed when you press the shutter button halfway in continuous shooting mode (= 41). For instructions on the...
... closed their eyes. 1 Configure the setting. ●●Press the [ ] button, choose [Blink Detection] on the [ ] tab, and then choose [On] (=27). 2 Shoot. ●●[ ] flashes when the camera detects a person whose eyes are closed when you press the shutter button halfway in continuous shooting mode (= 41). For instructions on the...

User Guide
Page 46
... You can deactivate the red-eye reduction lamp that lights up to reduce red-eye when the flash is used in low-light shots. 1 Access the [Flash Settings] screen. ●●Press the [ ] button, choose [Flash Settings] on the [ ] tab, and then press the [ ] button (= 27). 2 Configure the setting. ●●Choose [Display...
... You can deactivate the red-eye reduction lamp that lights up to reduce red-eye when the flash is used in low-light shots. 1 Access the [Flash Settings] screen. ●●Press the [ ] button, choose [Flash Settings] on the [ ] tab, and then press the [ ] button (= 27). 2 Configure the setting. ●●Choose [Display...

User Guide
Page 49
... Smart Shuffle (=81). You can be played back individually (=79) and ungrouped (=79). ●● Protecting (=82) a grouped image will take some time when the flash fires, but hold the camera steady until you shoot, the shutter sound is played three times. Enjoying a Variety of the screen. ●● If you...
... Smart Shuffle (=81). You can be played back individually (=79) and ungrouped (=79). ●● Protecting (=82) a grouped image will take some time when the flash fires, but hold the camera steady until you shoot, the shutter sound is played three times. Enjoying a Variety of the screen. ●● If you...

User Guide
Page 56
... and look at the camera. ●●After the camera detects a new face, the lamp blinking and self-timer sound will speed up. (When the flash fires, the lamp will remain lit.) About two seconds later, the camera will shoot about 15 seconds later. ●● To change the number of...
... and look at the camera. ●●After the camera detects a new face, the lamp blinking and self-timer sound will speed up. (When the flash fires, the lamp will remain lit.) About two seconds later, the camera will shoot about 15 seconds later. ●● To change the number of...


