

Service Manual
Page 11
... 2.0±1.5 mm /0.78±0.59 in. (two-sided/overlay/one -sided) Auto power off Available (about 0 sheets of 80 gm/2 paper) Copy tray 100 sheets (approx.; COPYRIGHT © 1994 CANON INC. Performance Item PC720 PC740 PC750 PC770 Original type Sheet, book, 3-D object (2 kg max.) Maximum original size A4/LGL DIRECT 1 : 1 REDUCE I 1 : 0.707 Reproduction REDUCE...
... 2.0±1.5 mm /0.78±0.59 in. (two-sided/overlay/one -sided) Auto power off Available (about 0 sheets of 80 gm/2 paper) Copy tray 100 sheets (approx.; COPYRIGHT © 1994 CANON INC. Performance Item PC720 PC740 PC750 PC770 Original type Sheet, book, 3-D object (2 kg max.) Maximum original size A4/LGL DIRECT 1 : 1 REDUCE I 1 : 0.707 Reproduction REDUCE...
Service Manual
Page 19
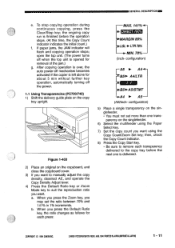
... transparency on the copy tray upright. To stop copying operation during continuous copying, press the Clear/Stop key; open the top unit. (The power turns off the power. 1.1 Using Transparencies (PC720/740) 1) Shift the... key operation, automatically turning off when the top unit is delivered. COPYRIGHT © 1994 CANON INC. E lBm51"1.- configuration) r A5 ► A4-0- When you may set more ...one is opened for each transparency delivered to suit the reproduction ratio you want using the Paper Select key. 7) Set the copy count you want to manually adjust the copy density,...
... transparency on the copy tray upright. To stop copying operation during continuous copying, press the Clear/Stop key; open the top unit. (The power turns off the power. 1.1 Using Transparencies (PC720/740) 1) Shift the... key operation, automatically turning off when the top unit is delivered. COPYRIGHT © 1994 CANON INC. E lBm51"1.- configuration) r A5 ► A4-0- When you may set more ...one is opened for each transparency delivered to suit the reproduction ratio you want using the Paper Select key. 7) Set the copy count you want to manually adjust the copy density,...

Service Manual
Page 20
... 1-405 Figure 1-406 2) Place an original on the Copy Start key. A441- b. A4/LTR 1 - 12 COPYRIGHT 1994 CANON INC. A5- (AB/Inch- hang on to the copy paper, and remove it when the transparency has disappeared into the machine in 1% increments. When you want to manually adjust the copy ... still holding the trailing edge of about 1 cm. a. If this is the case, go through the following: 1) Place copy paper underneath the transparency with the copy paper on the copy tray upright. When you press the Zoom key, you may fail to move into the machine. DIRECT 100% MARGIN 86% LGL 0...
... 1-405 Figure 1-406 2) Place an original on the Copy Start key. A441- b. A4/LTR 1 - 12 COPYRIGHT 1994 CANON INC. A5- (AB/Inch- hang on to the copy paper, and remove it when the transparency has disappeared into the machine in 1% increments. When you want to manually adjust the copy ... still holding the trailing edge of about 1 cm. a. If this is the case, go through the following: 1) Place copy paper underneath the transparency with the copy paper on the copy tray upright. When you press the Zoom key, you may fail to move into the machine. DIRECT 100% MARGIN 86% LGL 0...

Service Manual
Page 21
... Count indicator. 8) Press the Copy Start key. • Be sure to remove each transparency delivered to the copy tray before the next one transparency on the singlefeeder. 6) Select the multifeeder using the Paper Select key. 7) Set the copy count you want using the Copy Count/Zoom Set key; hang on to the... copy paper, and remove it when the transparency has disappeared into the machine in response to move into the machine. CANON PC120/7401750/770 REV.O AUG.1994 PRINTED IN JAPAN punk AU JAPONI 1 - 13 If the ...
... Count indicator. 8) Press the Copy Start key. • Be sure to remove each transparency delivered to the copy tray before the next one transparency on the singlefeeder. 6) Select the multifeeder using the Paper Select key. 7) Set the copy count you want using the Copy Count/Zoom Set key; hang on to the... copy paper, and remove it when the transparency has disappeared into the machine in response to move into the machine. CANON PC120/7401750/770 REV.O AUG.1994 PRINTED IN JAPAN punk AU JAPONI 1 - 13 If the ...
Service Manual
Page 76
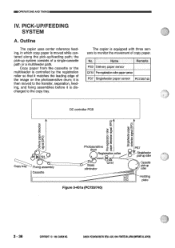
...it matches the leading edge of copy paper. Name Remarks PS3 Delivery paper sensor Q751 Pre-registration roller paper sensor PS7 Singlefeeder paper sensor PC720/740 DC controller PCB 0 CC--...opyti ( PS3 Fixing assembly Cassette Photosensitive drum Registration roller eliminator Q751 Figure 3-401a (PC720...drum; CANON PC7N740790/170 REV.OAUG.1994 PRINTEDIN JAPAN ompFumt AU JAPON) Outline The copier uses center reference feeding, in which copy paper is controlled...
...it matches the leading edge of copy paper. Name Remarks PS3 Delivery paper sensor Q751 Pre-registration roller paper sensor PS7 Singlefeeder paper sensor PC720/740 DC controller PCB 0 CC--...opyti ( PS3 Fixing assembly Cassette Photosensitive drum Registration roller eliminator Q751 Figure 3-401a (PC720...drum; CANON PC7N740790/170 REV.OAUG.1994 PRINTEDIN JAPAN ompFumt AU JAPON) Outline The copier uses center reference feeding, in which copy paper is controlled...
Service Manual
Page 157
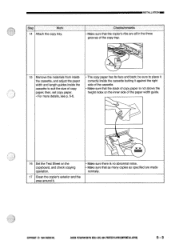
... no abnormal noise. • Make sure that the copier's ribs are made normally. then, set copy paper. • For more details, see p. 5-6. • The copy paper has its face and back; Step Work 14 Attach the copy tray. CANON PC720740750/770 REV.O AUG.1994 PRINTED IN JAPAN (INPRIME AU JAPONI 5 - 5 INSTALLATIONM Checks/remarks •...
... no abnormal noise. • Make sure that the copier's ribs are made normally. then, set copy paper. • For more details, see p. 5-6. • The copy paper has its face and back; Step Work 14 Attach the copy tray. CANON PC720740750/770 REV.O AUG.1994 PRINTED IN JAPAN (INPRIME AU JAPONI 5 - 5 INSTALLATIONM Checks/remarks •...
Service Manual
Page 159
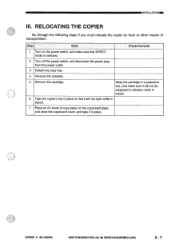
...1 Turn on the copyboard glass, and close the copyboard cover, and tape it will not open while in transit. 7 Place an A4 sheet of copy paper on the power switch, and make sure it will not be subjected to vibration while in transit. 6 Tape the copier's top in place so that... DIRECT mode is selected. 2 Turn off the power switch, and disconnect the power plug from the power outlet. 3 Detach the copy tray. 4 Remove the cassette. 5 Remove the cartridge. Keep the cartridge in a protective box, and make sure that it in place. COPYRIGHT © 1994 CANONINC. NSTALLATIONIM ...
...1 Turn on the copyboard glass, and close the copyboard cover, and tape it will not open while in transit. 7 Place an A4 sheet of copy paper on the power switch, and make sure it will not be subjected to vibration while in transit. 6 Tape the copier's top in place so that... DIRECT mode is selected. 2 Turn off the power switch, and disconnect the power plug from the power outlet. 3 Detach the copy tray. 4 Remove the cassette. 5 Remove the cartridge. Keep the cartridge in a protective box, and make sure that it in place. COPYRIGHT © 1994 CANONINC. NSTALLATIONIM ...


