

Instruction Manual
Page 2
Introduction The EOS REBEL T5i/EOS 700D is a digital single-lens reflex camera featuring a fine-detail CMOS sensor with music in your country may prohibit photography even for anything other than private enjoyment. You can then better understand the camera. If the camera or memory card is compatible ...the images cannot be recorded or downloaded to a computer, Canon cannot be aware that certain public performances, exhibitions, etc., may prohibit the use of your recorded images or copyrighted music and images with approx. 18.00 effective megapixels, DIGIC 5, high-precision and high-speed...
Introduction The EOS REBEL T5i/EOS 700D is a digital single-lens reflex camera featuring a fine-detail CMOS sensor with music in your country may prohibit photography even for anything other than private enjoyment. You can then better understand the camera. If the camera or memory card is compatible ...the images cannot be recorded or downloaded to a computer, Canon cannot be aware that certain public performances, exhibitions, etc., may prohibit the use of your recorded images or copyrighted music and images with approx. 18.00 effective megapixels, DIGIC 5, high-precision and high-speed...

Instruction Manual
Page 3
... Instruction Manuals are included on the Lens Kit type, a lens instruction manual may also be included. Camera (with eyecup and body cap) Battery Pack LP-E8 (with protective cover) Battery Charger LC-E8/LC-E8E* Wide Strap Interface Cable EOS DIGITAL Solution Disk (Software/Software Instruction Manuals) Camera Instruction Manual (this booklet) * Battery Charger...
... Instruction Manuals are included on the Lens Kit type, a lens instruction manual may also be included. Camera (with eyecup and body cap) Battery Pack LP-E8 (with protective cover) Battery Charger LC-E8/LC-E8E* Wide Strap Interface Cable EOS DIGITAL Solution Disk (Software/Software Instruction Manuals) Camera Instruction Manual (this booklet) * Battery Charger...
Instruction Manual
Page 4
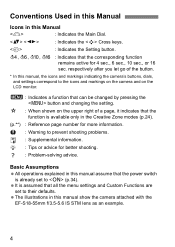
... assume that the power switch is already set to the icons and markings on the camera and on the upper right of the button. * In this manual, the icons and markings indicating the camera's buttons, dials, and settings correspond to their defaults. M : When shown on the...(p.**) : Reference page number for more information. : Warning to (p.34). Basic Assumptions All operations explained in this manual show the camera attached with the EF-S18-55mm f/3.5-5.6 IS STM lens as an example. 4 Conventions Used in this Manual Icons in this Manual : Indicates the Main Dial. : Indicates the...
... assume that the power switch is already set to the icons and markings on the camera and on the upper right of the button. * In this manual, the icons and markings indicating the camera's buttons, dials, and settings correspond to their defaults. M : When shown on the...(p.**) : Reference page number for more information. : Warning to (p.34). Basic Assumptions All operations explained in this manual show the camera attached with the EF-S18-55mm f/3.5-5.6 IS STM lens as an example. 4 Conventions Used in this Manual Icons in this Manual : Indicates the Main Dial. : Indicates the...

Instruction Manual
Page 5
... 6 Shooting Movies 173 7 Handy Features 203 8 Wireless Flash Photography 229 9 Image Playback 241 10 Post-Processing Images 273 11 Printing Images 279 12 Customizing the Camera 295 13 Reference 305 14 Downloading Images to a Personal Computer 361 15 Quick Reference Guide and Index 369 5 Chapters For first-time DSLR users, Chapters...
... 6 Shooting Movies 173 7 Handy Features 203 8 Wireless Flash Photography 229 9 Image Playback 241 10 Post-Processing Images 273 11 Printing Images 279 12 Customizing the Camera 295 13 Reference 305 14 Downloading Images to a Personal Computer 361 15 Quick Reference Guide and Index 369 5 Chapters For first-time DSLR users, Chapters...

Instruction Manual
Page 7
... Change the point of focus Shoot a moving subject Î p.100 (S AF point selection) Î p.70, 98 (AI Servo AF) Playback View the images on the camera Î p.84 (x Playback) Search for pictures quickly Î p.242 (H Index display) p.243 (I Image browsing) Rate images Î p.248 (Ratings) Prevent important images from accidental deletion...
... Change the point of focus Shoot a moving subject Î p.100 (S AF point selection) Î p.70, 98 (AI Servo AF) Playback View the images on the camera Î p.84 (x Playback) Search for pictures quickly Î p.242 (H Index display) p.243 (I Image browsing) Rate images Î p.248 (Ratings) Prevent important images from accidental deletion...

Instruction Manual
Page 12
... Source (White Balance 137 u Adjusting the Color Tone for the Light Source 139 Setting the Color Reproduction Range (Color Space 141 Mirror Lockup to Reduce Camera Shake 142 5 Shooting with the LCD Monitor (Live View Shooting) 145 A Shooting with the LCD Monitor 146 Shooting Function Settings 151 U Using Creative Filters 152...
... Source (White Balance 137 u Adjusting the Color Tone for the Light Source 139 Setting the Color Reproduction Range (Color Space 141 Mirror Lockup to Reduce Camera Shake 142 5 Shooting with the LCD Monitor (Live View Shooting) 145 A Shooting with the LCD Monitor 146 Shooting Function Settings 151 U Using Creative Filters 152...
Instruction Manual
Page 13
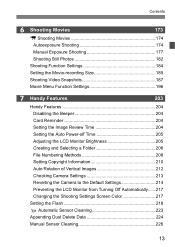
... Monitor Brightness 205 Creating and Selecting a Folder 206 File Numbering Methods 208 Setting Copyright Information 210 Auto Rotation of Vertical Images 212 Checking Camera Settings 213 Reverting the Camera to the Default Settings 214 Preventing the LCD Monitor from Turning Off Automatically......217 Changing the Shooting Settings Screen Color 217 Setting the...
... Monitor Brightness 205 Creating and Selecting a Folder 206 File Numbering Methods 208 Setting Copyright Information 210 Auto Rotation of Vertical Images 212 Checking Camera Settings 213 Reverting the Camera to the Default Settings 214 Preventing the LCD Monitor from Turning Off Automatically......217 Changing the Shooting Settings Screen Color 217 Setting the...

Instruction Manual
Page 15
Contents 12 Customizing the Camera 295 Setting Custom Functions 296 Custom Function Settings 298 C.Fn I: Exposure 298 C.Fn II: Image 299 C.Fn III: Autofocus/Drive 300 C.Fn IV: Operation/Others ... According to Shooting Mode 314 System Map 316 Menu Settings 318 Troubleshooting Guide 324 Error Codes 337 Specifications 338 Handling Precautions: EF-S18-55mm f/3.5-5.6 IS STM, EF-S18-135mm f/3.5-5.6 IS STM 347 Safety Precautions 349 14 Downloading Images to a Personal Computer 361 Downloading Images to a Personal Computer 362 About the Software 364 Installing...
Contents 12 Customizing the Camera 295 Setting Custom Functions 296 Custom Function Settings 298 C.Fn I: Exposure 298 C.Fn II: Image 299 C.Fn III: Autofocus/Drive 300 C.Fn IV: Operation/Others ... According to Shooting Mode 314 System Map 316 Menu Settings 318 Troubleshooting Guide 324 Error Codes 337 Specifications 338 Handling Precautions: EF-S18-55mm f/3.5-5.6 IS STM, EF-S18-135mm f/3.5-5.6 IS STM 347 Safety Precautions 349 14 Downloading Images to a Personal Computer 361 Downloading Images to a Personal Computer 362 About the Software 364 Installing...
Instruction Manual
Page 16
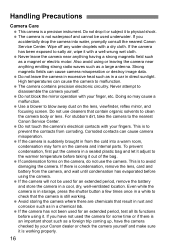
...extended period, remove the battery and store the camera in direct sunlight. If the camera has not been used underwater. Wipe off any water droplets with your Canon dealer or check the camera yourself and make sure it . Do not leave the camera in excessive heat such as in a while... from the cold into water, promptly consult the nearest Canon Service Center. Never attempt to the nearest Canon Service Center. Avoid storing the camera where there are chemicals that contain organic solvents to blow away dust on the camera, do not use cleaners that result in rust and corrosion...
...extended period, remove the battery and store the camera in direct sunlight. If the camera has not been used underwater. Wipe off any water droplets with your Canon dealer or check the camera yourself and make sure it . Do not leave the camera in excessive heat such as in a while... from the cold into water, promptly consult the nearest Canon Service Center. Never attempt to the nearest Canon Service Center. Avoid storing the camera where there are chemicals that contain organic solvents to blow away dust on the camera, do not use cleaners that result in rust and corrosion...

Instruction Manual
Page 17
...automatic sensor cleaning, having static electricity. If the LCD monitor is left unused for a prolonged period, screen burn-in rare cases lubricant from the camera, put down the lens with your fingers or anything having a strong magnetic field such as a TV set, speakers, or magnet. Cards To...Do not touch the card's electronic contacts with the rear end up and attach the lens caps to having the sensor cleaned by a Canon Service Center is recommended. 17 Also avoid places prone to avoid scratching the lens surface and electrical contacts. Handling Precautions LCD Monitor Although ...
...automatic sensor cleaning, having static electricity. If the LCD monitor is left unused for a prolonged period, screen burn-in rare cases lubricant from the camera, put down the lens with your fingers or anything having a strong magnetic field such as a TV set, speakers, or magnet. Cards To...Do not touch the card's electronic contacts with the rear end up and attach the lens caps to having the sensor cleaned by a Canon Service Center is recommended. 17 Also avoid places prone to avoid scratching the lens surface and electrical contacts. Handling Precautions LCD Monitor Although ...

Instruction Manual
Page 18
Align the lens' white or red index with the camera's index in the matching color. 4 Set the lens focus mode switch to (p.39). 5 Set the power switch to (Scene Intelligent Auto) (p.58). To charge the battery, see page 28. 2 Insert a card (p.31). With the card's label facing toward the back of the camera, insert it into the card slot. 3 White index Red index Attach the lens (p.39). Quick Start Guide 1 Insert the battery (p.30). All the necessary camera settings will be set the Mode Dial to , and set automatically. 18
Align the lens' white or red index with the camera's index in the matching color. 4 Set the lens focus mode switch to (p.39). 5 Set the power switch to (Scene Intelligent Auto) (p.58). To charge the battery, see page 28. 2 Insert a card (p.31). With the card's label facing toward the back of the camera, insert it into the card slot. 3 White index Red index Attach the lens (p.39). Quick Start Guide 1 Insert the battery (p.30). All the necessary camera settings will be set the Mode Dial to , and set automatically. 18
Instruction Manual
Page 19
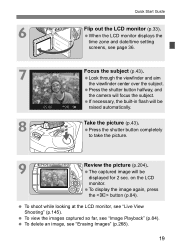
... at the LCD monitor, see "Erasing Images" (p.268). 19 To delete an image, see "Live View Shooting" (p.145). Press the shutter button halfway, and the camera will be raised automatically. 8 Take the picture (p.43). The captured image will focus the subject. Quick Start Guide 6 Flip out the LCD monitor (p.33). To...
... at the LCD monitor, see "Erasing Images" (p.268). 19 To delete an image, see "Live View Shooting" (p.145). Press the shutter button halfway, and the camera will be raised automatically. 8 Take the picture (p.43). The captured image will focus the subject. Quick Start Guide 6 Flip out the LCD monitor (p.33). To...

Instruction Manual
Page 24
... (p.67) 3 : Landscape (p.68) 4 : Close-up (p.69) 5 : Sports (p.70) 8 : Special Scene Mode (p.71) 6: Night Portrait (p.72) F: Handheld Night Scene (p.73) G: HDR Backlight Control (p.74) 24 The camera sets everything to suit the subject or scene. Creative Zone These modes give you do is press the shutter button. Nomenclature Mode Dial The Mode...
... (p.67) 3 : Landscape (p.68) 4 : Close-up (p.69) 5 : Sports (p.70) 8 : Special Scene Mode (p.71) 6: Night Portrait (p.72) F: Handheld Night Scene (p.73) G: HDR Backlight Control (p.74) 24 The camera sets everything to suit the subject or scene. Creative Zone These modes give you do is press the shutter button. Nomenclature Mode Dial The Mode...

Instruction Manual
Page 27
Then pass it through the camera's strap mount eyelet from the buckle. The eyepiece cover is also attached to take up any slack and make sure the strap will not loosen from the bottom. Eyepiece cover 27 Attaching the Strap Pass the end of the strap through the strap's buckle as shown in the illustration. 1 Getting Started This chapter explains preparatory steps before you start shooting and basic camera operations. Pull the strap to the strap (p.308).
Then pass it through the camera's strap mount eyelet from the buckle. The eyepiece cover is also attached to take up any slack and make sure the strap will not loosen from the bottom. Eyepiece cover 27 Attaching the Strap Pass the end of the strap through the strap's buckle as shown in the illustration. 1 Getting Started This chapter explains preparatory steps before you start shooting and basic camera operations. Pull the strap to the strap (p.308).

Instruction Manual
Page 29
Recharge the battery on the day before using the camera, remove the battery. If necessary, attach a commercially-available plug adapter for which Canon cannot be held liable. 29 Using it is compatible with the protective cover (provided) attached. After recharging the battery, detach it is ..., the battery has reached the end of power current is released, resulting in foreign countries. The battery charger is fully charged may result in the camera for at least 3 sec. When not using . Store the battery with a 100 V AC to 240 V AC 50/ 60 Hz power source. ...
Recharge the battery on the day before using the camera, remove the battery. If necessary, attach a commercially-available plug adapter for which Canon cannot be held liable. 29 Using it is compatible with the protective cover (provided) attached. After recharging the battery, detach it is ..., the battery has reached the end of power current is released, resulting in foreign countries. The battery charger is fully charged may result in the camera for at least 3 sec. When not using . Store the battery with a 100 V AC to 240 V AC 50/ 60 Hz power source. ...

Instruction Manual
Page 30
Installing and Removing the Battery Load a fully charged Battery Pack LP-E8 into the camera. After opening the battery compartment cover, be sure to attach the protective cover (provided, p.28) to swing it locks in place. 3 Close the cover. Installing ...
Installing and Removing the Battery Load a fully charged Battery Pack LP-E8 into the camera. After opening the battery compartment cover, be sure to attach the protective cover (provided, p.28) to swing it locks in place. 3 Close the cover. Installing ...

Instruction Manual
Page 32
... Access lamp 1 Open the cover. If you can damage the image data, card, or camera. • Removing the card. • Removing the battery. • Shaking or banging the camera around. Do not touch the card's contacts with the camera (p.48). If [Recording...] is lit or blinking. If a card-related error message is off...
... Access lamp 1 Open the cover. If you can damage the image data, card, or camera. • Removing the card. • Removing the battery. • Shaking or banging the camera around. Do not touch the card's contacts with the camera (p.48). If [Recording...] is lit or blinking. If a card-related error message is off...

Instruction Manual
Page 33
... movies, and play back images and movies. Be careful not to force and break the hinge when rotating the LCD monitor. When not using the camera, close the LCD monitor with the screen facing inward. During Live View shooting or movie shooting, facing the LCD monitor toward you can rotate it...
... movies, and play back images and movies. Be careful not to force and break the hinge when rotating the LCD monitor. When not using the camera, close the LCD monitor with the screen facing inward. During Live View shooting or movie shooting, facing the LCD monitor toward you can rotate it...

Instruction Manual
Page 34
... screens appear, see page 36 to the card, [Recording...] will be heard.) During the sensor cleaning, the LCD monitor will turn on the camera again, just press the shutter button halfway (p.43). To turn off automatically after the card finishes recording the image. 34 If you set the ...is being recorded to set the time zone and date/ time. : The camera turns on . You can shoot movies (p.173). : The camera turns on . Press the shutter button halfway (p.43) to this position when not using the camera. You can still shoot during sensor cleaning. If you repeatedly turn the power...
... screens appear, see page 36 to the card, [Recording...] will be heard.) During the sensor cleaning, the LCD monitor will turn on the camera again, just press the shutter button halfway (p.43). To turn off automatically after the card finishes recording the image. 34 If you set the ...is being recorded to set the time zone and date/ time. : The camera turns on . You can shoot movies (p.173). : The camera turns on . Press the shutter button halfway (p.43) to this position when not using the camera. You can still shoot during sensor cleaning. If you repeatedly turn the power...

Instruction Manual
Page 35
...the AF frequently without taking a picture. • Using the lens Image Stabilizer. • Using the LCD monitor often. z : Battery level is low, but the camera can still be used , the number of shots] Temperature At 23°C / 73°F At 0°C / 32°F No Flash 550 470 50% Flash Use... shots with any of possible shots with Battery Grip BG-E8 • With two LP-E8 batteries: approx. The lens operation is powered by the camera's battery. Turning on the Power z Checking the Battery Level When the power is turned on the lens used . The number of four levels. c :...
...the AF frequently without taking a picture. • Using the lens Image Stabilizer. • Using the LCD monitor often. z : Battery level is low, but the camera can still be used , the number of shots] Temperature At 23°C / 73°F At 0°C / 32°F No Flash 550 470 50% Flash Use... shots with any of possible shots with Battery Grip BG-E8 • With two LP-E8 batteries: approx. The lens operation is powered by the camera's battery. Turning on the Power z Checking the Battery Level When the power is turned on the lens used . The number of four levels. c :...


