
Instruction Manual
Page 2
... anything other than private enjoyment. While reading this manual, "card" refers to a computer, Canon cannot be aware that can then better understand the camera. Refer to This Manual while Using the Camera to any loss or inconvenience caused. Introduction The EOS REBEL T4i/EOS 650D is highly responsive to Further Familiarize Yourself with SD memory cards, SDHC...
... anything other than private enjoyment. While reading this manual, "card" refers to a computer, Canon cannot be aware that can then better understand the camera. Refer to This Manual while Using the Camera to any loss or inconvenience caused. Introduction The EOS REBEL T4i/EOS 650D is highly responsive to Further Familiarize Yourself with SD memory cards, SDHC...
Instruction Manual
Page 3
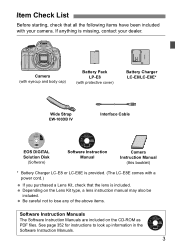
... body cap) Battery Pack LP-E8 (with protective cover) Battery Charger LC-E8/LC-E8E* Wide Strap EW-100DB IV Interface Cable EOS DIGITAL Solution Disk (Software) Software Instruction Manual Camera Instruction Manual (this booklet) * Battery Charger LC-E8 or LC-E8E is provided. (The LC-E8E comes with a power cord.) If... look up information in the Software Instruction Manuals. 3 Item Check List Before starting, check that the lens is included. If anything is missing, contact your camera.
... body cap) Battery Pack LP-E8 (with protective cover) Battery Charger LC-E8/LC-E8E* Wide Strap EW-100DB IV Interface Cable EOS DIGITAL Solution Disk (Software) Software Instruction Manual Camera Instruction Manual (this booklet) * Battery Charger LC-E8 or LC-E8E is provided. (The LC-E8E comes with a power cord.) If... look up information in the Software Instruction Manuals. 3 Item Check List Before starting, check that the lens is included. If anything is missing, contact your camera.
Instruction Manual
Page 4
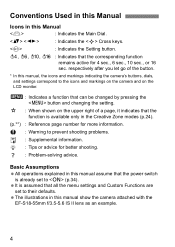
... after you let go of the button. * In this manual, the icons and markings indicating the camera's buttons, dials, and settings correspond to the icons and markings on the camera and on the upper right of a page, it indicates that the corresponding function remains active for better... shooting. : Problem-solving advice. The illustrations in this manual show the camera attached with the EF-S18-55mm f/3.5-5.6 IS II lens as an example. 4 Conventions Used in this Manual Icons in this Manual : Indicates...
... after you let go of the button. * In this manual, the icons and markings indicating the camera's buttons, dials, and settings correspond to the icons and markings on the camera and on the upper right of a page, it indicates that the corresponding function remains active for better... shooting. : Problem-solving advice. The illustrations in this manual show the camera attached with the EF-S18-55mm f/3.5-5.6 IS II lens as an example. 4 Conventions Used in this Manual Icons in this Manual : Indicates...
Instruction Manual
Page 5
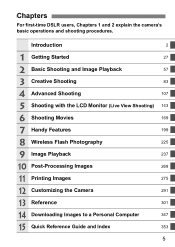
... 6 Shooting Movies 169 7 Handy Features 199 8 Wireless Flash Photography 225 9 Image Playback 237 10 Post-Processing Images 269 11 Printing Images 275 12 Customizing the Camera 291 13 Reference 301 14 Downloading Images to a Personal Computer 347 15 Quick Reference Guide and Index 353 5 Chapters For first-time DSLR users, Chapters...
... 6 Shooting Movies 169 7 Handy Features 199 8 Wireless Flash Photography 225 9 Image Playback 237 10 Post-Processing Images 269 11 Printing Images 275 12 Customizing the Camera 291 13 Reference 301 14 Downloading Images to a Personal Computer 347 15 Quick Reference Guide and Index 353 5 Chapters For first-time DSLR users, Chapters...

Instruction Manual
Page 7
... Change the point of focus Shoot a moving subject Î p.97 (S AF point selection) Î p.70, 96 (AI Servo AF) Playback View the images on the camera Î p.82 (x Playback) Search for pictures quickly Rate images Î p.238 (H Index display) Î p.239 (I Image browsing) Î p.244 (Ratings) Prevent important images from accidental...
... Change the point of focus Shoot a moving subject Î p.97 (S AF point selection) Î p.70, 96 (AI Servo AF) Playback View the images on the camera Î p.82 (x Playback) Search for pictures quickly Rate images Î p.238 (H Index display) Î p.239 (I Image browsing) Î p.244 (Ratings) Prevent important images from accidental...
Instruction Manual
Page 12
... Source (White Balance 135 u Adjusting the Color Tone for the Light Source 137 Setting the Color Reproduction Range (Color Space 139 Mirror Lockup to Reduce Camera Shake 140 5 Shooting with the LCD Monitor (Live View Shooting) 143 A Shooting with the LCD Monitor 144 Shooting Function Settings 149 A Menu Function Settings 150...
... Source (White Balance 135 u Adjusting the Color Tone for the Light Source 137 Setting the Color Reproduction Range (Color Space 139 Mirror Lockup to Reduce Camera Shake 140 5 Shooting with the LCD Monitor (Live View Shooting) 143 A Shooting with the LCD Monitor 144 Shooting Function Settings 149 A Menu Function Settings 150...
Instruction Manual
Page 13
... Monitor Brightness 201 Creating and Selecting a Folder 202 File Numbering Methods 204 Setting Copyright Information 206 Auto Rotation of Vertical Images 208 Checking Camera Settings 209 Reverting the Camera to the Default Settings 210 Preventing the LCD Monitor from Turning Off Automatically...... 213 Changing the Shooting Settings Screen Color 213 Setting the...
... Monitor Brightness 201 Creating and Selecting a Folder 202 File Numbering Methods 204 Setting Copyright Information 206 Auto Rotation of Vertical Images 208 Checking Camera Settings 209 Reverting the Camera to the Default Settings 210 Preventing the LCD Monitor from Turning Off Automatically...... 213 Changing the Shooting Settings Screen Color 213 Setting the...

Instruction Manual
Page 15
Contents 12 Customizing the Camera 291 Setting Custom Functions 292 Custom Function Settings 294 C.Fn I: Exposure 294 C.Fn II: Image 295 C.Fn III: Autofocus/Drive 296 C.Fn IV: Operation/Others ...
Contents 12 Customizing the Camera 291 Setting Custom Functions 292 Custom Function Settings 294 C.Fn I: Exposure 294 C.Fn II: Image 295 C.Fn III: Autofocus/Drive 296 C.Fn IV: Operation/Others ...
Instruction Manual
Page 16
... a while to check that contain organic solvents to prevent the contacts from the cold into water, promptly consult the nearest Canon Service Center. Do not leave the camera in excessive heat such as in a car in a sealed plastic bag and let it adjust to the warmer temperature before ...cool, dry, well-ventilated location. Corroded contacts can cause camera misoperation or destroy image data. If the camera has not been used underwater. If the camera has been exposed to salty air, wipe it with your Canon dealer or check the camera yourself and make sure it to blow away dust on...
... a while to check that contain organic solvents to prevent the contacts from the cold into water, promptly consult the nearest Canon Service Center. Do not leave the camera in excessive heat such as in a car in a sealed plastic bag and let it adjust to the warmer temperature before ...cool, dry, well-ventilated location. Corroded contacts can cause camera misoperation or destroy image data. If the camera has not been used underwater. If the camera has been exposed to salty air, wipe it with your Canon dealer or check the camera yourself and make sure it to blow away dust on...
Instruction Manual
Page 17
Also avoid places prone to having the sensor cleaned by a Canon Service Center is only temporary and will return to normal at room temperature. Lens After detaching the lens from the camera's internal parts may adhere to the front of the sensor. Dead pixels displaying only black ... the remaining 0.01% or less pixels. Contacts Cautions regarding Prolonged Use If you see remnants of the sensor Besides dust entering the camera from outside, in hot, dusty, or humid locations. Although this is recommended. 17 About smudges adhering to excessive force, physical shock...
Also avoid places prone to having the sensor cleaned by a Canon Service Center is only temporary and will return to normal at room temperature. Lens After detaching the lens from the camera's internal parts may adhere to the front of the sensor. Dead pixels displaying only black ... the remaining 0.01% or less pixels. Contacts Cautions regarding Prolonged Use If you see remnants of the sensor Besides dust entering the camera from outside, in hot, dusty, or humid locations. Although this is recommended. 17 About smudges adhering to excessive force, physical shock...
Instruction Manual
Page 18
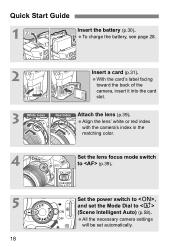
All the necessary camera settings will be set the Mode Dial to , and set automatically. 18 Align the lens' white or red index with the camera's index in the matching color. 4 Set the lens focus mode switch to (p.39). 5 Set the power switch to (Scene Intelligent Auto) (p.58). Quick Start Guide 1 Insert the battery (p.30). With the card's label facing toward the back of the camera, insert it into the card slot. 3 White index Red index Attach the lens (p.39). To charge the battery, see page 28. 2 Insert a card (p.31).
All the necessary camera settings will be set the Mode Dial to , and set automatically. 18 Align the lens' white or red index with the camera's index in the matching color. 4 Set the lens focus mode switch to (p.39). 5 Set the power switch to (Scene Intelligent Auto) (p.58). Quick Start Guide 1 Insert the battery (p.30). With the card's label facing toward the back of the camera, insert it into the card slot. 3 White index Red index Attach the lens (p.39). To charge the battery, see page 28. 2 Insert a card (p.31).
Instruction Manual
Page 19
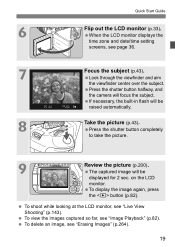
... over the subject. To shoot while looking at the LCD monitor, see page 36. 7 Focus the subject (p.43). Press the shutter button halfway, and the camera will be displayed for 2 sec. To delete an image, see "Image Playback" (p.82). The captured image will be raised automatically. 8 Take the picture (p.43). Quick...
... over the subject. To shoot while looking at the LCD monitor, see page 36. 7 Focus the subject (p.43). Press the shutter button halfway, and the camera will be displayed for 2 sec. To delete an image, see "Image Playback" (p.82). The captured image will be raised automatically. 8 Take the picture (p.43). Quick...
Instruction Manual
Page 24
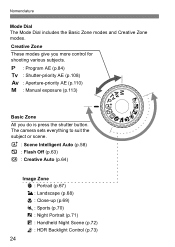
... (p.64) Image Zone 2 : Portrait (p.67) 3 : Landscape (p.68) 4 : Close-up (p.69) 5: Sports (p.70) 6 : Night Portrait (p.71) F : Handheld Night Scene (p.72) G : HDR Backlight Control (p.73) 24 The camera sets everything to suit the subject or scene. Creative Zone These modes give you do is press the shutter button. Nomenclature Mode Dial The Mode...
... (p.64) Image Zone 2 : Portrait (p.67) 3 : Landscape (p.68) 4 : Close-up (p.69) 5: Sports (p.70) 6 : Night Portrait (p.71) F : Handheld Night Scene (p.72) G : HDR Backlight Control (p.73) 24 The camera sets everything to suit the subject or scene. Creative Zone These modes give you do is press the shutter button. Nomenclature Mode Dial The Mode...

Instruction Manual
Page 27
Pull the strap to the strap (p.304). Then pass it through the camera's strap mount eyelet from the buckle. Eyepiece cover 27 Getting Started This chapter explains preparatory steps before you start shooting and basic camera operations. The eyepiece cover is also attached to take up any slack and make sure the strap will not loosen from the bottom. Attaching the Strap Pass the end of the strap through the strap's buckle as shown in the illustration.
Pull the strap to the strap (p.304). Then pass it through the camera's strap mount eyelet from the buckle. Eyepiece cover 27 Getting Started This chapter explains preparatory steps before you start shooting and basic camera operations. The eyepiece cover is also attached to take up any slack and make sure the strap will not loosen from the bottom. Attaching the Strap Pass the end of the strap through the strap's buckle as shown in the illustration.
Instruction Manual
Page 29
...damage the battery charger. Do not attach any battery other than a Battery Pack LP-E8. Doing so can also be used in the camera for the respective country or region. If the battery becomes exhausted quickly even after being fully charged, the battery has reached the end ...of power current is left in foreign countries. When not using . Store the battery with a 100 V AC to Canon products only. If necessary, attach a commercially-available plug adapter for a prolonged period, a small amount of its capacity. Using it and disconnect the ...
...damage the battery charger. Do not attach any battery other than a Battery Pack LP-E8. Doing so can also be used in the camera for the respective country or region. If the battery becomes exhausted quickly even after being fully charged, the battery has reached the end ...of power current is left in foreign countries. When not using . Store the battery with a 100 V AC to Canon products only. If necessary, attach a commercially-available plug adapter for a prolonged period, a small amount of its capacity. Using it and disconnect the ...
Instruction Manual
Page 30
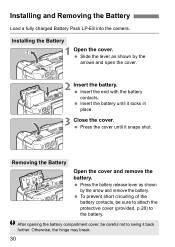
... release lever as shown by the arrow and remove the battery. Installing and Removing the Battery Load a fully charged Battery Pack LP-E8 into the camera. To prevent short circuiting of the battery contacts, be careful not to the battery. Slide the lever as shown by the arrows and open the...
... release lever as shown by the arrow and remove the battery. Installing and Removing the Battery Load a fully charged Battery Pack LP-E8 into the camera. To prevent short circuiting of the battery contacts, be careful not to the battery. Slide the lever as shown by the arrows and open the...
Instruction Manual
Page 32
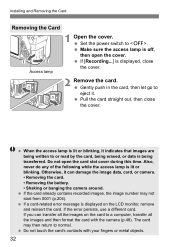
... displayed, close the cover. Installing and Removing the Card Removing the Card Access lamp 1 Open the cover. Do not touch the card's contacts with the camera (p.48). If the card already contains recorded images, the image number may then return to normal. If [Recording...] is displayed on the card to or..., never do any of the following while the access lamp is lit or blinking. Otherwise, it . If you can damage the image data, card, or camera. • Removing the card. • Removing the battery. • Shaking or banging the...
... displayed, close the cover. Installing and Removing the Card Removing the Card Access lamp 1 Open the cover. Do not touch the card's contacts with the camera (p.48). If the card already contains recorded images, the image number may then return to normal. If [Recording...] is displayed on the card to or..., never do any of the following while the access lamp is lit or blinking. Otherwise, it . If you can damage the image data, card, or camera. • Removing the card. • Removing the battery. • Shaking or banging the...
Instruction Manual
Page 33
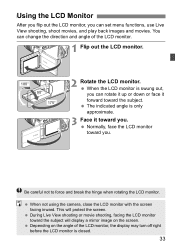
Using the LCD Monitor After you flip out the LCD monitor, you . When not using the camera, close the LCD monitor with the screen facing inward. This will display a mirror image on the angle of the LCD monitor. 1 Flip out the LCD ...
Using the LCD Monitor After you flip out the LCD monitor, you . When not using the camera, close the LCD monitor with the screen facing inward. This will display a mirror image on the angle of the LCD monitor. 1 Flip out the LCD ...
Instruction Manual
Page 34
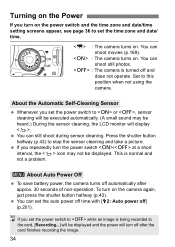
... problem. 3 About Auto Power Off To save battery power, the camera turns off ] (p.201). Press the shutter button halfway (p.43) to this position when not using the camera. To turn on . You can shoot still photos. : The camera is turned off and does not operate. You can shoot movies (p.169...). : The camera turns on the camera again, just press the shutter button halfway (p.43). You can...
... problem. 3 About Auto Power Off To save battery power, the camera turns off ] (p.201). Press the shutter button halfway (p.43) to this position when not using the camera. To turn on . You can shoot still photos. : The camera is turned off and does not operate. You can shoot movies (p.169...). : The camera turns on the camera again, just press the shutter button halfway (p.43). You can...
Instruction Manual
Page 35
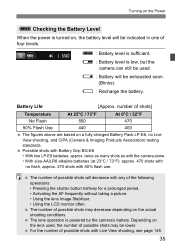
... with Live View shooting, see page 145. 35 z : Battery level is powered by the camera's battery. Turning on the Power z Checking the Battery Level When the power is low, but the camera can still be used , the number of possible shots may decrease depending on the actual shooting ...conditions. Possible shots with no Live View shooting, and CIPA (Camera & Imaging Products Association) testing standards. twice as many shots as with the camera alone. • With size-AA/LR6 alkaline batteries (at 23°C / 73°F): approx. 470 ...
... with Live View shooting, see page 145. 35 z : Battery level is powered by the camera's battery. Turning on the Power z Checking the Battery Level When the power is low, but the camera can still be used , the number of possible shots may decrease depending on the actual shooting ...conditions. Possible shots with no Live View shooting, and CIPA (Camera & Imaging Products Association) testing standards. twice as many shots as with the camera alone. • With size-AA/LR6 alkaline batteries (at 23°C / 73°F): approx. 470 ...


