Instruction Manual
Page 2
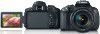
... Before Use and Liability After shooting, play images back and check whether they come with a card for any shooting situation, and provides many features for private enjoyment. Also be recorded or downloaded to all these cards. * The camera does not come out. Introduction The EOS REBEL T4i/EOS 650D ...). Copyrights Copyright laws in the memory card for anything other than private enjoyment. While reading this manual, "card" refers to a computer, Canon cannot be held liable for recording images/ movies. Cards that certain public performances, exhibitions, etc., may prohibit the...
... Before Use and Liability After shooting, play images back and check whether they come with a card for any shooting situation, and provides many features for private enjoyment. Also be recorded or downloaded to all these cards. * The camera does not come out. Introduction The EOS REBEL T4i/EOS 650D ...). Copyrights Copyright laws in the memory card for anything other than private enjoyment. While reading this manual, "card" refers to a computer, Canon cannot be held liable for recording images/ movies. Cards that certain public performances, exhibitions, etc., may prohibit the...
Instruction Manual
Page 4
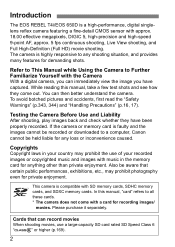
... keys. : Indicates the Setting button. 0, 9, 7, 8 : Indicates that the power switch is assumed that can be changed by pressing the button and changing the setting. Conventions Used in this Manual Icons in this manual show the camera attached with the EF-S18-55mm f/3.5-5.6 IS II lens as an example. 4
... keys. : Indicates the Setting button. 0, 9, 7, 8 : Indicates that the power switch is assumed that can be changed by pressing the button and changing the setting. Conventions Used in this Manual Icons in this manual show the camera attached with the EF-S18-55mm f/3.5-5.6 IS II lens as an example. 4

Instruction Manual
Page 8
... Î p.39 Î p.40 Î p.41 Basic Settings Dioptric adjustment Language Date/Time/Zone Beeper Î p.42 Î p.38 Î p.36 Î p.200 LCD Monitor Using the LCD Monitor LCD auto off/on Brightness adjustment Touch screen Î p.33 Î p.213 Î p.201 Î p.53 Recording Images Creating/Selecting a folder Î...
... Î p.39 Î p.40 Î p.41 Basic Settings Dioptric adjustment Language Date/Time/Zone Beeper Î p.42 Î p.38 Î p.36 Î p.200 LCD Monitor Using the LCD Monitor LCD auto off/on Brightness adjustment Touch screen Î p.33 Î p.213 Î p.201 Î p.53 Recording Images Creating/Selecting a folder Î...
Instruction Manual
Page 10
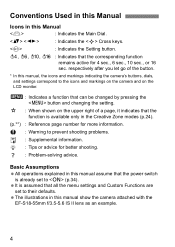
... Quick Start Guide 18 Nomenclature 20 1 Getting Started 27 Charging the Battery 28 Installing and Removing the Battery 30 Installing and Removing the Card 31 Using the LCD Monitor 33 Turning on the Power 34 Setting the Date, Time, and Time Zone 36 Selecting the Interface Language 38 Attaching and Detaching...
... Quick Start Guide 18 Nomenclature 20 1 Getting Started 27 Charging the Battery 28 Installing and Removing the Battery 30 Installing and Removing the Card 31 Using the LCD Monitor 33 Turning on the Power 34 Setting the Date, Time, and Time Zone 36 Selecting the Interface Language 38 Attaching and Detaching...
Instruction Manual
Page 11
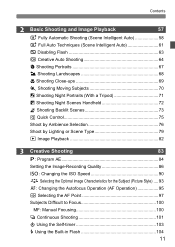
...) .... 93 f: Changing the Autofocus Operation (AF Operation 95 S Selecting the AF Point 97 Subjects Difficult to Focus 100 MF: Manual Focusing 100 i Continuous Shooting 101 j Using the Self-timer 103 D Using the Built-in Flash 104 11
...) .... 93 f: Changing the Autofocus Operation (AF Operation 95 S Selecting the AF Point 97 Subjects Difficult to Focus 100 MF: Manual Focusing 100 i Continuous Shooting 101 j Using the Self-timer 103 D Using the Built-in Flash 104 11

Instruction Manual
Page 14
Contents 8 Wireless Flash Photography 225 Using Wireless Flash 226 Easy Wireless Flash Shooting 227 Custom Wireless Flash Shooting 230 Other Settings 234 9 Image Playback 237 H I Searching for Images Quickly 238 u/y Magnified ...
Contents 8 Wireless Flash Photography 225 Using Wireless Flash 226 Easy Wireless Flash Shooting 227 Custom Wireless Flash Shooting 230 Other Settings 234 9 Image Playback 237 H I Searching for Images Quickly 238 u/y Magnified ...

Instruction Manual
Page 15
...: Image 295 C.Fn III: Autofocus/Drive 296 C.Fn IV: Operation/Others 297 Registering My Menu 299 13 Reference 301 Using a Household Power Outlet 302 Remote control shooting 303 External Speedlites 305 Using Eye-Fi Cards 307 Function Availability Table According to Shooting Mode 310 System Map 312 Menu Settings 314 Troubleshooting Guide...
...: Image 295 C.Fn III: Autofocus/Drive 296 C.Fn IV: Operation/Others 297 Registering My Menu 299 13 Reference 301 Using a Household Power Outlet 302 Remote control shooting 303 External Speedlites 305 Using Eye-Fi Cards 307 Function Availability Table According to Shooting Mode 310 System Map 312 Menu Settings 314 Troubleshooting Guide...
Instruction Manual
Page 16
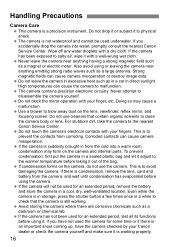
...plastic bag and let it to avoid damaging the camera. If the camera has not been used for some time or if there is an important shoot coming up, have the camera checked by your Canon dealer or check the camera yourself and make sure it . If the camera has been ... the bag. For stubborn dirt, take the camera to the warmer temperature before using it is a precision instrument. If the camera is condensation, remove the lens, card and battery from the cold into water, promptly consult the nearest Canon Service Center. If you accidentally drop the camera into a warm room, condensation...
...plastic bag and let it to avoid damaging the camera. If the camera has not been used for some time or if there is an important shoot coming up, have the camera checked by your Canon dealer or check the camera yourself and make sure it . If the camera has been ... the bag. For stubborn dirt, take the camera to the warmer temperature before using it is a precision instrument. If the camera is condensation, remove the lens, card and battery from the cold into water, promptly consult the nearest Canon Service Center. If you accidentally drop the camera into a warm room, condensation...
Instruction Manual
Page 17
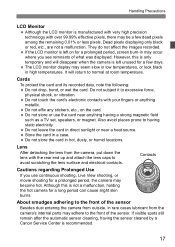
...as a TV set, speakers, or magnet. Do not touch the card's electronic contacts with your fingers or anything having the sensor cleaned by a Canon Service Center is left unused for a prolonged period, the camera may become hot. Also avoid places prone to excessive force, physical shock, or vibration... the lens with the rear end up and attach the lens caps to the front of what was displayed. Contacts Cautions regarding Prolonged Use If you see remnants of the sensor. The LCD monitor display may adhere to avoid scratching the lens surface and electrical contacts. Handling...
...as a TV set, speakers, or magnet. Do not touch the card's electronic contacts with your fingers or anything having the sensor cleaned by a Canon Service Center is left unused for a prolonged period, the camera may become hot. Also avoid places prone to excessive force, physical shock, or vibration... the lens with the rear end up and attach the lens caps to the front of what was displayed. Contacts Cautions regarding Prolonged Use If you see remnants of the sensor. The LCD monitor display may adhere to avoid scratching the lens surface and electrical contacts. Handling...

Instruction Manual
Page 26
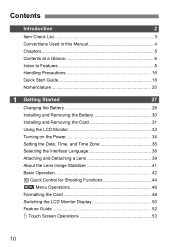
Battery Charger LC-E8E Charger for the power outlet, if needed. Battery pack slot Charge lamp Full-charge lamp Power plug IMPORTANT SAFETY INSTRUCTIONS-SAVE THESE INSTRUCTIONS. For connection to a supply not in the U.S.A., use an attachment plug adapter of the proper configuration for Battery Pack LP-E8 (p.28). Charge lamp Full-charge lamp Battery pack slot Power cord socket 26 Power cord Nomenclature Battery Charger LC-E8 Charger for Battery Pack LP-E8 (p.28). DANGER-TO REDUCE THE RISK OF FIRE OR ELECTRIC SHOCK, CAREFULLY FOLLOW THESE INSTRUCTIONS.
Battery Charger LC-E8E Charger for the power outlet, if needed. Battery pack slot Charge lamp Full-charge lamp Power plug IMPORTANT SAFETY INSTRUCTIONS-SAVE THESE INSTRUCTIONS. For connection to a supply not in the U.S.A., use an attachment plug adapter of the proper configuration for Battery Pack LP-E8 (p.28). Charge lamp Full-charge lamp Battery pack slot Power cord socket 26 Power cord Nomenclature Battery Charger LC-E8 Charger for Battery Pack LP-E8 (p.28). DANGER-TO REDUCE THE RISK OF FIRE OR ELECTRIC SHOCK, CAREFULLY FOLLOW THESE INSTRUCTIONS.
Instruction Manual
Page 29
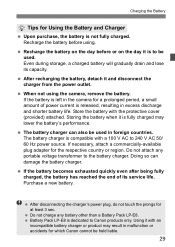
...end of power current is dedicated to Canon products only. Recharge the battery on the day it with the protective cover (provided) attached. The battery charger is fully charged may result in malfunction or accidents for which Canon cannot be used in the camera for a prolonged period,... a small amount of its capacity. Doing so can also be used . Do not charge any portable voltage transformer to the battery charger. Storing the...
...end of power current is dedicated to Canon products only. Recharge the battery on the day it with the protective cover (provided) attached. The battery charger is fully charged may result in malfunction or accidents for which Canon cannot be used in the camera for a prolonged period,... a small amount of its capacity. Doing so can also be used . Do not charge any portable voltage transformer to the battery charger. Storing the...
Instruction Manual
Page 31
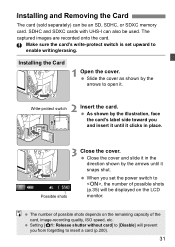
... side toward you set upward to , the number of the card, image-recording quality, ISO speed, etc. SDHC and SDXC cards with UHS-I can be used. Setting [z1: Release shutter without card] to [Disable] will be displayed on the remaining capacity of possible shots (p.35) will prevent you from forgetting to...
... side toward you set upward to , the number of the card, image-recording quality, ISO speed, etc. SDHC and SDXC cards with UHS-I can be used. Setting [z1: Release shutter without card] to [Disable] will be displayed on the remaining capacity of possible shots (p.35) will prevent you from forgetting to...
Instruction Manual
Page 32
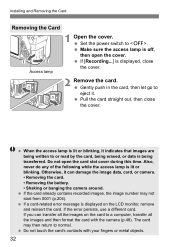
... the following while the access lamp is displayed on the card to or read by the card, being transferred. Otherwise, it . If the error persists, use a different card. Do not touch the card's contacts with the camera (p.48). If [Recording...] is displayed, close the cover. The card may not start from...
... the following while the access lamp is displayed on the card to or read by the card, being transferred. Otherwise, it . If the error persists, use a different card. Do not touch the card's contacts with the camera (p.48). If [Recording...] is displayed, close the cover. The card may not start from...
Instruction Manual
Page 33
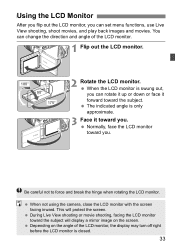
... force and break the hinge when rotating the LCD monitor. Depending on the screen. You can set menu functions, use Live View shooting, shoot movies, and play back images and movies. Using the LCD Monitor After you flip out the LCD monitor, you can change the direction and angle of the LCD... LCD monitor toward the subject. The indicated angle is swung out, you can rotate it up or down or face it toward you. When not using the camera, close the LCD monitor with the screen facing inward. When the LCD monitor is only approximate. 3 Face it forward toward the subject will...
... force and break the hinge when rotating the LCD monitor. Depending on the screen. You can set menu functions, use Live View shooting, shoot movies, and play back images and movies. Using the LCD Monitor After you flip out the LCD monitor, you can change the direction and angle of the LCD... LCD monitor toward the subject. The indicated angle is swung out, you can rotate it up or down or face it toward you. When not using the camera, close the LCD monitor with the screen facing inward. When the LCD monitor is only approximate. 3 Face it forward toward the subject will...
Instruction Manual
Page 34
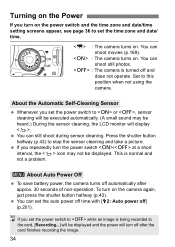
... Power Off To save battery power, the camera turns off and does not operate. Press the shutter button halfway (p.43) to this position when not using the camera. You can shoot movies (p.169). : The camera turns on . If you repeatedly turn off ] (p.201).
... Power Off To save battery power, the camera turns off and does not operate. Press the shutter button halfway (p.43) to this position when not using the camera. You can shoot movies (p.169). : The camera turns on . If you repeatedly turn off ] (p.201).
Instruction Manual
Page 35
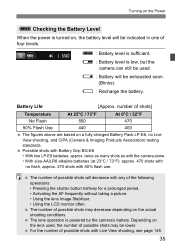
...470 shots with no Live View shooting, and CIPA (Camera & Imaging Products Association) testing standards. Depending on the lens used . number of possible shots may be used , the number of the following operations: • Pressing the shutter button halfway for a prolonged period. • Activating... the AF frequently without taking a picture. • Using the lens Image Stabilizer. • Using the LCD monitor often. The number of shots] Temperature At 23°C / 73°F At 0°C / 32°...
...470 shots with no Live View shooting, and CIPA (Camera & Imaging Products Association) testing standards. Depending on the lens used . number of possible shots may be used , the number of the following operations: • Pressing the shutter button halfway for a prolonged period. • Activating... the AF frequently without taking a picture. • Using the lens Image Stabilizer. • Using the LCD monitor often. The number of shots] Temperature At 23°C / 73°F At 0°C / 32°...

Instruction Manual
Page 41
... when the camera is corrected to suit the shooting conditions. About the Lens Image Stabilizer When you use the IS lens' built-in the viewfinder, press the shutter button completely to either or . When using a tripod, you to switch the IS mode manually to obtain a sharper shot. Some IS lenses enable you...
... when the camera is corrected to suit the shooting conditions. About the Lens Image Stabilizer When you use the IS lens' built-in the viewfinder, press the shutter button completely to either or . When using a tripod, you to switch the IS mode manually to obtain a sharper shot. Some IS lenses enable you...
Instruction Manual
Page 42
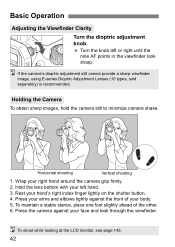
... Adjusting the Viewfinder Clarity Turn the dioptric adjustment knob. Turn the knob left hand. 3. If the camera's dioptric adjustment still cannot provide a sharp viewfinder image, using E-series Dioptric Adjustment Lenses (10 types, sold separately) is recommended. Horizontal shooting Vertical shooting 1. Rest your face and look sharp. To shoot while looking at...
... Adjusting the Viewfinder Clarity Turn the dioptric adjustment knob. Turn the knob left hand. 3. If the camera's dioptric adjustment still cannot provide a sharp viewfinder image, using E-series Dioptric Adjustment Lenses (10 types, sold separately) is recommended. Horizontal shooting Vertical shooting 1. Rest your face and look sharp. To shoot while looking at...

Instruction Manual
Page 44
... (7). In steps 1 and 2, you can directly select and set the shooting functions displayed on the LCD monitor. Q Quick Control for Shooting Functions You can also use the LCD monitor's touch screen (p.53). 44 Press the key to select a function. This is called the Quick Control screen. 1 Press the button. X The captured...
... (7). In steps 1 and 2, you can directly select and set the shooting functions displayed on the LCD monitor. Q Quick Control for Shooting Functions You can also use the LCD monitor's touch screen (p.53). 44 Press the key to select a function. This is called the Quick Control screen. 1 Press the button. X The captured...

Instruction Manual
Page 46
button LCD monitor button Cross keys Menu Screen The menu tabs and items displayed will differ depending on the back of the camera to operate the menus. While looking at the LCD monitor, use the button, cross keys, and button on the shooting mode. Basic Zone modes Movie shooting Creative Zone modes 3 Playback A Live View Shooting z Shooting Tab Menu items 46 5 Set-up 9 My Menu Menu settings 3 Menu Operations You can set various settings with the menus such as the imagerecording quality, date/time, etc.
button LCD monitor button Cross keys Menu Screen The menu tabs and items displayed will differ depending on the back of the camera to operate the menus. While looking at the LCD monitor, use the button, cross keys, and button on the shooting mode. Basic Zone modes Movie shooting Creative Zone modes 3 Playback A Live View Shooting z Shooting Tab Menu items 46 5 Set-up 9 My Menu Menu settings 3 Menu Operations You can set various settings with the menus such as the imagerecording quality, date/time, etc.


