Instruction Manual
Page 3
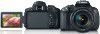
... the Software Instruction Manuals. 3 Camera (with eyecup and body cap) Battery Pack LP-E8 (with protective cover) Battery Charger LC-E8/LC-E8E* Wide Strap EW-100DB IV Interface Cable EOS DIGITAL Solution Disk (Software) Software Instruction Manual Camera Instruction Manual (this booklet) * Battery Charger LC-E8 or LC-E8E is provided. (The LC...
... the Software Instruction Manuals. 3 Camera (with eyecup and body cap) Battery Pack LP-E8 (with protective cover) Battery Charger LC-E8/LC-E8E* Wide Strap EW-100DB IV Interface Cable EOS DIGITAL Solution Disk (Software) Software Instruction Manual Camera Instruction Manual (this booklet) * Battery Charger LC-E8 or LC-E8E is provided. (The LC...

Instruction Manual
Page 8
Index to Features Power Battery • Charging • Installing/Removing • Battery check Power outlet Auto power off Î p.28 Î p.30 Î p.35 Î p.302 Î p.34 Card Installing/Removing Format Î p.31 Î p.48 Release ...
Index to Features Power Battery • Charging • Installing/Removing • Battery check Power outlet Auto power off Î p.28 Î p.30 Î p.35 Î p.302 Î p.34 Card Installing/Removing Format Î p.31 Î p.48 Release ...
Instruction Manual
Page 10
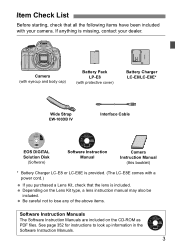
... Manual 4 Chapters 5 Contents at a Glance 6 Index to Features 8 Handling Precautions 16 Quick Start Guide 18 Nomenclature 20 1 Getting Started 27 Charging the Battery 28 Installing and Removing the Battery 30 Installing and Removing the Card 31 Using the LCD Monitor 33 Turning on the Power 34 Setting the Date, Time, and Time...
... Manual 4 Chapters 5 Contents at a Glance 6 Index to Features 8 Handling Precautions 16 Quick Start Guide 18 Nomenclature 20 1 Getting Started 27 Charging the Battery 28 Installing and Removing the Battery 30 Installing and Removing the Card 31 Using the LCD Monitor 33 Turning on the Power 34 Setting the Date, Time, and Time...
Instruction Manual
Page 16
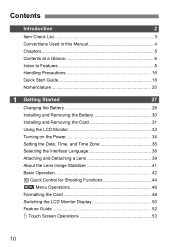
... warm room, condensation may cause a malfunction. Do not use the camera. If the camera is condensation, remove the lens, card and battery from the camera, and wait until condensation has evaporated before using it to disassemble the camera yourself. If condensation forms on the lens, viewfinder... not used underwater. If the camera has not been used for an extended period, remove the battery and store the camera in from the cold into water, promptly consult the nearest Canon Service Center. The camera contains precision electronic circuitry. Use a blower to blow away dust on...
... warm room, condensation may cause a malfunction. Do not use the camera. If the camera is condensation, remove the lens, card and battery from the camera, and wait until condensation has evaporated before using it to disassemble the camera yourself. If condensation forms on the lens, viewfinder... not used underwater. If the camera has not been used for an extended period, remove the battery and store the camera in from the cold into water, promptly consult the nearest Canon Service Center. The camera contains precision electronic circuitry. Use a blower to blow away dust on...
Instruction Manual
Page 18
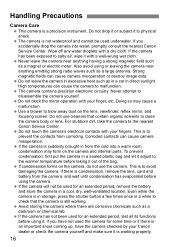
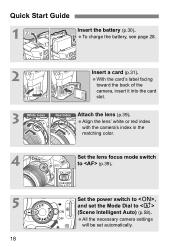
All the necessary camera settings will be set the Mode Dial to , and set automatically. 18 With the card's label facing toward the back of the camera, insert it into the card slot. 3 White index Red index Attach the lens (p.39). Quick Start Guide 1 Insert the battery (p.30). Align the lens' white or red index with the camera's index in the matching color. 4 Set the lens focus mode switch to (p.39). 5 Set the power switch to (Scene Intelligent Auto) (p.58). To charge the battery, see page 28. 2 Insert a card (p.31).
All the necessary camera settings will be set the Mode Dial to , and set automatically. 18 With the card's label facing toward the back of the camera, insert it into the card slot. 3 White index Red index Attach the lens (p.39). Quick Start Guide 1 Insert the battery (p.30). Align the lens' white or red index with the camera's index in the matching color. 4 Set the lens focus mode switch to (p.39). 5 Set the power switch to (Scene Intelligent Auto) (p.58). To charge the battery, see page 28. 2 Insert a card (p.31).

Instruction Manual
Page 21
... button (p.135) Picture Style selection button (p.93) Drive mode selection button (p.101, 103) AF operation selection button (p.95) DC cord hole (p.302) Access lamp (p.32) Battery compartment cover release lever (p.30) Battery compartment cover (p.30) Erase button (p.264) Card slot (p.31) 21
... button (p.135) Picture Style selection button (p.93) Drive mode selection button (p.101, 103) AF operation selection button (p.95) DC cord hole (p.302) Access lamp (p.32) Battery compartment cover release lever (p.30) Battery compartment cover (p.30) Erase button (p.264) Card slot (p.31) 21
Instruction Manual
Page 22
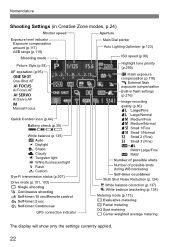
... range (p.119) Shooting mode Picture Style (p.93) AF operation (p.95) X One-Shot AF 9 AI Focus AF Z AI Servo AF a Manual Focus Quick Control icon (p.44) Battery check (p.35) zxcn White balance (p.135) Q Auto W Daylight E Shade R Cloudy Y Tungsten light U White fluorescent light I Flash O Custom Eye-Fi transmission status (p.307) Drive mode (p.101...
... range (p.119) Shooting mode Picture Style (p.93) AF operation (p.95) X One-Shot AF 9 AI Focus AF Z AI Servo AF a Manual Focus Quick Control icon (p.44) Battery check (p.35) zxcn White balance (p.135) Q Auto W Daylight E Shade R Cloudy Y Tungsten light U White fluorescent light I Flash O Custom Eye-Fi transmission status (p.307) Drive mode (p.101...

Instruction Manual
Page 26
For connection to a supply not in the U.S.A., use an attachment plug adapter of the proper configuration for Battery Pack LP-E8 (p.28). DANGER-TO REDUCE THE RISK OF FIRE OR ELECTRIC SHOCK, CAREFULLY FOLLOW THESE INSTRUCTIONS. Battery Charger LC-E8E Charger for the power outlet, if needed. Nomenclature Battery Charger LC-E8 Charger for Battery Pack LP-E8 (p.28). Battery pack slot Charge lamp Full-charge lamp Power plug IMPORTANT SAFETY INSTRUCTIONS-SAVE THESE INSTRUCTIONS. Charge lamp Full-charge lamp Battery pack slot Power cord socket 26 Power cord
For connection to a supply not in the U.S.A., use an attachment plug adapter of the proper configuration for Battery Pack LP-E8 (p.28). DANGER-TO REDUCE THE RISK OF FIRE OR ELECTRIC SHOCK, CAREFULLY FOLLOW THESE INSTRUCTIONS. Battery Charger LC-E8E Charger for the power outlet, if needed. Nomenclature Battery Charger LC-E8 Charger for Battery Pack LP-E8 (p.28). Battery pack slot Charge lamp Full-charge lamp Power plug IMPORTANT SAFETY INSTRUCTIONS-SAVE THESE INSTRUCTIONS. Charge lamp Full-charge lamp Battery pack slot Power cord socket 26 Power cord

Instruction Manual
Page 28
... in low temperatures (6°C - 10°C / 43°F - 50°F) will light up in orange. Charging the Battery 1 Remove the protective cover. X When the battery is fully recharged, the full-charge lamp will take longer (up in green. For LC-E8 As shown by the arrow, .... 4 hours). 28 It takes approx. 2 hours to recharge the battery will vary greatly depending on the ambient temperature and the battery's remaining capacity. To detach the battery, follow the above procedure in the illustration, attach the battery securely to the charger and insert the plug into a power outlet....
... in low temperatures (6°C - 10°C / 43°F - 50°F) will light up in orange. Charging the Battery 1 Remove the protective cover. X When the battery is fully recharged, the full-charge lamp will take longer (up in green. For LC-E8 As shown by the arrow, .... 4 hours). 28 It takes approx. 2 hours to recharge the battery will vary greatly depending on the ambient temperature and the battery's remaining capacity. To detach the battery, follow the above procedure in the illustration, attach the battery securely to the charger and insert the plug into a power outlet....
Instruction Manual
Page 29
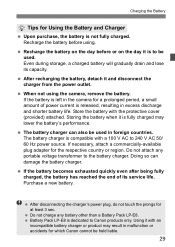
... charged may result in malfunction or accidents for which Canon cannot be held liable. 29 Recharge the battery on the day it is not fully charged. Store the battery with an incompatible battery charger or product may lower the battery's performance. Do not attach any battery other than a Battery Pack LP-E8. After disconnecting the charger's power...
... charged may result in malfunction or accidents for which Canon cannot be held liable. 29 Recharge the battery on the day it is not fully charged. Store the battery with an incompatible battery charger or product may lower the battery's performance. Do not attach any battery other than a Battery Pack LP-E8. After disconnecting the charger's power...
Instruction Manual
Page 30
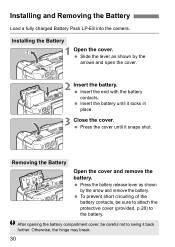
...the arrows and open the cover. 2 Insert the battery. After opening the battery compartment cover, be sure to attach the protective cover (provided, p.28) to swing it snaps shut. Installing and Removing the Battery Load a fully charged Battery Pack LP-E8 into the camera. Press the cover... until it locks in place. 3 Close the cover. Installing the Battery 1 Open the cover. Insert the battery until it back further. Removing the Battery Open the cover and remove the battery. Insert the end with the battery contacts. Otherwise, the hinge may break. 30 To prevent short circuiting...
...the arrows and open the cover. 2 Insert the battery. After opening the battery compartment cover, be sure to attach the protective cover (provided, p.28) to swing it snaps shut. Installing and Removing the Battery Load a fully charged Battery Pack LP-E8 into the camera. Press the cover... until it locks in place. 3 Close the cover. Installing the Battery 1 Open the cover. Insert the battery until it back further. Removing the Battery Open the cover and remove the battery. Insert the end with the battery contacts. Otherwise, the hinge may break. 30 To prevent short circuiting...
Instruction Manual
Page 32
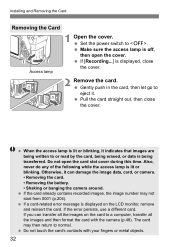
... out, then close the cover. 2 Remove the card. If you can damage the image data, card, or camera. • Removing the card. • Removing the battery. • Shaking or banging the camera around. The card may not start from 0001 (p.204). Do not touch the card's contacts with the camera (p.48...
... out, then close the cover. 2 Remove the card. If you can damage the image data, card, or camera. • Removing the card. • Removing the battery. • Shaking or banging the camera around. The card may not start from 0001 (p.204). Do not touch the card's contacts with the camera (p.48...
Instruction Manual
Page 34
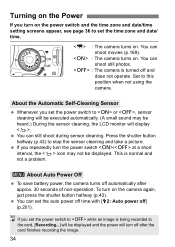
... be displayed and the power will display . You can shoot still photos. : The camera is normal and not a problem. 3 About Auto Power Off To save battery power, the camera turns off after approx. 30 seconds of non-operation. If you set the auto power off time with [52: Auto power off...
... be displayed and the power will display . You can shoot still photos. : The camera is normal and not a problem. 3 About Auto Power Off To save battery power, the camera turns off after approx. 30 seconds of non-operation. If you set the auto power off time with [52: Auto power off...
Instruction Manual
Page 35
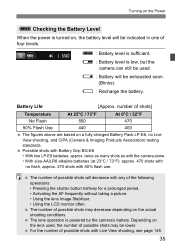
...Possible shots with Live View shooting, see page 145. 35 twice as many shots as with the camera alone. • With size-AA/LR6 alkaline batteries (at 23°C / 73°F): approx. 470 shots with no Live View shooting, and CIPA (Camera & Imaging Products Association) testing standards.... The number of possible shots may be lower. The lens operation is sufficient. x : Battery level is low, but the camera can still be used , the number of the following operations: • Pressing the shutter button halfway for a ...
...Possible shots with Live View shooting, see page 145. 35 twice as many shots as with the camera alone. • With size-AA/LR6 alkaline batteries (at 23°C / 73°F): approx. 470 shots with no Live View shooting, and CIPA (Camera & Imaging Products Association) testing standards.... The number of possible shots may be lower. The lens operation is sufficient. x : Battery level is low, but the camera can still be used , the number of the following operations: • Pressing the shutter button halfway for a ...

Instruction Manual
Page 37
... set to set . Press the key to select [Y]. If you press in step 3 will start from when you store the camera without the battery or if the camera's battery becomes exhausted, the time zone and date/time may be set in step 5. After changing the time zone, check that was set will...
... set to set . Press the key to select [Y]. If you press in step 3 will start from when you store the camera without the battery or if the camera's battery becomes exhausted, the time zone and date/time may be set in step 5. After changing the time zone, check that was set will...

Instruction Manual
Page 41
... cannot correct "subject blur", when the subject moves at the time of exposure. If is corrected to is mounted on a rocking boat. However, to save battery power, setting the IS switch to obtain a sharper shot. Some IS lenses enable you can operate with no problem. However, the following lenses switch the...
... cannot correct "subject blur", when the subject moves at the time of exposure. If is corrected to is mounted on a rocking boat. However, to save battery power, setting the IS switch to obtain a sharper shot. Some IS lenses enable you can operate with no problem. However, the following lenses switch the...
Instruction Manual
Page 65
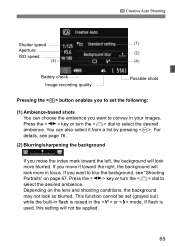
..., the background may not look more blurred. Depending on page 67. This function cannot be applied. 65 C Creative Auto Shooting Shutter speed (1) Aperture (2) ISO speed (3) (4) Battery check Image-recording quality Possible shots Pressing the button enables you to set the following: (1) Ambience-based shots You can also select it toward the...
..., the background may not look more blurred. Depending on page 67. This function cannot be applied. 65 C Creative Auto Shooting Shutter speed (1) Aperture (2) ISO speed (3) (4) Battery check Image-recording quality Possible shots Pressing the button enables you to set the following: (1) Ambience-based shots You can also select it toward the...
Instruction Manual
Page 102
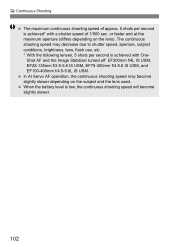
or faster and at the maximum aperture (differs depending on the subject and the lens used. When the battery level is low, the continuous shooting speed will become slightly slower depending on the lens). The continuous shooting speed may become slightly slower. 102 In ...
or faster and at the maximum aperture (differs depending on the subject and the lens used. When the battery level is low, the continuous shooting speed will become slightly slower depending on the lens). The continuous shooting speed may become slightly slower. 102 In ...
Instruction Manual
Page 145
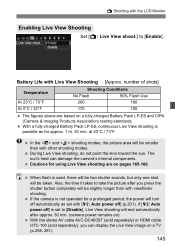
...Flash 50% Flash Use At 23°C / 73°F 200 180 At 0°C / 32°F 170 150 The figures above are on pages 165-166. Battery Life with [52: Auto power off] (p.201). Also, the time it takes to take the picture after approx. 30 min. (camera power remains on a fully...-charged Battery Pack LP-E8 and CIPA (Camera & Imaging Products Association) testing standards. With the stereo AV cable AVC-DC400ST (sold separately) or HDMI cable HTC-100...
...Flash 50% Flash Use At 23°C / 73°F 200 180 At 0°C / 32°F 170 150 The figures above are on pages 165-166. Battery Life with [52: Auto power off] (p.201). Also, the time it takes to take the picture after approx. 30 min. (camera power remains on a fully...-charged Battery Pack LP-E8 and CIPA (Camera & Imaging Products Association) testing standards. With the stereo AV cable AVC-DC400ST (sold separately) or HDMI cable HTC-100...

Instruction Manual
Page 146
... low- Multi • d : FlexiZone - However, the actual image recorded will look like. or bright-light conditions. 146 or bright-light conditions. Single • f: Quick mode Battery check AF point (Quick AF) Histogram Auto Lighting Optimizer Shooting mode Quick Control Drive mode Image-recording quality Built-in flash settings Switch to what...
... low- Multi • d : FlexiZone - However, the actual image recorded will look like. or bright-light conditions. 146 or bright-light conditions. Single • f: Quick mode Battery check AF point (Quick AF) Histogram Auto Lighting Optimizer Shooting mode Quick Control Drive mode Image-recording quality Built-in flash settings Switch to what...


