

Instruction Manual
Page 7
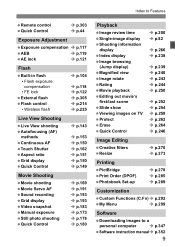
...) Delete unnecessary images Î p.264 (L Delete) Auto play images and movies Î p.254 (Slide show) View the images or movies on a TV set Î p.258 (Video OUT) Adjust the LCD monitor brightness Î p.201 (LCD monitor brightness) Apply special effect to images Î p.270 (Creative filters) Printing Print pictures easily Î...
...) Delete unnecessary images Î p.264 (L Delete) Auto play images and movies Î p.254 (Slide show) View the images or movies on a TV set Î p.258 (Video OUT) Adjust the LCD monitor brightness Î p.201 (LCD monitor brightness) Apply special effect to images Î p.270 (Creative filters) Printing Print pictures easily Î...
Instruction Manual
Page 9
... Î p.143 Î p.153 Î p.150 Î p.162 Î p.151 Î p.150 Î p.149 Movie Shooting Movie shooting Movie Servo AF Sound recording Grid display Video snapshot Manual exposure Still photo shooting Quick Control Î p.169 Î p.191 Î p.193 Î p.193 Î p.183 Î p.173 Î p.178 Î p.180 Playback...
... Î p.143 Î p.153 Î p.150 Î p.162 Î p.151 Î p.150 Î p.149 Movie Shooting Movie shooting Movie Servo AF Sound recording Grid display Video snapshot Manual exposure Still photo shooting Quick Control Î p.169 Î p.191 Î p.193 Î p.193 Î p.183 Î p.173 Î p.178 Î p.180 Playback...
Instruction Manual
Page 13
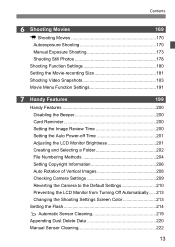
... k Shooting Movies 170 Autoexposure Shooting 170 Manual Exposure Shooting 173 Shooting Still Photos 178 Shooting Function Settings 180 Setting the Movie-recording Size 181 Shooting Video Snapshots 183 Movie Menu Function Settings 191 7 Handy Features 199 Handy Features 200 Disabling the Beeper 200 Card Reminder 200 Setting the Image Review Time...
... k Shooting Movies 170 Autoexposure Shooting 170 Manual Exposure Shooting 173 Shooting Still Photos 178 Shooting Function Settings 180 Setting the Movie-recording Size 181 Shooting Video Snapshots 183 Movie Menu Function Settings 191 7 Handy Features 199 Handy Features 200 Disabling the Beeper 200 Card Reminder 200 Setting the Image Review Time...

Instruction Manual
Page 20
... (p.17) Lens mount Lens lock pin Strap mount (p.27) Terminal cover Lens release button (p.40) Depth-of-field preview button (p.112) Body cap (p.39) Audio/video OUT/ Digital terminal (p.261, 276, 348) Remote control terminal (p.304) External microphone IN terminal (p.193) HDMI mini OUT terminal (p.258) 20 Built-in bold indicate...
... (p.17) Lens mount Lens lock pin Strap mount (p.27) Terminal cover Lens release button (p.40) Depth-of-field preview button (p.112) Body cap (p.39) Audio/video OUT/ Digital terminal (p.261, 276, 348) Remote control terminal (p.304) External microphone IN terminal (p.193) HDMI mini OUT terminal (p.258) 20 Built-in bold indicate...

Instruction Manual
Page 175
... Movies Information Display Each time you press the button, the information display will change . Single) Drive mode Image-recording quality Movie recording size Frame rate Video snapshot Movie Servo AF AE lock LED light Shutter speed Aperture GPS connection indicator Digital compass Exposure level indicator Quick Control White balance Picture Style...
... Movies Information Display Each time you press the button, the information display will change . Single) Drive mode Image-recording quality Movie recording size Frame rate Video snapshot Movie Servo AF AE lock LED light Shutter speed Aperture GPS connection indicator Digital compass Exposure level indicator Quick Control White balance Picture Style...

Instruction Manual
Page 180
... guide (p.52) will be displayed. 2 Select a function and set any of the following: AF method, drive mode, image-recording quality (still photos), movie-recording size, video snapshots, white balance, Picture Style, and Auto Lighting Optimizer. You can be set. 1 Press the button. (7) X The settable functions will appear. Press the key or...
... guide (p.52) will be displayed. 2 Select a function and set any of the following: AF method, drive mode, image-recording quality (still photos), movie-recording size, video snapshots, white balance, Picture Style, and Auto Lighting Optimizer. You can be set. 1 Press the button. (7) X The settable functions will appear. Press the key or...

Instruction Manual
Page 181
... quality. The aspect ratio will be 4:3. The aspect ratio will be 16:9. : Standard-definition recording quality. The 9 (frame rate) switches automatically depending on the [52: Video system] setting. 3 Setting the Movie-recording Size The menu option [Z2: Movie rec. Frame rate (fps: frames per second). The aspect ratio will be 16...
... quality. The aspect ratio will be 4:3. The aspect ratio will be 16:9. : Standard-definition recording quality. The 9 (frame rate) switches automatically depending on the [52: Video system] setting. 3 Setting the Movie-recording Size The menu option [Z2: Movie rec. Frame rate (fps: frames per second). The aspect ratio will be 16...

Instruction Manual
Page 183
... to the card as a single movie file. Video Snapshot Album Concept Video snapshot 1 Video snapshot 2 Video snapshot x Video snapshot album Setting the Video Snapshot Shooting Duration 1 Select [Video snapshot]. Select [Enable], then press . 183 By changing the scene or angle in each video snapshot, you can be played together with the video snapshot function. Under the [Z2] tab, select...
... to the card as a single movie file. Video Snapshot Album Concept Video snapshot 1 Video snapshot 2 Video snapshot x Video snapshot album Setting the Video Snapshot Shooting Duration 1 Select [Video snapshot]. Select [Enable], then press . 183 By changing the scene or angle in each video snapshot, you can be played together with the video snapshot function. Under the [Z2] tab, select...

Instruction Manual
Page 184
..." (p.187). 4 Select [Create a new album]. Select [Album settings], then press . If you want to continue shooting for an existing album, go to "Adding to "Creating a Video Snapshot Album" (p.185). 184 A blue bar will appear to indicate the snapshot length. 3 Shooting...
..." (p.187). 4 Select [Create a new album]. Select [Album settings], then press . If you want to continue shooting for an existing album, go to "Adding to "Creating a Video Snapshot Album" (p.185). 184 A blue bar will appear to indicate the snapshot length. 3 Shooting...

Instruction Manual
Page 185
.... Press the button. Press the key to set shooting duration elapses, the shooting stops automatically. Set [Video snapshot] to album], then press . Press the key to select [JAdd to [Disable]. After the set [Disable]. X After the LCD monitor turns off and the ...access lamp stops blinking, the confirmation screen will be sure to select [JSave as a new album], then select [OK]. 10 Quit the video snapshot shooting. Repeat step 7 to the normal movie shooting screen. 185 Press the button to exit the menu and return to shoot the next...
.... Press the button. Press the key to set shooting duration elapses, the shooting stops automatically. Set [Video snapshot] to album], then press . Press the key to select [JAdd to [Disable]. After the set [Disable]. X After the LCD monitor turns off and the ...access lamp stops blinking, the confirmation screen will be sure to select [JSave as a new album], then select [OK]. 10 Quit the video snapshot shooting. Repeat step 7 to the normal movie shooting screen. 185 Press the button to exit the menu and return to shoot the next...

Instruction Manual
Page 186
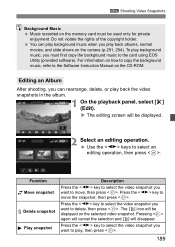
... time you can adjust the built-in Steps 8 and 9 Function JSave as album (Step 8) JAdd to album (Step 9) W Save as the video snapshot album's first video snapshot. For playback operations, see the table below. Skip backward* Each time you press , the previous frame is saved as the first... (p.250) volume by a few seconds. 4 Last frame Displays the last scene of the album's first video snapshot. The video snapshot just recorded will be saved as a new album (Step 9) 1 Playback video snapshot (Steps 8 and 9) rDo not save it will be added to the album recorded immediately before. ...
... time you can adjust the built-in Steps 8 and 9 Function JSave as album (Step 8) JAdd to album (Step 9) W Save as the video snapshot album's first video snapshot. For playback operations, see the table below. Skip backward* Each time you press , the previous frame is saved as the first... (p.250) volume by a few seconds. 4 Last frame Displays the last scene of the album's first video snapshot. The video snapshot just recorded will be saved as a new album (Step 9) 1 Playback video snapshot (Steps 8 and 9) rDo not save it will be added to the album recorded immediately before. ...

Instruction Manual
Page 187
... Adding to Existing Album 1 Select [Add to "Creating a Video Snapshot Album" (p.185). Select [OK] on page 184 to select [Add to the movie shooting screen. 3 Shoot the video snapshot. Go to existing album]. Press the key to match the existing album's settings. You cannot select an ...album shot with another camera. 187 X Certain video snapshot settings will change to select an album, then press . Press the button to exit the menu and return to existing album], then press...
... Adding to Existing Album 1 Select [Add to "Creating a Video Snapshot Album" (p.185). Select [OK] on page 184 to select [Add to the movie shooting screen. 3 Shoot the video snapshot. Go to existing album]. Press the key to match the existing album's settings. You cannot select an ...album shot with another camera. 187 X Certain video snapshot settings will change to select an album, then press . Press the button to exit the menu and return to existing album], then press...

Instruction Manual
Page 188
... 4 sec., or 8 sec. Note that the image is only approximate. Depending on the upper left indicates that if you do any of a video snapshot is a video snapshot. 3 Play back the album. On the movie playback panel displayed, select [7] (Play), then press . 188 Playing an Album You can ...add to select an album. each). 3 Shooting Video Snapshots Cautions for subsequent video snapshots. • Changing the [Movie rec. On the single-image display, the [ ] icon displayed on the frame rate, the shooting...
... 4 sec., or 8 sec. Note that the image is only approximate. Depending on the upper left indicates that if you do any of a video snapshot is a video snapshot. 3 Play back the album. On the movie playback panel displayed, select [7] (Play), then press . 188 Playing an Album You can ...add to select an album. each). 3 Shooting Video Snapshots Cautions for subsequent video snapshots. • Changing the [Movie rec. On the single-image display, the [ ] icon displayed on the frame rate, the shooting...
Instruction Manual
Page 189
... press . Editing an Album After shooting, you can play background music when you play background music, you want to the card using EOS Utility (provided software). The [L] icon will disappear. Use the keys to the Software Instruction Manual on the camera (p.251, 254). Do... Press the key to select the video snapshot you must be displayed. 2 Select an editing operation. 3 Shooting Video Snapshots Background Music Music recorded on the selected video snapshot. Press the key to select the video snapshot you want to play back the video snapshots in the album. 1 On...
... press . Editing an Album After shooting, you can play background music when you play background music, you want to the card using EOS Utility (provided software). The [L] icon will disappear. Use the keys to the Software Instruction Manual on the camera (p.251, 254). Do... Press the key to select the video snapshot you must be displayed. 2 Select an editing operation. 3 Shooting Video Snapshots Background Music Music recorded on the selected video snapshot. Press the key to select the video snapshot you want to play back the video snapshots in the album. 1 On...

Instruction Manual
Page 190
When the battery level is low, editing albums is possible. Provided Software Usable with Albums • EOS Video Snapshot Task: Editing albums is not possible. X The save it as a new movie, select [New file]. Use a fullycharged battery. Add-on function for ...automatically downloaded from the Internet using auto update function. 190 To save it and overwrite the original movie file, select [Overwrite], then press . 3 Shooting Video Snapshots 3 Save the edited album. Press the key to the Editing panel at the screen's bottom. To save screen will appear. Press the button ...
When the battery level is low, editing albums is possible. Provided Software Usable with Albums • EOS Video Snapshot Task: Editing albums is not possible. X The save it as a new movie, select [New file]. Use a fullycharged battery. Add-on function for ...automatically downloaded from the Internet using auto update function. 190 To save it and overwrite the original movie file, select [Overwrite], then press . 3 Shooting Video Snapshots 3 Save the edited album. Press the key to the Editing panel at the screen's bottom. To save screen will appear. Press the button ...
Instruction Manual
Page 194
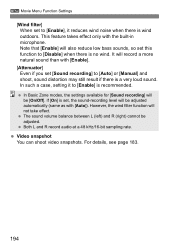
...] to [Enable], it to [Disable] when there is no wind. For details, see page 183. 194 This feature takes effect only with [Auto]). Video snapshot You can shoot video snapshots. The sound volume balance between L (left) and R (right) cannot be [On/Off]. Both L and R record audio at a 48 kHz/16-bit sampling...
...] to [Enable], it to [Disable] when there is no wind. For details, see page 183. 194 This feature takes effect only with [Auto]). Video snapshot You can shoot video snapshots. The sound volume balance between L (left) and R (right) cannot be [On/Off]. Both L and R record audio at a 48 kHz/16-bit sampling...
Instruction Manual
Page 211
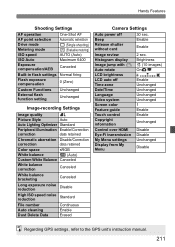
... ISO speed noise reduction Standard File number Auto cleaning Dust Delete Data Continuous Enable Erased Camera Settings Auto power off Time zone Date/Time Language Video system Screen color Feature guide Touch control Copyright information 2 sec. Brightness e (10 images) OnzD Enable Unchanged Unchanged Unchanged Unchanged 1 Enable Enable Unchanged Control over HDMI...
... ISO speed noise reduction Standard File number Auto cleaning Dust Delete Data Continuous Enable Erased Camera Settings Auto power off Time zone Date/Time Language Video system Screen color Feature guide Touch control Copyright information 2 sec. Brightness e (10 images) OnzD Enable Unchanged Unchanged Unchanged Unchanged 1 Enable Enable Unchanged Control over HDMI...

Instruction Manual
Page 212
Movie Shooting AF method u+Tracking Movie Servo AF Enable AF with shutter button during k ONE SHOT Grid display Off Metering timer 16 sec. Movie recording size 1920x1080 Sound recording Auto Video snapshot Disable 212 Handy Features Live View Shooting Live View shooting Enable AF method u+Tracking Continuous AF Enable Touch Shutter Disable Grid display Off Aspect ratio 3:2 Metering timer 16 sec.
Movie Shooting AF method u+Tracking Movie Servo AF Enable AF with shutter button during k ONE SHOT Grid display Off Metering timer 16 sec. Movie recording size 1920x1080 Sound recording Auto Video snapshot Disable 212 Handy Features Live View Shooting Live View shooting Enable AF method u+Tracking Continuous AF Enable Touch Shutter Disable Grid display Off Aspect ratio 3:2 Metering timer 16 sec.

Instruction Manual
Page 248
... set and connect your camera with an HDMI cable, you can play back the still photos and movies on the camera. 248 However, video snapshot albums edited with EOS Video Snapshot Task (p.190) can also edit out the movie's first and last scenes, and play back movies on the TV. You can be...
... set and connect your camera with an HDMI cable, you can play back the still photos and movies on the camera. 248 However, video snapshot albums edited with EOS Video Snapshot Task (p.190) can also edit out the movie's first and last scenes, and play back movies on the TV. You can be...

Instruction Manual
Page 250
... the image. Select [7] (Play), then press . For more details on the upper left edge of the screen. 4 Play back the movie. If the movie is a video snapshot, < > will be played on the index display, press to switch to the single-image display. As movies cannot be displayed. X The movie playback panel...
... the image. Select [7] (Play), then press . For more details on the upper left edge of the screen. 4 Play back the movie. If the movie is a video snapshot, < > will be played on the index display, press to switch to the single-image display. As movies cannot be displayed. X The movie playback panel...


