Instruction Manual
Page 4
... Introduction Handling Cautions 6 Quick Start Guide 8 Nomenclature 10 Conventions Used in this Instructions ...16 1 Before You Start 17 Installing the Batteries 18 Checking the Battery Level 19 Mounting and Detaching a Lens ......20 Mounting a Lens 20 Detaching the Lens 20 How the Shutter Button Works.........21 5Loading ...the Self-timer 33 Using the Eyepiece Cover 34 Imprinting the Date or Time 35 Setting the Date and Time...........36 Replacing the Date Battery .........36 3 AF Modes and Metering Modes ...37 Selecting the AF Mode 38 One-Shot AF for Still Subjects.....39 AI Servo AF...
... Introduction Handling Cautions 6 Quick Start Guide 8 Nomenclature 10 Conventions Used in this Instructions ...16 1 Before You Start 17 Installing the Batteries 18 Checking the Battery Level 19 Mounting and Detaching a Lens ......20 Mounting a Lens 20 Detaching the Lens 20 How the Shutter Button Works.........21 5Loading ...the Self-timer 33 Using the Eyepiece Cover 34 Imprinting the Date or Time 35 Setting the Date and Time...........36 Replacing the Date Battery .........36 3 AF Modes and Metering Modes ...37 Selecting the AF Mode 38 One-Shot AF for Still Subjects.....39 AI Servo AF...

Instruction Manual
Page 6
... in wet conditions or underwater. Do not drop it or subject it with any dust on the contacts, resulting in places prone to your nearest Canon dealer. • The shutter curtains are working properly. 6 If small amounts of water splash onto the camera, wipe it to touch the shutter ...Use only a blower to blow air too forcefully on a sunny day. If the camera gets wet, take it thoroughly with your Canon dealer beforehand, or check for an extended period, remove the batteries. Do not clean the camera body or lens with a clean dry cloth. Be careful not to clean them.
... in wet conditions or underwater. Do not drop it or subject it with any dust on the contacts, resulting in places prone to your nearest Canon dealer. • The shutter curtains are working properly. 6 If small amounts of water splash onto the camera, wipe it to touch the shutter ...Use only a blower to blow air too forcefully on a sunny day. If the camera gets wet, take it thoroughly with your Canon dealer beforehand, or check for an extended period, remove the batteries. Do not clean the camera body or lens with a clean dry cloth. Be careful not to clean them.
Instruction Manual
Page 7
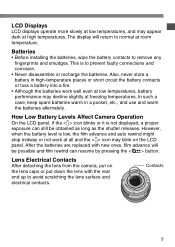
... to normal at high temperatures. The display will be possible and film rewind can still be obtained as long as the shutter releases. After the batteries are replaced with the rear end up to remove any fingerprints and smudges. LCD Displays LCD displays operate more slowly at low temperatures, and may...
... to normal at high temperatures. The display will be possible and film rewind can still be obtained as long as the shutter releases. After the batteries are replaced with the rear end up to remove any fingerprints and smudges. LCD Displays LCD displays operate more slowly at low temperatures, and may...

Instruction Manual
Page 8
... until it snaps shut. (p.22) • The film will pop-up and fire automatically. (p.78) Aim the AF points on the battery chamber cover, and insert two CR123A lithium batteries as shown by the arrow until it snaps in flash will advance to autofocus. (p.21) • Under low-light or backlit conditions..., the built-in place. (p.20) 5 Load the film. Refer to the battery orientation diagram on the main subject and press the shutter button halfway to the first frame. 8 6Focus the subject.
... until it snaps shut. (p.22) • The film will pop-up and fire automatically. (p.78) Aim the AF points on the battery chamber cover, and insert two CR123A lithium batteries as shown by the arrow until it snaps in flash will advance to autofocus. (p.21) • Under low-light or backlit conditions..., the built-in place. (p.20) 5 Load the film. Refer to the battery orientation diagram on the main subject and press the shutter button halfway to the first frame. 8 6Focus the subject.

Instruction Manual
Page 10
.../ Remote control lamp (p.32/33/76) LCD panel (p.12) Main Dial (p.16) Shutter button (p.21) LCD panel illumination button (p.74) Remote control sensor (p.76) Grip / Battery compartment (p.18) Built-in brackets < >. Nomenclature • Reference page numbers are in parentheses. • The camera controls are indicated as icons in flash / AF-assist...
.../ Remote control lamp (p.32/33/76) LCD panel (p.12) Main Dial (p.16) Shutter button (p.21) LCD panel illumination button (p.74) Remote control sensor (p.76) Grip / Battery compartment (p.18) Built-in brackets < >. Nomenclature • Reference page numbers are in parentheses. • The camera controls are indicated as icons in flash / AF-assist...

Instruction Manual
Page 11
Eyecup (p.25, 34) Viewfinder eyepiece *Date display panel (p.35) Function button (p.23, 32, 68, 72, 73, 74, 80) Metering mode button (p.52) Film check window Quick Control Dial (p.16) AF point selection key (p.41)
Eyecup (p.25, 34) Viewfinder eyepiece *Date display panel (p.35) Function button (p.23, 32, 68, 72, 73, 74, 80) Metering mode button (p.52) Film check window Quick Control Dial (p.16) AF point selection key (p.41)
Instruction Manual
Page 12
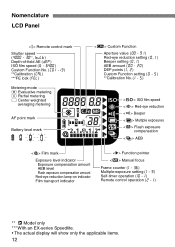
... items. 12 K, y) Depth-of-field AE (r) ISO film speed (U - P) **Calibration (u) ***FE lock (o) Metering mode Z Evaluative metering X Partial metering C Center-weighted averaging metering AF point mark Battery level mark Custom Function Aperture value (Q - A) Multiple-exposure setting (E - F) Custom Function No. (p - C) DEP points (E, R) Custom Function setting (W - Y) **Calibration No. (E - Y) ISO film speed Red-eye reduction...
... items. 12 K, y) Depth-of-field AE (r) ISO film speed (U - P) **Calibration (u) ***FE lock (o) Metering mode Z Evaluative metering X Partial metering C Center-weighted averaging metering AF point mark Battery level mark Custom Function Aperture value (Q - A) Multiple-exposure setting (E - F) Custom Function No. (p - C) DEP points (E, R) Custom Function setting (W - Y) **Calibration No. (E - Y) ISO film speed Red-eye reduction...
Instruction Manual
Page 18
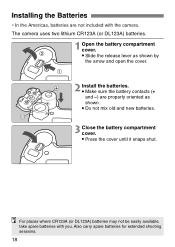
... shown by the arrow and open the cover. 1 + 2 Install the batteries. • Make sure the battery contacts (+ and -) are not included with you. Also carry spare batteries for extended shooting sessions. 18 The camera uses two lithium CR123A (or DL123A) batteries. 2 1 Open the battery compartment cover. • Slide the release lever as shown. • Do...
... shown by the arrow and open the cover. 1 + 2 Install the batteries. • Make sure the battery contacts (+ and -) are not included with you. Also carry spare batteries for extended shooting sessions. 18 The camera uses two lithium CR123A (or DL123A) batteries. 2 1 Open the battery compartment cover. • Slide the release lever as shown. • Do...
Instruction Manual
Page 19
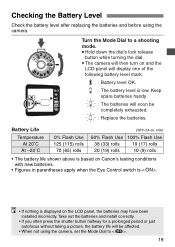
...50% Flash Use 100% Flash Use 38 (33) rolls 19 (17) rolls 20 (19) rolls 10 (9) rolls • The battery life shown above is based on Canon's testing conditions with new batteries. • Figures in parentheses apply when the Eye Control switch is . • If nothing is low.... Battery Life (With 24-ex. Checking the Battery Level Check the battery level after replacing the batteries and before using the camera, ...
...50% Flash Use 100% Flash Use 38 (33) rolls 19 (17) rolls 20 (19) rolls 10 (9) rolls • The battery life shown above is based on Canon's testing conditions with new batteries. • Figures in parentheses apply when the Eye Control switch is . • If nothing is low.... Battery Life (With 24-ex. Checking the Battery Level Check the battery level after replacing the batteries and before using the camera, ...

Instruction Manual
Page 36
...loosen the screw as shown in the illustration. 2 Take out the battery. 3 Insert a new battery. • The battery's positive contact (+) must face up. 4 Reattach the battery chamber cover. • Set the correct date and time. 36 Battery life is blinking and you press the button, the settable digit ... display. • Press the button. 2 Select the digit to be reset to 0. Replacing the Date Battery When the date/time on the imprinted photograph looks faded, replace the CR2025 lithium battery as follows: Year → month → day. sEach time you press , the seconds will change...
...loosen the screw as shown in the illustration. 2 Take out the battery. 3 Insert a new battery. • The battery's positive contact (+) must face up. 4 Reattach the battery chamber cover. • Set the correct date and time. 36 Battery life is blinking and you press the button, the settable digit ... display. • Press the button. 2 Select the digit to be reset to 0. Replacing the Date Battery When the date/time on the imprinted photograph looks faded, replace the CR2025 lithium battery as follows: Year → month → day. sEach time you press , the seconds will change...

Instruction Manual
Page 71
... the Mode Dial to . 2 Set the shutter speed to and turn the dial. 4 Start the bulb exposure. Bulb Exposures★ When bulb is set of batteries, the maximum bulb exposure time (at the LCD panel and turn the dial to select "y". • "y" follows "K" 3 Select the desired aperture value. • Turn the...
... the Mode Dial to . 2 Set the shutter speed to and turn the dial. 4 Start the bulb exposure. Bulb Exposures★ When bulb is set of batteries, the maximum bulb exposure time (at the LCD panel and turn the dial to select "y". • "y" follows "K" 3 Select the desired aperture value. • Turn the...

Instruction Manual
Page 76
... advance mode lever to the camera's remote control terminal. KWireless Remote Control With Remote Controller RC-1 (sold separately), wireless operation is possible up to save battery power. sThe icon appears on using the remote control, see the RC-1's instructions.
... advance mode lever to the camera's remote control terminal. KWireless Remote Control With Remote Controller RC-1 (sold separately), wireless operation is possible up to save battery power. sThe icon appears on using the remote control, see the RC-1's instructions.
Instruction Manual
Page 94
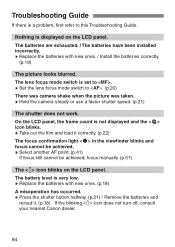
... new ones. (p.18) A misoperation has occurred. s Press the shutter button halfway. (p.21) / Remove the batteries and reload it correctly. (p.22) The focus confirmation light in the viewfinder blinks and focus cannot be achieved, focus manually. (p.51) ... not turn off, consult your nearest Canon dealer. 94 On the LCD panel, the frame count is very low. s Replace the batteries with new ones. / Install the batteries correctly. (p.18) The picture looks blurred. The batteries are exhausted. / The batteries have been installed incorrectly. The battery level is not displayed and the icon...
... new ones. (p.18) A misoperation has occurred. s Press the shutter button halfway. (p.21) / Remove the batteries and reload it correctly. (p.22) The focus confirmation light in the viewfinder blinks and focus cannot be achieved, focus manually. (p.51) ... not turn off, consult your nearest Canon dealer. 94 On the LCD panel, the frame count is very low. s Replace the batteries with new ones. / Install the batteries correctly. (p.18) The picture looks blurred. The batteries are exhausted. / The batteries have been installed incorrectly. The battery level is not displayed and the icon...
Instruction Manual
Page 97
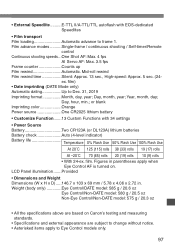
...hour, min.; • External Speedlite..........E-TTL II/A-TTL/TTL autoflash with 34 settings • Power Source Battery Two CR123A (or DL123A) lithium batteries Battery check Auto (4-level indicator) Battery life Temperature 0% Flash Use 50% Flash Use 100% Flash Use At 20˚C 125 (115)... AF is turned on Canon's testing and measuring standards. • Specifications and external appearance are based on . or blank Imprinting color Orange Power source One CR2025 lithium battery • Customize Function.......13 Custom Functions with EOS-dedicated Speedlites • Film...
...hour, min.; • External Speedlite..........E-TTL II/A-TTL/TTL autoflash with 34 settings • Power Source Battery Two CR123A (or DL123A) lithium batteries Battery check Auto (4-level indicator) Battery life Temperature 0% Flash Use 50% Flash Use 100% Flash Use At 20˚C 125 (115)... AF is turned on Canon's testing and measuring standards. • Specifications and external appearance are based on . or blank Imprinting color Orange Power source One CR2025 lithium battery • Customize Function.......13 Custom Functions with EOS-dedicated Speedlites • Film...
Instruction Manual
Page 98
...39 Aperture value 89 Attaching the Strap 17 A-TTL/TTL autoflash 81 Automatic Selection 42 Av 58 B Basic Photography Terms 89 Basic zone 14 Batteries 18 Battery Life 19 Beeper 74 Built-in flash 78 Bulb Exposures 71 C C.Fn 83 CAL 43 Calibration Procedure 43 Center-weighted averaging metering ...52... Checking the Battery Level 19 Close-up 30 Continuous shooting 73 Creative zone 14 Custom Functions 83 D Date/Time 35 DEP 62 Depth-of-field 59, 90...
...39 Aperture value 89 Attaching the Strap 17 A-TTL/TTL autoflash 81 Automatic Selection 42 Av 58 B Basic Photography Terms 89 Basic zone 14 Batteries 18 Battery Life 19 Beeper 74 Built-in flash 78 Bulb Exposures 71 C C.Fn 83 CAL 43 Calibration Procedure 43 Center-weighted averaging metering ...52... Checking the Battery Level 19 Close-up 30 Continuous shooting 73 Creative zone 14 Custom Functions 83 D Date/Time 35 DEP 62 Depth-of-field 59, 90...
Instruction Manual
Page 99
... Line 93 Program Shift 55 Q Quick Control Dial 16 Quick Start Guide 8 R Red-eye Reduction 32 Remote Controller 76 Remote Switch 76 Replacing the Date Battery 36 S Self-timer 33 Shooting modes 14 Shutter Button Halfway pressing 21 Full pressing 21 Shutter speed 89 Single-frame shooting 73 Speedlite 78, 81...
... Line 93 Program Shift 55 Q Quick Control Dial 16 Quick Start Guide 8 R Red-eye Reduction 32 Remote Controller 76 Remote Switch 76 Replacing the Date Battery 36 S Self-timer 33 Shooting modes 14 Shutter Button Halfway pressing 21 Full pressing 21 Shutter speed 89 Single-frame shooting 73 Speedlite 78, 81...


