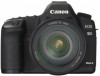

EOS 5D Mark II Instruction Manual
Page 3
...included with protective cover) Battery Charger LC-E6/LC-E6E* Wide Strap EW-EOS5DMKII Interface Cable IFC-200U Stereo Video Cable STV-250N EOS DIGITAL Solution Disk (Software) Software Instruction Manual (1) Instruction Manual (this booklet) (2) Pocket Guide Quick start guide to shooting. (3) CD-... lens instruction manual might also be included. Be careful not to the bundled software (EOS DIGITAL Solution Disk) and Software Instruction Manuals. * Battery Charger LC-E6 or LC-E6E is missing, contact your camera. Camera (with eyecup and body cap) Battery Pack LP-E6 (with your dealer.
...included with protective cover) Battery Charger LC-E6/LC-E6E* Wide Strap EW-EOS5DMKII Interface Cable IFC-200U Stereo Video Cable STV-250N EOS DIGITAL Solution Disk (Software) Software Instruction Manual (1) Instruction Manual (this booklet) (2) Pocket Guide Quick start guide to shooting. (3) CD-... lens instruction manual might also be included. Be careful not to the bundled software (EOS DIGITAL Solution Disk) and Software Instruction Manuals. * Battery Charger LC-E6 or LC-E6E is missing, contact your camera. Camera (with eyecup and body cap) Battery Pack LP-E6 (with your dealer.

EOS 5D Mark II Instruction Manual
Page 12
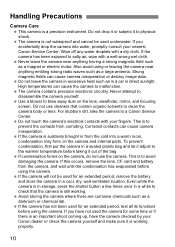
... as a darkroom or chemical lab. Do not touch the camera's electrical contacts with a well-wrung wet cloth. To prevent condensation, first put the camera in from the cold into water, promptly consult your Canon dealer or check the camera yourself and make sure it out of the bag. If ... shutter button a few times once in direct sunlight. Use a blower to blow away dust on the camera, do not use cleaners that the camera is to clean the camera body or lens. For stubborn dirt, take the camera to physical shock. This is still working properly. 12 Corroded contacts can cause...
... as a darkroom or chemical lab. Do not touch the camera's electrical contacts with a well-wrung wet cloth. To prevent condensation, first put the camera in from the cold into water, promptly consult your Canon dealer or check the camera yourself and make sure it out of the bag. If ... shutter button a few times once in direct sunlight. Use a blower to blow away dust on the camera, do not use cleaners that the camera is to clean the camera body or lens. For stubborn dirt, take the camera to physical shock. This is still working properly. 12 Corroded contacts can cause...

EOS 5D Mark II Instruction Manual
Page 16
... mount index (p.31) Flash-sync contacts (p.103) Hot shoe (p.103) Main Dial (p.36) Shutter button (p.35) Remote control sensor (p.102) Focal plane mark Mode Dial (p.20) Strap mount (p.23) Self-timer lamp (p.86) Grip (Battery compartment) DC coupler cord hole (p.196) Mirror (p.101,151) Contacts ... Date/time battery (p.197) Depth-of-field preview button (p.93) Lens release button (p.32) Lens lock pin Body cap (p.31) 16 Audio/video OUT terminal (p.139) PC terminal (p.104) Digital terminal (p.154,167) Remote control terminal (N3 type) (p.100) HDMI mini OUT terminal (p.140) External microphone ...
... mount index (p.31) Flash-sync contacts (p.103) Hot shoe (p.103) Main Dial (p.36) Shutter button (p.35) Remote control sensor (p.102) Focal plane mark Mode Dial (p.20) Strap mount (p.23) Self-timer lamp (p.86) Grip (Battery compartment) DC coupler cord hole (p.196) Mirror (p.101,151) Contacts ... Date/time battery (p.197) Depth-of-field preview button (p.93) Lens release button (p.32) Lens lock pin Body cap (p.31) 16 Audio/video OUT terminal (p.139) PC terminal (p.104) Digital terminal (p.154,167) Remote control terminal (N3 type) (p.100) HDMI mini OUT terminal (p.140) External microphone ...

EOS 5D Mark II Instruction Manual
Page 31
...the focus mode switch to (autofocus). If it snaps in a place with EF-S lenses. Minimizing Dust When changing lenses, do it . 31 The camera cannot be sure to attach the body cap to (manual focus), autofocus will not operate. 4 Remove the front lens cap. Align the red dots on the... body cap before attaching it in place. 3 On the lens, set to the camera. Doing so may cause loss of vision. Attaching and Detaching a Lens Attaching a Lens 1 Remove the caps. Remove ...
...the focus mode switch to (autofocus). If it snaps in a place with EF-S lenses. Minimizing Dust When changing lenses, do it . 31 The camera cannot be sure to attach the body cap to (manual focus), autofocus will not operate. 4 Remove the front lens cap. Align the red dots on the... body cap before attaching it in place. 3 On the lens, set to the camera. Doing so may cause loss of vision. Attaching and Detaching a Lens Attaching a Lens 1 Remove the caps. Remove ...

EOS 5D Mark II Instruction Manual
Page 34
... Press your arms and elbows lightly against your body. 5. To maintain a stable stance, place one foot in the viewfinder look through the viewfinder. 6. Holding the Camera To obtain sharp images, hold the camera still to minimize camera shake. Press the camera against the front of the other. 34 Press ...firmly. 2. Wrap your left or right so that the nine AF points in front of your face and look sharp. If the camera's dioptric adjustment still cannot provide a sharp viewfinder image, using Dioptric Adjustment Lens E (10 types, sold separately) is recommended. Horizontal ...
... Press your arms and elbows lightly against your body. 5. To maintain a stable stance, place one foot in the viewfinder look through the viewfinder. 6. Holding the Camera To obtain sharp images, hold the camera still to minimize camera shake. Press the camera against the front of the other. 34 Press ...firmly. 2. Wrap your left or right so that the nine AF points in front of your face and look sharp. If the camera's dioptric adjustment still cannot provide a sharp viewfinder image, using Dioptric Adjustment Lens E (10 types, sold separately) is recommended. Horizontal ...

EOS 5D Mark II Instruction Manual
Page 84
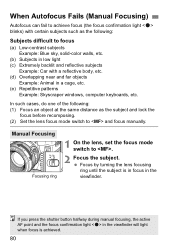
... to focus Low-contrast subjects (Example: Blue sky, solid-color walls, etc.) Subjects in low light Extremely backlit or reflective subjects (Example: Car with a reflective body, etc.) Near and far subjects covered by turning the lens focusing ring until the subject looks sharp in the viewfinder. MF: Manual Focusing 1 Set the...
... to focus Low-contrast subjects (Example: Blue sky, solid-color walls, etc.) Subjects in low light Extremely backlit or reflective subjects (Example: Car with a reflective body, etc.) Near and far subjects covered by turning the lens focusing ring until the subject looks sharp in the viewfinder. MF: Manual Focusing 1 Set the...
EOS 5D Mark II Instruction Manual
Page 147
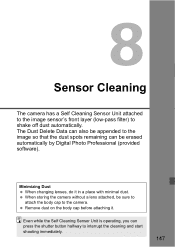
...immediately. 147 Even while the Self Cleaning Sensor Unit is operating, you can be sure to attach the body cap to shake off dust automatically. 8 Sensor Cleaning The camera has a Self Cleaning Sensor Unit attached to the image sensor's front layer (low-pass filter) to ...the camera. Remove dust on the body cap before attaching it in a place with minimal dust. When storing the camera without a lens attached, be erased automatically by Digital Photo Professional (provided software). Minimizing Dust When changing lenses, do it ...
...immediately. 147 Even while the Self Cleaning Sensor Unit is operating, you can be sure to attach the body cap to shake off dust automatically. 8 Sensor Cleaning The camera has a Self Cleaning Sensor Unit attached to the image sensor's front layer (low-pass filter) to ...the camera. Remove dust on the body cap before attaching it in a place with minimal dust. When storing the camera without a lens attached, be erased automatically by Digital Photo Professional (provided software). Minimizing Dust When changing lenses, do it ...

EOS 5D Mark II Instruction Manual
Page 216
...-E6 Type: Charger dedicated to the Battery Pack LP-E6 Recharging time: Approx. 2 hours 30 min. Weight: Approx. 810 g / 28.6 oz. (body only) • Operation Environment Working temperature range: 0°C - 40°C / 32°F - 104°F Working humidity: 85% or less •... capacity: 1800 mAh Working temperature range: 0°C - 40°C / 32°F - 104°F Working humidity: 85% or less Dimensions (W x H x D): 38.4 x 21 x 56.8 mm / 1.5 x 0.8 x 2.2 in . With Live View shooting: At 23°C/73°F, approx. 200 shots. At 0°C/32°F, approx. 180 shots....
...-E6 Type: Charger dedicated to the Battery Pack LP-E6 Recharging time: Approx. 2 hours 30 min. Weight: Approx. 810 g / 28.6 oz. (body only) • Operation Environment Working temperature range: 0°C - 40°C / 32°F - 104°F Working humidity: 85% or less •... capacity: 1800 mAh Working temperature range: 0°C - 40°C / 32°F - 104°F Working humidity: 85% or less Dimensions (W x H x D): 38.4 x 21 x 56.8 mm / 1.5 x 0.8 x 2.2 in . With Live View shooting: At 23°C/73°F, approx. 200 shots. At 0°C/32°F, approx. 180 shots....

Instruction Manual
Page 13
...the Zoom Clamp grooved tabs align with the Gear Sleeve. Install the black Zoom Clamp on the Lens Zoom Ring and lower the lens into camera body and align Gear Sleeve teeth with Gear Sleeve Ribs 13 If necessary, install rubber strips to expand the Zoom Clamp so it meshes properly ...Gear Sleeve ribs. Bayonet lens into the housing opening on Type 2 lenses, the Zoom Clamp and Gear Sleeve need to be installed from the camera body, after the camera and lens have been installed in the housing opening as shown. Installing the Zoom Clamp & Gear Sleeve On Type 2 Lenses Due to the ...
...the Zoom Clamp grooved tabs align with the Gear Sleeve. Install the black Zoom Clamp on the Lens Zoom Ring and lower the lens into camera body and align Gear Sleeve teeth with Gear Sleeve Ribs 13 If necessary, install rubber strips to expand the Zoom Clamp so it meshes properly ...Gear Sleeve ribs. Bayonet lens into the housing opening on Type 2 lenses, the Zoom Clamp and Gear Sleeve need to be installed from the camera body, after the camera and lens have been installed in the housing opening as shown. Installing the Zoom Clamp & Gear Sleeve On Type 2 Lenses Due to the ...

Instruction Manual
Page 15
... o-ring. Place the port, with o-ring, into place. Each port lock has a Release Button. Check that the lock is seated flush against the Port Lock Body. Do not rely on an audible "click" to lightly lubricate it .
... o-ring. Place the port, with o-ring, into place. Each port lock has a Release Button. Check that the lock is seated flush against the Port Lock Body. Do not rely on an audible "click" to lightly lubricate it .

Instruction Manual
Page 22
Shoulder Washer for 12-24 Screw 9104.5 Waterproof Bulkhead Cap 0200.91 Body Cap Recommended Accessories Accessory Mounting Points The top of the SLR-DC housing features a 1/4-20 threaded mounting point for use with Main O-ring, Port O-ring, & 1cc Lubricant 0333.6 Tray Mounting Screw 12-24 x...Controller TTL flash control is not available when using an EV-Controller, and therefore an EV-Controller is available to support your housing. A full range of accessories is not recommended for the attachment of a tripod or other lightweight accessories. Note: The EV-Controller cannot be used as ...
Shoulder Washer for 12-24 Screw 9104.5 Waterproof Bulkhead Cap 0200.91 Body Cap Recommended Accessories Accessory Mounting Points The top of the SLR-DC housing features a 1/4-20 threaded mounting point for use with Main O-ring, Port O-ring, & 1cc Lubricant 0333.6 Tray Mounting Screw 12-24 x...Controller TTL flash control is not available when using an EV-Controller, and therefore an EV-Controller is available to support your housing. A full range of accessories is not recommended for the attachment of a tripod or other lightweight accessories. Note: The EV-Controller cannot be used as ...
Instruction Manual
Page 3
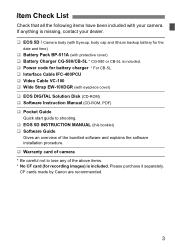
Please purchase it separately. CF cards made by Canon are recommended. 3 If anything is missing, contact your dealer. ‰ EOS 5D / Camera body (with Eyecup, body cap and lithium backup battery for the date and time) ‰ Battery Pack BP-511A (with protective ...EOS DIGITAL Solution Disk (CD-ROM) ‰ Software Instruction Manual (CD-ROM, PDF) ‰ Pocket Guide Quick start guide to shooting. ‰ EOS 5D INSTRUCTION MANUAL (this booklet) ‰ Software Guide Gives an overview of the bundled software and explains the software installation procedure. ‰ Warranty card of camera...
Please purchase it separately. CF cards made by Canon are recommended. 3 If anything is missing, contact your dealer. ‰ EOS 5D / Camera body (with Eyecup, body cap and lithium backup battery for the date and time) ‰ Battery Pack BP-511A (with protective ...EOS DIGITAL Solution Disk (CD-ROM) ‰ Software Instruction Manual (CD-ROM, PDF) ‰ Pocket Guide Quick start guide to shooting. ‰ EOS 5D INSTRUCTION MANUAL (this booklet) ‰ Software Guide Gives an overview of the bundled software and explains the software installation procedure. ‰ Warranty card of camera...
Instruction Manual
Page 10
... shoot coming up, have the camera checked by your Canon dealer or check the camera yourself and make sure it adjust to blow away dust on the camera, do not use cleaners that the camera is to clean the camera body or lens. Do not leave the camera in excessive heat such as a... large antenna. The camera contains precision electronic ...
... shoot coming up, have the camera checked by your Canon dealer or check the camera yourself and make sure it adjust to blow away dust on the camera, do not use cleaners that the camera is to clean the camera body or lens. Do not leave the camera in excessive heat such as a... large antenna. The camera contains precision electronic ...

Instruction Manual
Page 14
... (p.18) Self-timer lamp (p.48) Grip (Battery compartment) Strap mount (p.21) Terminal cover DC coupler cord hole (p.26) Mirror (p.42,97) Contacts (p.11) Lens mount Depth-of-field preview button (p.89) Lens release button (p.27) Lens lock pin Digital terminal (p.124) Body cap (p.27) 14 PC terminal (p.102) Remote control terminal (N3 type...
... (p.18) Self-timer lamp (p.48) Grip (Battery compartment) Strap mount (p.21) Terminal cover DC coupler cord hole (p.26) Mirror (p.42,97) Contacts (p.11) Lens mount Depth-of-field preview button (p.89) Lens release button (p.27) Lens lock pin Digital terminal (p.124) Body cap (p.27) 14 PC terminal (p.102) Remote control terminal (N3 type...

Instruction Manual
Page 27
Remove the rear lens cap and the body cap by turning them as shown by the arrow. Turn the lens until it . When attaching or detaching ...release button, turn the lens as shown by the arrow. 2 Attach the lens. Align the red dots on the lens and camera and turn the lens as shown by the arrow until it stops, then detach it snaps in place. 3 On the lens,... set to prevent dust from entering the camera through the lens mount. 27 Mounting and Detaching a Lens Mounting a Lens 1 Remove the caps. If it is set the focus...
Remove the rear lens cap and the body cap by turning them as shown by the arrow. Turn the lens until it . When attaching or detaching ...release button, turn the lens as shown by the arrow. 2 Attach the lens. Align the red dots on the lens and camera and turn the lens as shown by the arrow until it stops, then detach it snaps in place. 3 On the lens,... set to prevent dust from entering the camera through the lens mount. 27 Mounting and Detaching a Lens Mounting a Lens 1 Remove the caps. If it is set the focus...

Instruction Manual
Page 44
...face and look sharp. The illustration shows the knob at the standard setting (-1 dpt). Turn the dioptric adjustment knob. Holding the Camera To obtain sharp images, hold the camera still to +1 dpt. Hold the lens bottom with your right hand, and press your both feet. 44 Dioptric Adjustment By adjusting...your left or right so that the AF points in front of the other instead of lining up both elbows lightly against your body. If the camera's dioptric adjustment still cannot provide a sharp viewfinder image, using Dioptric Adjustment Lens E (10 types, optional) is -3 to minimize...
...face and look sharp. The illustration shows the knob at the standard setting (-1 dpt). Turn the dioptric adjustment knob. Holding the Camera To obtain sharp images, hold the camera still to +1 dpt. Hold the lens bottom with your right hand, and press your both feet. 44 Dioptric Adjustment By adjusting...your left or right so that the AF points in front of the other instead of lining up both elbows lightly against your body. If the camera's dioptric adjustment still cannot provide a sharp viewfinder image, using Dioptric Adjustment Lens E (10 types, optional) is -3 to minimize...
Instruction Manual
Page 80
... to focus (a) Low-contrast subjects Example: Blue sky, solid-color walls, etc. (b) Subjects in low light (c) Extremely backlit and reflective subjects Example: Car with a reflective body, etc. (d) Overlapping near and far objects Example: Animal in a cage, etc. (e) Repetitive patterns Example: Skyscraper windows, computer keyboards, etc. Focus by turning the lens focusing...
... to focus (a) Low-contrast subjects Example: Blue sky, solid-color walls, etc. (b) Subjects in low light (c) Extremely backlit and reflective subjects Example: Car with a reflective body, etc. (d) Overlapping near and far objects Example: Animal in a cage, etc. (e) Repetitive patterns Example: Skyscraper windows, computer keyboards, etc. Focus by turning the lens focusing...

Instruction Manual
Page 174
...Dimensions (W x H x D): 152 x 113 x 75 mm / 6.0 x 4.4 x 3.0 in . Weight: Approx. 810g / 28.6 oz. (body only) • Operation Environment Working temperature range: 0°C- 40°C / 32°F - 104°F Working humidity: 85% or less •...x D): 91 x 67 x 31 mm / 3.6 x 2.6 x 1.2 in. Weight: Approx. 115 g / 4.0 oz 174 Specifications • Customization Camera setting registration: Under Mode Dial's setting Custom Functions: 21 Custom Functions with 57 settings • Power Source Battery: Battery life: Battery check: Power saving: Date/Time battery: One Battery Pack...
...Dimensions (W x H x D): 152 x 113 x 75 mm / 6.0 x 4.4 x 3.0 in . Weight: Approx. 810g / 28.6 oz. (body only) • Operation Environment Working temperature range: 0°C- 40°C / 32°F - 104°F Working humidity: 85% or less •...x D): 91 x 67 x 31 mm / 3.6 x 2.6 x 1.2 in. Weight: Approx. 115 g / 4.0 oz 174 Specifications • Customization Camera setting registration: Under Mode Dial's setting Custom Functions: 21 Custom Functions with 57 settings • Power Source Battery: Battery life: Battery check: Power saving: Date/Time battery: One Battery Pack...
