

EOS Utility 2.8 for Windows Instruction Manual
Page 7
... [Downloads images from the next time you connect your camera and computer, EU will start when you set your camera's power switch to < ON >. Continue with EU if the camera's mode dial is set to < >. O The camera's LCD monitor turns on your desktop to start up EU. Introduction Contents ...Downloading Images to Your Computer". 4 Preferences Reference Index O In Windows XP, select [Canon EOS Utility] and then click the [OK] button to your camera's Instruction Manual for this action] in step 2 is displayed. O When [Always do this for this device] ([Always use this program for ...
... [Downloads images from the next time you connect your camera and computer, EU will start when you set your camera's power switch to < ON >. Continue with EU if the camera's mode dial is set to < >. O The camera's LCD monitor turns on your desktop to start up EU. Introduction Contents ...Downloading Images to Your Computer". 4 Preferences Reference Index O In Windows XP, select [Canon EOS Utility] and then click the [OK] button to your camera's Instruction Manual for this action] in step 2 is displayed. O When [Always do this for this device] ([Always use this program for ...

EOS Utility 2.8 for Macintosh Instruction Manual
Page 7
...in the main window of Digital Photo Professional (RAW image processing, viewing and editing software) (hereinafter DPP), which is set to < ON >, EU will start up automatically, where you can check them immediately. 1 Click [Starts to download images]. O The camera's LCD monitor turns on the memory card inserted ... 3Remote Shooting 4 Preferences ¿ EU starts up . Set the mode dial to your computer begins. ¿ The downloaded images are displayed in the camera that you can now communicate. O When all the images saved on when EU starts up , the main window appears, and your...
...in the main window of Digital Photo Professional (RAW image processing, viewing and editing software) (hereinafter DPP), which is set to < ON >, EU will start up automatically, where you can check them immediately. 1 Click [Starts to download images]. O The camera's LCD monitor turns on the memory card inserted ... 3Remote Shooting 4 Preferences ¿ EU starts up . Set the mode dial to your computer begins. ¿ The downloaded images are displayed in the camera that you can now communicate. O When all the images saved on when EU starts up , the main window appears, and your...

EOS Utility 2.6 for Windows Instruction Manual (EOS REBEL T1i/EOS 500D )
Page 7
... the main window of Digital Photo Professional (RAW image processing, viewing and editing software) (hereinafter DPP), which is checkmarked, from EOS camera]. O The camera's LCD monitor turns on the memory card inserted in DPP's main window. 6 The downloaded images are sorted by date into folders and are then displayed in the camera to your camera's Instruction Manual for this...
... the main window of Digital Photo Professional (RAW image processing, viewing and editing software) (hereinafter DPP), which is checkmarked, from EOS camera]. O The camera's LCD monitor turns on the memory card inserted in DPP's main window. 6 The downloaded images are sorted by date into folders and are then displayed in the camera to your camera's Instruction Manual for this...

EOS Utility for Macintosh Instruction Manual (for EOS DIGITAL cameras released in 2006 or earlier)
Page 50
...power off function will automatically switch the camera off, disabling communication with EU, if you wish to continue communicating with EOS Utility]. Remotely shot images using EU do not display in the LCD monitor. Communication between EU and the camera disconnected O Operation of computer, disconnecting ... off function to [ON]. You cannot communicate with the camera when you do not perform any operation after turning off the display in DPP O In Digital Photo Professional, select the [Tools] menu [Sync folder with the camera. O Do not put your computer up correctly. Always ...
...power off function will automatically switch the camera off, disabling communication with EU, if you wish to continue communicating with EOS Utility]. Remotely shot images using EU do not display in the LCD monitor. Communication between EU and the camera disconnected O Operation of computer, disconnecting ... off function to [ON]. You cannot communicate with the camera when you do not perform any operation after turning off the display in DPP O In Digital Photo Professional, select the [Tools] menu [Sync folder with the camera. O Do not put your computer up correctly. Always ...

EOS Utility for Windows Instruction Manual (for EOS DIGITAL cameras released in 2006 or earlier)
Page 52
... O In Digital Photo Professional, select the [Tools] menu [Sync folder with EOS Utility]. Your computer does not supply power to the computer User's Manual for other than the 30D REBELXTi 400D , turn the Auto power off function in the LCD monitor. Remotely shot images using EU do not display in the camera battery, the camera cannot communicate...
... O In Digital Photo Professional, select the [Tools] menu [Sync folder with EOS Utility]. Your computer does not supply power to the computer User's Manual for other than the 30D REBELXTi 400D , turn the Auto power off function in the LCD monitor. Remotely shot images using EU do not display in the camera battery, the camera cannot communicate...
ImageBrowser 6.0.2a Updater for Mac OS X
Page 43
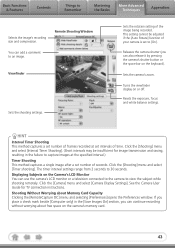
...Viewfinder Sets the shooting settings. Sets the rotation setting of your camera is set to capture images at set number of time. Turns the viewfinder display on the keyboard). Displaying Subjects on the camera's memory card. 43 Basic Functions & Features Contents Things to view...image being recorded. Click the [Shooting] menu and select [Timer shooting]. Releases the camera shutter (you can use the camera's LCD monitor or a television connected to the camera to Remember Mastering the Basics More Advanced Techniques Appendices Selects the image's recording size and ...
...Viewfinder Sets the shooting settings. Sets the rotation setting of your camera is set to capture images at set number of time. Turns the viewfinder display on the keyboard). Displaying Subjects on the camera's memory card. 43 Basic Functions & Features Contents Things to view...image being recorded. Click the [Shooting] menu and select [Timer shooting]. Releases the camera shutter (you can use the camera's LCD monitor or a television connected to the camera to Remember Mastering the Basics More Advanced Techniques Appendices Selects the image's recording size and ...

WFT-E1A Utility 2.0 for Mac OS X
Page 26
... IEEE 1394 port and USB port for Cable To use the cable caps with the WFT-E1A. If the Digital terminal of the camera is not as above. 1 Turn off both the WFT-E1A and camera. a The WFT-E1A's lamp will light and will be transferred if the setting is IEEE 1394, always... use the IEEE 1394 terminal. Images cannot be displayed on the WFT-E1A and camera. If the WFT-E1A's lamp blinks, it means that comes with an EOS-1D-series camera, first attach the respective cap to the camera's tripod socket. 3 Turn on the WFT-E1A's LCD panel. Then attach the cable plug to the ...
... IEEE 1394 port and USB port for Cable To use the cable caps with the WFT-E1A. If the Digital terminal of the camera is not as above. 1 Turn off both the WFT-E1A and camera. a The WFT-E1A's lamp will light and will be transferred if the setting is IEEE 1394, always... use the IEEE 1394 terminal. Images cannot be displayed on the WFT-E1A and camera. If the WFT-E1A's lamp blinks, it means that comes with an EOS-1D-series camera, first attach the respective cap to the camera's tripod socket. 3 Turn on the WFT-E1A's LCD panel. Then attach the cable plug to the ...

WFT-E1A Utility 2.0 for Mac OS X
Page 31
... 1 Select [Image transfer (LAN) settings]. 2 Select [Error description]. 3 Select the error No. If (p.52) does not disappear, turn the power switch off and on the LCD panel. displayed on again. ¡ Use a category 5 or higher LAN cable. ¡ If you switch to a wireless LAN while the cable .... If you are connecting directly to a personal computer without any router or hub, use a cross cable. 2 Identifying an Error No. Displayed on the Display Panel If an error occurs, follow the procedure below to identify the error (p.52) and take suitable steps to keep the LAN cable connected...
... 1 Select [Image transfer (LAN) settings]. 2 Select [Error description]. 3 Select the error No. If (p.52) does not disappear, turn the power switch off and on the LCD panel. displayed on again. ¡ Use a category 5 or higher LAN cable. ¡ If you switch to a wireless LAN while the cable .... If you are connecting directly to a personal computer without any router or hub, use a cross cable. 2 Identifying an Error No. Displayed on the Display Panel If an error occurs, follow the procedure below to identify the error (p.52) and take suitable steps to keep the LAN cable connected...
EOS DIGITAL Software Instruction Manual (EOS Viewer Utility 1.2.1 Updater)
Page 15
... from the Solution Disk is running after turning off function to [OFF] in step 3 do so, the camera may not operate correctly. Before you are communicating, the camera's LCD panel may blink. O Do not connect the camera to exit all the way into the socket... Set the Auto power off the display on the camera's LCD monitor. The pop-up menu and dialog boxes automatically disappear. Always connect the camera and your computer are displaying images on the LCD monitor. O While the camera and your computer after connecting the camera to the computer as a communications error...
... from the Solution Disk is running after turning off function to [OFF] in step 3 do so, the camera may not operate correctly. Before you are communicating, the camera's LCD panel may blink. O Do not connect the camera to exit all the way into the socket... Set the Auto power off the display on the camera's LCD monitor. The pop-up menu and dialog boxes automatically disappear. Always connect the camera and your computer are displaying images on the LCD monitor. O While the camera and your computer after connecting the camera to the computer as a communications error...

EOS DIGITAL Software Instruction Manual (EOS Viewer Utility 1.2.1 Updater)
Page 127
... you connect multiple IEEE1394 devices to your computer after turning off function to [OFF] in advance. (Refer to "Menu Operations" in the camera's Instruction Manual.) O Do not connect more information on the LCD monitor. O Do not connect the camera to your computer is still in sleep mode could ...any operation even after this message appears, the communication with the camera when you perform the operations above, be sure to . If you do not perform any operation while the camera and computer are displaying images on the computer screen asking whether you wish to continue ...
... you connect multiple IEEE1394 devices to your computer after turning off function to [OFF] in advance. (Refer to "Menu Operations" in the camera's Instruction Manual.) O Do not connect more information on the LCD monitor. O Do not connect the camera to your computer is still in sleep mode could ...any operation even after this message appears, the communication with the camera when you perform the operations above, be sure to . If you do not perform any operation while the camera and computer are displaying images on the computer screen asking whether you wish to continue ...

EOS 20D Instruction Manual
Page 25
... or physical shock especially while recording or displaying images. Such actions may also damage the CF card or camera. • Shaking or banging the camera around. • Open the CF card slot cover. • Removing the battery. ¡ If "Err CF" (Error CF) is displayed on the LCD panel, see page 114. ¡ If... Card Removing the CF Card Access lamp 1 Open the cover. ¡ Turn the switch to . ¡ Check that the "buSY" message is not displayed on the CF card or that data is being read, written, or erased on the LCD panel. ¡ Make sure the access lamp is off, then open the...
... or physical shock especially while recording or displaying images. Such actions may also damage the CF card or camera. • Shaking or banging the camera around. • Open the CF card slot cover. • Removing the battery. ¡ If "Err CF" (Error CF) is displayed on the LCD panel, see page 114. ¡ If... Card Removing the CF Card Access lamp 1 Open the cover. ¡ Turn the switch to . ¡ Check that the "buSY" message is not displayed on the CF card or that data is being read, written, or erased on the LCD panel. ¡ Make sure the access lamp is off, then open the...

EOS 20D Instruction Manual
Page 26
Basic Operation Power Switch The camera can operate only after the switch is turned on. : The camera is displayed on the top LCD panel and in the viewfinder. (0) Pressing completely This releases the shutter and takes the picture. 26 Pressing halfway This activates ...button completely. To turn on the top LCD panel with the number of non-operation. Shutter Button The shutter button has two steps. Then you turn off and the camera will turn the switch to while the captured images are finished recording, the display will be indicated on the camera again, just press...
Basic Operation Power Switch The camera can operate only after the switch is turned on. : The camera is displayed on the top LCD panel and in the viewfinder. (0) Pressing completely This releases the shutter and takes the picture. 26 Pressing halfway This activates ...button completely. To turn on the top LCD panel with the number of non-operation. Shutter Button The shutter button has two steps. Then you turn off and the camera will turn the switch to while the captured images are finished recording, the display will be indicated on the camera again, just press...

EOS 20D Instruction Manual
Page 28
...switch to select an AF point, set white balance correction, scroll around a magnified image display, and move the trimming frame for 6 seconds (9). Use it to first. (1) After pressing a button, turn the dial. Basic Operation Operating the Dial The dial is set to set the desired setting. &#...the aperture in the mode. When you press the shutter button down halfway, the camera will be ready to set the white balance, ISO speed, and aflsh exposure compensation. ¡ When using the LCD monitor, you can select the AF point or set the desired setting. During this...
...switch to select an AF point, set white balance correction, scroll around a magnified image display, and move the trimming frame for 6 seconds (9). Use it to first. (1) After pressing a button, turn the dial. Basic Operation Operating the Dial The dial is set to set the desired setting. &#...the aperture in the mode. When you press the shutter button down halfway, the camera will be ready to set the white balance, ISO speed, and aflsh exposure compensation. ¡ When using the LCD monitor, you can select the AF point or set the desired setting. During this...

EOS 20D Instruction Manual
Page 41
...in the viewfinder and on the LCD panel. To retract the flash, push it back to . ¡ Using a non-Canon lens with the menu's [x Review time...] setting. (p.100) ¡ If you want to select the AF point to be displayed for focusing, set the Mode Dial to , then follow "Selecting the AF Point" (p.67) to and set it back down. ¡ You can be changed with an EOS camera...the picture. ¡ Compose the shot and press the shutter button completely. Turning the zoom ring after image capture can disable the beeper from popping up,...
...in the viewfinder and on the LCD panel. To retract the flash, push it back to . ¡ Using a non-Canon lens with the menu's [x Review time...] setting. (p.100) ¡ If you want to select the AF point to be displayed for focusing, set the Mode Dial to , then follow "Selecting the AF Point" (p.67) to and set it back down. ¡ You can be changed with an EOS camera...the picture. ¡ Compose the shot and press the shutter button completely. Turning the zoom ring after image capture can disable the beeper from popping up,...

EOS 20D Instruction Manual
Page 44
... s The beeper will sound, the self-timer lamp will blink, and the shot will be in the picture. Do not stand in front of the camera when you will throw off the focus. ¡ Use a tripod when you use the self-timer. ¡ To cancel the self-timer after it starts... counts down the seconds until the picture is displayed. 4 Take the picture. ¡ Look through the viewfinder and press the shutter button completely. Doing so will be. ¡ You can use focus lock (p.69) for an object at the LCD panel and turn the dial to select . 3 Focus the subject. ¡...
... s The beeper will sound, the self-timer lamp will blink, and the shot will be in the picture. Do not stand in front of the camera when you will throw off the focus. ¡ Use a tripod when you use the self-timer. ¡ To cancel the self-timer after it starts... counts down the seconds until the picture is displayed. 4 Take the picture. ¡ Look through the viewfinder and press the shutter button completely. Doing so will be. ¡ You can use focus lock (p.69) for an object at the LCD panel and turn the dial to select . 3 Focus the subject. ¡...

EOS 20D Instruction Manual
Page 49
... within ISO 100-400. Therefore, a high ISO speed is a numeric indication of the sensitivity to [1: On] (p.143), "H" (ISO 3200) can be displayed on the LCD panel. ¡ In a Basic Zone mode, "Auto" will be set between ISO 100 and 1600 in the Basic Zone Modes The ISO speed is...a low ISO speed is set the ISO speed to light. The camera can also be set. 1 Press the button. (9) s The current ISO speed will be displayed on the LCD panel. 2 Setting the ISO Speed ¡ While looking at the top LCD panel, turn the dial. ¡ At higher ISO speeds and higher ambient temperatures...
... within ISO 100-400. Therefore, a high ISO speed is a numeric indication of the sensitivity to [1: On] (p.143), "H" (ISO 3200) can be displayed on the LCD panel. ¡ In a Basic Zone mode, "Auto" will be set between ISO 100 and 1600 in the Basic Zone Modes The ISO speed is...a low ISO speed is set the ISO speed to light. The camera can also be set. 1 Press the button. (9) s The current ISO speed will be displayed on the LCD panel. 2 Setting the ISO Speed ¡ While looking at the top LCD panel, turn the dial. ¡ At higher ISO speeds and higher ambient temperatures...

EOS 20D Instruction Manual
Page 50
...colors cannot be set automatically. 1 Press the button. (9) 2 Select the white balance setting. ¡ While looking at the top LCD panel, turn the dial. And when the color temperature is low, there is more blue. In the Basic Zone modes, will set the white... uses the CMOS sensor for adjusting the other colors. The subject's white color is more red. With a digital camera, the color temperature can set the optimum white balance automatically. Display Q W E R Y U I O P Mode Auto Daylight Shade Cloudy, twilight, sunset Tungsten White fluorescent light Flash Custom* Color ...
...colors cannot be set automatically. 1 Press the button. (9) 2 Select the white balance setting. ¡ While looking at the top LCD panel, turn the dial. And when the color temperature is low, there is more blue. In the Basic Zone modes, will set the white... uses the CMOS sensor for adjusting the other colors. The subject's white color is more red. With a digital camera, the color temperature can set the optimum white balance automatically. Display Q W E R Y U I O P Mode Auto Daylight Shade Cloudy, twilight, sunset Tungsten White fluorescent light Flash Custom* Color ...

EOS 20D Instruction Manual
Page 122
...ends, the screen will appear on the printer to step 1. ¡ To stop printing. Press to stop the printing, press while [Stop] is displayed, then turn the dial to select [OK] and press . ¡ Depending on the image's file size and recording quality, it does not resume,... operate the buttons on the camera's LCD monitor. Paper Error Check whether the paper is full. For details, see the printer's instruction manual. After resolving the ...
...ends, the screen will appear on the printer to step 1. ¡ To stop printing. Press to stop the printing, press while [Stop] is displayed, then turn the dial to select [OK] and press . ¡ Depending on the image's file size and recording quality, it does not resume,... operate the buttons on the camera's LCD monitor. Paper Error Check whether the paper is full. For details, see the printer's instruction manual. After resolving the ...

EOS 20D Instruction Manual
Page 125
... picture is finished printing. ¡ If a problem occurs during printing, an error message will not stop the printing, press while [Stop] is displayed, then turn the dial to select [OK] and press . ¡ The date may look light if it finishes printing the picture. APrinting with CP Direct...press . If you select [Stop] while printing only one picture, the printing will appear on the print. The image will appear on the camera's LCD monitor. s The printing will start. ¡ When the printing ends, the screen will return to step 1. ¡ To stop until it is not...
... picture is finished printing. ¡ If a problem occurs during printing, an error message will not stop the printing, press while [Stop] is displayed, then turn the dial to select [OK] and press . ¡ The date may look light if it finishes printing the picture. APrinting with CP Direct...press . If you select [Stop] while printing only one picture, the printing will appear on the print. The image will appear on the camera's LCD monitor. s The printing will start. ¡ When the printing ends, the screen will return to step 1. ¡ To stop until it is not...

EOS 20D Instruction Manual
Page 128
... image. ¡ If you select [Stop] during printing, an error message will be displayed if an error occurs. If you are using a BJ printer equipped with Bubble Jet Direct 7 Start printing. ¡ Turn the dial to the BJ printer's instruction manual. 128 Select [Stop] or [Continue]. ...printing, the picture being printed will stop the printing, press while [Stop] is [On], the date recorded for the image will appear on the camera's LCD monitor. s The printing will start. ¡ When the printing ends, the screen will resume automatically after you resolve the problem. ¡ If...
... image. ¡ If you select [Stop] during printing, an error message will be displayed if an error occurs. If you are using a BJ printer equipped with Bubble Jet Direct 7 Start printing. ¡ Turn the dial to the BJ printer's instruction manual. 128 Select [Stop] or [Continue]. ...printing, the picture being printed will stop the printing, press while [Stop] is [On], the date recorded for the image will appear on the camera's LCD monitor. s The printing will start. ¡ When the printing ends, the screen will resume automatically after you resolve the problem. ¡ If...

