EOS-1D Instructions
Page 20
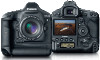
...14. • For more information, reference page numbers are set to < >. • In these Instruc- respectively after you let go of the button. • The sample photographs were taken with any operation, first turn the < > switch to < > or < >. • The < > icon indicates the Main Dial. • The... the < > switch is already set to < >. Be sure it is used as the demonstration lens in parentheses (→p.00). • The Canon EF 50mm f/1.4 USM lens is set to < >. tions. • The procedures assume that the Menu and Custom Functions are provided in these Instructions...
...14. • For more information, reference page numbers are set to < >. • In these Instruc- respectively after you let go of the button. • The sample photographs were taken with any operation, first turn the < > switch to < > or < >. • The < > icon indicates the Main Dial. • The... the < > switch is already set to < >. Be sure it is used as the demonstration lens in parentheses (→p.00). • The Canon EF 50mm f/1.4 USM lens is set to < >. tions. • The procedures assume that the Menu and Custom Functions are provided in these Instructions...
EOS-1D Instructions
Page 50
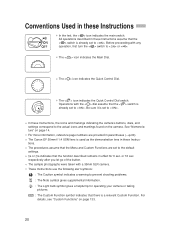
... If you have not register any processing parameters, you will reappear. • To exit the menu and turn off the LCD monitor, press the < > button. Sample processing parameter screens. 50 Press the < > button. 1 •• While pressing the < > button, turn the < > dial to select < >. •...the < > dial to select the desired set and register up to three sets of processing parameters. (For details, see the separate "EOS-1D Software Instructions") The procedure below describes how you specify with the driver software. You can select one of processing param- Then let go...
... If you have not register any processing parameters, you will reappear. • To exit the menu and turn off the LCD monitor, press the < > button. Sample processing parameter screens. 50 Press the < > button. 1 •• While pressing the < > button, turn the < > dial to select < >. •...the < > dial to select the desired set and register up to three sets of processing parameters. (For details, see the separate "EOS-1D Software Instructions") The procedure below describes how you specify with the driver software. You can select one of processing param- Then let go...
EOS-1D Instructions
Page 110
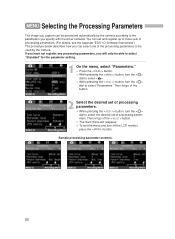
The sample display shows +2/3 stop flash exposure compensation. 2 •Take the picture. C.Fn-06-2 enables the flash exposure compensation amount to be retained even after the < > switch is set to < >. • You can set the EOS-dedicated Speedlite's flash exposure compensation amount up to < >. • The flash exposure compensation amount will override the... scale. • Press the < > button to display the flash exposure compensation amount on the LCD panel. • To cancel flash exposure compensation, set with certain EOS-dedicated Speedlites.
The sample display shows +2/3 stop flash exposure compensation. 2 •Take the picture. C.Fn-06-2 enables the flash exposure compensation amount to be retained even after the < > switch is set to < >. • You can set the EOS-dedicated Speedlite's flash exposure compensation amount up to < >. • The flash exposure compensation amount will override the... scale. • Press the < > button to display the flash exposure compensation amount on the LCD panel. • To cancel flash exposure compensation, set with certain EOS-dedicated Speedlites.
EOS-1D Instructions
Page 118
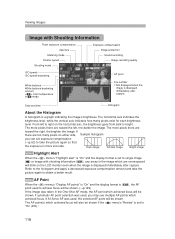
... compensation amount and take the picture again so that the exposure is ( ), the AF point used , the selected AF point will blink on either side, Sample histogram you may see multiple AF points which achieved focus. MENU AF Point When the < > menu's "Display AF points" is "On" and the display format...
... compensation amount and take the picture again so that the exposure is ( ), the AF point used , the selected AF point will blink on either side, Sample histogram you may see multiple AF points which achieved focus. MENU AF Point When the < > menu's "Display AF points" is "On" and the display format...
EOS-1D Instructions
Page 157
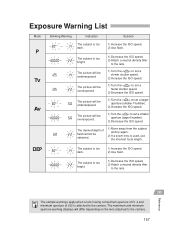
... Warning List Mode Blinking Warning Indication The subject is too bright. 1) Decrease the ISO speed. 2) Attach a neutral density filter to the lens. Reference 10 The sample warnings apply when a lens having a maximum aperture of f/1.4 and minimum aperture of field cannot be overexposed. 1) Turn the < > to set a slower shutter speed. 2) Increase the...
... Warning List Mode Blinking Warning Indication The subject is too bright. 1) Decrease the ISO speed. 2) Attach a neutral density filter to the lens. Reference 10 The sample warnings apply when a lens having a maximum aperture of f/1.4 and minimum aperture of field cannot be overexposed. 1) Turn the < > to set a slower shutter speed. 2) Increase the...