EOS-1D Instructions
Page 2
... operation of this camera. ∗ Using CF cards made by Canon is faulty and the images cannot be sure to professional-level, creative work. Canon and EOS are trademarks of Canon Inc. • Adobe and Photoshop are properly recorded on the ...images of photography, from fully automatic snapshooting to test it first. Thank you for anything but private enjoyment. It uses CompactFlash cards (CF Type I and II) as the recording medium. The EOS-1D digital camera is a registered trademark of their respective owners. 2 It has many features for Interference by a personal computer, Canon...
... operation of this camera. ∗ Using CF cards made by Canon is faulty and the images cannot be sure to professional-level, creative work. Canon and EOS are trademarks of Canon Inc. • Adobe and Photoshop are properly recorded on the ...images of photography, from fully automatic snapshooting to test it first. Thank you for anything but private enjoyment. It uses CompactFlash cards (CF Type I and II) as the recording medium. The EOS-1D digital camera is a registered trademark of their respective owners. 2 It has many features for Interference by a personal computer, Canon...
EOS-1D Instructions
Page 3
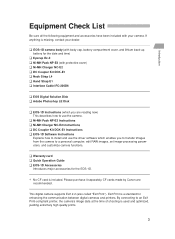
...Canon are reading now) This describes how to use the camera. ¢ Ni-MH Pack NP-E3 Instructions ¢ Ni-MH Charger NC-E2 Instructions ¢ DC Coupler Kit DCK-E1 Instructions ¢ EOS-1D Software Instructions Explains how to install and use the driver software which you to transfer images... from the camera to an Exif Print-compliant printer, the camera's image data at the time of shooting is missing, contact your dealer. ¢ EOS-1D camera body (with body cap, battery compartment cover, and lithium back...
...Canon are reading now) This describes how to use the camera. ¢ Ni-MH Pack NP-E3 Instructions ¢ Ni-MH Charger NC-E2 Instructions ¢ DC Coupler Kit DCK-E1 Instructions ¢ EOS-1D Software Instructions Explains how to install and use the driver software which you to transfer images... from the camera to an Exif Print-compliant printer, the camera's image data at the time of shooting is missing, contact your dealer. ¢ EOS-1D camera body (with body cap, battery compartment cover, and lithium back...
EOS-1D Instructions
Page 4
...Default Settings 34 Dioptric Adjustment 35 Holding the Camera 35 Attaching the Neck Strap and Hand Strap ...... 36 2 Settings for Images 37 MENU Image-Recording Quality 38 About Processing 39 MENU Simultaneous Capture in RAW and JPEG Formats ..... 40 Selecting the White Balance 41 ...MENU Selecting the Color Maxtrix 48 Setting the ISO Speed 49 MENU Selecting the Processing Parameters ... 50 About Processing Parameters 51 MENU Reviewing Images 52 Image Review 52 Changing the Review Time 53 Creating and Selecting a Folder 54 Creating a Folder with the Camera 54 Selecting a Folder 55...
...Default Settings 34 Dioptric Adjustment 35 Holding the Camera 35 Attaching the Neck Strap and Hand Strap ...... 36 2 Settings for Images 37 MENU Image-Recording Quality 38 About Processing 39 MENU Simultaneous Capture in RAW and JPEG Formats ..... 40 Selecting the White Balance 41 ...MENU Selecting the Color Maxtrix 48 Setting the ISO Speed 49 MENU Selecting the Processing Parameters ... 50 About Processing Parameters 51 MENU Reviewing Images 52 Image Review 52 Changing the Review Time 53 Creating and Selecting a Folder 54 Creating a Folder with the Camera 54 Selecting a Folder 55...
EOS-1D Instructions
Page 5
... Flash 111 Wireless, Multi-Speedlite System 111 Metered Manual Flash Photography .......... 112 About TTL and A-TTL Autoflash Speedlites .. 113 Using Non-Canon Flash Units 114 7 Playback Images 115 Playback Images 116 Automatic Playback After Continuous Shooting .... 117 Image with Shooting Information 118 About the Histogram 118 MENU Highlight Alert 118 MENU AF point 118...
... Flash 111 Wireless, Multi-Speedlite System 111 Metered Manual Flash Photography .......... 112 About TTL and A-TTL Autoflash Speedlites .. 113 Using Non-Canon Flash Units 114 7 Playback Images 115 Playback Images 116 Automatic Playback After Continuous Shooting .... 117 Image with Shooting Information 118 About the Histogram 118 MENU Highlight Alert 118 MENU AF point 118...
EOS-1D Instructions
Page 6
... be made, you shoot the sun or a bright subject, vertical or horizontal stripes caused by one or more of the image area, horizontal stripes might appear in the manual. This mark indicates that may appear. 6 During vertical shooting, hold the ...image. Inc. One Canon Plaza, Lake Success, NY 11042, U.S.A. Operation is encouraged to try to which can radiate radio frequency energy and, if not installed and used with the limits for help. Do not make any adverse effects from that to correct the interference by the light source may cause undesired operation. EOS-1D...
... be made, you shoot the sun or a bright subject, vertical or horizontal stripes caused by one or more of the image area, horizontal stripes might appear in the manual. This mark indicates that may appear. 6 During vertical shooting, hold the ...image. Inc. One Canon Plaza, Lake Success, NY 11042, U.S.A. Operation is encouraged to try to which can radiate radio frequency energy and, if not installed and used with the limits for help. Do not make any adverse effects from that to correct the interference by the light source may cause undesired operation. EOS-1D...

EOS-1D Instructions
Page 9
...interface cable to connect the camera to strong electromagnetic fields may become hot. Ensure that supplied with a battery installed will damage the image data. • Do not use any other equipment generating strong electromagnetic fields. Extended Storage When not using the camera for a ...prolonged period, the camera body may cause malfunctions or corrupt image data. SKIN BURN HAZARD • When the camera's main switch is not a malfunction, holding it from the camera and wait...
...interface cable to connect the camera to strong electromagnetic fields may become hot. Ensure that supplied with a battery installed will damage the image data. • Do not use any other equipment generating strong electromagnetic fields. Extended Storage When not using the camera for a ...prolonged period, the camera body may cause malfunctions or corrupt image data. SKIN BURN HAZARD • When the camera's main switch is not a malfunction, holding it from the camera and wait...

EOS-1D Instructions
Page 10
..., etc. Never attempt to disassemble the camera. (6) Use only a blower brush to blow away dust on the camera, do not affect the images recorded. (2) Do not press hard against the LCD monitor or LCD panel or subject it adjust gradually to malfunction. (5) The camera contains precision ... so may blacken. Strong magnetic fields and radio waves can cause camera misoperation or destroy image data. (4) Do not leave the camera in places of all the camera controls or take the camera to a Canon Service Center. (4) At low temperatures, the liquid-crystal display response may become dirty, ...
..., etc. Never attempt to disassemble the camera. (6) Use only a blower brush to blow away dust on the camera, do not affect the images recorded. (2) Do not press hard against the LCD monitor or LCD panel or subject it adjust gradually to malfunction. (5) The camera contains precision ... so may blacken. Strong magnetic fields and radio waves can cause camera misoperation or destroy image data. (4) Do not leave the camera in places of all the camera controls or take the camera to a Canon Service Center. (4) At low temperatures, the liquid-crystal display response may become dirty, ...

EOS-1D Instructions
Page 11
Do not subject the card to generate static charge or an electromagnetic field. Doing so may destroy the image data. (3) To prevent deformation due to heat, do not leave any CF cards in direct sunlight or near anything having static charge. Also avoid places ... not bend or exert any excessive force or physical shock on the CF card. (5) To protect the data, be able to record or display any images. Lens Electrical Contacts After detaching the lens from the camera, attach the lens caps or put down the lens with the camera will not be...
Do not subject the card to generate static charge or an electromagnetic field. Doing so may destroy the image data. (3) To prevent deformation due to heat, do not leave any CF cards in direct sunlight or near anything having static charge. Also avoid places ... not bend or exert any excessive force or physical shock on the CF card. (5) To protect the data, be able to record or display any images. Lens Electrical Contacts After detaching the lens from the camera, attach the lens caps or put down the lens with the camera will not be...

EOS-1D Instructions
Page 13
... will be changed. (→p.53) 13 This display time can also be displayed for 2 sec. • To review previous images, see "Playback Images" on page 116. • To erase an image, see "Erasing an Image" on page 122. 11 Review the picture on the LCD monitor. After inserting a CF card, close the cover. (→...
... will be changed. (→p.53) 13 This display time can also be displayed for 2 sec. • To review previous images, see "Playback Images" on page 116. • To erase an image, see "Erasing an Image" on page 122. 11 Review the picture on the LCD monitor. After inserting a CF card, close the cover. (→...

EOS-1D Instructions
Page 16
...; Display button (→54,116) 〈 〉 Erase button (→122) Rear LCD panel (→18) 〈 〉 Clear buttons (→34) 〈 〉 Recording image quality selection button (→38) CF card eject button (→28) Access lamp (→28) CF card slot cover release knob (→27) Recording microphone...
...; Display button (→54,116) 〈 〉 Erase button (→122) Rear LCD panel (→18) 〈 〉 Clear buttons (→34) 〈 〉 Recording image quality selection button (→38) CF card eject button (→28) Access lamp (→28) CF card slot cover release knob (→27) Recording microphone...
EOS-1D Instructions
Page 18
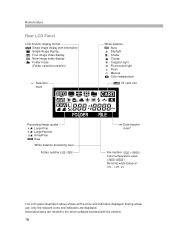
...use, only the relevant icons and indicators are related to the driver software bundled with information Single image display Four-image index display Nine-image index display Folder mode (Folder selection/creation) Selection mark White balance Auto Daylight Shade Cloudy Tungsten ...light Fluorescent light Flash Manual Color temperature CF card icon Recording image quality Large/Fine Large/Normal Small/Fine Raw White balance bracketing level Folder number ( - ) Date transfer mark* File number ( ...
...use, only the relevant icons and indicators are related to the driver software bundled with information Single image display Four-image index display Nine-image index display Folder mode (Folder selection/creation) Selection mark White balance Auto Daylight Shade Cloudy Tungsten ...light Fluorescent light Flash Manual Color temperature CF card icon Recording image quality Large/Fine Large/Normal Small/Fine Raw White balance bracketing level Folder number ( - ) Date transfer mark* File number ( ...

EOS-1D Instructions
Page 24
...battery release handle as shown by the arrow. 2 Press the battery release button and pull out the battery. 24 It is based on Canon's testing conditions (w/EF 50mm f/1.4 USM lens, review turned on your shooting conditions. • Using the LCD monitor more frequently will reduce... button halfway for a prolonged period or activating the autofocus without taking a picture will vary depending on , reviewing time of 2 sec., and " + " image quality). Installing and Removing the Battery Battery Life Temperature At 20˚C / 68˚F At 0˚C / 32˚F Number of Shots Approx. 500 ...
...battery release handle as shown by the arrow. 2 Press the battery release button and pull out the battery. 24 It is based on Canon's testing conditions (w/EF 50mm f/1.4 USM lens, review turned on your shooting conditions. • Using the LCD monitor more frequently will reduce... button halfway for a prolonged period or activating the autofocus without taking a picture will vary depending on , reviewing time of 2 sec., and " + " image quality). Installing and Removing the Battery Battery Life Temperature At 20˚C / 68˚F At 0˚C / 32˚F Number of Shots Approx. 500 ...
EOS-1D Instructions
Page 26
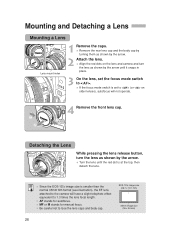
...camera and turn the lens as shown by the arrow until the red dot is at the top, then detach the lens. • Since the EOS-1D's image size is smaller than the normal 35mm film format (see illustration), the EF lens attached to the camera will not operate. 4 Remove the front lens... cap. Detaching the Lens While pressing the lens release button, turn the lens as shown by the arrow. 2 •Attach the lens. EOS-1D's image size (28.7 x 19.1 mm) 35mm image size (36 x 24 mm) 26 Align the red dots on older lenses), autofocus will have a slight telephoto effect equivalent to lose the...
...camera and turn the lens as shown by the arrow until the red dot is at the top, then detach the lens. • Since the EOS-1D's image size is smaller than the normal 35mm film format (see illustration), the EF lens attached to the camera will not operate. 4 Remove the front lens... cap. Detaching the Lens While pressing the lens release button, turn the lens as shown by the arrow. 2 •Attach the lens. EOS-1D's image size (28.7 x 19.1 mm) 35mm image size (36 x 24 mm) 26 Align the red dots on older lenses), autofocus will have a slight telephoto effect equivalent to lose the...
EOS-1D Instructions
Page 27
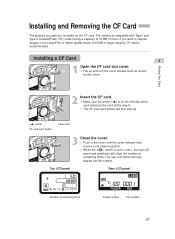
... camera is recommended. Push in the cover until the cover release knob returns to its original position. • When the < > switch is set to capture images in . Before You Start Installing and Removing the CF Card The pictures you want to < >, the top LCD panel and viewfinder will show the number...
... camera is recommended. Push in the cover until the cover release knob returns to its original position. • When the < > switch is set to capture images in . Before You Start Installing and Removing the CF Card The pictures you want to < >, the top LCD panel and viewfinder will show the number...
EOS-1D Instructions
Page 28
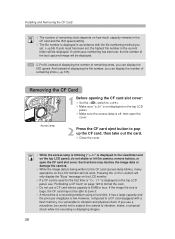
... pop up the CF card, then take out the card. • Close the cover. • While the access lamp is blinking (" " is recording or displaying images. 28 Access lamp 2 Press the CF card eject button to a CF card equipped with the file numbering method you can display the ISO speed. It...; Make sure " " is not displayed on the top LCD panel), do not shake or hit the camera, remove battery, or open the cover. If the image file size is a recording medium using a hard disk. If continuous numbering has been set , the highest file number in the viewfinder and on the top...
... pop up the CF card, then take out the card. • Close the cover. • While the access lamp is blinking (" " is recording or displaying images. 28 Access lamp 2 Press the CF card eject button to a CF card equipped with the file numbering method you can display the ISO speed. It...; Make sure " " is not displayed on the top LCD panel), do not shake or hit the camera, remove battery, or open the cover. If the image file size is a recording medium using a hard disk. If continuous numbering has been set , the highest file number in the viewfinder and on the top...
EOS-1D Instructions
Page 29
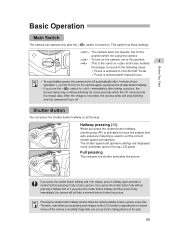
... again and wait a moment before it fully to taking a picture, the access lamp may continue blinking for a few seconds while the CF card records the image data. Set to this position. 1 < > : This is the same as < > and it also enables the beeper to sound in the following cases: ...the camera. < > : To turn the < > switch to take a picture. Full pressing This releases the shutter and takes the picture. After the image is recording image data, you press the shutter button halfway and then press it fully immediately, the camera will still take a moment before pressing it takes the...
... again and wait a moment before it fully to taking a picture, the access lamp may continue blinking for a few seconds while the CF card records the image data. Set to this position. 1 < > : This is the same as < > and it also enables the beeper to sound in the following cases: ...the camera. < > : To turn the < > switch to take a picture. Full pressing This releases the shutter and takes the picture. After the image is recording image data, you press the shutter button halfway and then press it fully immediately, the camera will still take a moment before pressing it takes the...
EOS-1D Instructions
Page 31
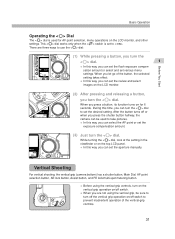
During this time, you can set the review and select images on the LCD monitor. (2) After pressing and releasing a button, you turn the < > dial. When you let go of the vertical-grip controls. 31 Vertical Shooting ...
During this time, you can set the review and select images on the LCD monitor. (2) After pressing and releasing a button, you turn the < > dial. When you let go of the vertical-grip controls. 31 Vertical Shooting ...

EOS-1D Instructions
Page 32
..., follow the procedure below . you use the < > button, < > button, and < > dial as explained below . 32 While looking at the LCD monitor, you can record an image simultaneously in both the RAW and JPEG formats, set the date and time, set Custom Functions, etc. back to select a setting. Menu Operations By setting...
..., follow the procedure below . you use the < > button, < > button, and < > dial as explained below . 32 While looking at the LCD monitor, you can record an image simultaneously in both the RAW and JPEG formats, set the date and time, set Custom Functions, etc. back to select a setting. Menu Operations By setting...

EOS-1D Instructions
Page 33
... that the date and time has been set correctly. s s 4 •Select the menu setting. The setting will be displayed in one of the button. Each image will take effect immediately. Hold down the < > button and turn the < > dial to taking pictures by pressing the shutter button halfway. • The menu can...
... that the date and time has been set correctly. s s 4 •Select the menu setting. The setting will be displayed in one of the button. Each image will take effect immediately. Hold down the < > button and turn the < > dial to taking pictures by pressing the shutter button halfway. • The menu can...

EOS-1D Instructions
Page 34
...Menu Operations About the LCD Monitor The color LCD monitor on the back of the camera enables you to review and select recorded images and set various menu settings. • With the LCD monitor, you can change the brightness of the LCD monitor. (→... lock Canceled FE lock Canceled AEB Canceled Custom Functions Settings retained AF point registration Center AF point Image Recording Settings Image quality (Large/Fine) White balance (Auto) White balance bracketing Image processing parameters Color Matrix Canceled Standard 1 The camera will be used as a viewfinder to work ...
...Menu Operations About the LCD Monitor The color LCD monitor on the back of the camera enables you to review and select recorded images and set various menu settings. • With the LCD monitor, you can change the brightness of the LCD monitor. (→... lock Canceled FE lock Canceled AEB Canceled Custom Functions Settings retained AF point registration Center AF point Image Recording Settings Image quality (Large/Fine) White balance (Auto) White balance bracketing Image processing parameters Color Matrix Canceled Standard 1 The camera will be used as a viewfinder to work ...
