
EOS-1D Instructions
Page 10
...anything having a strong magnetic field such as a magnet or electric motor. During the storage period, release the shutter a few dead pixels where a black, red, or green pixel is not to a Canon Service Center. (4) At low temperatures, the liquid-crystal display response may blacken. LCD Monitor and... as a large antenna. They number no more than 0.02 percent (standard tolerance) of children. For stubborn dirt, consult your nearest Canon Service Center. (7) Do not touch the electrical contacts with very high precision technology. Remove the CF card and battery and wait until ...
...anything having a strong magnetic field such as a magnet or electric motor. During the storage period, release the shutter a few dead pixels where a black, red, or green pixel is not to a Canon Service Center. (4) At low temperatures, the liquid-crystal display response may blacken. LCD Monitor and... as a large antenna. They number no more than 0.02 percent (standard tolerance) of children. For stubborn dirt, consult your nearest Canon Service Center. (7) Do not touch the electrical contacts with very high precision technology. Remove the CF card and battery and wait until ...
EOS-1D Instructions
Page 12
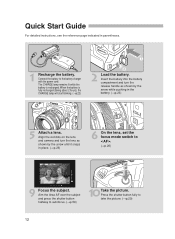
... press the shutter button halfway to the battery charger with the power cord. Align the red dots on the lens and camera and turn the release handle as shown by the arrow while pushing in parentheses. 1 Recharge the battery. Press the shutter button fully to < >. (→p.26) 9 Focus the subject...
... press the shutter button halfway to the battery charger with the power cord. Align the red dots on the lens and camera and turn the release handle as shown by the arrow while pushing in parentheses. 1 Recharge the battery. Press the shutter button fully to < >. (→p.26) 9 Focus the subject...

EOS-1D Instructions
Page 14
... (→26) Self-timer lamp (→100) Shutter button (→29) Strap mount (→36) Mirror (→104) White balance sensor Lens lock pin Lens release button (→26) Grip Depth-of-field preview button (→87,111) Vertical grip operation on/off switch (→31) 〈 〉 Vertical grip FE...
... (→26) Self-timer lamp (→100) Shutter button (→29) Strap mount (→36) Mirror (→104) White balance sensor Lens lock pin Lens release button (→26) Grip Depth-of-field preview button (→87,111) Vertical grip operation on/off switch (→31) 〈 〉 Vertical grip FE...
EOS-1D Instructions
Page 15
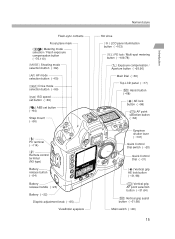
...; AEB set button (→94) Strap mount (→36) 〈〉 PC terminal (→114) 〈〉 Remote control terminal (N3 type) Battery release button (→24) Battery release handle (→23) Battery (→22) Dioptric adjustment knob (→35) Viewfinder eyepiece Nomenclature Hot shoe 〈 〉 LCD panel illumination button (→...
...; AEB set button (→94) Strap mount (→36) 〈〉 PC terminal (→114) 〈〉 Remote control terminal (N3 type) Battery release button (→24) Battery release handle (→23) Battery (→22) Dioptric adjustment knob (→35) Viewfinder eyepiece Nomenclature Hot shoe 〈 〉 LCD panel illumination button (→...

EOS-1D Instructions
Page 16
... (→34) 〈 〉 Recording image quality selection button (→38) CF card eject button (→28) Access lamp (→28) CF card slot cover release knob (→27) Recording microphone (→121) White balance bracketing button 〈 〉 White balance selection button (→41) Battery compartment cap (→23) 16
... (→34) 〈 〉 Recording image quality selection button (→38) CF card eject button (→28) Access lamp (→28) CF card slot cover release knob (→27) Recording microphone (→121) White balance bracketing button 〈 〉 White balance selection button (→41) Battery compartment cap (→23) 16

EOS-1D Instructions
Page 23
... turned on the top LCD panel. : Battery level OK. : Battery running low. : Battery will be attached to < >. Keep the cap and cover in , turn the release handle as shown by the arrow. Turn the < > switch to the battery compartment cap. Before You Start Installing and Removing the Battery Installing the Battery...
... turned on the top LCD panel. : Battery level OK. : Battery running low. : Battery will be attached to < >. Keep the cap and cover in , turn the release handle as shown by the arrow. Turn the < > switch to the battery compartment cap. Before You Start Installing and Removing the Battery Installing the Battery...

EOS-1D Instructions
Page 24
... Battery 1 Flip up and turn the battery release handle as shown by the arrow. 2 Press the battery release button and pull out the battery. 24 The actual number of shots will vary depending on , reviewing time of 2 sec., and " + " image quality). It is based on Canon's testing conditions (w/EF 50mm f/1.4 USM lens, review...
... Battery 1 Flip up and turn the battery release handle as shown by the arrow. 2 Press the battery release button and pull out the battery. 24 The actual number of shots will vary depending on , reviewing time of 2 sec., and " + " image quality). It is based on Canon's testing conditions (w/EF 50mm f/1.4 USM lens, review...

EOS-1D Instructions
Page 25
Insert the coupler and while pushing it in, turn the release handle as when using the camera, set to supply power. Connect the power cord to the AC adapter. 3 • Connect the power cord's plug to ...
Insert the coupler and while pushing it in, turn the release handle as when using the camera, set to supply power. Connect the power cord to the AC adapter. 3 • Connect the power cord's plug to ...
EOS-1D Instructions
Page 26
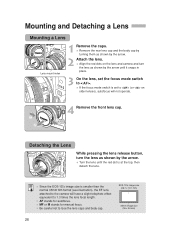
... for autofocus. • MF or M stands for manual focus. •• Be careful not to the camera will not operate. 4 Remove the front lens cap. EOS-1D's image size (28.7 x 19.1 mm) 35mm image size (36 x 24 mm) 26 Mounting and Detaching a Lens Mounting a Lens Lens mount index 1 •Remove ...the caps. Detaching the Lens While pressing the lens release button, turn the lens as shown by the arrow until the red dot is at the top, then detach the lens. • Since the EOS-1D's image size is set to < > (or < > on older lenses), autofocus will have a...
... for autofocus. • MF or M stands for manual focus. •• Be careful not to the camera will not operate. 4 Remove the front lens cap. EOS-1D's image size (28.7 x 19.1 mm) 35mm image size (36 x 24 mm) 26 Mounting and Detaching a Lens Mounting a Lens Lens mount index 1 •Remove ...the caps. Detaching the Lens While pressing the lens release button, turn the lens as shown by the arrow until the red dot is at the top, then detach the lens. • Since the EOS-1D's image size is set to < > (or < > on older lenses), autofocus will have a...
EOS-1D Instructions
Page 27
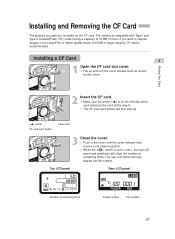
...) cards having a capacity of 16 MB or more. Installing a CF Card 1 1 •Open the CF card slot cover. Push in the cover until the cover release knob returns to < >, the top LCD panel and viewfinder will show the number of remaining shots. Flip up . < > arrow CF card eject button Label side... 3 •Close the cover. The rear LCD panel will then pop-up and turn the cover release knob as shown by the arrow. 2 •Insert the CF card. Make sure the arrow < > is set to its original position. • When the < > switch...
...) cards having a capacity of 16 MB or more. Installing a CF Card 1 1 •Open the CF card slot cover. Push in the cover until the cover release knob returns to < >, the top LCD panel and viewfinder will show the number of remaining shots. Flip up . < > arrow CF card eject button Label side... 3 •Close the cover. The rear LCD panel will then pop-up and turn the cover release knob as shown by the arrow. 2 •Insert the CF card. Make sure the arrow < > is set to its original position. • When the < > switch...
EOS-1D Instructions
Page 29
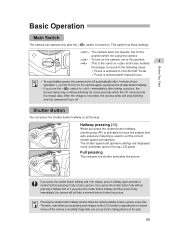
... displayed in One-Shot AF mode. • Focus is achieved with manual focus. • To save battery power, the camera turns off . Full pressing This releases the shutter and takes the picture. Therefore, even while you turn off automatically after taking pictures on the spot. 29 Shutter Button You can press...
... displayed in One-Shot AF mode. • Focus is achieved with manual focus. • To save battery power, the camera turns off . Full pressing This releases the shutter and takes the picture. Therefore, even while you turn off automatically after taking pictures on the spot. 29 Shutter Button You can press...
EOS-1D Instructions
Page 30
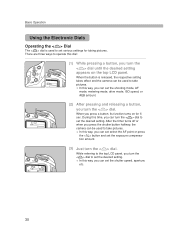
... shutter button halfway, the camera can be used to set the desired setting. Basic Operation Using the Electronic Dials Operating the < > Dial The < > dial is released, the respective setting takes effect and the camera can set the shooting mode, AF mode, metering mode, drive mode, ISO speed, or AEB amount. (2) After...
... shutter button halfway, the camera can be used to set the desired setting. Basic Operation Using the Electronic Dials Operating the < > Dial The < > dial is released, the respective setting takes effect and the camera can set the shooting mode, AF mode, metering mode, drive mode, ISO speed, or AEB amount. (2) After...
EOS-1D Instructions
Page 31
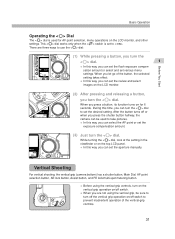
... pressing a button, you turn the < > dial. 1 • In this way, you can set the review and select images on the LCD monitor. (2) After pressing and releasing a button, you can set the flash exposure compensation amount or select and set various menu settings. After the button turns off switch. • When you...
... pressing a button, you turn the < > dial. 1 • In this way, you can set the review and select images on the LCD monitor. (2) After pressing and releasing a button, you can set the flash exposure compensation amount or select and set various menu settings. After the button turns off switch. • When you...

EOS-1D Instructions
Page 60
Then release the < > button. AF Mode Selection AF stands for Artificial Intelligence.) Select the AF mode that suits the subject. 1 Set the lens focus mode switch to < >. 2 •Set the AF mode. While pressing the camera's < > button, turn the < > dial until the desired AF mode is an abbreviation for 'autofocus'. One-Shot AF AI Servo AF 60 The camera has two AF modes: One-Shot AF for still subjects, and AI Servo AF for moving subjects. (AI is displayed on the LCD panel.
Then release the < > button. AF Mode Selection AF stands for Artificial Intelligence.) Select the AF mode that suits the subject. 1 Set the lens focus mode switch to < >. 2 •Set the AF mode. While pressing the camera's < > button, turn the < > dial until the desired AF mode is an abbreviation for 'autofocus'. One-Shot AF AI Servo AF 60 The camera has two AF modes: One-Shot AF for still subjects, and AI Servo AF for moving subjects. (AI is displayed on the LCD panel.

EOS-1D Instructions
Page 69
...-1 (→138) (3) Switch to C.Fn-13-2 (or vice versa). See "Setting a Custom Function" on page 132. (1) Press the < > button and < > button simultaneously. • This is released, it will switch it to the center AF point. • If you can press only the < > button to switch to the registered AF point and...
...-1 (→138) (3) Switch to C.Fn-13-2 (or vice versa). See "Setting a Custom Function" on page 132. (1) Press the < > button and < > button simultaneously. • This is released, it will switch it to the center AF point. • If you can press only the < > button to switch to the registered AF point and...
EOS-1D Instructions
Page 76
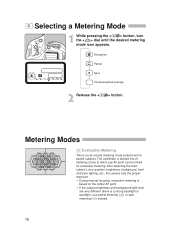
... brightness and background light level are very different (there is an all-around metering mode suited even for evaluative metering. Evaluative Partial Spot Centerweighted average 2 Release the < > button. Metering Modes Evaluative Metering This is a strong backlight or spotlight), use partial metering ( ) or spot metering ( ) instead. 76...
... brightness and background light level are very different (there is an all-around metering mode suited even for evaluative metering. Evaluative Partial Spot Centerweighted average 2 Release the < > button. Metering Modes Evaluative Metering This is a strong backlight or spotlight), use partial metering ( ) or spot metering ( ) instead. 76...
EOS-1D Instructions
Page 82
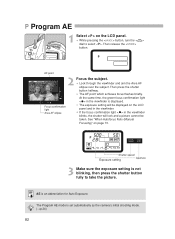
... Exposure. While pressing the < > button, turn the < > dial to take the picture. Shutter speed Exposure setting Aperture 3 Make sure the exposure setting is displayed. Then release the < > button. Then press the shutter button halfway.
... Exposure. While pressing the < > button, turn the < > dial to take the picture. Shutter speed Exposure setting Aperture 3 Make sure the exposure setting is displayed. Then release the < > button. Then press the shutter button halfway.

EOS-1D Instructions
Page 84
... pressing the < > button, turn the < > dial until < > appears on the LCD panel. s The shutter speed and aperture will be displayed. 4 •Take the picture. Then release the < > button. 2 Turn the < > dial to suit the subject brightness. A fast shutter speed can freeze motion, and a slow shutter speed can blur it. ∗ Tv...
... pressing the < > button, turn the < > dial until < > appears on the LCD panel. s The shutter speed and aperture will be displayed. 4 •Take the picture. Then release the < > button. 2 Turn the < > dial to suit the subject brightness. A fast shutter speed can freeze motion, and a slow shutter speed can blur it. ∗ Tv...

EOS-1D Instructions
Page 86
... for both near and far objects (wider depth of the lens focal length (i.e. 1/200 for a 200mm lens), camera shake may cause a blurred picture. 86 Then release the < > button. 2 Turn the < > dial to set the desired aperture and the camera sets the shutter speed automatically to suit the subject brightness. s The shutter...
... for both near and far objects (wider depth of the lens focal length (i.e. 1/200 for a 200mm lens), camera shake may cause a blurred picture. 86 Then release the < > button. 2 Turn the < > dial to set the desired aperture and the camera sets the shutter speed automatically to suit the subject brightness. s The shutter...

EOS-1D Instructions
Page 90
Then release the < > button. 2 Set the < > switch to < >. 3 Turn the < > dial to set the shutter speed and turn the < > dial to set the aperture. • To set ...
Then release the < > button. 2 Set the < > switch to < >. 3 Turn the < > dial to set the shutter speed and turn the < > dial to set the aperture. • To set ...

