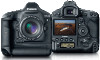
EOS-1D Instructions
Page 6
...any adverse effects from that interference will not occur in a particular installation. Tel No. (516)328-5600 The Mark is a directive conformity mark of the equipment. These limits are designed to the equipment unless otherwise specified in Subject B of the FCC Rules....ceiling lights. · Be aware that may cause undesired operation. EOS-1D This device complies with the instructions, may cause harmful interference to radio communications. Increase the separation between the equipment and receiver. - One Canon Plaza, Lake Success, NY 11042, U.S.A. If this device must be...
...any adverse effects from that interference will not occur in a particular installation. Tel No. (516)328-5600 The Mark is a directive conformity mark of the equipment. These limits are designed to the equipment unless otherwise specified in Subject B of the FCC Rules....ceiling lights. · Be aware that may cause undesired operation. EOS-1D This device complies with the instructions, may cause harmful interference to radio communications. Increase the separation between the equipment and receiver. - One Canon Plaza, Lake Success, NY 11042, U.S.A. If this device must be...
EOS-1D Instructions
Page 15
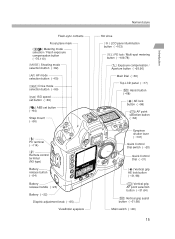
Flash-sync contacts Focal plane mark 〈 〉 Metering mode selection / Flash exposure compensation button (→76,110) 〈 〉 Shooting mode selection button (→82) 〈 〉 AF mode selection ...
Flash-sync contacts Focal plane mark 〈 〉 Metering mode selection / Flash exposure compensation button (→76,110) 〈 〉 Shooting mode selection button (→82) 〈 〉 AF mode selection ...
EOS-1D Instructions
Page 18
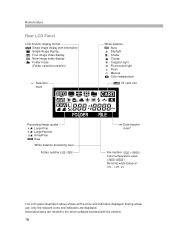
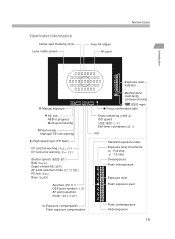
... with information Single image display Four-image index display Nine-image index display Folder mode (Folder selection/creation) Selection mark White balance Auto Daylight Shade Cloudy Tungsten light Fluorescent light Flash Manual Color temperature CF card icon Recording image quality ...Large/Fine Large/Normal Small/Fine Raw White balance bracketing level Folder number ( - ) Date transfer mark* File number ( - ) Color temperature value ( - ) Personal white balance* ( - ) The LCD panel illustration above shows all the icons...
... with information Single image display Four-image index display Nine-image index display Folder mode (Folder selection/creation) Selection mark White balance Auto Daylight Shade Cloudy Tungsten light Fluorescent light Flash Manual Color temperature CF card icon Recording image quality ...Large/Fine Large/Normal Small/Fine Raw White balance bracketing level Folder number ( - ) Date transfer mark* File number ( - ) Color temperature value ( - ) Personal white balance* ( - ) The LCD panel illustration above shows all the icons...
EOS-1D Instructions
Page 19
... lock ( ) Busy ( ) Aperture ( - ) DEP point number ( , ) AF point selection mode ( , , ) Exposure compensation Flash exposure compensation Exposure level indicator Maximum burst count during continuous shooting JPEG mark Focus confirmation light Shots remaining ( - ) ISO speed ( - ,,) Self-timer countdown ( - ) ISO Standard exposure index Exposure level increments : Full stop : 1/3 stop Overexposure Flash overexposure Exposure level...
... lock ( ) Busy ( ) Aperture ( - ) DEP point number ( , ) AF point selection mode ( , , ) Exposure compensation Flash exposure compensation Exposure level indicator Maximum burst count during continuous shooting JPEG mark Focus confirmation light Shots remaining ( - ) ISO speed ( - ,,) Self-timer countdown ( - ) ISO Standard exposure index Exposure level increments : Full stop : 1/3 stop Overexposure Flash overexposure Exposure level...
EOS-1D Instructions
Page 20
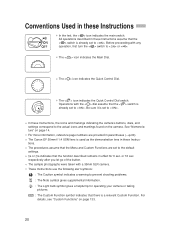
Be sure it is set to < >. • In these Instructions, the icons and markings indicating the camera's buttons, dials, and settings correspond to the actual icons and markings found on page 133. 20 respectively after you let go of the button. • The sample photographs were taken ... any operation, first turn the < > switch to < >. For details, see "Custom Functions" on the camera. Conventions Used in parentheses (→p.00). • The Canon EF 50mm f/1.4 USM lens is already set to < > or < >. • The < > icon indicates the Main Dial. • The < > icon indicates ...
Be sure it is set to < >. • In these Instructions, the icons and markings indicating the camera's buttons, dials, and settings correspond to the actual icons and markings found on page 133. 20 respectively after you let go of the button. • The sample photographs were taken ... any operation, first turn the < > switch to < >. For details, see "Custom Functions" on the camera. Conventions Used in parentheses (→p.00). • The Canon EF 50mm f/1.4 USM lens is already set to < > or < >. • The < > icon indicates the Main Dial. • The < > icon indicates ...
EOS-1D Instructions
Page 54
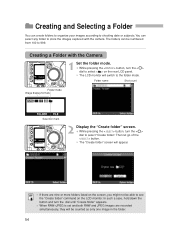
... the < > dial to store the images captured with the Camera 1 •Set the folder mode. Folder name Shot count Folder mode Image display formats Selection mark 2 •Display the "Create folder" screen. While pressing the < > button, turn the < > dial to select < > on the LCD monitor. Then let go of the < > button...
... the < > dial to store the images captured with the Camera 1 •Set the folder mode. Folder name Shot count Folder mode Image display formats Selection mark 2 •Display the "Create folder" screen. While pressing the < > button, turn the < > dial to select < > on the LCD monitor. Then let go of the < > button...

EOS-1D Instructions
Page 79
... Modes Exposure level indicator after taking three spot meter readings 1 32 2 Window 1 Ceiling 3 Wall 4 • While referring to the exposure level indicator's three spot metering marks, you press the < > button to try and take up to eight spot meter readings for one picture.
... Modes Exposure level indicator after taking three spot meter readings 1 32 2 Window 1 Ceiling 3 Wall 4 • While referring to the exposure level indicator's three spot metering marks, you press the < > button to try and take up to eight spot meter readings for one picture.
EOS-1D Instructions
Page 91
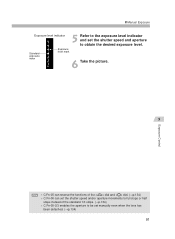
Manual Exposure Exposure level indicator 5 Refer to obtain the desired exposure level. Standard exposure index Exposure level mark 6 Take the picture. 5 Exposure Control C.Fn-05 can reverse the functions of the < > dial and < > dial. (→p.134) •• C.Fn-06 can set the ...
Manual Exposure Exposure level indicator 5 Refer to obtain the desired exposure level. Standard exposure index Exposure level mark 6 Take the picture. 5 Exposure Control C.Fn-05 can reverse the functions of the < > dial and < > dial. (→p.134) •• C.Fn-06 can set the ...
EOS-1D Instructions
Page 116
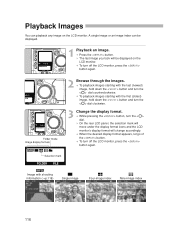
...the < > button again. Folder mode Image display formats 2 •Browse through the images. s On the rear LCD panel, the selection mark will move under the display format icons and the LCD monitor's display format will be displayed. 1 •Playback an image. Press the ...< > button. While pressing the < > button, turn the < > dial clockwise. 3 •Change the display format. Selection mark Image with the first (oldest) image, hold down the < > button and turn the < > dial. Playback Images You can be displayed on the LCD ...
...the < > button again. Folder mode Image display formats 2 •Browse through the images. s On the rear LCD panel, the selection mark will move under the display format icons and the LCD monitor's display format will be displayed. 1 •Playback an image. Press the ...< > button. While pressing the < > button, turn the < > dial clockwise. 3 •Change the display format. Selection mark Image with the first (oldest) image, hold down the < > button and turn the < > dial. Playback Images You can be displayed on the LCD ...
EOS-1D Instructions
Page 117
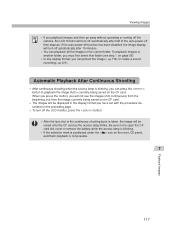
... can press the < > button to open the CF card slot cover or remove the battery while the access lamp is blinking. • If the selection mark is positioned under the < > icon on the preceding page. • To turn off time elapses.
... can press the < > button to open the CF card slot cover or remove the battery while the access lamp is blinking. • If the selection mark is positioned under the < > icon on the preceding page. • To turn off time elapses.
EOS-1D Instructions
Page 127
The mark you to set the menu settings is explained in these Instructions gives just a brief description of the camera's menu settings, Custom Func- The procedure to customize the camera's various settings and functions. 8 Menu Settings On-screen menus enable you see in "Menu Operations." (→p.32, 33) 8 Menu Settings 127 This section explains all of the relevant Custom Function. tions, and Personal Functions.
The mark you to set the menu settings is explained in these Instructions gives just a brief description of the camera's menu settings, Custom Func- The procedure to customize the camera's various settings and functions. 8 Menu Settings On-screen menus enable you see in "Menu Operations." (→p.32, 33) 8 Menu Settings 127 This section explains all of the relevant Custom Function. tions, and Personal Functions.


