Photo Printing Guide
Page 2
... PRO", "MEMORY STICK Duo" and "Memory Stick Pro Duo" are trademarks of Sony Corporation. • "xD-Picture Card" is a trademark of Fuji Photo Film CO., Ltd. • "MultiMediaCard" is a trademark of Infineon Technologies AG. • "SD card" and "miniSD Card" are trademarks of Microsoft...: AC 100-240 V, 50/60 Hz Trademark Notices • "Microsoft" and "Windows" are as computers, monitors, printers, faxes and copiers. Copyright© 2005 CANON INC. It is a trademark of this product meets the ENERGY STAR guidelines for enhancing the communication between digital cameras and...
... PRO", "MEMORY STICK Duo" and "Memory Stick Pro Duo" are trademarks of Sony Corporation. • "xD-Picture Card" is a trademark of Fuji Photo Film CO., Ltd. • "MultiMediaCard" is a trademark of Infineon Technologies AG. • "SD card" and "miniSD Card" are trademarks of Microsoft...: AC 100-240 V, 50/60 Hz Trademark Notices • "Microsoft" and "Windows" are as computers, monitors, printers, faxes and copiers. Copyright© 2005 CANON INC. It is a trademark of this product meets the ENERGY STAR guidelines for enhancing the communication between digital cameras and...
Photo Printing Guide
Page 4
... Properly on the LCD/Cannot See the Display on the LCD..........77 Paper Does Not Feed Properly/Paper Jam 77 Printing is Blurred/Colors are Wrong/White Streaks appear 78 Printed Surface is Scratched or Ink Blots 79 Cannot Print Properly from the Digital Camera 81 Cannot ...Install the Printer Driver 83 Cannot Print Properly through Wireless Communication 84 Appendix ...85 For the Optional Bluetooth Unit Users 85 Specifications ...87 Safety Precautions ...90...
... Properly on the LCD/Cannot See the Display on the LCD..........77 Paper Does Not Feed Properly/Paper Jam 77 Printing is Blurred/Colors are Wrong/White Streaks appear 78 Printed Surface is Scratched or Ink Blots 79 Cannot Print Properly from the Digital Camera 81 Cannot ...Install the Printer Driver 83 Cannot Print Properly through Wireless Communication 84 Appendix ...85 For the Optional Bluetooth Unit Users 85 Specifications ...87 Safety Precautions ...90...

Photo Printing Guide
Page 10
.... For details, contact a Canon service representative. 8 Infrared Port Receives the data sent from a digital camera here. LCD Monitor Displays menus, setting items, and photos for printing. Cover Open Switch Slide to the right to support paper. Printer Parts and Their Functions Printer Parts and Their Functions This ..." on when the memory card is not available to some regions due to the law or the regulations of the printer. Printer „ Front View Cover Open to a digital camera, digital video camcorder or the optional Bluetooth unit*. Direct Print Port Connects the...
.... For details, contact a Canon service representative. 8 Infrared Port Receives the data sent from a digital camera here. LCD Monitor Displays menus, setting items, and photos for printing. Cover Open Switch Slide to the right to support paper. Printer Parts and Their Functions Printer Parts and Their Functions This ..." on when the memory card is not available to some regions due to the law or the regulations of the printer. Printer „ Front View Cover Open to a digital camera, digital video camcorder or the optional Bluetooth unit*. Direct Print Port Connects the...
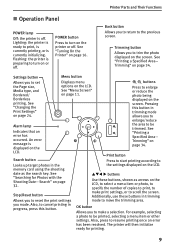
Photo Printing Guide
Page 11
...Reset button make a selection. you to reset the print settings mode to be printed, selecting a menu item or other settings. Lighting: the printer is ready to cancel printing in trimming mode allows you to be trimmed. Displays menu options on page 34. See "Menu Screen" on page... 34. Also, to print, is currently printing, or is currently initializing. For example, selecting a photo to trim the photo displayed on the printer or off . POWER button Press to resume printing once an error has been resolved. Trimming button Allows you to set the Page...
...Reset button make a selection. you to reset the print settings mode to be printed, selecting a menu item or other settings. Lighting: the printer is ready to cancel printing in trimming mode allows you to be trimmed. Displays menu options on page 34. See "Menu Screen" on page... 34. Also, to print, is currently printing, or is currently initializing. For example, selecting a photo to trim the photo displayed on the printer or off . POWER button Press to resume printing once an error has been resolved. Trimming button Allows you to set the Page...

Photo Printing Guide
Page 13
... the menu screen. Refer to the following menu list to print each menu. Print studio* Layout print Sticker print Print all photos Photo Index print Color balance DPOF print You can specify how many copies to access functions in the memory card on the LCD and print them at...various print functions to Print for Each Photograph-Photo Print" on a sticker or printing an index of all photos. Menu Photo gallery* Photo print* You can view the photos in each photo and print them . See "Print Menus in Print Studio" on page 28. Printer Parts and Their Functions Menu Screen Press the...
... the menu screen. Refer to the following menu list to print each menu. Print studio* Layout print Sticker print Print all photos Photo Index print Color balance DPOF print You can specify how many copies to access functions in the memory card on the LCD and print them at...various print functions to Print for Each Photograph-Photo Print" on a sticker or printing an index of all photos. Menu Photo gallery* Photo print* You can view the photos in each photo and print them . See "Print Menus in Print Studio" on page 28. Printer Parts and Their Functions Menu Screen Press the...

Photo Printing Guide
Page 15
... "DPOF print" on page 41. Layout print Prints the specified photo in Print Studio Print studio provides you with Adjusted Color Balance-Color Balance" on page 41. See "Print all photos" on page 38. See "Printing with the following print menus. Printer Parts and Their Functions „ Print Menus in the specified layout. Sticker print...
... "DPOF print" on page 41. Layout print Prints the specified photo in Print Studio Print studio provides you with Adjusted Color Balance-Color Balance" on page 41. See "Print all photos" on page 38. See "Printing with the following print menus. Printer Parts and Their Functions „ Print Menus in the specified layout. Sticker print...

Photo Printing Guide
Page 16
... See "Print Head Cleaning" on the printing surface." Deep cleaning If print quality does not improve after standard head cleaning, use when printing a photo from a Mobile Phone or a PDA" on page 70. Device settings Displays the setting items below . See "Setting the Page Size, Media Type... Printing from a device via an infrared or Bluetooth communication. Head alignment print Prints the current settings of the sheet/The roller inside the printer is extremely dirty" on page 80. See "Printing a current setting of the Print Head position" on page 51. 14 Roller cleaning...
... See "Print Head Cleaning" on the printing surface." Deep cleaning If print quality does not improve after standard head cleaning, use when printing a photo from a Mobile Phone or a PDA" on page 70. Device settings Displays the setting items below . See "Setting the Page Size, Media Type... Printing from a device via an infrared or Bluetooth communication. Head alignment print Prints the current settings of the sheet/The roller inside the printer is extremely dirty" on page 80. See "Printing a current setting of the Print Head position" on page 51. 14 Roller cleaning...
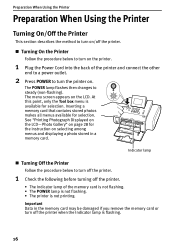
Photo Printing Guide
Page 18
...changes to turn the printer on. Preparation When Using the Printer Preparation When Using the Printer Turning On/Off the Printer This section describes the method to turn on/off the printer when the Indicator lamp is flashing. 16 See "Printing Photograph Displayed on the LCD-Photo Gallery" on page 28...among menus and displaying a photo stored in the memory card may be damaged if you remove the memory card or turn off the printer. „ Turning On the Printer Follow the procedure below to turn off the printer. 1 Check the following before turning off the printer. • The Indicator ...
...changes to turn the printer on. Preparation When Using the Printer Preparation When Using the Printer Turning On/Off the Printer This section describes the method to turn on/off the printer when the Indicator lamp is flashing. 16 See "Printing Photograph Displayed on the LCD-Photo Gallery" on page 28...among menus and displaying a photo stored in the memory card may be damaged if you remove the memory card or turn off the printer. „ Turning On the Printer Follow the procedure below to turn off the printer. 1 Check the following before turning off the printer. • The Indicator ...

Photo Printing Guide
Page 20
... the digital camera, refer to your digital camera user's manual. • Use the digital camera to format a memory card. Preparation When Using the Printer Important • This printer supports images taken with a camera compatible with computer-specific formats. • Images edited on the computer may not be damaged. For types of memory... compatible with the Design rules for Camera File system, CIFF, Exif2.21 or earlier, JFIF, TIFF (Exif2.21 compliant) and DPOF (Ver. 1.00 compliant). • Photos stored in improper printing. 18
... the digital camera, refer to your digital camera user's manual. • Use the digital camera to format a memory card. Preparation When Using the Printer Important • This printer supports images taken with a camera compatible with computer-specific formats. • Images edited on the computer may not be damaged. For types of memory... compatible with the Design rules for Camera File system, CIFF, Exif2.21 or earlier, JFIF, TIFF (Exif2.21 compliant) and DPOF (Ver. 1.00 compliant). • Photos stored in improper printing. 18

Photo Printing Guide
Page 22
... or 17 lb) • Paper that the Indicator lamp is too thick* (more than 105 gsm or 28 lb) * non-Canon brand paper • Picture postcards • Postcards with an affixed photo or sticker • Any type of paper with your computer, follow the instructions for removal of the memory card from... of paper. Using such paper will not only produce unsatisfactory results, but can damage the data stored in the memory card. Preparation When Using the Printer „ Removing a Memory Card Note If you use the printer connected to your fingers to remove the memory card.
... or 17 lb) • Paper that the Indicator lamp is too thick* (more than 105 gsm or 28 lb) * non-Canon brand paper • Picture postcards • Postcards with an affixed photo or sticker • Any type of paper with your computer, follow the instructions for removal of the memory card from... of paper. Using such paper will not only produce unsatisfactory results, but can damage the data stored in the memory card. Preparation When Using the Printer „ Removing a Memory Card Note If you use the printer connected to your fingers to remove the memory card.
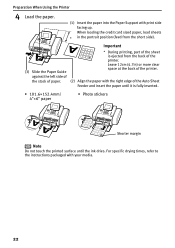
Photo Printing Guide
Page 24
... of the sheet is fully inserted. • 101.6×152.4mm/ 4"×6" paper • Photo stickers Shorter margin Note Do not touch the printed surface until the ink dries. Preparation When Using the Printer 4 Load the paper. (1) Insert the paper into the Paper Support with your media. 22 Leave 12cm... (4.7in) or more clear space at the back of the printer. (2) Align the paper with the right edge of the printer. For specific drying times, refer to the instructions packaged with print side facing up. When loading the credit card ...
... of the sheet is fully inserted. • 101.6×152.4mm/ 4"×6" paper • Photo stickers Shorter margin Note Do not touch the printed surface until the ink dries. Preparation When Using the Printer 4 Load the paper. (1) Insert the paper into the Paper Support with your media. 22 Leave 12cm... (4.7in) or more clear space at the back of the printer. (2) Align the paper with the right edge of the printer. For specific drying times, refer to the instructions packaged with print side facing up. When loading the credit card ...
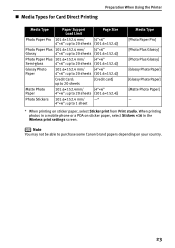
Photo Printing Guide
Page 25
... „ Media Types for Card Direct Printing Preparation When Using the Printer Media Type Paper Support Load Limit Page Size Photo Paper Pro 101.6×152.4 mm/ [4"×6" 4"×6": up to 20 sheets (101.6×152.4)] Photo Paper Plus 101.6×152.4 mm/ [4"×6" Glossy 4"×6": ....4)] Credit Card: up to 20 sheets [Credit card] Matte Photo Paper 101.6×152.4mm/ [4"×6" 4"×6": up to 20 sheets (101.6×152.4)] Photo Stickers 101.6×152.4 mm/ -* 4"×6": up to purchase some Canon brand papers depending on sticker paper, select Stickers ×16 ...
... „ Media Types for Card Direct Printing Preparation When Using the Printer Media Type Paper Support Load Limit Page Size Photo Paper Pro 101.6×152.4 mm/ [4"×6" 4"×6": up to 20 sheets (101.6×152.4)] Photo Paper Plus 101.6×152.4 mm/ [4"×6" Glossy 4"×6": ....4)] Credit Card: up to 20 sheets [Credit card] Matte Photo Paper 101.6×152.4mm/ [4"×6" 4"×6": up to 20 sheets (101.6×152.4)] Photo Stickers 101.6×152.4 mm/ -* 4"×6": up to purchase some Canon brand papers depending on sticker paper, select Stickers ×16 ...

Photo Printing Guide
Page 27
... and then press the OK button. 5 Use the ST buttons to speed over speed when printing. 25 Press the Settings button. Note You can print photos applying the saved print settings when you select Load settings. „ Print Setting Items The Settings tab contains the following setting items. Tab1 • Page... OK button. High Gives priority to Sepia here. 5 Complete setting. 4 Display the selected item. Change to quality over quality when printing. Preparation When Using the Printer Press the W X buttons to display the selected item.
... and then press the OK button. 5 Use the ST buttons to speed over speed when printing. 25 Press the Settings button. Note You can print photos applying the saved print settings when you select Load settings. „ Print Setting Items The Settings tab contains the following setting items. Tab1 • Page... OK button. High Gives priority to Sepia here. 5 Complete setting. 4 Display the selected item. Change to quality over quality when printing. Preparation When Using the Printer Press the W X buttons to display the selected item.

Photo Printing Guide
Page 28
...the date the photo was taken. Print date & file no . Print file...on photos. only .....Prints file numbers (DCF numbers) on photos. Print date only.........Prints the date the photo was ...photo ON/Vivid photo OFF If you select Vivid photo ON, Vivid photo function (Greens and blue are printed more brightly) is used. • Photo optimizer pro ON/Photo optimizer pro OFF If you select Photo optimizer pro ON, Photo optimizer pro function automatically corrects the image brightness and color... and prints darkened faces brighter when printing photos taken against a bright light. •...
...the date the photo was taken. Print date & file no . Print file...on photos. only .....Prints file numbers (DCF numbers) on photos. Print date only.........Prints the date the photo was ...photo ON/Vivid photo OFF If you select Vivid photo ON, Vivid photo function (Greens and blue are printed more brightly) is used. • Photo optimizer pro ON/Photo optimizer pro OFF If you select Photo optimizer pro ON, Photo optimizer pro function automatically corrects the image brightness and color... and prints darkened faces brighter when printing photos taken against a bright light. •...

Photo Printing Guide
Page 29
... tones only. Preparation When Using the Printer • Brightness Adjusts the brightness of a printed image. Prints a photo in the manner of a printed image. Contrast +2/Contrast +1/Contrast standard/Contrast -1/Contrast -2 • Color hue Adjusts the color hue of an illustration. 27 Color hue red +2/Color hue red +1/Color hue original/Color hue yellow +1/ Color hue yellow +2 • Effect No effects...
... tones only. Preparation When Using the Printer • Brightness Adjusts the brightness of a printed image. Prints a photo in the manner of a printed image. Contrast +2/Contrast +1/Contrast standard/Contrast -1/Contrast -2 • Color hue Adjusts the color hue of an illustration. 27 Color hue red +2/Color hue red +1/Color hue original/Color hue yellow +1/ Color hue yellow +2 • Effect No effects...

Photo Printing Guide
Page 30
... page 16. (2) Load the paper. All menu options can print your favorite photos one by one, or display a list of the photos and specify the number of copies to print for printing: (1) Turn on the printer. Note If you took and stored in the memory card on the LCD and print them. 1 Prepare... LCD. Tool box is inserted into the Card Slot. Printing from the Memory Card Printing from the Memory Card Printing Photograph You can print the photos you leave the printer more than five minutes without using any button on the operation panel, the LCD goes into sleep mode automatically.
... page 16. (2) Load the paper. All menu options can print your favorite photos one by one, or display a list of the photos and specify the number of copies to print for printing: (1) Turn on the printer. Note If you took and stored in the memory card on the LCD and print them. 1 Prepare... LCD. Tool box is inserted into the Card Slot. Printing from the Memory Card Printing from the Memory Card Printing Photograph You can print the photos you leave the printer more than five minutes without using any button on the operation panel, the LCD goes into sleep mode automatically.

Photo Printing Guide
Page 32
... type and Print quality. To change any of copies to print. See "To Change Print Setting" on the operation panel. See "Preparation When Using the Printer" on page 16. 2 Select Photo print. (1) Press the Menu button. (2) Use the W X buttons to print. The number of copies to print for Each Photograph...
... type and Print quality. To change any of copies to print. See "To Change Print Setting" on the operation panel. See "Preparation When Using the Printer" on page 16. 2 Select Photo print. (1) Press the Menu button. (2) Use the W X buttons to print. The number of copies to print for Each Photograph...

Photo Printing Guide
Page 36
... Area-Trimming You can print a specified area of the photo displayed on the operation panel. Note Please trim the photo after trimming the photo, the trimmed selection will be lost. 1 Select the photo to print. • Trimming button: you can rotate ...the trimming area. • STW X buttons: you can move the trimming area. • buttons: you change the settings after specifying Page size, Media type, and Borderless/Bordered on photographs that have been trimmed. • Once the trimmed area is displayed. The printer...
... Area-Trimming You can print a specified area of the photo displayed on the operation panel. Note Please trim the photo after trimming the photo, the trimmed selection will be lost. 1 Select the photo to print. • Trimming button: you can rotate ...the trimming area. • STW X buttons: you can move the trimming area. • buttons: you change the settings after specifying Page size, Media type, and Borderless/Bordered on photographs that have been trimmed. • Once the trimmed area is displayed. The printer...

Photo Printing Guide
Page 37
See "Preparation When Using the Printer" on One Sheet of Media-Layout Print You can print the specified photo in the specified layout (Borderless or Bordered ×2/×4/×8/Half, borderless/Half, bordered/Half, borderless (w/ lines)/Half, bordered (w/lines)/Album (4/right)/...displayed. 3 Specify the layout. (1) Use the W X buttons to select the layout. (2) Press the OK button. Printing from the Memory Card „ Printing Multiple Photos on page 16. 2 Select Layout print. (1) Press the Menu button. (2) Use the W X buttons to select Print studio and then press the OK button. Half...
See "Preparation When Using the Printer" on One Sheet of Media-Layout Print You can print the specified photo in the specified layout (Borderless or Bordered ×2/×4/×8/Half, borderless/Half, bordered/Half, borderless (w/ lines)/Half, bordered (w/lines)/Album (4/right)/...displayed. 3 Specify the layout. (1) Use the W X buttons to select the layout. (2) Press the OK button. Printing from the Memory Card „ Printing Multiple Photos on page 16. 2 Select Layout print. (1) Press the Menu button. (2) Use the W X buttons to select Print studio and then press the OK button. Half...

Photo Printing Guide
Page 39
... press the OK button. The photo selection screen is displayed. 4 Select the photo to print. (1) Use the W X buttons to select the photo you want to print. Stickers ×16 See "Preparation When Using the Printer" on page 34. 37 The screen for Photos with the Shooting Date-Search".... (2) Use the W X buttons to specify the layout. (2) Press the OK button. Note You can do... • You can print your favorite photo on the Canon Photo Stickers. 1 Prepare to print. (2) Press the OK button. The Print studio menu is displayed. 3 Specify the layout. (1) Use the W X buttons...
... press the OK button. The photo selection screen is displayed. 4 Select the photo to print. (1) Use the W X buttons to select the photo you want to print. Stickers ×16 See "Preparation When Using the Printer" on page 34. 37 The screen for Photos with the Shooting Date-Search".... (2) Use the W X buttons to specify the layout. (2) Press the OK button. Note You can do... • You can print your favorite photo on the Canon Photo Stickers. 1 Prepare to print. (2) Press the OK button. The Print studio menu is displayed. 3 Specify the layout. (1) Use the W X buttons...


