Instruction Manual
Page 5
... Function Effectively 25 Setting the Custom Functions 26 o Shooting with Remote Control frisizz) 29 Replacing the Remote Control Battery 31 Imprinting the Date and Time eirrgazh 32 Setting the Date and Time 32 Imprinting Captions iricracra 34 Selecting the Language 35 31Additional Information Troubleshooting 36 Specifications 38 Please note that these instructions...
... Function Effectively 25 Setting the Custom Functions 26 o Shooting with Remote Control frisizz) 29 Replacing the Remote Control Battery 31 Imprinting the Date and Time eirrgazh 32 Setting the Date and Time 32 Imprinting Captions iricracra 34 Selecting the Language 35 31Additional Information Troubleshooting 36 Specifications 38 Please note that these instructions...
Instruction Manual
Page 9
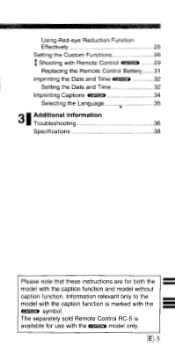
Flash ON (Fires for all shots) 15 Flash AUTO 11 Manual exposure compensation (lE Caption imprinting 1 Date and time imprinting E -9 CAPTION Nomenclature 0fOt--A1,C4UA.1PT.T50I_Oq84N>"')8DoA:T8Er8i V01-ii0=e I :§) CO) Cti Date and time, caption number or Custom Function number 2 Self-timer/Remote control 3 Frame counter 4 Film mark 5 Battery level indicator (-413) 6 Night portrait (Slow-sync) 7 Red-eye reduction mark 8 ® Flash OFF (Never fires) $.
Flash ON (Fires for all shots) 15 Flash AUTO 11 Manual exposure compensation (lE Caption imprinting 1 Date and time imprinting E -9 CAPTION Nomenclature 0fOt--A1,C4UA.1PT.T50I_Oq84N>"')8DoA:T8Er8i V01-ii0=e I :§) CO) Cti Date and time, caption number or Custom Function number 2 Self-timer/Remote control 3 Frame counter 4 Film mark 5 Battery level indicator (-413) 6 Night portrait (Slow-sync) 7 Red-eye reduction mark 8 ® Flash OFF (Never fires) $.

Instruction Manual
Page 10
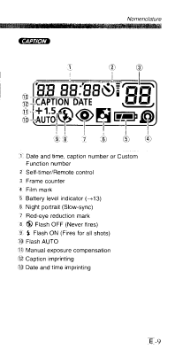
Set the date and time. (->33) argars t-10 Load a new battery. • Pull the tape to remove the battery. • Align the + - terminals correctly and insert the battery - end first. ▪ appears on the LCD panel blinks. Close the battery cover. • Push the cover closed until you hear a clicking sound. 4The date display " " on the LCD panel. Loading the Battery IIIIIP•••=7111111 Applicable Battery: One lithium battery tCR2) I Open the battery cover.
Set the date and time. (->33) argars t-10 Load a new battery. • Pull the tape to remove the battery. • Align the + - terminals correctly and insert the battery - end first. ▪ appears on the LCD panel blinks. Close the battery cover. • Push the cover closed until you hear a clicking sound. 4The date display " " on the LCD panel. Loading the Battery IIIIIP•••=7111111 Applicable Battery: One lithium battery tCR2) I Open the battery cover.

Instruction Manual
Page 32
Setting the Date and Time When you replace the battery or travel to the different time zone, use the following procedure to -shoot mode. • Date/time etc. Imprinting the Date and Time izaiuza MIN button to return to ready-to set or adjust the date and time settings. 0-32 M The "02" in the year display indicates the last two digits in the year 2002. imprinted here.
Setting the Date and Time When you replace the battery or travel to the different time zone, use the following procedure to -shoot mode. • Date/time etc. Imprinting the Date and Time izaiuza MIN button to return to ready-to set or adjust the date and time settings. 0-32 M The "02" in the year display indicates the last two digits in the year 2002. imprinted here.

Instruction Manual
Page 33
.... E -33 Setting the Time E4 C47: n ,a, TE 64) 4 Repeat 2 and (2) above to zero. 5 Press the an button and once ":" stops blinking, date and time setting is pressed, the number increases by one. If kept pressed, the number increases continuously. Press the ' button to return to set mode. 2 ...button is completed. Setting position cycles through in the order year-monthday-hour-minute-(:). 12)Press the Blo button to ready-toshoot mode. Setting the Date ICO2A3P F9- 21 , 117D1>71-:ELI F ., 12;67En 1 Set the date and time. 1, Press the IlEl button for more than 2 seconds for...
.... E -33 Setting the Time E4 C47: n ,a, TE 64) 4 Repeat 2 and (2) above to zero. 5 Press the an button and once ":" stops blinking, date and time setting is pressed, the number increases by one. If kept pressed, the number increases continuously. Press the ' button to return to set mode. 2 ...button is completed. Setting position cycles through in the order year-monthday-hour-minute-(:). 12)Press the Blo button to ready-toshoot mode. Setting the Date ICO2A3P F9- 21 , 117D1>71-:ELI F ., 12;67En 1 Set the date and time. 1, Press the IlEl button for more than 2 seconds for...

Instruction Manual
Page 34
... (no data imprinted) E-1 • I LOVE YOU • E-2 THANK YOU! CF • The caption number changes each time you want to imprint a caption only, set the date and time to -shoot mode. CAPTION, on the LCD panel. Select the Caption mode. • Press the [MODE) button until CAPTION appears on the LCD...
... (no data imprinted) E-1 • I LOVE YOU • E-2 THANK YOU! CF • The caption number changes each time you want to imprint a caption only, set the date and time to -shoot mode. CAPTION, on the LCD panel. Select the Caption mode. • Press the [MODE) button until CAPTION appears on the LCD...

Instruction Manual
Page 37
The date/time or caption imprinted on the photos is difficult to read. • Compose your shots so that the background where the data is imprinted is dark. (-32) "H" is displayed on the last frame. • Use 12-, 20-, 24- When the "H" disappears from the camera. or 36exposure film with the DXcode. Problem Solution I can't imprint the date/time or a caption on the LCD panel. • Remove the battery from the LCD panel, load the battery again. (-10) rEi-37
The date/time or caption imprinted on the photos is difficult to read. • Compose your shots so that the background where the data is imprinted is dark. (-32) "H" is displayed on the last frame. • Use 12-, 20-, 24- When the "H" disappears from the camera. or 36exposure film with the DXcode. Problem Solution I can't imprint the date/time or a caption on the LCD panel. • Remove the battery from the LCD panel, load the battery again. (-10) rEi-37

Instruction Manual
Page 39
...-ex. AIAF (Dual AF) Function AIAF (Artificial Intelligence Auto-focus) has a wide focusing area and is based on Canon's testing standards. • Specifications and physical appearance are subject to change without battery) CAPTION Automatic Date: Auto calendar to 13.2 ft.) Flash Recycling Time: Approx. 6 seconds (with 50% flash use) Dimensions (W x H x D): 105 x 58...
...-ex. AIAF (Dual AF) Function AIAF (Artificial Intelligence Auto-focus) has a wide focusing area and is based on Canon's testing standards. • Specifications and physical appearance are subject to change without battery) CAPTION Automatic Date: Auto calendar to 13.2 ft.) Flash Recycling Time: Approx. 6 seconds (with 50% flash use) Dimensions (W x H x D): 105 x 58...


