Instruction Manual
Page 2
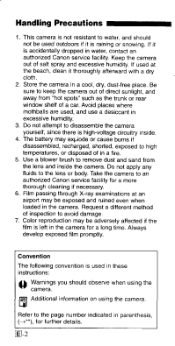
... if necessary. 6. Request a different method of a car. Additional information on using the camera. Be sure to disassemble the camera yourself, since there is accidentally dropped in a cool, dry, dust-free place. Take the camera to water, and should observe when using the camera. If it thoroughly afterward with a dry cloth. 2. Store the camera in water, contact an authorized Canon service facility. Do not attempt...
... if necessary. 6. Request a different method of a car. Additional information on using the camera. Be sure to disassemble the camera yourself, since there is accidentally dropped in a cool, dry, dust-free place. Take the camera to water, and should observe when using the camera. If it thoroughly afterward with a dry cloth. 2. Store the camera in water, contact an authorized Canon service facility. Do not attempt...

Instruction Manual
Page 4
... Operations Loading the Battery 10 Loading the Film 11 Removing the Film 12 Rewinding the Film in Mid-roll 12 Turning the Power On 13 Checking the Battery Level 13 Taking Pictures in Flash AUTO Mode 14 Shutter Button 15 Green/Orange Lamps 16 Using Focus Lock 17 Close-up Photography 18 Subjects Difficult to Autofocus 19 Holding the Camera 19 (.!•_) Shooting with Self-timer 20 2 Advanced Operations S(0) Changing the Flash Mode 22 AUTOS Flash AUTO 23 AUX4(01) Flash AUTO with Red-eye Reduction 23 Flash...
... Operations Loading the Battery 10 Loading the Film 11 Removing the Film 12 Rewinding the Film in Mid-roll 12 Turning the Power On 13 Checking the Battery Level 13 Taking Pictures in Flash AUTO Mode 14 Shutter Button 15 Green/Orange Lamps 16 Using Focus Lock 17 Close-up Photography 18 Subjects Difficult to Autofocus 19 Holding the Camera 19 (.!•_) Shooting with Self-timer 20 2 Advanced Operations S(0) Changing the Flash Mode 22 AUTOS Flash AUTO 23 AUX4(01) Flash AUTO with Red-eye Reduction 23 Flash...
Instruction Manual
Page 5
... 26 o Shooting with Remote Control frisizz) 29 Replacing the Remote Control Battery 31 Imprinting the Date and Time eirrgazh 32 Setting the Date and Time 32 Imprinting Captions iricracra 34 Selecting the Language 35 31Additional Information Troubleshooting 36 Specifications 38 Please note that these instructions are for use with the caption function and model without caption function. IMMO MINIM Information relevant only to the model with the caption function is...
... 26 o Shooting with Remote Control frisizz) 29 Replacing the Remote Control Battery 31 Imprinting the Date and Time eirrgazh 32 Setting the Date and Time 32 Imprinting Captions iricracra 34 Selecting the Language 35 31Additional Information Troubleshooting 36 Specifications 38 Please note that these instructions are for use with the caption function and model without caption function. IMMO MINIM Information relevant only to the model with the caption function is...

Instruction Manual
Page 6
... abbreviation for Auto Focus. Im CD Shutter button (-O4) 2 vo Self-timer/Remote control IZIZI13 button (-s20, 28, 29) ® AF* sensor/Metering window (-4-) LCD panel (-->8, 9) (5) Viewfinder window ® (MODE) Mode button (-432, 34) arruna C.7-> q 6 Flash mode button ( 22, 28, 32-34) C) Flash (.9) Back cover release lever Press this lever down to open the back cover. Lens Ii Red-eye reduction/Self-timer lamp/AF*-assist beam emitter (->20, 23, 25, 30) In dark places...
... abbreviation for Auto Focus. Im CD Shutter button (-O4) 2 vo Self-timer/Remote control IZIZI13 button (-s20, 28, 29) ® AF* sensor/Metering window (-4-) LCD panel (-->8, 9) (5) Viewfinder window ® (MODE) Mode button (-432, 34) arruna C.7-> q 6 Flash mode button ( 22, 28, 32-34) C) Flash (.9) Back cover release lever Press this lever down to open the back cover. Lens Ii Red-eye reduction/Self-timer lamp/AF*-assist beam emitter (->20, 23, 25, 30) In dark places...

Instruction Manual
Page 7
OO 0 14 Viewfinder (14 Dioptric adjustment knob Turn this pin to adjust the focus when you cannot see the viewfinder image clearly. 176. Orange lamp (-16) 10 Green lamp (-*16) 17 Main switch ® 14 Zoom-out (wide-angle)/ Selection eircurm button (-*14, 33, 35) [41] Zoom-in (telephoto)/Set aff27:13 button (-*14, 28, 32-35) 4 Film check window Strap mount Battery compartment cover (-*10) 4 Strap ,Z4 Strap buckle pin Use this knob to push the MD button. Mid-roll rewind button (-*12) 1 :20 Tripod socket Attaching the Strap it" 2 E-7
OO 0 14 Viewfinder (14 Dioptric adjustment knob Turn this pin to adjust the focus when you cannot see the viewfinder image clearly. 176. Orange lamp (-16) 10 Green lamp (-*16) 17 Main switch ® 14 Zoom-out (wide-angle)/ Selection eircurm button (-*14, 33, 35) [41] Zoom-in (telephoto)/Set aff27:13 button (-*14, 28, 32-35) 4 Film check window Strap mount Battery compartment cover (-*10) 4 Strap ,Z4 Strap buckle pin Use this knob to push the MD button. Mid-roll rewind button (-*12) 1 :20 Tripod socket Attaching the Strap it" 2 E-7
Instruction Manual
Page 9
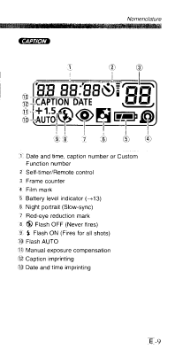
CAPTION Nomenclature 0fOt--A1,C4UA.1PT.T50I_Oq84N>"')8DoA:T8Er8i V01-ii0=e I :§) CO) Cti Date and time, caption number or Custom Function number 2 Self-timer/Remote control 3 Frame counter 4 Film mark 5 Battery level indicator (-413) 6 Night portrait (Slow-sync) 7 Red-eye reduction mark 8 ® Flash OFF (Never fires) $. Flash ON (Fires for all shots) 15 Flash AUTO 11 Manual exposure compensation (lE Caption imprinting 1 Date and time imprinting E -9
CAPTION Nomenclature 0fOt--A1,C4UA.1PT.T50I_Oq84N>"')8DoA:T8Er8i V01-ii0=e I :§) CO) Cti Date and time, caption number or Custom Function number 2 Self-timer/Remote control 3 Frame counter 4 Film mark 5 Battery level indicator (-413) 6 Night portrait (Slow-sync) 7 Red-eye reduction mark 8 ® Flash OFF (Never fires) $. Flash ON (Fires for all shots) 15 Flash AUTO 11 Manual exposure compensation (lE Caption imprinting 1 Date and time imprinting E -9

Instruction Manual
Page 12
... blinks, open the back cover and remove the film. • Loading the Film „A„..gignitgureaminindiEnliiitiffli A film speed of ISO 25, 50, 100, 200, 400, 800, 1600 and 3200. Q • The film rewinds automatically when it into the film compartment, close the back cover and press the shutter button once or twice. • For slide (reversal) film, you can use DXcoded film speeds of ISO 400 is recommended. • The film speed...
... blinks, open the back cover and remove the film. • Loading the Film „A„..gignitgureaminindiEnliiitiffli A film speed of ISO 25, 50, 100, 200, 400, 800, 1600 and 3200. Q • The film rewinds automatically when it into the film compartment, close the back cover and press the shutter button once or twice. • For slide (reversal) film, you can use DXcoded film speeds of ISO 400 is recommended. • The film speed...
Instruction Manual
Page 13
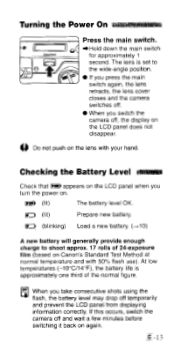
...; When you switch the camera off temporarily and prevent the LCD panel from displaying information correctly. The lens is approximately one third of 24-exposure film (based on . (lit) The battery level OK. At low temperatures (-10°C/14°F), the battery life is set to shoot approx. 17 rolls of the normal figure. 1]il When you turn the power on Canon's Standard...
...; When you switch the camera off temporarily and prevent the LCD panel from displaying information correctly. The lens is approximately one third of 24-exposure film (based on . (lit) The battery level OK. At low temperatures (-10°C/14°F), the battery life is set to shoot approx. 17 rolls of the normal figure. 1]il When you turn the power on Canon's Standard...

Instruction Manual
Page 14
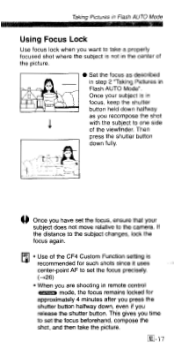
.... • Pressing the L button zooms in low light or backlit conditions. Taking Pictures in Flash AUTO Mode MINI As long as the subject is in focus, the green lamp lights. (-416) 4When the flash fires automatically, the orange lamp lights. (-u16) • Keep the shutter button pressed halfway (Focus Lock). Wide area AF frame el' Decide on the size of your subject and lightly press the shutter button halfway down (press...
.... • Pressing the L button zooms in low light or backlit conditions. Taking Pictures in Flash AUTO Mode MINI As long as the subject is in focus, the green lamp lights. (-416) 4When the flash fires automatically, the orange lamp lights. (-u16) • Keep the shutter button pressed halfway (Focus Lock). Wide area AF frame el' Decide on the size of your subject and lightly press the shutter button halfway down (press...

Instruction Manual
Page 15
... focus and exposure. In general, you hear the sound of the film winding on, which indicates that the shot has been taken. Lightly press the shutter button halfway * (press 4 lightly) to wide-angle position. 41 Shutter Button The shutter button is a two-stage switch. E -15 If (-) 3 Compose the shot and take the picture. M If the lens is left extended in the telephoto position and is not used...
... focus and exposure. In general, you hear the sound of the film winding on, which indicates that the shot has been taken. Lightly press the shutter button halfway * (press 4 lightly) to wide-angle position. 41 Shutter Button The shutter button is a two-stage switch. E -15 If (-) 3 Compose the shot and take the picture. M If the lens is left extended in the telephoto position and is not used...
Instruction Manual
Page 17
... are shooting in remote control MST) mode, the focus remains locked for approximately 4 minutes after you press the shutter button halfway down, even if you recompose the shot with the subject to the camera. Once your subject does not move relative to one side of the picture. • Set the focus as you release the shutter button. Taking Pictures in Flash AUTO Mode Using Focus Lock Use focus lock when you have set the focus, ensure...
... are shooting in remote control MST) mode, the focus remains locked for approximately 4 minutes after you press the shutter button halfway down, even if you recompose the shot with the subject to the camera. Once your subject does not move relative to one side of the picture. • Set the focus as you release the shutter button. Taking Pictures in Flash AUTO Mode Using Focus Lock Use focus lock when you have set the focus, ensure...
Instruction Manual
Page 19
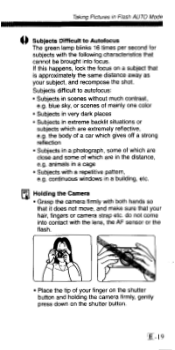
... on the shutter button. do not come into focus. Taking Pictures in Flash AUTO Mode Subjects Difficult to autofocus: • Subjects in scenes without much contrast, e.g. the body of a car which gives off a strong reflection Subjects in a photograph, some of which are close and some of your hair, fingers or camera strap etc. Subjects difficult to Autofocus The green lamp blinks 16 times per...
... on the shutter button. do not come into focus. Taking Pictures in Flash AUTO Mode Subjects Difficult to autofocus: • Subjects in scenes without much contrast, e.g. the body of a car which gives off a strong reflection Subjects in a photograph, some of which are close and some of your hair, fingers or camera strap etc. Subjects difficult to Autofocus The green lamp blinks 16 times per...

Instruction Manual
Page 20
... self-timer mode. • Press the tl!!') button. .16_,) appears on the LCD panel. -The shutter is cancelled. C), ~' Compose the picture and press the shutter button. ▪ The red-eye reduction lamp blinks once a second and a countdown seconds remaining before the photo is taken is displayed on the LCD panel. • If you are some distance from the camera. c "Th_ 6)tallels AUTO Set...
... self-timer mode. • Press the tl!!') button. .16_,) appears on the LCD panel. -The shutter is cancelled. C), ~' Compose the picture and press the shutter button. ▪ The red-eye reduction lamp blinks once a second and a countdown seconds remaining before the photo is taken is displayed on the LCD panel. • If you are some distance from the camera. c "Th_ 6)tallels AUTO Set...
Instruction Manual
Page 21
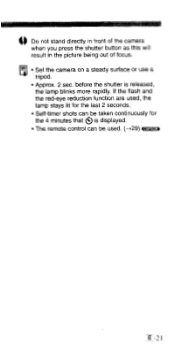
before the shutter is displayed. • The remote control can be used , the lamp stays lit for the last 2 seconds. • Self-timer shots can be taken continuously for the 4 minutes that is released, the lamp blinks more rapidly. If the flash and the red-eye reduction function are used . (-29) E -21 Aginfagegl ime Do not stand directly in front of the camera when you press the shutter button as this will result in the picture being out of focus. • Set the camera on a steady surface or use a tripod. • Approx. 2 sec.
before the shutter is displayed. • The remote control can be used , the lamp stays lit for the last 2 seconds. • Self-timer shots can be taken continuously for the 4 minutes that is released, the lamp blinks more rapidly. If the flash and the red-eye reduction function are used . (-29) E -21 Aginfagegl ime Do not stand directly in front of the camera when you press the shutter button as this will result in the picture being out of focus. • Set the camera on a steady surface or use a tripod. • Approx. 2 sec.
Instruction Manual
Page 23
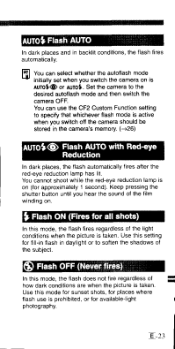
... the shutter button until you switch off the camera should be stored in the camera's memory. (-26) AUTO*C> Flash AUTO with Red-eye Reduction In dark places, the flash automatically fires after the red-eye reduction lamp has lit. Use this mode, the flash does not fire regardless of how dark conditions are when the picture is active when you hear the sound of the film winding...
... the shutter button until you switch off the camera should be stored in the camera's memory. (-26) AUTO*C> Flash AUTO with Red-eye Reduction In dark places, the flash automatically fires after the red-eye reduction lamp has lit. Use this mode, the flash does not fire regardless of how dark conditions are when the picture is active when you hear the sound of the film winding...

Instruction Manual
Page 24
... manual exposure compensation is also optional. • The effects of the film winding on. • The red-eye reduction function operates. • In some conditions, AUT04® may be difficult to see on prints from color print film. +1.5® Exposure Compensation You can use this reason, it is best to take the picture in both vo>K1 and AuT4C> modes...
... manual exposure compensation is also optional. • The effects of the film winding on. • The red-eye reduction function operates. • In some conditions, AUT04® may be difficult to see on prints from color print film. +1.5® Exposure Compensation You can use this reason, it is best to take the picture in both vo>K1 and AuT4C> modes...

Instruction Manual
Page 27
...-time release does ION not operate. • The Custom Functions were all set the flash to a particular mode. (--•22) Useful for situations where you do not want to focus definitely on the frame counter and the 0 blink. When you press the shutter button halfway down in memory immediately before the camera is pressed, you want the sudden sound of the film rewinding. While the shutter button...
...-time release does ION not operate. • The Custom Functions were all set the flash to a particular mode. (--•22) Useful for situations where you do not want to focus definitely on the frame counter and the 0 blink. When you press the shutter button halfway down in memory immediately before the camera is pressed, you want the sudden sound of the film rewinding. While the shutter button...
Instruction Manual
Page 36
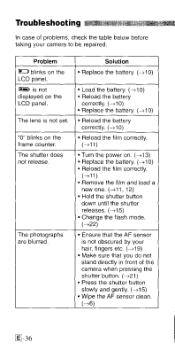
...; Remove the film and load a new one. (-O1, 12) • Hold the shutter button down until the shutter releases. (-*15) • Change the flash mode. (-*22) • Ensure that the AF sensor is not obscured by your camera to be repaired. is not set. The shutter does not release. "0" blinks on the LCD panel. The photographs are blurred. Problem F=, blinks on the frame counter. Solution • Replace the battery. (-*10) • Load...
...; Remove the film and load a new one. (-O1, 12) • Hold the shutter button down until the shutter releases. (-*15) • Change the flash mode. (-*22) • Ensure that the AF sensor is not obscured by your camera to be repaired. is not set. The shutter does not release. "0" blinks on the LCD panel. The photographs are blurred. Problem F=, blinks on the frame counter. Solution • Replace the battery. (-*10) • Load...

Instruction Manual
Page 37
The date/time or caption imprinted on the photos is difficult to read. • Compose your shots so that the background where the data is imprinted is dark. (-32) "H" is displayed on the last frame. • Use 12-, 20-, 24- When the "H" disappears from the camera. or 36exposure film with the DXcode. Problem Solution I can't imprint the date/time or a caption on the LCD panel. • Remove the battery from the LCD panel, load the battery again. (-10) rEi-37
The date/time or caption imprinted on the photos is difficult to read. • Compose your shots so that the background where the data is imprinted is dark. (-32) "H" is displayed on the last frame. • Use 12-, 20-, 24- When the "H" disappears from the camera. or 36exposure film with the DXcode. Problem Solution I can't imprint the date/time or a caption on the LCD panel. • Remove the battery from the LCD panel, load the battery again. (-10) rEi-37
Instruction Manual
Page 38
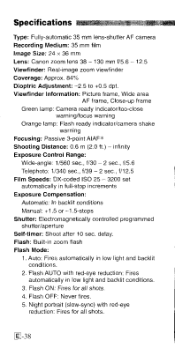
.... 2. Viewfinder Information: Picture frame, Wide area AF frame, Close-up frame Green lamp: Camera ready indicator/too-close warning/focus warning Orange lamp: Flash ready indicator/camera shake warning Focusing: Passive 3-point AIAF* Shooting Distance: 0.6 m (2.0 ft.) - Auto: Fires automatically in zoom flash Flash Mode: 1. Night portrait (slow-sync) with red-eye reduction: Fires automatically in full-stop increments Exposure Compensation: Automatic: In backlit conditions Manual: +1.5 or -1.5-stops Shutter: Electromagnetically controlled programmed shutter/aperture Self-timer: Shoot...
.... 2. Viewfinder Information: Picture frame, Wide area AF frame, Close-up frame Green lamp: Camera ready indicator/too-close warning/focus warning Orange lamp: Flash ready indicator/camera shake warning Focusing: Passive 3-point AIAF* Shooting Distance: 0.6 m (2.0 ft.) - Auto: Fires automatically in zoom flash Flash Mode: 1. Night portrait (slow-sync) with red-eye reduction: Fires automatically in full-stop increments Exposure Compensation: Automatic: In backlit conditions Manual: +1.5 or -1.5-stops Shutter: Electromagnetically controlled programmed shutter/aperture Self-timer: Shoot...

