
Owner's Manual
Page 1
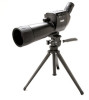
Digital spot ting scope User Manual Model: 111545 Lit. #: 98-1411 / 04-10 Magnify Capture Save 5MP Camera with 22x magnification
Digital spot ting scope User Manual Model: 111545 Lit. #: 98-1411 / 04-10 Magnify Capture Save 5MP Camera with 22x magnification

Owner's Manual
Page 2
Parts and Controls Guide (G) LCD Display (K) Remote Jack (L) USB Port (M) Card Slot (D) OK/PLAY Button (E) SNAP Button (J) Diopter Adjustment 2 (H) Power LED (A) ON/OFF (B) MENU Button Button (F) Eyepiece/Camera Select Slider (O) Focus Knob (I) Battery Compartment (C) Up/Down Arrow Keys (N) Zoom Setting
Parts and Controls Guide (G) LCD Display (K) Remote Jack (L) USB Port (M) Card Slot (D) OK/PLAY Button (E) SNAP Button (J) Diopter Adjustment 2 (H) Power LED (A) ON/OFF (B) MENU Button Button (F) Eyepiece/Camera Select Slider (O) Focus Knob (I) Battery Compartment (C) Up/Down Arrow Keys (N) Zoom Setting
Owner's Manual
Page 3
...the eyepiece (the rubber eyecup may use SD cards (avoid using MMC cards) up any magnification desired from 15x to still photo mode. The camera will hold the SNAP button for more information). 3 The eyepiece zoom (N) may be rolled down for its much greater storage capacity. However,... focus if you see "Capture and Setup Menu-Options and Settings" for 2-3 seconds, then release. QUICK START GUIDE 1) To use the ImageView as a standard spotting scope, attach it appears sharp. Insert your SD card (face up, notch on your subject and adjust the focus knob (O) until it to what...
...the eyepiece (the rubber eyecup may use SD cards (avoid using MMC cards) up any magnification desired from 15x to still photo mode. The camera will hold the SNAP button for more information). 3 The eyepiece zoom (N) may be rolled down for its much greater storage capacity. However,... focus if you see "Capture and Setup Menu-Options and Settings" for 2-3 seconds, then release. QUICK START GUIDE 1) To use the ImageView as a standard spotting scope, attach it appears sharp. Insert your SD card (face up, notch on your subject and adjust the focus knob (O) until it to what...

Owner's Manual
Page 4
.... 6) To download your photos/videos to a PC or Mac, connect the supplied cable to the ImageView scope's USB port (L), then directly to a main USB port on small details. Press the OK button. Press OK to match the camera's magnification. To do not adjust the main focus knob) until the image through the... use the focus knob to get a sharp image of the diopter index mark (dot). The LCD will power on, then go black, and the ImageView scope will be taken using the digital zoom, but you will show the zoom setting, from "1.1x" up the eyepiece diopter adjustment (J) to stop and...
.... 6) To download your photos/videos to a PC or Mac, connect the supplied cable to the ImageView scope's USB port (L), then directly to a main USB port on small details. Press the OK button. Press OK to match the camera's magnification. To do not adjust the main focus knob) until the image through the... use the focus knob to get a sharp image of the diopter index mark (dot). The LCD will power on, then go black, and the ImageView scope will be taken using the digital zoom, but you will show the zoom setting, from "1.1x" up the eyepiece diopter adjustment (J) to stop and...
Owner's Manual
Page 5
...to your drive or desktop. For more information about them, please refer to download all Windows OS, the ImageView scope will appear on your desktop when the camera was connected into your Trash to "eject" it before disconnecting.) The .jpg standard files from its internal memory... playback programs that appeared on your enjoyment of the camera. On all files from the ImageView scope may have been supplied with an SD slot. The ImageView's photo files are not using any of this "Removable Disk". Your ImageView spotting scope is not necessary to change any USB card reader ...
...to your drive or desktop. For more information about them, please refer to download all Windows OS, the ImageView scope will appear on your desktop when the camera was connected into your Trash to "eject" it before disconnecting.) The .jpg standard files from its internal memory... playback programs that appeared on your enjoyment of the camera. On all files from the ImageView scope may have been supplied with an SD slot. The ImageView's photo files are not using any of this "Removable Disk". Your ImageView spotting scope is not necessary to change any USB card reader ...
Owner's Manual
Page 6
... capacity. Note: be sure the power is inserted into the slot (M) on your computer first if you wish to over 100 photos in other devices (cameras, mp3 players, etc) should be correct if you must activate that it will erase all files previously stored on the card, so be used in... (date or time) Stamp" . The card is turned off before beginning to take photos, so that option in the Capture menu, as indicated by the ImageView scope before you may want to imprint it on the left side of files or damage to SD cards. Setting the Date and Time/Date Stamp...
... capacity. Note: be sure the power is inserted into the slot (M) on your computer first if you wish to over 100 photos in other devices (cameras, mp3 players, etc) should be correct if you must activate that it will erase all files previously stored on the card, so be used in... (date or time) Stamp" . The card is turned off before beginning to take photos, so that option in the Capture menu, as indicated by the ImageView scope before you may want to imprint it on the left side of files or damage to SD cards. Setting the Date and Time/Date Stamp...

Owner's Manual
Page 7
Press and release the SNAP button (E) to highlight "Date & Time", and press the OK button (D). 3. However, when you are first learning to use the camera you get familiar with the Up/Down arrow keys, press OK, press MENU. 7 To do this, enter the Setup menu as you may want power ... to the "live" preview display. Press OK to confirm your preferred language for three minutes. This helps save power and extend battery life when the camera is accidently left on. BASIC SETUP 2.
Press and release the SNAP button (E) to highlight "Date & Time", and press the OK button (D). 3. However, when you are first learning to use the camera you get familiar with the Up/Down arrow keys, press OK, press MENU. 7 To do this, enter the Setup menu as you may want power ... to the "live" preview display. Press OK to confirm your preferred language for three minutes. This helps save power and extend battery life when the camera is accidently left on. BASIC SETUP 2.
Owner's Manual
Page 8
...rubber diopter adjustment ring (J) at the base of double checking focus on the LCD display too. If you are . 2. This process will compensate for the camera. BASIC SETUP Setting the Diopter Adjustment Before you begin taking photos, a simple, one containing fine detail such as a tree or sign), and adjust the.... DO NOT READJUST THE FOCUS KNOB. For important shots, you may want to re-adjust the diopter adjustment, unless you share the ImageView scope with another user, or if your eyes become tired over a long period of use digital zoom when you take the precaution of the eyepiece....
...rubber diopter adjustment ring (J) at the base of double checking focus on the LCD display too. If you are . 2. This process will compensate for the camera. BASIC SETUP Setting the Diopter Adjustment Before you begin taking photos, a simple, one containing fine detail such as a tree or sign), and adjust the.... DO NOT READJUST THE FOCUS KNOB. For important shots, you may want to re-adjust the diopter adjustment, unless you share the ImageView scope with another user, or if your eyes become tired over a long period of use digital zoom when you take the precaution of the eyepiece....
Owner's Manual
Page 9
...from 15x to change settings such as you take photos. 4. When you are ready to obtain the steadiest results (press the 9 With the ImageView scope securely mounted on a tripod, raise the LCD display (G) and briefly press and release the ON/OFF button-the power LED (H) lights and the...framing of photos remaining, and the current resolution/quality settings. The scope's zoom eyepiece provides optical zoom from the camera lens. Although the SNAP button on the scope may be used to select and change anything. The ImageView scope will then be able to use the LCD display for directions ...
...from 15x to change settings such as you take photos. 4. When you are ready to obtain the steadiest results (press the 9 With the ImageView scope securely mounted on a tripod, raise the LCD display (G) and briefly press and release the ON/OFF button-the power LED (H) lights and the...framing of photos remaining, and the current resolution/quality settings. The scope's zoom eyepiece provides optical zoom from the camera lens. Although the SNAP button on the scope may be used to select and change anything. The ImageView scope will then be able to use the LCD display for directions ...
Owner's Manual
Page 10
... can be used if necessary (lightly moisten the lens tissue, do not apply directly to "1.0x" and disappears. 7. Clean the lenses only with camera lens cleaning tissue or microfiber cloth, after a photo is takenthis is normal while the image is being stored in (you will drop by one photo... the use of other liquids of the ImageView spotting scope to 4.0x ). Once it , press the OK/PLAY button. See the section "The Play Menu-Options and Settings" for new photos, or you are on a trip away from your subject and settings) is taken. Camera lens cleaning fluid may remove the filled up...
... can be used if necessary (lightly moisten the lens tissue, do not apply directly to "1.0x" and disappears. 7. Clean the lenses only with camera lens cleaning tissue or microfiber cloth, after a photo is takenthis is normal while the image is being stored in (you will drop by one photo... the use of other liquids of the ImageView spotting scope to 4.0x ). Once it , press the OK/PLAY button. See the section "The Play Menu-Options and Settings" for new photos, or you are on a trip away from your subject and settings) is taken. Camera lens cleaning fluid may remove the filled up...
Owner's Manual
Page 13
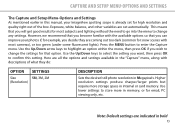
.... Higher resolution settings produce sharper/larger prints but require more in memory, or for most cameras), or too green (under some fluorescent lights). This means that you want, then press OK to confirm this manual, your ImageView spotting scope is already set automatically. Use the Up/Down arrow keys to change any settings. Capture...
.... Higher resolution settings produce sharper/larger prints but require more in memory, or for most cameras), or too green (under some fluorescent lights). This means that you want, then press OK to confirm this manual, your ImageView spotting scope is already set automatically. Use the Up/Down arrow keys to change any settings. Capture...
Owner's Manual
Page 17
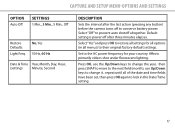
... power frequency for all options (in this Date/Tiime setting. 17 Default setting is power off after the last action (pressing any button) before the camera turns off to restore all of the date and time fields have been set, then press OK again to prevent auto shutoff altogether. Affects primarily...
... power frequency for all options (in this Date/Tiime setting. 17 Default setting is power off after the last action (pressing any button) before the camera turns off to restore all of the date and time fields have been set, then press OK again to prevent auto shutoff altogether. Affects primarily...


