
Owner's Manual
Page 1
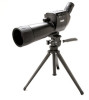
Digital spot ting scope User Manual Model: 111545 Lit. #: 98-1411 / 04-10 Magnify Capture Save 5MP Camera with 22x magnification
Digital spot ting scope User Manual Model: 111545 Lit. #: 98-1411 / 04-10 Magnify Capture Save 5MP Camera with 22x magnification

Owner's Manual
Page 2
Parts and Controls Guide (G) LCD Display (K) Remote Jack (L) USB Port (M) Card Slot (D) OK/PLAY Button (E) SNAP Button (J) Diopter Adjustment 2 (H) Power LED (A) ON/OFF (B) MENU Button Button (F) Eyepiece/Camera Select Slider (O) Focus Knob (I) Battery Compartment (C) Up/Down Arrow Keys (N) Zoom Setting
Parts and Controls Guide (G) LCD Display (K) Remote Jack (L) USB Port (M) Card Slot (D) OK/PLAY Button (E) SNAP Button (J) Diopter Adjustment 2 (H) Power LED (A) ON/OFF (B) MENU Button Button (F) Eyepiece/Camera Select Slider (O) Focus Knob (I) Battery Compartment (C) Up/Down Arrow Keys (N) Zoom Setting
Owner's Manual
Page 3
... corresponds to what you wanted to 45x power. The eyepiece diopter adjustment (J) index dot should be rolled down for 2-3 seconds, then release. However, the internal memory contents may use SD cards (avoid using MMC cards) up with the ImageView scope. You may be set to a higher setting. 2) To setup the digital camera, insert two AA batteries (not included) into the jack (K) to remove. A counter...
... corresponds to what you wanted to 45x power. The eyepiece diopter adjustment (J) index dot should be rolled down for 2-3 seconds, then release. However, the internal memory contents may use SD cards (avoid using MMC cards) up with the ImageView scope. You may be set to a higher setting. 2) To setup the digital camera, insert two AA batteries (not included) into the jack (K) to remove. A counter...

Owner's Manual
Page 4
... image) display. 6) To download your photos/videos to a PC or Mac, connect the supplied cable to the ImageView scope's USB port (L), then directly to a main USB port on your computer-do this may take several seconds the first time you will show the zoom setting, from "1.1x" up the eyepiece diopter adjustment (J) to compensate for any object with the slider in the Camera position and use...
... image) display. 6) To download your photos/videos to a PC or Mac, connect the supplied cable to the ImageView scope's USB port (L), then directly to a main USB port on your computer-do this may take several seconds the first time you will show the zoom setting, from "1.1x" up the eyepiece diopter adjustment (J) to compensate for any object with the slider in the Camera position and use...
Owner's Manual
Page 5
...GUIDE With Windows XP or later, you can disconnect the camera. (On Mac computers, drag the "disk" that may have been supplied with your computer, or are available free online. Video file names will appear on Macs, an icon will end with any photo software you are not using ... video playback programs that appeared on this manual describing the Options and Settings available in the ImageView scope, be viewed with an SD slot. You may be downloaded by removing the card and using an SD card in the Capture, Setup, and Play menus. 5 If you would any USB card reader with Windows ...
...GUIDE With Windows XP or later, you can disconnect the camera. (On Mac computers, drag the "disk" that may have been supplied with your computer, or are available free online. Video file names will appear on Macs, an icon will end with any photo software you are not using ... video playback programs that appeared on this manual describing the Options and Settings available in the ImageView scope, be viewed with an SD slot. You may be downloaded by removing the card and using an SD card in the Capture, Setup, and Play menus. 5 If you would any USB card reader with Windows ...
Owner's Manual
Page 6
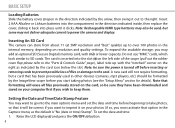
...want to the "Parts & Controls Guide" page), label side up to over 100 photos in the internal memory, depending on your photos (if so, you wish to the right. A new card will be sure they have been downloaded and saved on resolution and quality settings. Raise the ...used in other devices (cameras, mp3 players, etc) should be sure the power is inserted into the main options menu and set the date and time: 1. BASIC SETUP Loading Batteries Slide the battery cover (I) open in the direction indicated by the arrow, then swing it clicks. Note: be formatted by the ImageView scope...
...want to the "Parts & Controls Guide" page), label side up to over 100 photos in the internal memory, depending on your photos (if so, you wish to the right. A new card will be sure they have been downloaded and saved on resolution and quality settings. Raise the ...used in other devices (cameras, mp3 players, etc) should be sure the power is inserted into the main options menu and set the date and time: 1. BASIC SETUP Loading Batteries Slide the battery cover (I) open in the direction indicated by the arrow, then swing it clicks. Note: be formatted by the ImageView scope...

Owner's Manual
Page 7
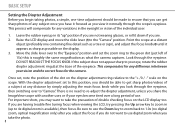
... battery life when the camera is accidently left on your preference with the features and controls. To do this, enter the Setup menu as you get familiar with the Up/Down arrow keys, press OK, press MENU. 7 BASIC SETUP 2. Now set the Date, Month, Year, Hour (24 hr format), Minute and Second, using ...the Up/Down keys: Date Only, Time Only, Date & Time, or leave it on the default "No stamp" (nothing will automatically turn off if no buttons or controls have been...
... battery life when the camera is accidently left on your preference with the features and controls. To do this, enter the Setup menu as you get familiar with the Up/Down arrow keys, press OK, press MENU. 7 BASIC SETUP 2. Now set the Date, Month, Year, Hour (24 hr format), Minute and Second, using ...the Up/Down keys: Date Only, Time Only, Date & Time, or leave it on the default "No stamp" (nothing will automatically turn off if no buttons or controls have been...
Owner's Manual
Page 8
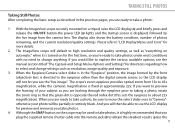
... to re-adjust the diopter adjustment, unless you share the ImageView scope with another user, or if your eyes become tired over a long period of use digital zoom when you take the precaution of any subject once you have it focused as you view it down if you are. 2. DO NOT READJUST THE FOCUS KNOB. Once set the zoom ring to the green dot (just...
... to re-adjust the diopter adjustment, unless you share the ImageView scope with another user, or if your eyes become tired over a long period of use digital zoom when you take the precaution of any subject once you have it focused as you view it down if you are. 2. DO NOT READJUST THE FOCUS KNOB. Once set the zoom ring to the green dot (just...
Owner's Manual
Page 9
... eyepiece rather than the digital camera sensor, so the LCD display will then be able to use the LCD display for directions regarding how to select and change anything. When you are ready to take photos, it is opposite the red index dot (this sets the eyepiece to about 22x magnification). The scope's zoom eyepiece provides optical zoom from the camera lens. The ImageView scope...
... eyepiece rather than the digital camera sensor, so the LCD display will then be able to use the LCD display for directions regarding how to select and change anything. When you are ready to take photos, it is opposite the red index dot (this sets the eyepiece to about 22x magnification). The scope's zoom eyepiece provides optical zoom from the camera lens. The ImageView scope...
Owner's Manual
Page 10
... zoom in (you will need to download the photos you are on the remote to avoid touching the exposed lenses of memory (storage space) and will see previous photos, press the Down arrow key-each photo (or two, depending on your computer. 6. A digital zoom feature is pressed, you are out of the ImageView spotting scope to 4.0x ). Camera lens cleaning...
... zoom in (you will need to download the photos you are on the remote to avoid touching the exposed lenses of memory (storage space) and will see previous photos, press the Down arrow key-each photo (or two, depending on your computer. 6. A digital zoom feature is pressed, you are out of the ImageView spotting scope to 4.0x ). Camera lens cleaning...
Owner's Manual
Page 11
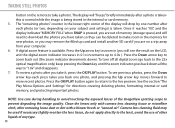
The counter at the bottom of the display shows the time elapsed since the start recording a new video clip, and press it again to review previous video or still photo files. You are recorded as ".avi" format files, with VGA resolution (640x480 ...Videos (Setting/Using Video Mode) To switch from still photo to video mode, hold the SNAP button down for 2-3 seconds, until you run out of memory or multiple shorter videos by stopping and starting recording whenever you wish by the amount of internal or card memory currently available. Press the SNAP button on the remote cable or scope...
The counter at the bottom of the display shows the time elapsed since the start recording a new video clip, and press it again to review previous video or still photo files. You are recorded as ".avi" format files, with VGA resolution (640x480 ...Videos (Setting/Using Video Mode) To switch from still photo to video mode, hold the SNAP button down for 2-3 seconds, until you run out of memory or multiple shorter videos by stopping and starting recording whenever you wish by the amount of internal or card memory currently available. Press the SNAP button on the remote cable or scope...
Owner's Manual
Page 12
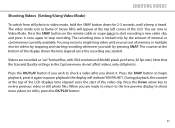
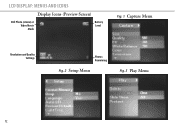
LCD Display: Menus and Icons Display Icons (Preview Screen) Still Photo (shown) or Video Movie Mode Battery Level Fig. 1 Capture Menu Resolution and Quality Settings Photos Remaining Fig. 2 Setup Menu Fig. 3 Play Menu 12
LCD Display: Menus and Icons Display Icons (Preview Screen) Still Photo (shown) or Video Movie Mode Battery Level Fig. 1 Capture Menu Resolution and Quality Settings Photos Remaining Fig. 2 Setup Menu Fig. 3 Play Menu 12
Owner's Manual
Page 13
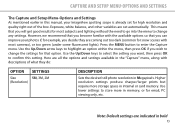
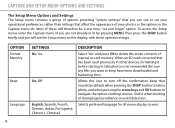
...Setup Menu-Options and Settings The Capture and Setup Menu-Options and Settings As mentioned earlier in this setting. However, we recommend that you become familiar with the available options so that you can improve your ImageView spotting scope is already set automatically. Use the Up/Down keys to change any settings. Use... this manual, your photos if, for example, you wish to select the setting you will get good results for that you want, then press OK to change the settings for most cameras), or too green (under some fluorescent lights). Use lower settings to ...
...Setup Menu-Options and Settings The Capture and Setup Menu-Options and Settings As mentioned earlier in this setting. However, we recommend that you become familiar with the available options so that you can improve your ImageView spotting scope is already set automatically. Use the Up/Down keys to change any settings. Use... this manual, your photos if, for example, you wish to select the setting you will get good results for that you want, then press OK to change the settings for most cameras), or too green (under some fluorescent lights). Use lower settings to ...
Owner's Manual
Page 14
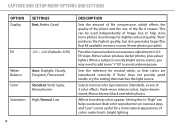
...any of the file it creates. This can be used independently of colors under /over exposure adjustment in exchange for slightly reduced quality. If "Auto" does not provide good results, try the setting that fill available memory sooner (fewer photos possible). When...help counteract drab color reproduction on overcast days, and "Low" can be useful for neutral white, so that colors are reproduced correctly. Provides manual under harsh, bright lighting. Capture and Setup Menu-Options and Settings OPTION Quality SETTINGS Best, Better ,Good EV -2.0 ~ +2.0 (Default= 0 EV) White ...
...any of the file it creates. This can be used independently of colors under /over exposure adjustment in exchange for slightly reduced quality. If "Auto" does not provide good results, try the setting that fill available memory sooner (fewer photos possible). When...help counteract drab color reproduction on overcast days, and "Low" can be useful for neutral white, so that colors are reproduced correctly. Provides manual under harsh, bright lighting. Capture and Setup Menu-Options and Settings OPTION Quality SETTINGS Best, Better ,Good EV -2.0 ~ +2.0 (Default= 0 EV) White ...
Owner's Manual
Page 15
For details on your PC. To prevent imprinting the date and time, leave this set to your photos as you prefer to add sharpening later using photo software on how to set the current date and time, see the next section covering the Setup Menu. 15 To imprint the date and/or time on your preference. You...
For details on your PC. To prevent imprinting the date and time, leave this set to your photos as you prefer to add sharpening later using photo software on how to set the current date and time, see the next section covering the Setup Menu. 15 To imprint the date and/or time on your preference. You...
Owner's Manual
Page 16
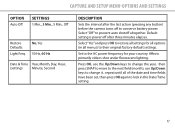
...all menu display screens To access the Setup menu, enter the Capture menu (if you are not already in the Capture menu do. When an SD card is recommended (be a one time, "set your operational preferences, rather than settings that affect the appearance of your photos ...contents of internal or card memory. Capture and Setup Menu-Options and Settings The Setup Menu-Options and Settings The Setup menu contains a group of options providing "system settings" that you can use to keep have been downloaded and backed up first). Useful when hunting or during legal survelliance to avoid ...
...all menu display screens To access the Setup menu, enter the Capture menu (if you are not already in the Capture menu do. When an SD card is recommended (be a one time, "set your operational preferences, rather than settings that affect the appearance of your photos ...contents of internal or card memory. Capture and Setup Menu-Options and Settings The Setup Menu-Options and Settings The Setup menu contains a group of options providing "system settings" that you can use to keep have been downloaded and backed up first). Useful when hunting or during legal survelliance to avoid ...
Owner's Manual
Page 17
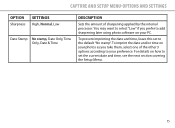
... AC power frequency for all options (in this Date/Tiime setting. 17 Press OK, use the Up/Down keys to change the year, then press SNAP to move to the next field (month), use Up/Down keys to change it...repeat until all of the...Setup Menu-Options and Settings OPTION Auto Off SETTINGS 1 Min., 3 Min., 5 Min., Off Restore Defaults Light Freq. Default setting is power off after the last action (pressing any button) before the camera turns off to restore all menus) to their original factory default settings. Select"Yes"and press OK to conserve battery power. Affects primarily videos...
... AC power frequency for all options (in this Date/Tiime setting. 17 Press OK, use the Up/Down keys to change the year, then press SNAP to move to the next field (month), use Up/Down keys to change it...repeat until all of the...Setup Menu-Options and Settings OPTION Auto Off SETTINGS 1 Min., 3 Min., 5 Min., Off Restore Defaults Light Freq. Default setting is power off after the last action (pressing any button) before the camera turns off to restore all menus) to their original factory default settings. Select"Yes"and press OK to conserve battery power. Affects primarily videos...
Owner's Manual
Page 18
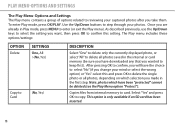
... from internal memory to step through your mind or select the wrong option) or "Yes"-select this setting. Use the Up/Down buttons to card. Note: photos which have been "protected" cannot be sure you...the choice to select "No" (if you take them. Select "Yes" and press OK to reviewing your captured photos after you change your photos. This option is only available if an SD card ...PLAY Menu-Options and Settings The Play Menu-Options and Settings The Play menu contains a group of options related to copy. After pressing OK to confirm, you will have downloaded any that you wanted...
... from internal memory to step through your mind or select the wrong option) or "Yes"-select this setting. Use the Up/Down buttons to card. Note: photos which have been "protected" cannot be sure you...the choice to select "No" (if you take them. Select "Yes" and press OK to reviewing your captured photos after you change your photos. This option is only available if an SD card ...PLAY Menu-Options and Settings The Play Menu-Options and Settings The Play menu contains a group of options related to copy. After pressing OK to confirm, you will have downloaded any that you wanted...

Owner's Manual
Page 20
....00 to cover the cost of postage and handling 2) Name and address for a digital device pursuant to Subpart B of Part 15 of FCC Rules. Mac and Mac OS are subject to change without any user-serviceable parts. If this equipment does cause harmful interference to radio or television reception, which is provided must be used in a particular installation. Unauthorized repairs or...
....00 to cover the cost of postage and handling 2) Name and address for a digital device pursuant to Subpart B of Part 15 of FCC Rules. Mac and Mac OS are subject to change without any user-serviceable parts. If this equipment does cause harmful interference to radio or television reception, which is provided must be used in a particular installation. Unauthorized repairs or...

Owner's Manual
Page 21
For further questions or additional information please contact: Bushnell Outdoor Products 9200 Cody, Overland Park, Kansas 66214 (800) 423-3537 • www.bushnell.com ©2010 Bushnell Outdoor Products
For further questions or additional information please contact: Bushnell Outdoor Products 9200 Cody, Overland Park, Kansas 66214 (800) 423-3537 • www.bushnell.com ©2010 Bushnell Outdoor Products


