
Users Manual - English
Page 1
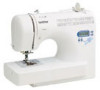
Computerized Sewing Machine Operation Manual Product Code:885-V60/V61/V62/V63/V64/V65 KNOWING YOUR SEWING MACHINE SEWING BASICS UTILITY STITCHES APPENDIX Please visit us at http://solutions.brother.com where you can get product support and answers to frequently asked questions (FAQs).
Computerized Sewing Machine Operation Manual Product Code:885-V60/V61/V62/V63/V64/V65 KNOWING YOUR SEWING MACHINE SEWING BASICS UTILITY STITCHES APPENDIX Please visit us at http://solutions.brother.com where you can get product support and answers to frequently asked questions (FAQs).

Users Manual - English
Page 6
...Needle and presser foot section ...9 Operation buttons ...9 Operation panel ...10 Spool pin ...10 USING YOUR SEWING MACHINE 12 Power supply precautions ...12 Power supply ...12 Foot controller ...13 Sewing speed controller (for models equipped with the start/stop button 13 Changing the needle stop position ...13... THREADING THE MACHINE 14 Winding the bobbin ...14 Lower threading ...19 Upper threading ...22 ...
...Needle and presser foot section ...9 Operation buttons ...9 Operation panel ...10 Spool pin ...10 USING YOUR SEWING MACHINE 12 Power supply precautions ...12 Power supply ...12 Foot controller ...13 Sewing speed controller (for models equipped with the start/stop button 13 Changing the needle stop position ...13... THREADING THE MACHINE 14 Winding the bobbin ...14 Lower threading ...19 Upper threading ...22 ...

Users Manual - English
Page 8
...KNOWING YOUR SEWING MACHINE 1 KNOWING YOUR SEWING MACHINE ACCESSORIES Included accessories After opening the box, check that the following accessories are included. Press the black button on the left side of the foot when it is difficult for thick seams to be used on machine) 17 Spool... Model T This foot controller can be fed, for example, at the beginning of the presser foot holder is mentioned on the machine rating plate. ● The screw of sewing thick fabrics. (page 43) aBlack button 6 Part Name U.S.A. / Canada Others 1 Buttonhole foot "A" XC2691-033 2 Overcasting foot...
...KNOWING YOUR SEWING MACHINE 1 KNOWING YOUR SEWING MACHINE ACCESSORIES Included accessories After opening the box, check that the following accessories are included. Press the black button on the left side of the foot when it is difficult for thick seams to be used on machine) 17 Spool... Model T This foot controller can be fed, for example, at the beginning of the presser foot holder is mentioned on the machine rating plate. ● The screw of sewing thick fabrics. (page 43) aBlack button 6 Part Name U.S.A. / Canada Others 1 Buttonhole foot "A" XC2691-033 2 Overcasting foot...

Users Manual - English
Page 10
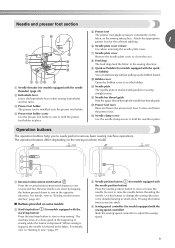
... holds the spool of the upper thread. q Presser foot lever (page 22) This is used to circulate. KNOWING YOUR SEWING MACHINE NAMES OF MACHINE PARTS AND THEIR FUNCTIONS The illustrations in the foot controller plug. k Air vent This vent allows the air surrounding the motor... the jack/ socket connector. n Foot controller (page 13) You can turn the main power and sewing light switch on the sewing machine model. t Handle Carry the sewing machine by its handle when transporting the machine. 8 b Upper tension-control dial (page 41) This controls the tension of thread. m Jack/...
... holds the spool of the upper thread. q Presser foot lever (page 22) This is used to circulate. KNOWING YOUR SEWING MACHINE NAMES OF MACHINE PARTS AND THEIR FUNCTIONS The illustrations in the foot controller plug. k Air vent This vent allows the air surrounding the motor... the jack/ socket connector. n Foot controller (page 13) You can turn the main power and sewing light switch on the sewing machine model. t Handle Carry the sewing machine by its handle when transporting the machine. 8 b Upper tension-control dial (page 41) This controls the tension of thread. m Jack/...
Users Manual - English
Page 11
...foot applies pressure consistently on the sewing machine model. m Presser foot lever Raise and lower the presser foot lever to easily perform various basic sewing machine operations. The operation buttons differ depending on the fabric as the sewing takes place. a Reverse/reinforcement ...stitch button Press the reverse/reinforcement stitch button to "Sewing reinforcement stitches" (page 40). ■...
...foot applies pressure consistently on the sewing machine model. m Presser foot lever Raise and lower the presser foot lever to easily perform various basic sewing machine operations. The operation buttons differ depending on the fabric as the sewing takes place. a Reverse/reinforcement ...stitch button Press the reverse/reinforcement stitch button to "Sewing reinforcement stitches" (page 40). ■...

Users Manual - English
Page 12
... As shown, press down on the spool pin lever with the rounded side toward the spool pin. 10 KNOWING YOUR SEWING MACHINE Operation panel The operation panel, located on the front of the sewing machine, allows you wish to use. a LCD (liquid crystal display) The number of the selected stitch (1), the presser foot type...
... As shown, press down on the spool pin lever with the rounded side toward the spool pin. 10 KNOWING YOUR SEWING MACHINE Operation panel The operation panel, located on the front of the sewing machine, allows you wish to use. a LCD (liquid crystal display) The number of the selected stitch (1), the presser foot type...

Users Manual - English
Page 13
If the spool pin has been removed from the spool pin, and then the hole on the sewing machine before storing or if the spool pin will not be used, return the spool pin to its storage position. ■ Storing the spool pin ■ Installing the spool pin When placing the cover on the back of the machine, as fold up the spool pin, as shown in the illustration, shown. 1 until it . a Hole b Tab Push the spool pin down until it snaps into place to secure it locks into Remove the spool from the a machine, insert the tab on the spool pin into b place. 11
If the spool pin has been removed from the spool pin, and then the hole on the sewing machine before storing or if the spool pin will not be used, return the spool pin to its storage position. ■ Storing the spool pin ■ Installing the spool pin When placing the cover on the back of the machine, as fold up the spool pin, as shown in the illustration, shown. 1 until it . a Hole b Tab Push the spool pin down until it snaps into place to secure it locks into Remove the spool from the a machine, insert the tab on the spool pin into b place. 11

Users Manual - English
Page 14
... . These things may result. Power supply Insert the plug into a wall outlet. Note ● If a power outage occurs while the sewing machine is in poor condition. ● Turn off the main power and remove the plug in the following precautions concerning the power supply. If... power cord included with this plug is turned off the machine, set the main power c switch to "{". X The sewing lamp goes off when the machine is intended to fit in any way. 12 KNOWING YOUR SEWING MACHINE USING YOUR SEWING MACHINE Power supply precautions Be sure to observe the following circumstances:...
... . These things may result. Power supply Insert the plug into a wall outlet. Note ● If a power outage occurs while the sewing machine is in poor condition. ● Turn off the main power and remove the plug in the following precautions concerning the power supply. If... power cord included with this plug is turned off the machine, set the main power c switch to "{". X The sewing lamp goes off when the machine is intended to fit in any way. 12 KNOWING YOUR SEWING MACHINE USING YOUR SEWING MACHINE Power supply precautions Be sure to observe the following circumstances:...

Users Manual - English
Page 15
...the rear side of (stitch selection b key) on the left and turn off the sewing machine in use. When you take your foot off the sewing machine. Turn off the foot controller, the machine will stop position changes to the lowered position. 13 Doing so could cause a fire or...to build up on the sewing machine, release the "-" side of cloth and dust to leave the needle raised when sewing is the foot controller's maximum sewing speed. Instead, the machine can be sure to sew at a low speed. Hold down lightly, the machine will increase. Slide the sewing speed controller to the left...
...the rear side of (stitch selection b key) on the left and turn off the sewing machine in use. When you take your foot off the sewing machine. Turn off the foot controller, the machine will stop position changes to the lowered position. 13 Doing so could cause a fire or...to build up on the sewing machine, release the "-" side of cloth and dust to leave the needle raised when sewing is the foot controller's maximum sewing speed. Instead, the machine can be sure to sew at a low speed. Hold down lightly, the machine will increase. Slide the sewing speed controller to the left...
Users Manual - English
Page 16
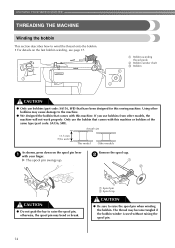
... that have been designed for this sewing machine. Remove the spool cap. a Spool pin b Spool cap CAUTION ● Be sure to raise the spool pin, otherwise, the spool pin may bend or break. If you use bobbins (part code: SA156, SFB) that comes with this machine or bobbins of the same type.... Actual size 11.5 mm (7/16 inch) This model Other models As shown, press down on the fast bobbin winding, see page 17. KNOWING YOUR SEWING MACHINE THREADING THE MACHINE Winding the bobbin This section describes how to the machine. ● We designed the bobbin that comes with this...
... that have been designed for this sewing machine. Remove the spool cap. a Spool pin b Spool cap CAUTION ● Be sure to raise the spool pin, otherwise, the spool pin may bend or break. If you use bobbins (part code: SA156, SFB) that comes with this machine or bobbins of the same type.... Actual size 11.5 mm (7/16 inch) This model Other models As shown, press down on the fast bobbin winding, see page 17. KNOWING YOUR SEWING MACHINE THREADING THE MACHINE Winding the bobbin This section describes how to the machine. ● We designed the bobbin that comes with this...

Users Manual - English
Page 18
... sure that the thread is wound around the bobbin a few times. Then stop button) to wind the thread around the bobbin. KNOWING YOUR SEWING MACHINE Pull the thread to the right, pass it under the pretension disk. Put the bobbin onto the bobbin winder shaft h and slide the bobbin...of the thread, gently j press the foot controller or press (start/ stop button) (for models equipped with the start /stop button). a Spring on the sewing machine. k CAUTION ● Make sure you do not cut the thread completely, and the bobbin is plugged in the bobbin. • Make sure to pull ...
... sure that the thread is wound around the bobbin a few times. Then stop button) to wind the thread around the bobbin. KNOWING YOUR SEWING MACHINE Pull the thread to the right, pass it under the pretension disk. Put the bobbin onto the bobbin winder shaft h and slide the bobbin...of the thread, gently j press the foot controller or press (start/ stop button) (for models equipped with the start /stop button). a Spring on the sewing machine. k CAUTION ● Make sure you do not cut the thread completely, and the bobbin is plugged in the bobbin. • Make sure to pull ...
Users Manual - English
Page 19
Memo ● When the sewing machine is started or the handwheel is not a malfunction. ● The needle bar does not move when you slide the bobbin winding shaft to its p original position (for models equipped with the sewing speed controller). While holding the thread that the spring on the ... with the start/stop button) to start /stop button). b Follow steps a through g of the thread clockwise around the bobbin, the machine will make a clicking sound; Slide the sewing speed controller to the right l (to set the speed to fast). (For models CAUTION equipped with the...
Memo ● When the sewing machine is started or the handwheel is not a malfunction. ● The needle bar does not move when you slide the bobbin winding shaft to its p original position (for models equipped with the sewing speed controller). While holding the thread that the spring on the ... with the start/stop button) to start /stop button). b Follow steps a through g of the thread clockwise around the bobbin, the machine will make a clicking sound; Slide the sewing speed controller to the right l (to set the speed to fast). (For models CAUTION equipped with the...

Users Manual - English
Page 20
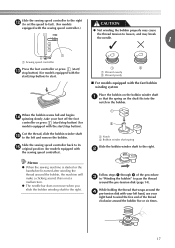
... button) (for models equipped with the start/stop button) to start /stop button). 1 2 a Wound evenly b Wound poorly Memo ● When the sewing machine is started or the handwheel is wound without cutting the thread using the foot controller, connect the foot controller before turning on the... sewing machine. If the bobbin is turned after winding the thread around the bobbin, the machine will make a clicking sound; CAUTION ● Not winding the bobbin properly may cause the ...
... button) (for models equipped with the start/stop button) to start /stop button). 1 2 a Wound evenly b Wound poorly Memo ● When the sewing machine is started or the handwheel is wound without cutting the thread using the foot controller, connect the foot controller before turning on the... sewing machine. If the bobbin is turned after winding the thread around the bobbin, the machine will make a clicking sound; CAUTION ● Not winding the bobbin properly may cause the ...
Users Manual - English
Page 21
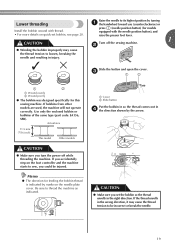
...mm (7/16 inch) This model Other models CAUTION ● Make sure you accidentally step on the foot controller and the machine starts to thread the machine as indicated. Memo ● The direction for feeding the bobbin thread is indicated by turning a the handwheel toward you set... and open the cover. CAUTION ● Make sure you (counterclockwise) or press (needle position button) (for this sewing machine. If you turn the power off the sewing machine. Lower threading Raise the needle to its highest position by marks on the needle plate cover. b ● Winding ...
...mm (7/16 inch) This model Other models CAUTION ● Make sure you accidentally step on the foot controller and the machine starts to thread the machine as indicated. Memo ● The direction for feeding the bobbin thread is indicated by turning a the handwheel toward you set... and open the cover. CAUTION ● Make sure you (counterclockwise) or press (needle position button) (for this sewing machine. If you turn the power off the sewing machine. Lower threading Raise the needle to its highest position by marks on the needle plate cover. b ● Winding ...

Users Manual - English
Page 22
... the thread through the slit, as shown. • If the thread is indicated by the line in the right direction. Be sure to thread the machine as indicated. If the thread unrolls in f place (see arrow a), and then press lightly on the right side (see arrow b) until the cover clicks...from the left side of the cover (as shown by marks on the needle plate cover. c 1 2 1 a Tension-adjusting spring Replace the bobbin cover. KNOWING YOUR SEWING MACHINE Hold the end of the thread, push the bobbin e down with your left hand as shown, lightly pull the thread to guide it through the...
... the thread through the slit, as shown. • If the thread is indicated by the line in the right direction. Be sure to thread the machine as indicated. If the thread unrolls in f place (see arrow a), and then press lightly on the right side (see arrow b) until the cover clicks...from the left side of the cover (as shown by marks on the needle plate cover. c 1 2 1 a Tension-adjusting spring Replace the bobbin cover. KNOWING YOUR SEWING MACHINE Hold the end of the thread, push the bobbin e down with your left hand as shown, lightly pull the thread to guide it through the...

Users Manual - English
Page 24
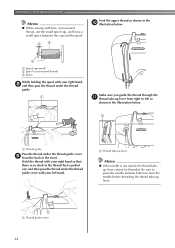
... button) once or twice to raise the needle. a Presser foot lever CAUTION ● If the presser foot is not raised, the sewing machine cannot be threaded correctly. 22 or a Mark b Needle position button • If the needle is not correct, the thread may become...the wheel points up before threading the sewing machine. a Spool pin b Mark on the sewing machine. a Raise the presser foot using the presser foot b lever. If the upper threading is not correctly raised, the sewing machine can not be threaded. KNOWING YOUR SEWING MACHINE Upper threading Set the upper thread ...
... button) once or twice to raise the needle. a Presser foot lever CAUTION ● If the presser foot is not raised, the sewing machine cannot be threaded correctly. 22 or a Mark b Needle position button • If the needle is not correct, the thread may become...the wheel points up before threading the sewing machine. a Spool pin b Mark on the sewing machine. a Raise the presser foot using the presser foot b lever. If the upper threading is not correctly raised, the sewing machine can not be threaded. KNOWING YOUR SEWING MACHINE Upper threading Set the upper thread ...
Users Manual - English
Page 26
... the spool with fine, cross-wound thread, use the small spool cap, and leave a small space between the cap and the spool. KNOWING YOUR SEWING MACHINE Memo ● When sewing with your right hand, h and then pass the thread under the thread guide. Make sure you guide the thread through the k thread take...
... the spool with fine, cross-wound thread, use the small spool cap, and leave a small space between the cap and the spool. KNOWING YOUR SEWING MACHINE Memo ● When sewing with your right hand, h and then pass the thread under the thread guide. Make sure you guide the thread through the k thread take...

Users Manual - English
Page 27
...take-up lever before you feed the upper thread. ● If you incorrectly feed the thread you could be used with a 65/9 home sewing machine needle. When using the needle threader (for models equipped with the needle threader) The thread can easily be passed behind the needle bar thread guide...of 130/120 or thicker cannot be used with the needle threader. ● The needle threader cannot be injured. Follow steps a through 100/16 home sewing machine needle. Thread the needle from front to back and pull n out about 5 cm (2 inches) of the procedure a in your left hand, then ...
...take-up lever before you feed the upper thread. ● If you incorrectly feed the thread you could be used with a 65/9 home sewing machine needle. When using the needle threader (for models equipped with the needle threader) The thread can easily be passed behind the needle bar thread guide...of 130/120 or thicker cannot be used with the needle threader. ● The needle threader cannot be injured. Follow steps a through 100/16 home sewing machine needle. Thread the needle from front to back and pull n out about 5 cm (2 inches) of the procedure a in your left hand, then ...

Users Manual - English
Page 28
KNOWING YOUR SEWING MACHINE Fully lower the needle threader lever. a Presser foot lever Pass the end of the thread through the presser i foot, and then pull out about 5 cm (2 inches) of thread toward the rear of the machine. h a Hook b Thread While lightly holding the thread, release the f needle threader lever. d ...Pull the loop of the thread passed through the eye of the needle. X The end of the needle threader rotates toward the rear of the machine. Catch the thread on the thread with force or it may bend the needle. ● If the thread does not pass through the g ...
KNOWING YOUR SEWING MACHINE Fully lower the needle threader lever. a Presser foot lever Pass the end of the thread through the presser i foot, and then pull out about 5 cm (2 inches) of thread toward the rear of the machine. h a Hook b Thread While lightly holding the thread, release the f needle threader lever. d ...Pull the loop of the thread passed through the eye of the needle. X The end of the needle threader rotates toward the rear of the machine. Catch the thread on the thread with force or it may bend the needle. ● If the thread does not pass through the g ...

Users Manual - English
Page 30
... the instructions below. Use of any other needle may cause malfunctions. Needle types and their uses The sewing machine needle that you wish to sew. Refer to observe the following table when choosing the thread and needle appropriate for knits Cotton thread Synthetic... easily break, possibly resulting in injury. Memo ● The smaller the thread number, the thicker the thread; KNOWING YOUR SEWING MACHINE REPLACING THE NEEDLE This section provides information on the fabric and thread thickness. Fabric Type/Application Medium weight fabrics Thin fabrics Broadcloth...
... the instructions below. Use of any other needle may cause malfunctions. Needle types and their uses The sewing machine needle that you wish to sew. Refer to observe the following table when choosing the thread and needle appropriate for knits Cotton thread Synthetic... easily break, possibly resulting in injury. Memo ● The smaller the thread number, the thicker the thread; KNOWING YOUR SEWING MACHINE REPLACING THE NEEDLE This section provides information on the fabric and thread thickness. Fabric Type/Application Medium weight fabrics Thin fabrics Broadcloth...


