Brother International XR6060 Support Question
Brother International XR6060 Support Question
Find answers below for this question about Brother International XR6060.Need a Brother International XR6060 manual? We have 3 online manuals for this item!
Question posted by pimik on November 19th, 2013
How To Thread A Brother Sewing Machine Xr6060
The person who posted this question about this Brother International product did not include a detailed explanation. Please use the "Request More Information" button to the right if more details would help you to answer this question.
Current Answers
Related Brother International XR6060 Manual Pages
Users Manual - English - Page 1

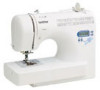
Computerized Sewing Machine
Operation Manual
Product Code:885-V60/V61/V62/V63/V64/V65
KNOWING YOUR SEWING MACHINE
SEWING BASICS
UTILITY STITCHES
APPENDIX
Please visit us at http://solutions.brother.com where you can get product support and answers to frequently asked questions (FAQs).
Users Manual - English - Page 6

... pin ...10
USING YOUR SEWING MACHINE 12
Power supply precautions ...12 Power supply ...12 Foot controller ...13 Sewing speed controller (for models equipped with the start/stop button 13 Changing the needle stop position ...13
THREADING THE MACHINE 14
Winding the bobbin ...14 Lower threading ...19 Upper threading ...22 Drawing up the lower thread ...27
REPLACING THE NEEDLE...
Users Manual - English - Page 10

... to control the sewing speed, and to start and stop sewing.
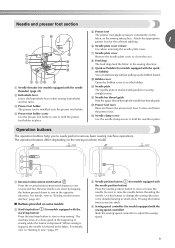
d Thread take-up lever (page 24)
e Thread cutter (page 40) Pass the threads through the thread cutter to lower the feed dogs.
s Thread guide cover (pages 16 and 22) Pass the thread under this thread guide when winding the bobbin thread and threading the machine.
t Handle Carry the sewing machine by its handle...
Users Manual - English - Page 11
... the reverse/reinforcement stitch button to easily perform various basic sewing machine operations. When sewing is stopped, the needle is installed onto the presser foot...sewing straight seams.
l Needle bar thread guide Pass the upper thread through the needle bar thread guide. Needle and presser foot section
e Presser foot
The presser foot applies pressure consistently on the sewing machine...
Users Manual - English - Page 16
... cap
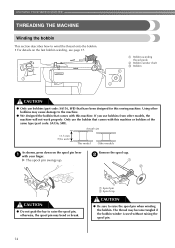
CAUTION
● Be sure to raise the spool pin when winding the bobbin. Remove the spool cap. X The spool pin swings up. KNOWING YOUR SEWING MACHINE
THREADING THE MACHINE
Winding the bobbin
This section describes how to wind the thread onto the bobbin. • For details on the spool pin lever a with your finger.
Users Manual - English - Page 18

... the start /stop the machine. Turn on the machine.
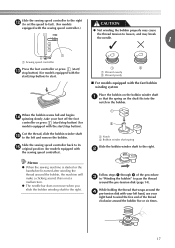
● When the foot controller is wound, when the thread runs low it in , the start /stop button) to wind the thread around the bobbin. i
While holding the end of the thread straight up.
a Spring on the bobbin. KNOWING YOUR SEWING MACHINE
Pull the thread to the right, pass...
Users Manual - English - Page 19
... controller).
Memo
● When the sewing machine is started or the handwheel is not a malfunction.
● The needle bar does not move when you slide the bobbin winding shaft to the right.
While holding the thread that the spring on the shaft fits into the
notch in "Winding the bobbin" to pass the...
Users Manual - English - Page 20

... with the start/stop button).
1
2
a Wound evenly b Wound poorly
Memo
● When the sewing machine is started or the handwheel is wound without cutting the thread using the foot controller, connect the foot controller before turning on the sewing machine. a Sewing speed controller
Turn on the machine.
● When the foot controller is plugged in cutter)
X The...
Users Manual - English - Page 21
... models
CAUTION
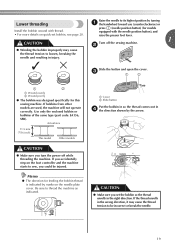
● Make sure you set bobbin, see page 20. CAUTION
● Make sure you turn the power off the sewing machine. Slide the button and open the cover. Lower threading
Raise the needle to its highest position by turning a the handwheel toward you could be incorrect or break the needle.
19...
Users Manual - English - Page 22

....
20 a Cover b Slide button
Insert the bobbin with your right hand so that the d end of the thread is on
the right side (see arrow b) until the cover clicks into place. KNOWING YOUR SEWING MACHINE
Hold the end of the thread, push the bobbin e down with your left hand as shown, lightly pull the...
Users Manual - English - Page 24

... to raise the needle. a Spool pin b Mark on the sewing machine. a
Raise the presser foot using the presser foot b lever. KNOWING YOUR SEWING MACHINE
Upper threading
Set the upper thread and thread the needle. • For details on the wheel points up before threading the sewing machine.
Raise the needle by turning the handwheel c toward you (counterclockwise) so that the...
Users Manual - English - Page 26
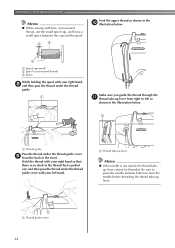
... spool cap, and leave a small space between the cap and the spool.
KNOWING YOUR SEWING MACHINE
Memo
● When sewing with your left as shown in the illustration below . cb
Feed the upper thread as
shown in the j illustration below .
a Thread take -up lever
Memo
● If the needle is pulled out, and then pass...
Users Manual - English - Page 27

... sure you raise the presser foot lever and the thread take -up lever is lowered, the upper thread cannot be used with a 65/9 home sewing machine
needle. Put the thread behind the
needle bar thread guide by holding the thread in "Upper threading" to thread the machine
to the needle bar thread guide.
● Make sure you turn the power off...
Users Manual - English - Page 28

... may cause sewing problems.
26 h
a Hook b Thread
While lightly holding the thread, release the f needle threader lever.
X The end of the needle threader rotates toward the rear of the needle, start from step c again. Raise the presser foot lever. The hook will pull the
thread through the eye of the machine.
KNOWING YOUR SEWING MACHINE
Fully lower...
Users Manual - English - Page 29
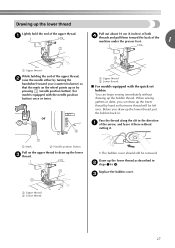
... them toward the back of the machine under the presser foot.
1
a Upper thread
While holding the end of the upper thread.
When sewing gathers or darts, you (counterclockwise) so that some thread will be removed. c
a Upper thread b Lower thread
27 Drawing up the lower thread
Lightly hold the end of the upper thread, b raise the needle either by pressing...
Users Manual - English - Page 30

... Tweed Jersey Tricot
Easily frayed fabrics
For top-stitching
Thread Type Cotton thread Synthetic thread Silk thread Cotton thread Synthetic thread Silk thread
Cotton thread
Synthetic thread Silk thread
Thread for the fabric that should be used depends on sewing machine needles. Memo
● The smaller the thread number, the thicker the thread; Failure to read and carefully follow the...
Users Manual - English - Page 31

... needle
1
a Flat surface
CAUTION
● Before replacing the needle, be straight according to turn off the sewing machine. Use the ball point needle for best results when
sewing patterns using the needle, place the flat side of the
a Flat surface
fabric or thread. Checking the needle
Replace the needle as a substitute.
1
■ Transparent nylon...
Users Manual - English - Page 38
...
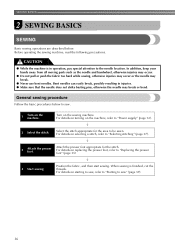
Follow the basic procedures below . For details on turning on the machine.
Position the fabric, and then start sewing. CAUTION
● While the machine is finished, cut the threads. In addition, keep your hands away from all moving parts such as the needle and handwheel, otherwise injuries may occur.
● Do not pull or...
Users Manual - English - Page 84

... the tab with your left hand.
b
Refer to the following steps to correct the c upper threading.
• If the bobbin was removed from the machine. APPENDIX
While holding the bobbin in place with your c finger, pass the thread through the slit in the
needle plate. • Hold down the bobbin with your right...
Users Manual - English - Page 91

...). Slowly turn the handwheel toward you e (counterclockwise) and check that the needle falls at the center of
incorrect upper threading or sewing thin fabrics.
Correctly thread the machine. g • For details on threading the machine, refer to "Lower threading" (page 19) and "Replacing the presser foot" (page 33). h
check that the needle
bar and feed dogs operate...
Similar Questions

Where Is The Start Button For A Brother Sewing Machine Xr6060
(Posted by elmosal 9 years ago)

How To Thread Brother Sewing Machine 2125i
(Posted by jvicToo 10 years ago)

How To Thread Brother Sewing Machine Ls2125i
(Posted by mcbeam 10 years ago)

How To Set Up A Tension For Brother Sewing Xr6060 Correctly
(Posted by Bobbmarkr 10 years ago)

Is There An Extension Arm Available For The Xr6060 Seweing Machine?
I am looking for a extension arm for the XR6060 seweing machine from Brother.
I am looking for a extension arm for the XR6060 seweing machine from Brother.
(Posted by jankay3 11 years ago)