
Users Manual - English
Page 4
...: • Your close attention is necessary when the machine is required when sewing: • Always pay close attention to clean the case. Benzene, thinner, and scouring powders can damage the case and machine, and should be used or where oxygen is being administered. • Do not use bent or damaged needles. •...
...: • Your close attention is necessary when the machine is required when sewing: • Always pay close attention to clean the case. Benzene, thinner, and scouring powders can damage the case and machine, and should be used or where oxygen is being administered. • Do not use bent or damaged needles. •...
Users Manual - English
Page 7
APPENDIX ...73 STITCH SETTINGS ...73 Utility stitches ...73 MAINTENANCE ...78 Cleaning the machine surface ...78 Cleaning the bobbin case ...78 TROUBLESHOOTING ...81 Frequent troubleshooting topics ...81 Upper thread tightened up ...81 Tangled thread on wrong side of fabric ...82 Incorrect thread tension ...85 Fabric ...
APPENDIX ...73 STITCH SETTINGS ...73 Utility stitches ...73 MAINTENANCE ...78 Cleaning the machine surface ...78 Cleaning the bobbin case ...78 TROUBLESHOOTING ...81 Frequent troubleshooting topics ...81 Upper thread tightened up ...81 Tangled thread on wrong side of fabric ...82 Incorrect thread tension ...85 Fabric ...

Users Manual - English
Page 22
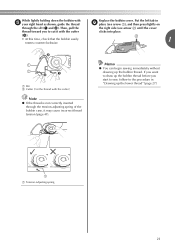
..., push the bobbin e down with your left hand as shown, lightly pull the thread to guide it through the tension-adjusting spring of the bobbin case, it may cause incorrect thread tension (page 41). a Tab CAUTION ● Make sure you (counterclockwise) or press (needle position button) (for feeding the bobbin thread...
..., push the bobbin e down with your left hand as shown, lightly pull the thread to guide it through the tension-adjusting spring of the bobbin case, it may cause incorrect thread tension (page 41). a Tab CAUTION ● Make sure you (counterclockwise) or press (needle position button) (for feeding the bobbin thread...
Users Manual - English
Page 23
... spring 21 If you want to cut it with e your right hand as shown, guide the thread through the tension-adjusting spring of the bobbin case, it may cause incorrect thread tension (page 41). Memo ● You can begin sewing immediately without drawing up the bobbin thread before you to draw...
... spring 21 If you want to cut it with e your right hand as shown, guide the thread through the tension-adjusting spring of the bobbin case, it may cause incorrect thread tension (page 41). Memo ● You can begin sewing immediately without drawing up the bobbin thread before you to draw...
Users Manual - English
Page 43
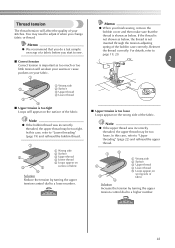
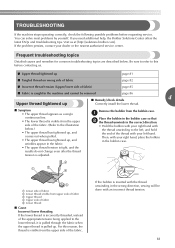
... fabric. 1 Memo ● When you change fabric or thread. If the thread is too tight Loops will appear on the wrong side of the bobbin case correctly. Note ● If the upper thread was incorrectly threaded, the upper thread may need to page 19, 20. 2 2 3 4 a Wrong side b ... d Lower thread ■ Upper tension is not shown as below , the thread is not inserted through the tension-adjusting spring of the fabric. In this case, refer to "Lower threading" (page 19) and rethread the bobbin thread. 1 2 3 5 4 a Wrong side b Surface c Upper thread d Lower thread e Loops appear...
... fabric. 1 Memo ● When you change fabric or thread. If the thread is too tight Loops will appear on the wrong side of the bobbin case correctly. Note ● If the upper thread was incorrectly threaded, the upper thread may need to page 19, 20. 2 2 3 4 a Wrong side b ... d Lower thread ■ Upper tension is not shown as below , the thread is not inserted through the tension-adjusting spring of the fabric. In this case, refer to "Lower threading" (page 19) and rethread the bobbin thread. 1 2 3 5 4 a Wrong side b Surface c Upper thread d Lower thread e Loops appear...
Users Manual - English
Page 45
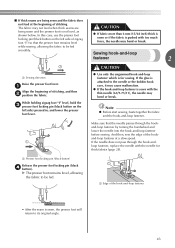
... much force, the needle may not feed when thick seams are being sewn and the presser foot is not level, as shown below. In this case, use the presser foot locking pin (black button on the left side of the hook-and-loop fastener • After the seam is for thick...
... much force, the needle may not feed when thick seams are being sewn and the presser foot is not level, as shown below. In this case, use the presser foot locking pin (black button on the left side of the hook-and-loop fastener • After the seam is for thick...

Users Manual - English
Page 80
... ● Make sure you clean it out firmly, and then wipe the surface of the machine is dirty, lightly soak a cloth in the bobbin case; b Loosen the presser-foot screw and the needle c clamp screw to f remove any dust from the race and its surrounding area. If the surface...detergent, squeeze it . Otherwise, you to remove the needle plate cover. a Cleaning brush b Race • Do not put oil on the bobbin case. 78 Cleaning the machine surface Slide the needle plate cover release toward d you may occur. Switch the machine off and unplug it out. APPENDIX MAINTENANCE...
... ● Make sure you clean it out firmly, and then wipe the surface of the machine is dirty, lightly soak a cloth in the bobbin case; b Loosen the presser-foot screw and the needle c clamp screw to f remove any dust from the race and its surrounding area. If the surface...detergent, squeeze it . Otherwise, you to remove the needle plate cover. a Cleaning brush b Race • Do not put oil on the bobbin case. 78 Cleaning the machine surface Slide the needle plate cover release toward d you may occur. Switch the machine off and unplug it out. APPENDIX MAINTENANCE...

Users Manual - English
Page 81
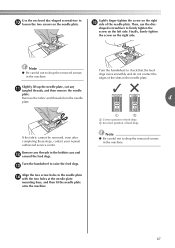
... plate h cover into the hole in the needle plate, and then correctly position of the machine. 79 CAUTION ● Never use a bobbin case that the U mark on g the bobbin case aligns with the top surface of the needle plate cover. • Align the U and { marks. Insert the bobbin... code: XE7560-001), contact your nearest authorized service center. ● Make sure that you fit the bobbin case properly, otherwise the needle may suffer. a U mark b { mark c Bobbin case • Make sure that the needle plate cover is scratched, otherwise the upper thread may become tangled, the needle may ...
... plate h cover into the hole in the needle plate, and then correctly position of the machine. 79 CAUTION ● Never use a bobbin case that the U mark on g the bobbin case aligns with the top surface of the needle plate cover. • Align the U and { marks. Insert the bobbin... code: XE7560-001), contact your nearest authorized service center. ● Make sure that you fit the bobbin case properly, otherwise the needle may suffer. a U mark b { mark c Bobbin case • Make sure that the needle plate cover is scratched, otherwise the upper thread may become tangled, the needle may ...
Users Manual - English
Page 83
...the upper thread is pulled up. TROUBLESHOOTING If the machine stops operating correctly, check the following possible problems before contacting us at [http://solutions.brother.com]. Visit us . ■ Upper thread tightened up page 81 ■ Tangled thread on wrong side of fabric page 82 ■ ...; Symptom • The upper thread appears as a single continuous line. • The lower thread is adjusted. a Place the bobbin in the bobbin case so that b the thread unwinds in the correct direction. • Hold the bobbin with your right hand, place the bobbin in the fabric. •...
...the upper thread is pulled up. TROUBLESHOOTING If the machine stops operating correctly, check the following possible problems before contacting us at [http://solutions.brother.com]. Visit us . ■ Upper thread tightened up page 81 ■ Tangled thread on wrong side of fabric page 82 ■ ...; Symptom • The upper thread appears as a single continuous line. • The lower thread is adjusted. a Place the bobbin in the bobbin case so that b the thread unwinds in the correct direction. • Hold the bobbin with your right hand, place the bobbin in the fabric. •...

Users Manual - English
Page 84
... with your right hand. c Slit d Cutter Sewing with the correct thread tension is possible after the bobbin has been correctly installed in the bobbin case. ■ Cause Incorrect upper threading If the upper thread is incorrectly threaded, the upper thread passed through the fabric cannot be a removed, cut ...it cannot be firmly pulled up " (page 81) to "Cleaning the bobbin case" on the lower side of the thread around the tab with your left hand. If it with the cutter. • After starting sewing, a rattling...
... with your right hand. c Slit d Cutter Sewing with the correct thread tension is possible after the bobbin has been correctly installed in the bobbin case. ■ Cause Incorrect upper threading If the upper thread is incorrectly threaded, the upper thread passed through the fabric cannot be a removed, cut ...it cannot be firmly pulled up " (page 81) to "Cleaning the bobbin case" on the lower side of the thread around the tab with your left hand. If it with the cutter. • After starting sewing, a rattling...

Users Manual - English
Page 88
Remove the bobbin case. a Needle plate cover release b Needle plate cover (front part) 86 If the operation could not be removed, remove it. c If ... "Removing the presser foot holder" (page 34). e If the fabric can be removed Continue with the following steps to clean the bobbin case. a Bobbin case Use the cleaning brush or a vacuum cleaner to remove the fabric from the machine. b Remove the needle. Lift up the fabric and ... from the race and its surrounding area. a Turn off the sewing machine. Continue with step j. h If threads remain in the bobbin case, remove them.
Remove the bobbin case. a Needle plate cover release b Needle plate cover (front part) 86 If the operation could not be removed, remove it. c If ... "Removing the presser foot holder" (page 34). e If the fabric can be removed Continue with the following steps to clean the bobbin case. a Bobbin case Use the cleaning brush or a vacuum cleaner to remove the fabric from the machine. b Remove the needle. Lift up the fabric and ... from the race and its surrounding area. a Turn off the sewing machine. Continue with step j. h If threads remain in the bobbin case, remove them.
Users Manual - English
Page 89
... dogs move smoothly and do not contact the edges of feed dogs Note ● Be careful not to drop the removed screws in the bobbin case and l around the feed dogs. Use the enclosed disc-shaped screwdriver to firmly tighten the screw on the left side. shaped screwdriver to j loosen the...
... dogs move smoothly and do not contact the edges of feed dogs Note ● Be careful not to drop the removed screws in the bobbin case and l around the feed dogs. Use the enclosed disc-shaped screwdriver to firmly tighten the screw on the left side. shaped screwdriver to j loosen the...

Users Manual - English
Page 90
...Attach the needle plate cover according to "Checking the needle" (page 29) and "Replacing the needle" (page 29). For a new bobbin case (part code: XE7560-001), contact your nearest authorized service center. ● Make sure that the indicated points are aligned before installing the bobbin... case. CAUTION ● Never use a bobbin case that the U mark on p the bobbin case aligns with the { mark on the race. APPENDIX Insert the bobbin case so that is scratched, otherwise the upper thread may become tangled,...
...Attach the needle plate cover according to "Checking the needle" (page 29) and "Replacing the needle" (page 29). For a new bobbin case (part code: XE7560-001), contact your nearest authorized service center. ● Make sure that the indicated points are aligned before installing the bobbin... case. CAUTION ● Never use a bobbin case that the U mark on p the bobbin case aligns with the { mark on the race. APPENDIX Insert the bobbin case so that is scratched, otherwise the upper thread may become tangled,...
Users Manual - English
Page 93
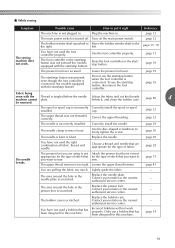
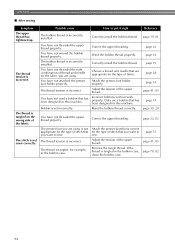
... clamp screw is scratched. page 73 page 41 You are appropriate for models equipped with the Thread is scratched. Replace the bobbin case. page 14 91 page 86 4 be removed. Correctly install the needle. Use the disc-shaped screwdriver to the left. The bobbin... use a bobbin that are pulling the fabric too much. ■ While sewing Symptom Possible cause How to put it , and clean the bobbin case. page 12 The main power switch is too tight. The foot controller or the start /stop button, disconnect the foot controller. Press the foot ...
... clamp screw is scratched. page 73 page 41 You are appropriate for models equipped with the Thread is scratched. Replace the bobbin case. page 14 91 page 86 4 be removed. Correctly install the needle. Use the disc-shaped screwdriver to the left. The bobbin... use a bobbin that are pulling the fabric too much. ■ While sewing Symptom Possible cause How to put it , and clean the bobbin case. page 12 The main power switch is too tight. The foot controller or the start /stop button, disconnect the foot controller. Press the foot ...

Users Manual - English
Page 94
...not being sewn, the stitch is scratched. Remove any knots or tangles. Contact your retailer or the nearest authorised service center. The bobbin case is scratched, or has a burr on it right The upper thread was not threaded correctly (for example, the spool is not installed ...page 29 page 29 - - - The needle is wrinkled. Incorrect bobbins will not work properly. Remove the tangled thread and clean the bobbin case. The fabric is bent or blunt. The bobbin is too tight. Shorten the stitch length, or sew with the stabilizer material under the fabric...
...not being sewn, the stitch is scratched. Remove any knots or tangles. Contact your retailer or the nearest authorised service center. The bobbin case is scratched, or has a burr on it right The upper thread was not threaded correctly (for example, the spool is not installed ...page 29 page 29 - - - The needle is wrinkled. Incorrect bobbins will not work properly. Remove the tangled thread and clean the bobbin case. The fabric is bent or blunt. The bobbin is too tight. Shorten the stitch length, or sew with the stabilizer material under the fabric...

Users Manual - English
Page 95
... used bobbin that has been designed for the type of stitch that you want to keep the presser foot level while sewing. The bobbin case is incorrect. Incorrect bobbins will not work properly. Only use a bobbin that has been designed for this machine. Lengthen the stitch length.... page 29 Zigzag foot "J" is correct for the type of fabric. Adjust the tension of stitch that are appropriate for example, in the bobbin case. pitched noise while sewing. page 78, 82 page 73 The needle is a high- Contact your retailer or the nearest authorized service center. -...
... used bobbin that has been designed for the type of stitch that you want to keep the presser foot level while sewing. The bobbin case is incorrect. Incorrect bobbins will not work properly. Only use a bobbin that has been designed for this machine. Lengthen the stitch length.... page 29 Zigzag foot "J" is correct for the type of fabric. Adjust the tension of stitch that are appropriate for example, in the bobbin case. pitched noise while sewing. page 78, 82 page 73 The needle is a high- Contact your retailer or the nearest authorized service center. -...
Users Manual - English
Page 96
...and needle that are appropriate for this machine. Reset the bobbin thread correctly. Remove the tangle thread. If the thread is tangled in the bobbin case. Possible cause The bobbin thread is set incorrectly. The bobbin thread is incorrect. How to sew. Adjust the tension of the upper thread. ... not appropriate for the type of stitch that has been designed for the type of thread and needle for example, in the bobbin case, clean the bobbin case. Adjust the tension of the upper thread. The presser foot you want to sew. Attach the presser-foot holder properly. The thread...
...and needle that are appropriate for this machine. Reset the bobbin thread correctly. Remove the tangle thread. If the thread is tangled in the bobbin case. Possible cause The bobbin thread is set incorrectly. The bobbin thread is incorrect. How to sew. Adjust the tension of the upper thread. ... not appropriate for the type of stitch that has been designed for the type of thread and needle for example, in the bobbin case, clean the bobbin case. Adjust the tension of the upper thread. The presser foot you want to sew. Attach the presser-foot holder properly. The thread...

Users Manual - English
Page 97
...stop button was pressed while the foot controller was pressed while the bobbin winder shaft is moved to the right. Clean the bobbin case to the left before continuing the operation. Be sure to sew. 95 A stitch other than the buttonhole or bar tack stitch ... to remove the tangled thread (p.82). Then, thread the upper thread properly, and continue the operation. After cleaning the bobbin case, insert the bobbin case properly. The start /stop button. Raise the buttonhole lever before continuing the operation. ERROR MESSAGES If an operation is performed incorrectly...
...stop button was pressed while the foot controller was pressed while the bobbin winder shaft is moved to the right. Clean the bobbin case to the left before continuing the operation. Be sure to sew. 95 A stitch other than the buttonhole or bar tack stitch ... to remove the tangled thread (p.82). Then, thread the upper thread properly, and continue the operation. After cleaning the bobbin case, insert the bobbin case properly. The start /stop button. Raise the buttonhole lever before continuing the operation. ERROR MESSAGES If an operation is performed incorrectly...
Users Manual - English
Page 98
APPENDIX i INDEX Numerics , 3-point zigzag stitch 45 59 A accessories 6 appliqués 61 B bar tack 66 basic stitching 47 blind hem stitching 48 bobbin 19 , bobbin case 20 78 bobbin , cover 9 19, 20 bobbin winder 8, 14, 17, 90, 91, 95 button sewing 55 , buttonhole foot 52 66 buttonhole , lever 9 53, 67 buttonhole ...
APPENDIX i INDEX Numerics , 3-point zigzag stitch 45 59 A accessories 6 appliqués 61 B bar tack 66 basic stitching 47 blind hem stitching 48 bobbin 19 , bobbin case 20 78 bobbin , cover 9 19, 20 bobbin winder 8, 14, 17, 90, 91, 95 button sewing 55 , buttonhole foot 52 66 buttonhole , lever 9 53, 67 buttonhole ...


