Brother International XR6060 Support Question
Brother International XR6060 Support Question
Find answers below for this question about Brother International XR6060.Need a Brother International XR6060 manual? We have 3 online manuals for this item!
Question posted by thethwings on May 28th, 2012
Carrying Or Storage Case And Free Arm.
Does the Brother XR6060 come with any type of case? Also does it have a free arm?
Current Answers
Related Brother International XR6060 Manual Pages
Users Manual - English - Page 1

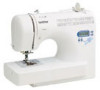
Computerized Sewing Machine
Operation Manual
Product Code:885-V60/V61/V62/V63/V64/V65
KNOWING YOUR SEWING MACHINE
SEWING BASICS
UTILITY STITCHES
APPENDIX
Please visit us at http://solutions.brother.com where you can get product support and answers to frequently asked questions (FAQs).
Users Manual - English - Page 6

... the needle stop position ...13
THREADING THE MACHINE 14
Winding the bobbin ...14 Lower threading ...19 Upper threading ...22 Drawing up the lower thread ...27
REPLACING THE NEEDLE 28
Needle precautions ...28 Needle types and their uses ...28 Checking the needle ...29 Replacing the needle ...29 Sewing with the twin needle ...31
REPLACING...
Users Manual - English - Page 8

...difficult for example, at the beginning of the presser foot holder is mentioned on the machine rating plate.
● The screw of sewing thick fabrics. (page 43)
aBlack button
6 Part Name
U.S.A. / Canada
Others
... foot "J"; KNOWING YOUR SEWING MACHINE
1 KNOWING YOUR SEWING MACHINE
ACCESSORIES
Included accessories
After opening the box, check that the following accessories are included.
Users Manual - English - Page 10

... guide cover (pages 16 and 22) Pass the thread under this thread guide when winding the bobbin thread and threading the machine. t Handle Carry the sewing machine by its handle when transporting the machine.
8 d Thread take-up lever (page 24)
e Thread cutter (page 40) Pass the threads through the thread cutter to lower the feed...
Users Manual - English - Page 11
...
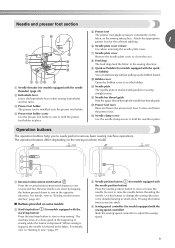
Remove the needle plate cover to easily perform various basic sewing machine operations. i Quick-set bobbin (for models equipped with the quick-
The machine sews at a slow speed at the beginning of sewing while the button is lowered in place. c Needle position button (for detailed sewing in place.
m Presser foot lever Raise and lower the presser...
Users Manual - English - Page 12

... panel
The operation panel, located on the front of the sewing machine, allows you wish to reduce the stitch length; a LCD (liquid crystal display)
The number of the selected stitch (1), the presser foot type to select a stitch and specify how the stitch will be stored by attaching it with your finger to the...
Users Manual - English - Page 13

...tab on the spool pin into
Remove the spool from the spool pin, and then
the hole on the sewing machine
before storing or if the spool pin will not be used, return the spool pin to secure it.
...spool pin
■ Installing the spool pin
When placing the cover on the back of the machine, as
fold up the spool pin, as shown in the illustration,
shown.
1
until it locks into place to its...
Users Manual - English - Page 14

.... Pulling on . Power supply
Insert the plug into the electrical outlet and the power supply jack on the machine.
● Do not insert the plug on the cord. b
X The sewing lamp comes on when the machine is intended to fit in a polarized outlet only one
blade wider than the other appliances plugged in to...
Users Manual - English - Page 15

... accidentally being started. After turning on the foot controller. Slide the sewing speed controller to the left and turn off the sewing machine in order to select the desired sewing speed. When you take your foot off the sewing machine.
Hold down lightly, the machine will stop position changes to leave the needle in the fabric when...
Users Manual - English - Page 16
... bobbins of the same type (part code: SA156, SFB). Actual size
11.5 mm (7/16 inch)
This model
Other models
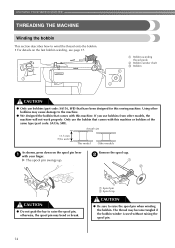
As shown, press down on the fast bobbin winding, see page 17. a Bobbin-winding
thread guide b Bobbin winder shaft c Bobbin
CAUTION
● Only use the bobbin that comes with this sewing machine.
b
CAUTION
● Do...
Users Manual - English - Page 18

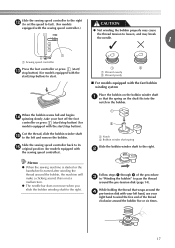
...wind the thread counterclockwise between the discs, pulling it in as far as possible. KNOWING YOUR SEWING MACHINE
Pull the thread to the right, pass it under the pretension disk. CAUTION
● ...- 3-15/16 inches)
Trim the excess thread above the bobbin. a Spring on the sewing machine. Then stop button) to wind the thread around the bobbin. Turn the bobbin clockwise, by hand, until ...
Users Manual - English - Page 19
... into the
notch in "Winding the bobbin" to wind the free end of the procedure c in the bobbin.
b
Follow steps a through g of the thread clockwise around the d pre-tension disk with your left and remove the bobbin.
Memo
● When the sewing machine is started or the handwheel is not a malfunction.
● The...
Users Manual - English - Page 20

... tension to loosen, and may bend or break when the bobbin thread starts to start / h stop button).
1
2
a Wound evenly b Wound poorly
Memo
● When the sewing machine is started or the handwheel is wound without cutting the thread using the foot controller, connect the foot controller before turning on the...
Users Manual - English - Page 22

...through the slit.
• Replace the cover so that the end of the thread comes out from the left tab in the right direction. Raise the needle to its ...machine as shown, lightly pull the thread to be incorrect or break the needle.
20 Put the left side of the bobbin case, it may cause the thread tension to guide it may cause incorrect thread tension (page 41). Turn off the sewing machine...
Users Manual - English - Page 31

...type marking
■ Correct needle
1
a Flat surface
CAUTION
● Before replacing the needle, be uneven or puckered or there may occur if the foot controller or the start/ stop button is not correct, particularly when sewing...
1
■ Transparent nylon thread
Use a 90/14 to turn off the sewing machine. Raise the needle by turning the handwheel a toward you (counterclockwise) so that...
Users Manual - English - Page 80

...-foot screw and the needle c clamp screw to f remove any dust from the race and its
surrounding area. APPENDIX
MAINTENANCE
Simple sewing machine maintenance operations are described below.
e Grasp the bobbin case, and then pull it should be injured.
Otherwise, you to remove the needle plate cover.
a Needle plate cover b Needle plate cover...
Users Manual - English - Page 88

..., contact your nearest authorized service center.
■ Removing the fabric from the machine
Immediately stop the sewing machine. Continue with step j. b
Remove the needle. Remove the presser foot and ... Remove the bobbin case. c If the needle is caught in the bobbin case, remove
them.
a Needle plate cover release b Needle plate cover (front part)
86
a
Turn off the sewing machine.
Users Manual - English - Page 93
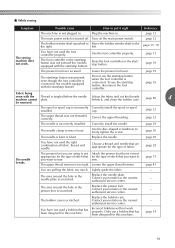
... the Thread is tangled below it right
Reference
The machine is not plugged in the needle plate is correct
appropriate for the type of stitch that you want to
you are using is not Attach the presser foot that is scratched. sew.
Replace the bobbin case. Only use a bobbin that has been designed for...
Users Manual - English - Page 97

... up because the thread is lowered.
After cleaning the bobbin case, insert the bobbin case properly. Note
● If error message "F1" through "F9" appears in the table. Follow the instructions indicated in the LCD while the sewing machine is being used, the machine may be malfunctioning. Disconnect the foot controller, and then press the...
Users Manual - English - Page 98
...
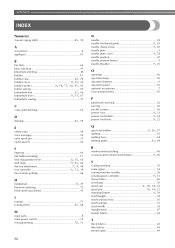
, bobbin case 20 78 bobbin , cover 9 19, 20 bobbin winder 8, 14, 17, 90, 91, 95
button sewing 55
, buttonhole foot 52 66 buttonhole , lever 9 53, 67
buttonhole sewing 51
C
... stitching 40
, reverse/reinforcement stitch button 9 40
S
scallop stitching 70 seam ripper 54 sewing machine needles 28
, sewing speed controller 9 13
sleeve holes 66 smocking 70
spool cap 6 10, 14, 23 ...
Similar Questions

How To Slide The Attachment's Arm For Optional Embroidery Unit Storage Case?
I forgot how to safely slide the embroidery attachment's arm over to place inside my plastic storage...
I forgot how to safely slide the embroidery attachment's arm over to place inside my plastic storage...
(Posted by bgooby 8 years ago)

Where Is The Start Button For A Brother Sewing Machine Xr6060
(Posted by elmosal 9 years ago)


How To Thread A Brother Sewing Machine Xr6060
(Posted by pimik 10 years ago)
Is There An Extension Arm Available For The Xr6060 Seweing Machine?
I am looking for a extension arm for the XR6060 seweing machine from Brother.
I am looking for a extension arm for the XR6060 seweing machine from Brother.
(Posted by jankay3 11 years ago)