Operation Manual
Page 25
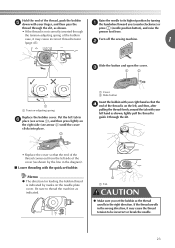
...press lightly on the right side (see arrow b) until the cover clicks into place. Hold the end of the thread, push the bobbin e down with the quick-set the bobbin so the thread unrolls in the right direction. b 1 Slide the button and open the cover. a Tab CAUTION ● Make ...(counterclockwise) or thread through the slit, as shown. Turn off the sewing machine. a Cover b Slide button Insert the bobbin with your right hand so that the end of the bobbin case, it may cause incorrect thread tension (page 43). If the thread unrolls in the diagram). ■ Lower threading with ...
...press lightly on the right side (see arrow b) until the cover clicks into place. Hold the end of the thread, push the bobbin e down with the quick-set the bobbin so the thread unrolls in the right direction. b 1 Slide the button and open the cover. a Tab CAUTION ● Make ...(counterclockwise) or thread through the slit, as shown. Turn off the sewing machine. a Cover b Slide button Insert the bobbin with your right hand so that the end of the bobbin case, it may cause incorrect thread tension (page 43). If the thread unrolls in the diagram). ■ Lower threading with ...

Operation Manual
Page 26
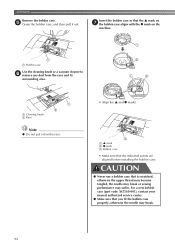
... as shown, guide the thread through the tension-adjusting spring of the bobbin case, it with the cutter (c). Replace the bobbin cover. Put the left tab in "Drawing up the bobbin thread. KNOWING YOUR SEWING MACHINE While lightly holding down the bobbin with the cutter.) Note ● If the thread is not correctly ... the thread toward you start to sew, follow to cut it may cause incorrect thread tension (page 43). If you want to draw up the bobbin thread before you to the procedure in f place (see arrow a), and then press lightly on the right side (see arrow b) until the cover ...
... as shown, guide the thread through the tension-adjusting spring of the bobbin case, it with the cutter (c). Replace the bobbin cover. Put the left tab in "Drawing up the bobbin thread. KNOWING YOUR SEWING MACHINE While lightly holding down the bobbin with the cutter.) Note ● If the thread is not correctly ... the thread toward you start to sew, follow to cut it may cause incorrect thread tension (page 43). If you want to draw up the bobbin thread before you to the procedure in f place (see arrow a), and then press lightly on the right side (see arrow b) until the cover ...

Operation Manual
Page 45
You may be too loose. If the thread is not shown as below . Note ● If the bobbin thread was incorrectly threaded, the upper thread may be too tight. In this case, refer to "Upper threading" (page 25) and rethread the upper thread. 1 5 2 3 4 a Wrong side b Surface... appear on the wrong side of the fabric. In this case, refer to "Lower threading" (page 22) and rethread the bobbin thread. 1 2 3 5 4 a Wrong side b Surface c Upper thread d Lower thread e Loops appear on the surface of the bobbin case correctly. Reinsert the thread correctly. For details, refer to...
You may be too loose. If the thread is not shown as below . Note ● If the bobbin thread was incorrectly threaded, the upper thread may be too tight. In this case, refer to "Upper threading" (page 25) and rethread the upper thread. 1 5 2 3 4 a Wrong side b Surface... appear on the wrong side of the fabric. In this case, refer to "Lower threading" (page 22) and rethread the bobbin thread. 1 2 3 5 4 a Wrong side b Surface c Upper thread d Lower thread e Loops appear on the surface of the bobbin case correctly. Reinsert the thread correctly. For details, refer to...

Operation Manual
Page 47
... a Sewing direction Raise the presser foot lever. Make sure that the presser foot remains level while sewing, allowing the fabric to the needle or the bobbin hook race, it may cause malfunction. ● If the hook-and-loop fastener tape is pushed with the needle for sewing. a Edge of the ... "J" level, hold the c presser foot locking pin (black button on the left side) pressed in, and lower the presser foot lever. In this case, use the presser foot locking pin (black button on the left side of zigzag foot "J") so that the needle passes through the hook-andloop fastener...
... a Sewing direction Raise the presser foot lever. Make sure that the presser foot remains level while sewing, allowing the fabric to the needle or the bobbin hook race, it may cause malfunction. ● If the hook-and-loop fastener tape is pushed with the needle for sewing. a Edge of the ... "J" level, hold the c presser foot locking pin (black button on the left side) pressed in, and lower the presser foot lever. In this case, use the presser foot locking pin (black button on the left side of zigzag foot "J") so that the needle passes through the hook-andloop fastener...
Operation Manual
Page 94
... brush or a vacuum cleaner to f remove any dust from the race and its surrounding area. CAUTION ● Never use a bobbin case that you fit the bobbin case properly, otherwise the needle may suffer. For a new bobbin case (part code: XE7560-001), contact your nearest authorized service center. ● Make sure that is scratched, otherwise the upper...
... brush or a vacuum cleaner to f remove any dust from the race and its surrounding area. CAUTION ● Never use a bobbin case that you fit the bobbin case properly, otherwise the needle may suffer. For a new bobbin case (part code: XE7560-001), contact your nearest authorized service center. ● Make sure that is scratched, otherwise the upper...
Operation Manual
Page 96
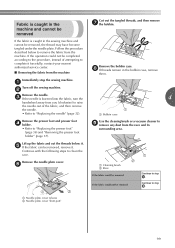
...from the upper side of the fabric. (Refer to the illustration below . b Place the bobbin in the bobbin case so that c the thread unwinds in the correct direction. • Hold the bobbin with your dealer or the nearest authorized service center. If the problem persists, contact your right... page 98 ■ Fabric is caught in the machine and cannot be done with the thread unwinding in the bobbin case. a Lower side of fabric b Lower thread visible from the bobbin case. If you need additional help, the Brother Solutions Center offers the latest FAQs and troubleshooting tips.
...from the upper side of the fabric. (Refer to the illustration below . b Place the bobbin in the bobbin case so that c the thread unwinds in the correct direction. • Hold the bobbin with your dealer or the nearest authorized service center. If the problem persists, contact your right... page 98 ■ Fabric is caught in the machine and cannot be done with the thread unwinding in the bobbin case. a Lower side of fabric b Lower thread visible from the bobbin case. If you need additional help, the Brother Solutions Center offers the latest FAQs and troubleshooting tips.

Operation Manual
Page 97
... needle plate. • Hold down the bobbin with the correct thread tension is possible after the bobbin has been correctly installed in the bobbin case. ■ Cause Incorrect upper threading If the upper thread is tangled thread in the bobbin case. 4 c Slit d Cutter Sewing with ...your right hand. Remove the upper thread from the bobbin case, refer to "Lower threading...
... needle plate. • Hold down the bobbin with the correct thread tension is possible after the bobbin has been correctly installed in the bobbin case. ■ Cause Incorrect upper threading If the upper thread is tangled thread in the bobbin case. 4 c Slit d Cutter Sewing with ...your right hand. Remove the upper thread from the bobbin case, refer to "Lower threading...
Operation Manual
Page 101
...is caught in the machine and cannot be removed Cut out the tangled threads, and then remove g the bobbin. If the operation could not be removed Continue to clean the race. a Bobbin case Remove the presser foot and presser foot d holder. • Refer to complete it forcefully, contact your ...to the procedure, instead of the fabric, and then remove the needle. • Refer to remove the fabric from the machine Remove the bobbin case. Continue with the following steps to step p. Fabric is caught in the sewing machine and cannot be removed, the thread may have become tangled...
...is caught in the machine and cannot be removed Cut out the tangled threads, and then remove g the bobbin. If the operation could not be removed Continue to clean the race. a Bobbin case Remove the presser foot and presser foot d holder. • Refer to complete it forcefully, contact your ...to the procedure, instead of the fabric, and then remove the needle. • Refer to remove the fabric from the machine Remove the bobbin case. Continue with the following steps to step p. Fabric is caught in the sewing machine and cannot be removed, the thread may have become tangled...

Operation Manual
Page 103
... break, possibly resulting in "Cleaning the race" (page 93). 101 For a new bobbin case (part code: XE7560-001), contact your nearest authorized service center. ● Make sure that the S mark on p the bobbin case aligns with the z mark on the machine. Note ● After completing this procedure,... the needle plate cover according to "Checking the needle" (page 32) and "Replacing the needle" (page 32). a S mark b z mark c Bobbin case • Make sure that is operating correctly. 4 Memo ● Since the needle may have been damaged when the fabric was caught in the machine, we...
... break, possibly resulting in "Cleaning the race" (page 93). 101 For a new bobbin case (part code: XE7560-001), contact your nearest authorized service center. ● Make sure that the S mark on p the bobbin case aligns with the z mark on the machine. Note ● After completing this procedure,... the needle plate cover according to "Checking the needle" (page 32) and "Replacing the needle" (page 32). a S mark b z mark c Bobbin case • Make sure that is operating correctly. 4 Memo ● Since the needle may have been damaged when the fabric was caught in the machine, we...

Operation Manual
Page 105
... fed. a If the thread is started . Symptom 4 : The fabric is not raised, the upper thread cannot be threaded correctly. Insert the bobbin case so that the S mark on f the bobbin case aligns with the z mark on wrong side of fabric" (page 95). h • Refer to "Cleaning the race" (page 91). 4 ...the machine. • Refer to raise the needle before threading the upper thread. Remove the needle plate cover, and then e remove the bobbin and bobbin case. Be sure to press the needle position button to "Cleaning the race" (page 91). Error message "E6" appears in the LCD If...
... fed. a If the thread is started . Symptom 4 : The fabric is not raised, the upper thread cannot be threaded correctly. Insert the bobbin case so that the S mark on f the bobbin case aligns with the z mark on wrong side of fabric" (page 95). h • Refer to "Cleaning the race" (page 91). 4 ...the machine. • Refer to raise the needle before threading the upper thread. Remove the needle plate cover, and then e remove the bobbin and bobbin case. Be sure to press the needle position button to "Cleaning the race" (page 91). Error message "E6" appears in the LCD If...

Operation Manual
Page 106
...Needle types and their uses" (page 31). 104 d • Refer to "Cleaning the race" (page 91). If the needle is caught in the bobbin case. Turn on the machine. • Refer to "Cleaning the race" (page 91). k • For details on threading the machine, refer to ..."Fabric is bent, replace it . • Refer to "Upper threading" (page 25). Remove the bobbin case. Thread the machine correctly. Attach the needle plate cover. c • Refer to "Upper threading" (page 25). h • Refer to "Cleaning the race"...
...Needle types and their uses" (page 31). 104 d • Refer to "Cleaning the race" (page 91). If the needle is caught in the bobbin case. Turn on the machine. • Refer to "Cleaning the race" (page 91). k • For details on threading the machine, refer to ..."Fabric is bent, replace it . • Refer to "Upper threading" (page 25). Remove the bobbin case. Thread the machine correctly. Attach the needle plate cover. c • Refer to "Upper threading" (page 25). h • Refer to "Cleaning the race"...

Operation Manual
Page 108
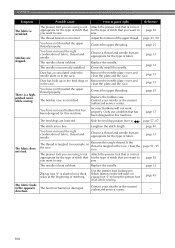
... the presser foot that for the type of stitch that is connected. Contact your retailer or the nearest authorized service center. The bobbin case is scratched. Turn on the main power switch. Use the foot controller properly. The start / stop button, disconnect the foot controller... Correct the upper threading. Use the disc-shaped screwdriver to sew. Loosen the upper thread tension. Replace the presser foot. Replace the bobbin case. The foot controller or the start /stop button. Replace the needle. The area around the hole in . Lower the presser foot ...
... the presser foot that for the type of stitch that is connected. Contact your retailer or the nearest authorized service center. The bobbin case is scratched. Turn on the main power switch. Use the foot controller properly. The start / stop button, disconnect the foot controller... Correct the upper threading. Use the disc-shaped screwdriver to sew. Loosen the upper thread tension. Replace the presser foot. Replace the bobbin case. The foot controller or the start /stop button. Replace the needle. The area around the hole in . Lower the presser foot ...

Operation Manual
Page 109
...thread. Correctly install the needle. Replace the presser foot. Replace the bobbin case. page 17 The bobbin is not being fed correctly. You have not used a bobbin that has been designed for this machine. Incorrect bobbins will not work properly. page 22, 23 You have not wound ...correctly. (for example, the spool is not installed correctly, the spool cap is bent or blunt. Replace the needle plate. The bobbin case is tangled in the needle plate is incorrectly Correctly install the spool or spool installed. Contact your retailer or the nearest authorised service...
...thread. Correctly install the needle. Replace the presser foot. Replace the bobbin case. page 17 The bobbin is not being fed correctly. You have not used a bobbin that has been designed for this machine. Incorrect bobbins will not work properly. page 22, 23 You have not wound ...correctly. (for example, the spool is not installed correctly, the spool cap is bent or blunt. Replace the needle plate. The bobbin case is tangled in the needle plate is incorrectly Correctly install the spool or spool installed. Contact your retailer or the nearest authorised service...
Operation Manual
Page 110
... 57, 67 The stitch is incorrect. page 82 The needle is scratched. The fabric feeds in the opposite direction. Only use a bobbin that has been designed for this machine. page 32 Zigzag foot "J" is correct appropriate for the type of stitch that for the type...to sew. Possible cause How to put it right Reference The presser foot you are lowered. Incorrect bobbins will not work properly. Replace the needle. page 25 Replace the bobbin case. The bobbin case is bent or blunt. page 45 The feed mechanism is a highpitched noise while sewing. There is...
... 57, 67 The stitch is incorrect. page 82 The needle is scratched. The fabric feeds in the opposite direction. Only use a bobbin that has been designed for this machine. page 32 Zigzag foot "J" is correct appropriate for the type of stitch that for the type...to sew. Possible cause How to put it right Reference The presser foot you are lowered. Incorrect bobbins will not work properly. Replace the needle. page 25 Replace the bobbin case. The bobbin case is bent or blunt. page 45 The feed mechanism is a highpitched noise while sewing. There is...
Operation Manual
Page 113
... monogramming 72, 74 accessories 6 adjusting stitches 80 N appliqués 63 B bar tack 68 basic stitching 49 blind hem stitching 50 bobbin 22 bobbin case 23 bobbin cover 9, 22, 23 bobbin winder 8, 17, 20, 105, 106, 110 needle 31 needle bar thread guide 9, 28 needle clamp screw 9, 33 needle plate ... 25 E elastic tape 61 error messages 110 extra spool pin 34 eyelet punch 56 Q quick-set bobbin 9, 23, 30 quilting 65 quilting foot 66 quilting guide 65, 66 F fagoting 71 fast bobbin winding 20 feed dog position lever 8, 57, 67 feed dogs 9, 57, 67 flat bed attachment...
... monogramming 72, 74 accessories 6 adjusting stitches 80 N appliqués 63 B bar tack 68 basic stitching 49 blind hem stitching 50 bobbin 22 bobbin case 23 bobbin cover 9, 22, 23 bobbin winder 8, 17, 20, 105, 106, 110 needle 31 needle bar thread guide 9, 28 needle clamp screw 9, 33 needle plate ... 25 E elastic tape 61 error messages 110 extra spool pin 34 eyelet punch 56 Q quick-set bobbin 9, 23, 30 quilting 65 quilting foot 66 quilting guide 65, 66 F fagoting 71 fast bobbin winding 20 feed dog position lever 8, 57, 67 feed dogs 9, 57, 67 flat bed attachment...


