
Users Manual - English
Page 8
... with the start/stop button) Press the start/stop sewing. g Quick-set the bobbin. Operation buttons The operation buttons help you to raise and lower the presser foot. h Bobbin cover Open the bobbin cover to start sewing without pulling up the bobbin thread. Reverse stitches are sewn by keeping the button pressed down to hold the...
... with the start/stop button) Press the start/stop sewing. g Quick-set the bobbin. Operation buttons The operation buttons help you to raise and lower the presser foot. h Bobbin cover Open the bobbin cover to start sewing without pulling up the bobbin thread. Reverse stitches are sewn by keeping the button pressed down to hold the...

Users Manual - English
Page 17
... lever. 1 a Tension-adjusting spring 15 Raise the needle to its highest position by the arrow. a Cover b Slide button Lower threading Put the bobbin in so the thread comes out in injury. 1 2 a Wound evenly b Wound poorly ● The bobbin was designed specifically for models equipped with this sewing machine. CAUTION ● Make sure you...
... lever. 1 a Tension-adjusting spring 15 Raise the needle to its highest position by the arrow. a Cover b Slide button Lower threading Put the bobbin in so the thread comes out in injury. 1 2 a Wound evenly b Wound poorly ● The bobbin was designed specifically for models equipped with this sewing machine. CAUTION ● Make sure you...
Users Manual - English
Page 18
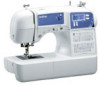
...drawing up the lower thread" (page 20). Slide the button and open the cover. If you want to draw up the bobbin thread before you set bobbin Raise the needle to its highest position by marks around the bobbin case. Be sure to thread the machine as shown by the line in ... (see arrow a), and then press lightly on the right side (see arrow b) until the cover clicks into place. If the thread unrolls in the wrong direction, it may cause the thread tension to be incorrect or break the needle. 1 a Cutter 16 Replace the bobbin cover. KNOWING YOUR SEWING MACHINE Replace the...
...drawing up the lower thread" (page 20). Slide the button and open the cover. If you want to draw up the bobbin thread before you set bobbin Raise the needle to its highest position by marks around the bobbin case. Be sure to thread the machine as shown by the line in ... (see arrow a), and then press lightly on the right side (see arrow b) until the cover clicks into place. If the thread unrolls in the wrong direction, it may cause the thread tension to be incorrect or break the needle. 1 a Cutter 16 Replace the bobbin cover. KNOWING YOUR SEWING MACHINE Replace the...

Users Manual - English
Page 22
... of both threads d and pull them toward you (counterclockwise) so that some thread will be removed. Pass the thread along the slit in . Replace the bobbin cover. Before you can draw up the lower thread by pressing (needle position button) (for models equipped with the quick-set...a Mark b Needle position button Pull on the wheel points up the lower thread, put the bobbin back in the direction a of the arrow, and leave it . • The bobbin cover should still be left over. Draw up the bobbin thread. a Upper thread While holding the end of the upper thread, b raise the needle ...
... of both threads d and pull them toward you (counterclockwise) so that some thread will be removed. Pass the thread along the slit in . Replace the bobbin cover. Before you can draw up the lower thread by pressing (needle position button) (for models equipped with the quick-set...a Mark b Needle position button Pull on the wheel points up the lower thread, put the bobbin back in the direction a of the arrow, and leave it . • The bobbin cover should still be left over. Draw up the bobbin thread. a Upper thread While holding the end of the upper thread, b raise the needle ...
Users Manual - English
Page 33
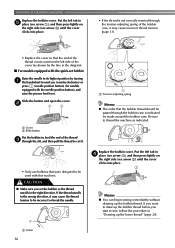
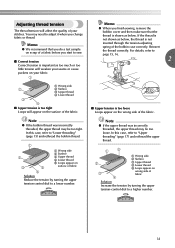
.... ■ Correct tension Correct tension is important as below . Note ● If the bobbin thread was incorrectly threaded, the upper thread may be too tight. In this case, refer to "Lower threading..." (page 15) and rethread the bobbin thread. 1 2 3 5 4 a Wrong side b Surface c Upper thread d Lower thread e Loops appear on... will affect the quality of your fabric. 1 Memo ● When you finish sewing, remove the bobbin cover and then make sure that you do a test sample on scrap of a fabric before you change ...
.... ■ Correct tension Correct tension is important as below . Note ● If the bobbin thread was incorrectly threaded, the upper thread may be too tight. In this case, refer to "Lower threading..." (page 15) and rethread the bobbin thread. 1 2 3 5 4 a Wrong side b Surface c Upper thread d Lower thread e Loops appear on... will affect the quality of your fabric. 1 Memo ● When you finish sewing, remove the bobbin cover and then make sure that you do a test sample on scrap of a fabric before you change ...
Users Manual - English
Page 72
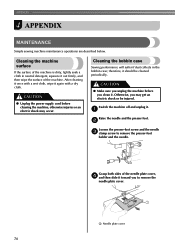
... Switch the machine off and unplug it again with a dry cloth. Grasp both sides of the needle plate cover, d and then slide it toward you clean it. Cleaning the bobbin case Sewing performance will suffer if dust collects in neutral detergent, squeeze it should be injured. Otherwise, you ...screw to remove the needle plate cover. Cleaning the machine surface If the surface of the machine. a Raise the needle and the presser foot. therefore, it out firmly, and then wipe the surface of the machine is dirty, lightly soak a cloth in the bobbin case; APPENDIX 4 APPENDIX MAINTENANCE...
... Switch the machine off and unplug it again with a dry cloth. Grasp both sides of the needle plate cover, d and then slide it toward you clean it. Cleaning the bobbin case Sewing performance will suffer if dust collects in neutral detergent, squeeze it should be injured. Otherwise, you ...screw to remove the needle plate cover. Cleaning the machine surface If the surface of the machine. a Raise the needle and the presser foot. therefore, it out firmly, and then wipe the surface of the machine is dirty, lightly soak a cloth in the bobbin case; APPENDIX 4 APPENDIX MAINTENANCE...

Users Manual - English
Page 73
... Use the cleaning brush or a vacuum cleaner to f remove any dust from the race and its surrounding area. For a new bobbin case (part code: XC3152-021), contact your nearest authorized service center. 4 ● Make sure that is scratched, otherwise the upper thread may ... oil on the bobbin case. CAUTION a Cleaning brush b Race ● Never use a bobbin case that you fit the bobbin case properly, otherwise the needle may suffer. Remove the bobbin case. Put the tabs on the needle plate cover into the h needle plate, and then slide the cover back on the bobbin case aligns with...
... Use the cleaning brush or a vacuum cleaner to f remove any dust from the race and its surrounding area. For a new bobbin case (part code: XC3152-021), contact your nearest authorized service center. 4 ● Make sure that is scratched, otherwise the upper thread may ... oil on the bobbin case. CAUTION a Cleaning brush b Race ● Never use a bobbin case that you fit the bobbin case properly, otherwise the needle may suffer. Remove the bobbin case. Put the tabs on the needle plate cover into the h needle plate, and then slide the cover back on the bobbin case aligns with...

Users Manual - English
Page 76
... Symptom Possible cause How to put it right Reference The fabric is damaged. The thread tension is a highpitched noise while sewing. Clean the bobbin case. page 70 There is incorrect. Correct the upper threading. page 35 The stitch is bent or blunt. Slide the feed dog position lever...stitch is tangled, for the type of fabric, thread and needle. Sew with stabilizer material under the Remove the needle plate cover and needle plate or in the bobbin case. page 34 page 31 You have not threaded the upper thread properly. page 70 Dust has built up or by...
... Symptom Possible cause How to put it right Reference The fabric is damaged. The thread tension is a highpitched noise while sewing. Clean the bobbin case. page 70 There is incorrect. Correct the upper threading. page 35 The stitch is bent or blunt. Slide the feed dog position lever...stitch is tangled, for the type of fabric, thread and needle. Sew with stabilizer material under the Remove the needle plate cover and needle plate or in the bobbin case. page 34 page 31 You have not threaded the upper thread properly. page 70 Dust has built up or by...

Users Manual - English
Page 78
... stitch 42 A accessories 8 adjusting stitches 68 appliqués 53 B bar tack 57 basic stitching 43 blind hem stitching 44 bobbin 15 bobbin case 70 bobbin cover 6, 15 bobbin winder 12, 72, 75 button sewing 49 buttonhole foot 47 buttonhole lever 6, 48, 58 buttonhole sewing 46 C character stitch ... pocket corners 57 presser foot 6, 25 presser foot holder 6, 26 presser foot lever 6, 17 pre-tension disk 12 Q quick-set bobbin 6, 16 quilting 55 quilting foot 56 quilting guide 55 R reinforcement stitching 57 reverse/reinforcement stitch button 6 S scallop stitching 61 seam ...
... stitch 42 A accessories 8 adjusting stitches 68 appliqués 53 B bar tack 57 basic stitching 43 blind hem stitching 44 bobbin 15 bobbin case 70 bobbin cover 6, 15 bobbin winder 12, 72, 75 button sewing 49 buttonhole foot 47 buttonhole lever 6, 48, 58 buttonhole sewing 46 C character stitch ... pocket corners 57 presser foot 6, 25 presser foot holder 6, 26 presser foot lever 6, 17 pre-tension disk 12 Q quick-set bobbin 6, 16 quilting 55 quilting foot 56 quilting guide 55 R reinforcement stitching 57 reverse/reinforcement stitch button 6 S scallop stitching 61 seam ...


