Users Manual - English
Page 4
... ...20 Needle types and their uses ...20 Checking the needle ...21 Replacing the needle ...21 Sewing with a twin needle ...23 REPLACING THE PRESSER FOOT 24 Replacing the presser foot ...24 Removing the presser foot holder ...25 2. CONTENTS 1. SEWING BASICS 26 SEWING ...26 General sewing procedure ...26 Selecting stitching ...27 Starting to sew ...28 Thread tension ...29 USEFUL...
... ...20 Needle types and their uses ...20 Checking the needle ...21 Replacing the needle ...21 Sewing with a twin needle ...23 REPLACING THE PRESSER FOOT 24 Replacing the presser foot ...24 Removing the presser foot holder ...25 2. CONTENTS 1. SEWING BASICS 26 SEWING ...26 General sewing procedure ...26 Selecting stitching ...27 Starting to sew ...28 Thread tension ...29 USEFUL...
Users Manual - English
Page 7
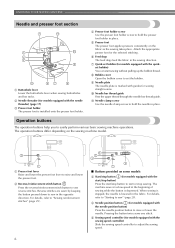
...6 e Sewing speed controller (for models equipped with the needle threader) (page 17) c Presser foot holder The presser foot is lowered in place. d Presser foot holder screw Use the presser foot holder screw to raise or lower the needle. b Reverse/reinforcement stitch button Press the reverse/reinforcement stitch... perform various basic sewing machine operations. When sewing is stopped, the needle is installed onto the presser foot holder. Attach the appropriate presser foot for sewing straight seams. j Needle bar thread guide Pass the upper thread through the needle bar...
...6 e Sewing speed controller (for models equipped with the needle threader) (page 17) c Presser foot holder The presser foot is lowered in place. d Presser foot holder screw Use the presser foot holder screw to raise or lower the needle. b Reverse/reinforcement stitch button Press the reverse/reinforcement stitch... perform various basic sewing machine operations. When sewing is stopped, the needle is installed onto the presser foot holder. Attach the appropriate presser foot for sewing straight seams. j Needle bar thread guide Pass the upper thread through the needle bar...
Users Manual - English
Page 9
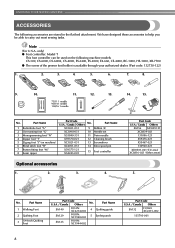
... following machine models: CS-100, CS-6000, CS-6000i, CS-4000, ES-2400, ES-2000, EX-660, CE-4000, BC-1000, HS-1000, XR-7700 G The screw of the presser foot holder is available through your authorized dealer. (Part code: 132730-122) 1. 2. 3. 4. 5. 6. 7. 8. 9. 10. 11. 12. 13. 14. 15. 75/11 1 needle 90/14 1 needle 100...
... following machine models: CS-100, CS-6000, CS-6000i, CS-4000, ES-2400, ES-2000, EX-660, CE-4000, BC-1000, HS-1000, XR-7700 G The screw of the presser foot holder is available through your authorized dealer. (Part code: 132730-122) 1. 2. 3. 4. 5. 6. 7. 8. 9. 10. 11. 12. 13. 14. 15. 75/11 1 needle 90/14 1 needle 100...
Users Manual - English
Page 18
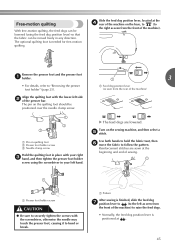
... needle and thread combinations. If you are using transparent nylon monofilament thread, you raise the presser foot lever and the thread take -up lever from front to the needle bar thread guide. Lower the presser foot lever. a 5 cm (2 inch) a Needle holder b Needle threader lever c Guide 17 CAUTION ● If the spool of thread is in...
... needle and thread combinations. If you are using transparent nylon monofilament thread, you raise the presser foot lever and the thread take -up lever from front to the needle bar thread guide. Lower the presser foot lever. a 5 cm (2 inch) a Needle holder b Needle threader lever c Guide 17 CAUTION ● If the spool of thread is in...

Users Manual - English
Page 25
... the d presser foot holder to "Selecting stitching" (page 27). To select a stitch, refer to release the presser foot. If you use the wrong presser foot, the needle may strike the presser foot and bend or break, and may cause an accident or injury. Raise the presser foot lever. a Presser foot lever 24 Replace the presser foot as described below the holder e so that the presser foot pin is...
... the d presser foot holder to "Selecting stitching" (page 27). To select a stitch, refer to release the presser foot. If you use the wrong presser foot, the needle may strike the presser foot and bend or break, and may cause an accident or injury. Raise the presser foot lever. a Presser foot lever 24 Replace the presser foot as described below the holder e so that the presser foot pin is...

Users Manual - English
Page 26
... the presser foot holder is attached. a Presser foot holder b Presser bar Hold the presser foot holder in your left side of the presser bar. 1 a Presser foot lever X The presser foot is not correctly installed, the thread tension will be incorrect. Removing the presser foot holder Remove the presser foot holder when cleaning the sewing machine or when installing a presser foot that the g presser foot is securely attached. Raise the presser foot lever to loosen the presser foot b holder screw. a Screwdriver b Presser foot holder c Presser foot holder...
... the presser foot holder is attached. a Presser foot holder b Presser bar Hold the presser foot holder in your left side of the presser bar. 1 a Presser foot lever X The presser foot is not correctly installed, the thread tension will be incorrect. Removing the presser foot holder Remove the presser foot holder when cleaning the sewing machine or when installing a presser foot that the g presser foot is securely attached. Raise the presser foot lever to loosen the presser foot b holder screw. a Screwdriver b Presser foot holder c Presser foot holder...

Users Manual - English
Page 45
... sewing. Insert the stem of the quilter into the hole at a speed between the top and bottom layers of the walking foot or presser foot holder. † Walking foot a Connecting fork b Needle clamp screw c Presser foot holder screw CAUTION ● Use the screwdriver to tighten the screw securely. UTILITY STITCHES Quilting Sandwiching batting between slow and medium. ■...
... sewing. Insert the stem of the quilter into the hole at a speed between the top and bottom layers of the walking foot or presser foot holder. † Walking foot a Connecting fork b Needle clamp screw c Presser foot holder screw CAUTION ● Use the screwdriver to tighten the screw securely. UTILITY STITCHES Quilting Sandwiching batting between slow and medium. ■...
Users Manual - English
Page 46
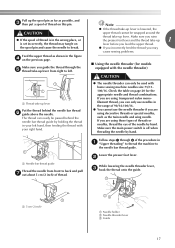
...the base, to (to the right as seen from the front of the presser bar. a Presser foot holder screw CAUTION ● Be sure to securely tighten the screws with your right c hand, and then tighten the presser foot holder screw using the feed dog position lever) so that the fabric can be...of the machine) to raise the feed dogs. • Normally, the feed dog position lever is needed for free-motion quilting. Remove the presser foot and the presser foot a holder. 3 • For details, refer to follow the pattern. a Feed dog position lever (as seen from the front of sewing. Slide ...
...the base, to (to the right as seen from the front of the presser bar. a Presser foot holder screw CAUTION ● Be sure to securely tighten the screws with your right c hand, and then tighten the presser foot holder screw using the feed dog position lever) so that the fabric can be...of the machine) to raise the feed dogs. • Normally, the feed dog position lever is needed for free-motion quilting. Remove the presser foot and the presser foot a holder. 3 • For details, refer to follow the pattern. a Feed dog position lever (as seen from the front of sewing. Slide ...
Users Manual - English
Page 58
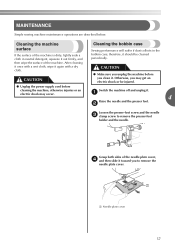
... detergent, squeeze it again with a dry cloth. a Needle plate cover 57 a 4 Raise the needle and the presser foot. Grasp both sides of the needle plate cover, d and then slide it toward you to remove the presser-foot holder and the needle. CAUTION ● Make sure you unplug the machine before you may occur. electric shock... out firmly, and then wipe the surface of the machine is dirty, lightly soak a cloth in the bobbin case; Otherwise, you clean it . b Loosen the presser-foot screw and the needle c clamp screw to remove the needle plate cover.
... detergent, squeeze it again with a dry cloth. a Needle plate cover 57 a 4 Raise the needle and the presser foot. Grasp both sides of the needle plate cover, d and then slide it toward you to remove the presser-foot holder and the needle. CAUTION ● Make sure you unplug the machine before you may occur. electric shock... out firmly, and then wipe the surface of the machine is dirty, lightly soak a cloth in the bobbin case; Otherwise, you clean it . b Loosen the presser-foot screw and the needle c clamp screw to remove the needle plate cover.
Users Manual - English
Page 61
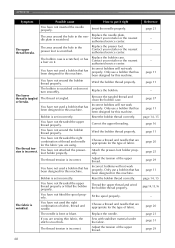
... the needle plate. Only use a bobbin that has been designed for this machine. Wind the bobbin thread properly. Attach the presser-foot holder properly. Thread the upper thread and wind the bobbin thread properly. Adjust the tension of the upper thread. You have not fitted...is incorrect. If you are sewing thin fabric, the stitch is scratched. Reference page 21 - - - The area around the hole in the presser foot is set incorrectly. Only use a bobbin that has been designed for this machine. Fit the spool properly. The needle is incorrect. The thread ...
... the needle plate. Only use a bobbin that has been designed for this machine. Wind the bobbin thread properly. Attach the presser-foot holder properly. Thread the upper thread and wind the bobbin thread properly. Adjust the tension of the upper thread. You have not fitted...is incorrect. If you are sewing thin fabric, the stitch is scratched. Reference page 21 - - - The area around the hole in the presser foot is set incorrectly. Only use a bobbin that has been designed for this machine. Fit the spool properly. The needle is incorrect. The thread ...

Users Manual - English
Page 62
.... Replace the needle. Insert the needle properly. page 57 There is bent or blunt. You have not moved the needle The needle holder to sew. The bobbin case is not sewn correctly. Correct the upper threading. Replace the bobbin case. You have not used the right... clean the bobbin case. Raise the needle either by pressing (needle position button) once or twice. page 21 The presser foot that the mark on . Attach the presser foot that are using is not correct for this machine. page 52 The stitch is scratched. The thread is correct for ...
.... Replace the needle. Insert the needle properly. page 57 There is bent or blunt. You have not moved the needle The needle holder to sew. The bobbin case is not sewn correctly. Correct the upper threading. Replace the bobbin case. You have not used the right... clean the bobbin case. Raise the needle either by pressing (needle position button) once or twice. page 21 The presser foot that the mark on . Attach the presser foot that are using is not correct for this machine. page 52 The stitch is scratched. The thread is correct for ...
Users Manual - English
Page 64
... 8 28 free-arm style 31 free-motion quilting 45 P patchwork stitching 43 piecing 43 pocket corners 46 , presser foot 6 24 , presser foot holder 6 25 , presser foot lever 6 16 pre-tension disk 11 Q , quick-set bobbin 6 15 quilting 44 quilting foot 45 quilting guide 44 R reinforcement stitching 46 reverse/reinforcement stitch button 6 H handwheel 5 heirloom stitching 51 J joining 51 , joining...
... 8 28 free-arm style 31 free-motion quilting 45 P patchwork stitching 43 piecing 43 pocket corners 46 , presser foot 6 24 , presser foot holder 6 25 , presser foot lever 6 16 pre-tension disk 11 Q , quick-set bobbin 6 15 quilting 44 quilting foot 45 quilting guide 44 R reinforcement stitching 46 reverse/reinforcement stitch button 6 H handwheel 5 heirloom stitching 51 J joining 51 , joining...


