Users Manual - English
Page 3
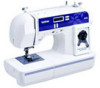
...machine. 4. For additional product information and updates, visit our web site at www.brother.com The contents of this machine, avoid direct sunlight and high humidity locations. Be sure to clean the case. up lever, needle, or other hot objects. 2. Do not use or store the machine near a... should never be used. 3. Plug the machine directly into the wall. Use only neutral soaps or detergents to keep your local authorized Brother dealer. Always consult the operation manual when replacing or installing any other parts to inspect and adjust the machine yourself. Remember to turn ...
...machine. 4. For additional product information and updates, visit our web site at www.brother.com The contents of this machine, avoid direct sunlight and high humidity locations. Be sure to clean the case. up lever, needle, or other hot objects. 2. Do not use or store the machine near a... should never be used. 3. Plug the machine directly into the wall. Use only neutral soaps or detergents to keep your local authorized Brother dealer. Always consult the operation manual when replacing or installing any other parts to inspect and adjust the machine yourself. Remember to turn ...
Users Manual - English
Page 4
......31 Using a free-arm style ...31 3 KNOWING YOUR SEWING MACHINE 5 NAMES OF MACHINE PARTS AND THEIR FUNCTIONS 5 The main parts ...5 Needle and presser foot section ...6 Operation buttons ...6 Operation panel ...7 Flat bed attachment ...7 ACCESSORIES ...8 Optional accessories ...8 USING YOUR SEWING MACHINE 9 Power... threading ...16 Drawing up the lower thread ...19 REPLACING THE NEEDLE 20 Needle precautions ...20 Needle types and their uses ...20 Checking the needle ...21 Replacing the needle ...21 Sewing with a twin needle ...23 REPLACING THE PRESSER FOOT 24 Replacing the presser foot ...24...
......31 Using a free-arm style ...31 3 KNOWING YOUR SEWING MACHINE 5 NAMES OF MACHINE PARTS AND THEIR FUNCTIONS 5 The main parts ...5 Needle and presser foot section ...6 Operation buttons ...6 Operation panel ...7 Flat bed attachment ...7 ACCESSORIES ...8 Optional accessories ...8 USING YOUR SEWING MACHINE 9 Power... threading ...16 Drawing up the lower thread ...19 REPLACING THE NEEDLE 20 Needle precautions ...20 Needle types and their uses ...20 Checking the needle ...21 Replacing the needle ...21 Sewing with a twin needle ...23 REPLACING THE PRESSER FOOT 24 Replacing the presser foot ...24...
Users Manual - English
Page 6
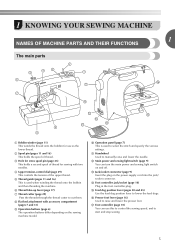
... (page 23) This holds a second spool of thread for use this to control the sewing speed, and to manually raise and lower the needle. h Flat bed attachment with two needles. k Handwheel Used to start and stop sewing. 5 1 KNOWING YOUR SEWING MACHINE 1 NAMES OF MACHINE PARTS AND THEIR FUNCTIONS The main parts a Bobbin...
... (page 23) This holds a second spool of thread for use this to control the sewing speed, and to manually raise and lower the needle. h Flat bed attachment with two needles. k Handwheel Used to start and stop sewing. 5 1 KNOWING YOUR SEWING MACHINE 1 NAMES OF MACHINE PARTS AND THEIR FUNCTIONS The main parts a Bobbin...
Users Manual - English
Page 7
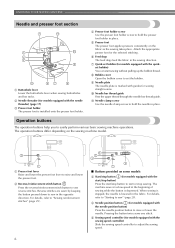
.... a Presser foot lever Raise and lower the presser foot lever to hold the presser foot holder in place. When sewing is stopped, the needle is depressed. e Presser foot The presser foot applies pressure consistently on the sewing machine model. h Bobbin cover Open the bobbin cover to start...presser foot holder screw to sew in the sewing direction. f Feed dogs The feed dogs feed the fabric in the opposite direction. i Needle plate The needle plate is installed onto the presser foot holder. The operation buttons differ depending on the fabric as the sewing takes place. g Quick-set...
.... a Presser foot lever Raise and lower the presser foot lever to hold the presser foot holder in place. When sewing is stopped, the needle is depressed. e Presser foot The presser foot applies pressure consistently on the sewing machine model. h Bobbin cover Open the bobbin cover to start...presser foot holder screw to sew in the sewing direction. f Feed dogs The feed dogs feed the fabric in the opposite direction. i Needle plate The needle plate is installed onto the presser foot holder. The operation buttons differ depending on the fabric as the sewing takes place. g Quick-set...
Users Manual - English
Page 9
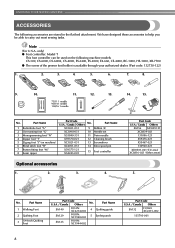
...EX-660, CE-4000, BC-1000, HS-1000, XR-7700 G The screw of the presser foot holder is available through your authorized dealer. (Part code: 132730-122) 1. 2. 3. 4. 5. 6. 7. 8. 9. 10. 11. 12. 13. 14. 15. 75/11 1 needle 90/14 1 needle 100/16 1 needle No. Part Code U.S.A. / Canada Others SA156 XA5539-151...(EU area) XC8816-021 (Other areas) 5. Note (For U.S.A. Part Name XC2691-031 9 Bobbin (4) XC3098-031 10 Needle set X53840-331 11 Twin needle X59370-021 12 Cleaning brush XC3021-031 13 Screwdriver XC4051-031 14 Extra spool pin X59375-121 X54243-001 15 Foot controller ...
...EX-660, CE-4000, BC-1000, HS-1000, XR-7700 G The screw of the presser foot holder is available through your authorized dealer. (Part code: 132730-122) 1. 2. 3. 4. 5. 6. 7. 8. 9. 10. 11. 12. 13. 14. 15. 75/11 1 needle 90/14 1 needle 100/16 1 needle No. Part Code U.S.A. / Canada Others SA156 XA5539-151...(EU area) XC8816-021 (Other areas) 5. Note (For U.S.A. Part Name XC2691-031 9 Bobbin (4) XC3098-031 10 Needle set X53840-331 11 Twin needle X59370-021 12 Cleaning brush XC3021-031 13 Screwdriver XC4051-031 14 Extra spool pin X59375-121 X54243-001 15 Foot controller ...
Users Manual - English
Page 11
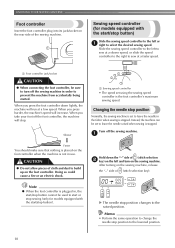
...Do not allow pieces of the sewing machine. When you press harder, the machine's speed will run at a low speed. Changing the needle stop button). KNOWING YOUR SEWING MACHINE Foot controller Insert the foot controller plug into its jack/socket on the foot controller. Instead, the machine... Normally, the sewing machine is set to sew at a slower speed, or slide the speed controller to the right to leave the needle raised when sewing is the foot controller's maximum sewing speed. Slide the sewing speed controller to the lowered position. 10 a Foot controller...
...Do not allow pieces of the sewing machine. When you press harder, the machine's speed will run at a low speed. Changing the needle stop button). KNOWING YOUR SEWING MACHINE Foot controller Insert the foot controller plug into its jack/socket on the foot controller. Instead, the machine... Normally, the sewing machine is set to sew at a slower speed, or slide the speed controller to the right to leave the needle raised when sewing is the foot controller's maximum sewing speed. Slide the sewing speed controller to the lowered position. 10 a Foot controller...
Users Manual - English
Page 13
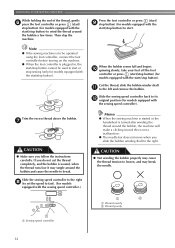
...press (start/stop button) (for models equipped with the start . Cut the thread, slide the bobbin winder shaft k to loosen, and may break the needle. 1 2 a Wound evenly b Wound poorly a Sewing speed controller 12 Trim the excess thread above the bobbin. KNOWING YOUR SEWING MACHINE While holding the... controller, connect the foot controller before turning on the machine. ● When the foot controller is not a malfunction. ● The needle bar does not move when you follow the instructions carefully. Then stop button) to wind the thread around the bobbin and cause the...
...press (start/stop button) (for models equipped with the start . Cut the thread, slide the bobbin winder shaft k to loosen, and may break the needle. 1 2 a Wound evenly b Wound poorly a Sewing speed controller 12 Trim the excess thread above the bobbin. KNOWING YOUR SEWING MACHINE While holding the... controller, connect the foot controller before turning on the machine. ● When the foot controller is not a malfunction. ● The needle bar does not move when you follow the instructions carefully. Then stop button) to wind the thread around the bobbin and cause the...
Users Manual - English
Page 14
... machine. ● When the foot controller is wound without cutting the thread using the cutter built into the notch in the bobbin or the needle may break the needle. g Press the foot controller or press (start . CAUTION ● Be sure to the left hand, use your foot off the foot controller or...
... machine. ● When the foot controller is wound without cutting the thread using the cutter built into the notch in the bobbin or the needle may break the needle. g Press the foot controller or press (start . CAUTION ● Be sure to the left hand, use your foot off the foot controller or...

Users Manual - English
Page 15
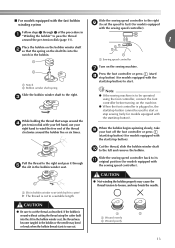
...bobbin, the machine will not operate correctly. CAUTION ● Winding the bobbin improperly may cause the thread tension to loosen, breaking the needle and resulting in the right direction. If it may cause the thread tension to be used , the machine will make a clicking sound;... so the thread unrolls in injury. 1 2 a Wound evenly b Wound poorly ● The bobbin was designed specifically for models equipped with the needle position button), and raise the presser foot lever. 14 1 a Tension-adjusting spring Replace the bobbin cover. KNOWING YOUR SEWING MACHINE Memo ●...
...bobbin, the machine will not operate correctly. CAUTION ● Winding the bobbin improperly may cause the thread tension to loosen, breaking the needle and resulting in the right direction. If it may cause the thread tension to be used , the machine will make a clicking sound;... so the thread unrolls in injury. 1 2 a Wound evenly b Wound poorly ● The bobbin was designed specifically for models equipped with the needle position button), and raise the presser foot lever. 14 1 a Tension-adjusting spring Replace the bobbin cover. KNOWING YOUR SEWING MACHINE Memo ●...
Users Manual - English
Page 16
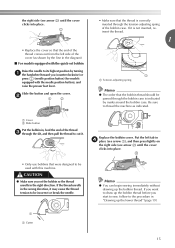
...not inserted, reinsert the thread. 1 1 a Tension-adjusting spring Memo ● The order that the bobbin thread should be incorrect or break the needle. 1 a Cutter Memo ● You can begin sewing immediately without drawing up the bobbin thread. If the thread unrolls in "Drawing up the bobbin... thread before you (counterclockwise) or press (needle position button) (for models equipped with this machine. the right side (see arrow b) until the cover clicks into place. • Only...
...not inserted, reinsert the thread. 1 1 a Tension-adjusting spring Memo ● The order that the bobbin thread should be incorrect or break the needle. 1 a Cutter Memo ● You can begin sewing immediately without drawing up the bobbin thread. If the thread unrolls in "Drawing up the bobbin... thread before you (counterclockwise) or press (needle position button) (for models equipped with this machine. the right side (see arrow b) until the cover clicks into place. • Only...
Users Manual - English
Page 17
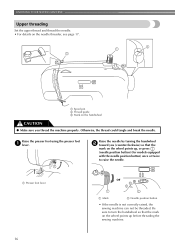
... turning the handwheel b toward you thread the machine properly. Be sure to raise the needle. KNOWING YOUR SEWING MACHINE Upper threading Set the upper thread and thread the needle. • For details on the wheel points up before threading the sewing machine. 16 a Spool pin b Thread guide c Mark on ...the handwheel CAUTION ● Make sure you (counterclockwise) so that the mark on the wheel points up , or press (needle position button) (for models equipped with the needle position button) once or twice to turn the handwheel so that the mark on the...
... turning the handwheel b toward you thread the machine properly. Be sure to raise the needle. KNOWING YOUR SEWING MACHINE Upper threading Set the upper thread and thread the needle. • For details on the wheel points up before threading the sewing machine. 16 a Spool pin b Thread guide c Mark on ...the handwheel CAUTION ● Make sure you (counterclockwise) so that the mark on the wheel points up , or press (needle position button) (for models equipped with the needle position button) once or twice to turn the handwheel so that the mark on the...
Users Manual - English
Page 18
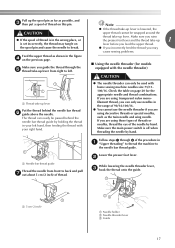
...wrapped around the thread take -up lever. Follow steps 1 through the e thread take -up lever from front to break. b While lowering the needle threader lever, c hook the thread onto the guide. Lower the presser foot lever. CAUTION ● If the spool of the procedure in your... left hand, then feeding the thread with your right hand. ● The needle threader can easily be passed behind the needle bar thread f guide above the needle. a 5 cm (2 inch) a Needle holder b Needle threader lever c Guide 17 Check the table on the spool pin and cause the...
...wrapped around the thread take -up lever. Follow steps 1 through the e thread take -up lever from front to break. b While lowering the needle threader lever, c hook the thread onto the guide. Lower the presser foot lever. CAUTION ● If the spool of the procedure in your... left hand, then feeding the thread with your right hand. ● The needle threader can easily be passed behind the needle bar thread f guide above the needle. a 5 cm (2 inch) a Needle holder b Needle threader lever c Guide 17 Check the table on the spool pin and cause the...

Users Manual - English
Page 19
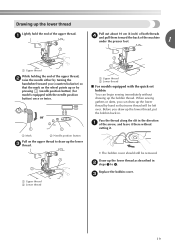
Catch the thread on the hook as shown below. e a Hook b Thread While lightly holding the thread, release the f needle threader lever. d Pull out about 5 cm (2 inch) of thread through the needle. The hook will pull the thread through g the needle toward you may cause sewing problems. 18 KNOWING YOUR SEWING MACHINE Fully lower the needle threader lever. X The end of the needle threader rotates toward the back of the needle. a 5 cm (2 inch) Note ● If you incorrectly feed the thread you and the hook passes through the eye of the sewing machine.
Catch the thread on the hook as shown below. e a Hook b Thread While lightly holding the thread, release the f needle threader lever. d Pull out about 5 cm (2 inch) of thread through the needle. The hook will pull the thread through g the needle toward you may cause sewing problems. 18 KNOWING YOUR SEWING MACHINE Fully lower the needle threader lever. X The end of the needle threader rotates toward the back of the needle. a 5 cm (2 inch) Note ● If you incorrectly feed the thread you and the hook passes through the eye of the sewing machine.
Users Manual - English
Page 20
...quick-set bobbin You can draw up the bobbin thread. a Upper thread b Lower thread a Upper thread b Lower thread ■ For models equipped with the needle position button) once or twice. a Pull out about 10 cm (4 inch) of both threads d and pull them toward the back of the machine under ...the presser foot. 1 a Upper thread While holding the end of the upper thread, b raise the needle either by hand so that the mark on the upper thread to 4. When sewing gathers or darts, you can begin sewing immediately without cutting it...
...quick-set bobbin You can draw up the bobbin thread. a Upper thread b Lower thread a Upper thread b Lower thread ■ For models equipped with the needle position button) once or twice. a Pull out about 10 cm (4 inch) of both threads d and pull them toward the back of the machine under ...the presser foot. 1 a Upper thread While holding the end of the upper thread, b raise the needle either by hand so that the mark on the upper thread to 4. When sewing gathers or darts, you can begin sewing immediately without cutting it...
Users Manual - English
Page 21
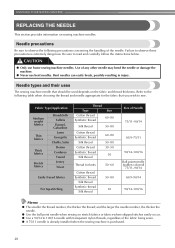
... regardless of any other needle may bend the needle or damage the machine. ● Never use home sewing machine needles. Bent needles can easily break, possibly resulting in injury. and the larger the needle number, the thicker the needle. ● Use the ball point needle when sewing on stretch ...knits 50-60 Cotton thread Synthetic thread Silk thread Synthetic thread Silk thread 50-80 30 Size of the needle. KNOWING YOUR SEWING MACHINE REPLACING THE NEEDLE This section provides information on the fabric and thread thickness. Failure to read and carefully follow the instructions ...
... regardless of any other needle may bend the needle or damage the machine. ● Never use home sewing machine needles. Bent needles can easily break, possibly resulting in injury. and the larger the needle number, the thicker the needle. ● Use the ball point needle when sewing on stretch ...knits 50-60 Cotton thread Synthetic thread Silk thread Synthetic thread Silk thread 50-80 30 Size of the needle. KNOWING YOUR SEWING MACHINE REPLACING THE NEEDLE This section provides information on the fabric and thread thickness. Failure to read and carefully follow the instructions ...
Users Manual - English
Page 22
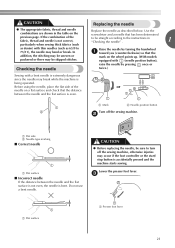
... according to be skipped stitches. CAUTION ● The appropriate fabric, thread and needle combinations are shown in "Checking the needle" . 1 Raise the needle by pressing once or twice.) Sewing with thin needles (such as described below. If the combination of the or needle on a flat surface and check that the mark on the previous page...
... according to be skipped stitches. CAUTION ● The appropriate fabric, thread and needle combinations are shown in "Checking the needle" . 1 Raise the needle by pressing once or twice.) Sewing with thin needles (such as described below. If the combination of the or needle on a flat surface and check that the mark on the previous page...

Users Manual - English
Page 23
... from the front of the sewing machine may be removed by simply loosening the needle clamp screw about one turn the needle clamp screw counterclockwise to tighten the needle clamp screw by turning it touches the needle stopper. a Needle stopper a Needle clamp screw b Needle bar thread guide c Needle bar Align the bottom edge of the machine, insert the...
... from the front of the sewing machine may be removed by simply loosening the needle clamp screw about one turn the needle clamp screw counterclockwise to tighten the needle clamp screw by turning it touches the needle stopper. a Needle stopper a Needle clamp screw b Needle bar thread guide c Needle bar Align the bottom edge of the machine, insert the...
Users Manual - English
Page 24
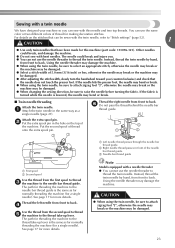
.... The path for more details. c Needle bar thread guide Note Models equipped with bent needles. Using the needle threader may bend or break. ■ Twin needle threading Attach the twin needle. Other needles could break and injure you can sew with the twin needle, refer to select an appropriate stitch,...toward you (counterclockwise) and check that have designed your machine so you . ● You can not use the needle threader to thread the twin needle. Using the needle threader may be damaged. ● When changing the sewing direction, be damaged. 23 The path for threading the ...
.... The path for more details. c Needle bar thread guide Note Models equipped with bent needles. Using the needle threader may bend or break. ■ Twin needle threading Attach the twin needle. Other needles could break and injure you can sew with the twin needle, refer to select an appropriate stitch,...toward you (counterclockwise) and check that have designed your machine so you . ● You can not use the needle threader to thread the twin needle. Using the needle threader may be damaged. ● When changing the sewing direction, be damaged. 23 The path for threading the ...

Users Manual - English
Page 25
... presser foot as described below the holder e so that have chosen. CAUTION ● Before replacing the presser foot, be used with (needle position button), raise the needle by turning the handwheel a toward you change the presser foot. Position the presser foot so the letter indicating the presser foot type (J, ...A, etc.) is aligned with this machine. If you use the wrong presser foot, the needle may strike the presser foot and bend or break, and may occur if the foot controller or the start and you have been designed ...
... presser foot as described below the holder e so that have chosen. CAUTION ● Before replacing the presser foot, be used with (needle position button), raise the needle by turning the handwheel a toward you change the presser foot. Position the presser foot so the letter indicating the presser foot type (J, ...A, etc.) is aligned with this machine. If you use the wrong presser foot, the needle may strike the presser foot and bend or break, and may occur if the foot controller or the start and you have been designed ...

Users Manual - English
Page 27
... break, possibly resulting in operation, pay special attention to sew" (page 28). 26 Turn on starting to sew, refer to "Starting to the needle location. Select the stitch appropriate for the stitch. Position the fabric, and then start sewing. In addition, keep your hands away from all moving parts... such as the needle and handwheel, otherwise injuries may occur. ● Do not pull or push the fabric too hard while sewing, otherwise injuries may occur or the...
... break, possibly resulting in operation, pay special attention to sew" (page 28). 26 Turn on starting to sew, refer to "Starting to the needle location. Select the stitch appropriate for the stitch. Position the fabric, and then start sewing. In addition, keep your hands away from all moving parts... such as the needle and handwheel, otherwise injuries may occur. ● Do not pull or push the fabric too hard while sewing, otherwise injuries may occur or the...


