
Users Manual - English
Page 3
...How to start sewing 17 How to change the light bulb 9 UPPER (NEEDLE) THREAD 10 LOWER (BOBBIN) THREAD 11 How to wind bobbin 11 How to remove and insert bobbin case 12 How to thread bobbin case 12 How to oil sewing machine 30 Check list for better sewing 32... selector 7 PRESSER FOOT 7 NEEDLE 8 How to change the needle 8 How to check the needle 8 Twin needle 8 RELATIVE CHART OF SEWING MATERIAL, NEEDLE AND THREAD . 9 SEW-LIGHT 9 Sew light switch button 9 How to change sewing direction 17 How to finish your sewing project . . 18 How to remove final sewing...
...How to start sewing 17 How to change the light bulb 9 UPPER (NEEDLE) THREAD 10 LOWER (BOBBIN) THREAD 11 How to wind bobbin 11 How to remove and insert bobbin case 12 How to thread bobbin case 12 How to oil sewing machine 30 Check list for better sewing 32... selector 7 PRESSER FOOT 7 NEEDLE 8 How to change the needle 8 How to check the needle 8 Twin needle 8 RELATIVE CHART OF SEWING MATERIAL, NEEDLE AND THREAD . 9 SEW-LIGHT 9 Sew light switch button 9 How to change sewing direction 17 How to finish your sewing project . . 18 How to remove final sewing...
Users Manual - English
Page 4
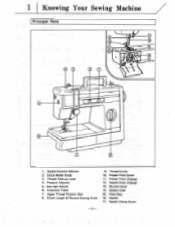
Needle Position Selector 2. Sew-light Switch 6. Thread Cutter 10. Bobbin Case 15. 1 Knowing Your Sewing Machine Principal Parts 10 11 15 12 0 0 0 2 5 IF I 1. Feed Dog 16. Pressure Adjuster 5. Shuttle Hook 14. Thread Take-up Lever 4. Stitch Width Knob 3. Presser Foot Screw 11. Extension Table 7. Upper Thread Tension Dial 8. Stitch Length & Reverse Sewing Knob 9. Presser Foot (Zigzag) 12. Needle 17. Needle Clamp Screw -2- Needle Plate (Zigzag) 13.
Needle Position Selector 2. Sew-light Switch 6. Thread Cutter 10. Bobbin Case 15. 1 Knowing Your Sewing Machine Principal Parts 10 11 15 12 0 0 0 2 5 IF I 1. Feed Dog 16. Pressure Adjuster 5. Shuttle Hook 14. Thread Take-up Lever 4. Stitch Width Knob 3. Presser Foot Screw 11. Extension Table 7. Upper Thread Tension Dial 8. Stitch Length & Reverse Sewing Knob 9. Presser Foot (Zigzag) 12. Needle 17. Needle Clamp Screw -2- Needle Plate (Zigzag) 13.
Users Manual - English
Page 5
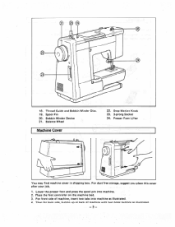
.... -3- Balance Wheel Machine Cover 22. Then for back side, button up at back of machine, insert two tabs into machine. 2. Spool Pin 20. 24 5 18. Thread Guide and Bobbin Winder Disc. 19. Presser Foot Lifter U, II 0 a You may find machine cover in shipping box. For dust free storage, suggest you place...
.... -3- Balance Wheel Machine Cover 22. Then for back side, button up at back of machine, insert two tabs into machine. 2. Spool Pin 20. 24 5 18. Thread Guide and Bobbin Winder Disc. 19. Presser Foot Lifter U, II 0 a You may find machine cover in shipping box. For dust free storage, suggest you place...
Users Manual - English
Page 10
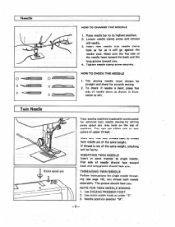
... side of machine. TO CHANGE THE NEEDLE 1. Loosen needle clamp screw and remove old needle. 3. HOW TO CHECK THE NEEDLE 1. THREADING TWIN NEEDLE Follow instructions for optional twin needle sewing by setting extra spool pin into needle clamp hole as far as single needle. The... groove should face you. Needle position selector "M". -8- The sewing needle must always be faulty. Needle X t-r-- Flat side of upper thread. INSERTING TWIN NEEDLE Insert in illustration at under "3". 3. Twin Needle tI 4 ) Extra spool pin Your sewing machine is bent, place flat side ...
... side of machine. TO CHANGE THE NEEDLE 1. Loosen needle clamp screw and remove old needle. 3. HOW TO CHECK THE NEEDLE 1. THREADING TWIN NEEDLE Follow instructions for optional twin needle sewing by setting extra spool pin into needle clamp hole as far as single needle. The... groove should face you. Needle position selector "M". -8- The sewing needle must always be faulty. Needle X t-r-- Flat side of upper thread. INSERTING TWIN NEEDLE Insert in illustration at under "3". 3. Twin Needle tI 4 ) Extra spool pin Your sewing machine is bent, place flat side ...

Users Manual - English
Page 11
... bulb and fix face plate 2. HOW TO CHANGE THE LIGHT BULB 13: 1. Select correct size of Sewing Material, Needle and Thread SEWING MATERIALS NEEDLE SIZES THREAD SIZES VERY THIN Fine tricot, Fine lace, Thin linen, Silk. Remove face plate by turning it counterclockwise. MAXIMUM INPUT OF LAMP...-40 Mercerized Heavy-Duty NOTE: 1. NOTE: 1) Make sure to disconnect electric supply plug from above chart. 2. Relative Chart of needle and thread from wall outlet before changing light bulb. 2) Always use CORRECT LIGHT BULB. Remove light bulb by loosing a screw on or off, push the...
... bulb and fix face plate 2. HOW TO CHANGE THE LIGHT BULB 13: 1. Select correct size of Sewing Material, Needle and Thread SEWING MATERIALS NEEDLE SIZES THREAD SIZES VERY THIN Fine tricot, Fine lace, Thin linen, Silk. Remove face plate by turning it counterclockwise. MAXIMUM INPUT OF LAMP...-40 Mercerized Heavy-Duty NOTE: 1. NOTE: 1) Make sure to disconnect electric supply plug from above chart. 2. Relative Chart of needle and thread from wall outlet before changing light bulb. 2) Always use CORRECT LIGHT BULB. Remove light bulb by loosing a screw on or off, push the...
Users Manual - English
Page 12
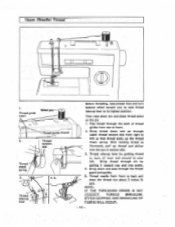
... illustrated, pull up lever to raise thread take-up thread and deliver into eyelet. 4. Thread take -up the thread check spring. Bring thread through the thread guard and guides. 5. Thread needle from front to front. 2. Thread guide (rear) Spool pin 2. Thread take -up lever Before threading, raise presser foot and turn balance wheel toward you to its highest position. Bring...
... illustrated, pull up lever to raise thread take-up thread and deliver into eyelet. 4. Thread take -up the thread check spring. Bring thread through the thread guard and guides. 5. Thread needle from front to front. 2. Thread guide (rear) Spool pin 2. Thread take -up lever Before threading, raise presser foot and turn balance wheel toward you to its highest position. Bring...
Users Manual - English
Page 13
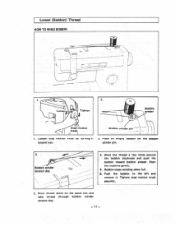
... winder pin. 3. Loosen!, r Tighten C 0 Bobbin presser Stop motion H I 4 2. Bobbin winder pin - - ; 2. Place an empty bobbin on the spool pin and take thread through bobbin winder tension disc. - 11 - Lower (Bobbin) Thread HOW TO WIND BOBBIN ws. ~.1 I , knob 1. Tighten stop motion knob by turning i toward bobbin presser. Start the machine gently. 5. Wind the...
... winder pin. 3. Loosen!, r Tighten C 0 Bobbin presser Stop motion H I 4 2. Bobbin winder pin - - ; 2. Place an empty bobbin on the spool pin and take thread through bobbin winder tension disc. - 11 - Lower (Bobbin) Thread HOW TO WIND BOBBIN ws. ~.1 I , knob 1. Tighten stop motion knob by turning i toward bobbin presser. Start the machine gently. 5. Wind the...
Users Manual - English
Page 14
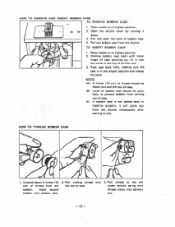
Pull out bobbin case from the bobbin. NOTE: (A) 4 inches (10 cm) of thread should be drawn out and left out of case. (B) Latch of bobbin case should be open the latch of shuttle race. 3. Insert ... its highest position. 2. Raise needle to sew. HOW TO THREAD BOBBIN CASE 0 - • 0 Tension spring , a o u, 1/4 • o.--.....--- .• 1. Pull thread to its highest position. 2. Raise needle to the lef under tension spring until thread enters into the slot of thread from the shuttle. Pull trailing thread into delivery eye. - 12 - Unwind about 4 inches (...
Pull out bobbin case from the bobbin. NOTE: (A) 4 inches (10 cm) of thread should be drawn out and left out of case. (B) Latch of bobbin case should be open the latch of shuttle race. 3. Insert ... its highest position. 2. Raise needle to sew. HOW TO THREAD BOBBIN CASE 0 - • 0 Tension spring , a o u, 1/4 • o.--.....--- .• 1. Pull thread to its highest position. 2. Raise needle to the lef under tension spring until thread enters into the slot of thread from the shuttle. Pull trailing thread into delivery eye. - 12 - Unwind about 4 inches (...
Users Manual - English
Page 15
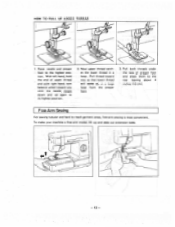
... machine a free-arm model, lift -up in a loop. Free-Arm Sewing For sewing tubular and hard to the highest position. HOW TO PULL UP LOWER THREAD N.> 1. With left hand, hold the end of presser foot and place them to its highest position. 2. Now upper... thread catches the lower thread in a large loop from the presser foot. 3. Pull both threads under the toes of upper thread and with right hand, turn balance wheel toward you until the needle moves down and up again...
... machine a free-arm model, lift -up in a loop. Free-Arm Sewing For sewing tubular and hard to the highest position. HOW TO PULL UP LOWER THREAD N.> 1. With left hand, hold the end of presser foot and place them to its highest position. 2. Now upper... thread catches the lower thread in a large loop from the presser foot. 3. Pull both threads under the toes of upper thread and with right hand, turn balance wheel toward you until the needle moves down and up again...
Users Manual - English
Page 16
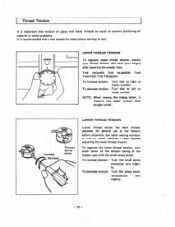
... the screw coun- THE TIGHTER THE TENSION. To regulate the lower thread tension, turn thread tension dial with the small screw driver. Increase Decrease Tension spring screw LOWER THREAD TENSION Lower thread tenion has been already adjusted for general use at the factory before ...slightly. - 14 - I. NOTE: When sewing the zigzag stitch, it also requires adjusting the lower thread tension. ly. TENSION • aa 0 N. 0 UPPER THREAD TENSION To regulate upper thread tension, merely turn small screw on the tension spring of material or other problems. It is important that...
... the screw coun- THE TIGHTER THE TENSION. To regulate the lower thread tension, turn thread tension dial with the small screw driver. Increase Decrease Tension spring screw LOWER THREAD TENSION Lower thread tenion has been already adjusted for general use at the factory before ...slightly. - 14 - I. NOTE: When sewing the zigzag stitch, it also requires adjusting the lower thread tension. ly. TENSION • aa 0 N. 0 UPPER THREAD TENSION To regulate upper thread tension, merely turn small screw on the tension spring of material or other problems. It is important that...
Users Manual - English
Page 17
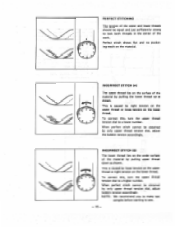
... make test samples before starting to sew. - 15 - When perfect stitch cannot be obtained by loose tension on the upper thread or tight tension on the lower thread. To correct this , turn the upper thread tension dial to a lower number. PERFECT STITCHING The tension of the upper and lower... threads should be equal and just sufficiently strong to lock both threads in the center of the material by tight tension on the upper thread or loose tension on the lower thread. I Perfect stitch shows flat and no puckering result ...
... make test samples before starting to sew. - 15 - When perfect stitch cannot be obtained by loose tension on the upper thread or tight tension on the lower thread. To correct this , turn the upper thread tension dial to a lower number. PERFECT STITCHING The tension of the upper and lower... threads should be equal and just sufficiently strong to lock both threads in the center of the material by tight tension on the upper thread or loose tension on the lower thread. I Perfect stitch shows flat and no puckering result ...
Users Manual - English
Page 19
... turning the balance wheel toward you and place both upper and lower thread to the new direction while the needle acts as it will allow. NOTE: Use straight stitch foot when sewing light or elastic type materials with ...
... turning the balance wheel toward you and place both upper and lower thread to the new direction while the needle acts as it will allow. NOTE: Use straight stitch foot when sewing light or elastic type materials with ...

Users Manual - English
Page 20
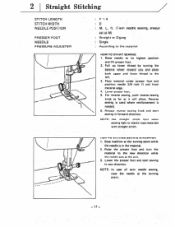
...material gently to its highest position. 3. Cut both in front and back of the presser foot as tricot, crepes, knits, etc., we recommend that the thread take -up lever is needed. 1. HOW TO SEW VERY THIN MATERIAL An underlay of material .... HOW TO FINISH YOUR SEWING PROJECT (REVERSE STITCHING) Reverse .... - 18 - Push reverse knob and stitch backwards for 3/5 inch (1 cm) from material edge. Leave about 4 inches (10 cm) of thread between toes of the presser foot to the rear while the thread take -up lever is at the highest position, and you are ready to sew again without any chance of...
...material gently to its highest position. 3. Cut both in front and back of the presser foot as tricot, crepes, knits, etc., we recommend that the thread take -up lever is needed. 1. HOW TO SEW VERY THIN MATERIAL An underlay of material .... HOW TO FINISH YOUR SEWING PROJECT (REVERSE STITCHING) Reverse .... - 18 - Push reverse knob and stitch backwards for 3/5 inch (1 cm) from material edge. Leave about 4 inches (10 cm) of thread between toes of the presser foot to the rear while the thread take -up lever is at the highest position, and you are ready to sew again without any chance of...
Users Manual - English
Page 21
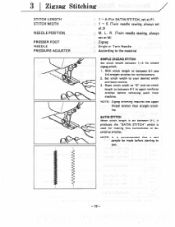
... 1-4 for simple zigzag stitch. 1. Reset stitch width to "0" and set stitch length to between 0.1 sew 5-6 straight stitches for reinforcement. 2. NOTE: Zigzag stitching requires less upper thread tension than straight stitching. NOTE: It is recommended that a test sample be made before removing work from machine. With stitch length to sew. - 19 - 3 I Zigzag...
... 1-4 for simple zigzag stitch. 1. Reset stitch width to "0" and set stitch length to between 0.1 sew 5-6 straight stitches for reinforcement. 2. NOTE: Zigzag stitching requires less upper thread tension than straight stitching. NOTE: It is recommended that a test sample be made before removing work from machine. With stitch length to sew. - 19 - 3 I Zigzag...
Users Manual - English
Page 25
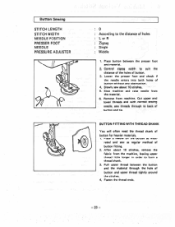
... both holes of button for heavier materials. 1. Stop machine and raise needle from machine. Kit BUTTON FITTING WITH THREAD SHANK You will often need the thread shank of button without any obstruction. 4. Fasten the thread ends. - 23 - Remove from the material. 6. Control zigzag width to the distance of holes : L or R : Zigzag... After about 10 stitches. 5. Place a needle on the button as illust• rated and sew as regular method of button and upper thread tightly around the stitches. 4. Slowly sew about 10 stitches, remove the fabric from the machine, leaving upper...
... both holes of button for heavier materials. 1. Stop machine and raise needle from machine. Kit BUTTON FITTING WITH THREAD SHANK You will often need the thread shank of button without any obstruction. 4. Fasten the thread ends. - 23 - Remove from the material. 6. Control zigzag width to the distance of holes : L or R : Zigzag... After about 10 stitches. 5. Place a needle on the button as illust• rated and sew as regular method of button and upper thread tightly around the stitches. 4. Slowly sew about 10 stitches, remove the fabric from the machine, leaving upper...
Users Manual - English
Page 26
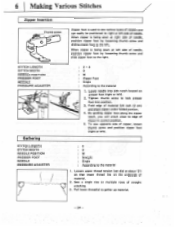
...zipper foot to the right. Tighten thumb screw to lock presser foot into side notch located on the underside of material. 2. Loosen upper thread tension (set dial at left side of needle. Fold edge of straight stitching. 3. By guiding zipper foot along the zipper teach, ...you will stitch close to gather up material. - 24 - Lower needle into position. 3. Pull lower thread(s) to edge of zipper in correct position. 5. 6 Making Various Stitches Zipper Insertion Thumb screw Zipper foot is used to sew various types of zippers...
...zipper foot to the right. Tighten thumb screw to lock presser foot into side notch located on the underside of material. 2. Loosen upper thread tension (set dial at left side of needle. Fold edge of straight stitching. 3. By guiding zipper foot along the zipper teach, ...you will stitch close to gather up material. - 24 - Lower needle into position. 3. Pull lower thread(s) to edge of zipper in correct position. 5. 6 Making Various Stitches Zipper Insertion Thumb screw Zipper foot is used to sew various types of zippers...
Users Manual - English
Page 29
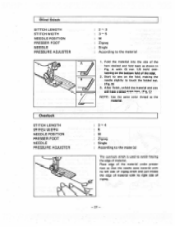
... of material with (5 mm 1/5 inch) overlapping on the fold, making the needle slightly to avoid fraying the edge of material. C) NOTE: Use the same color thread as shown in Fig. B) 3. Blind Stitch SITTCH LENGTH STITCH WIDTH NEEDLE POSITION PRESSER FOOT NEEDLE PRESSURE ADJUSTER A B Overlock STITCH LENGTH STITCH WIDTH NEEDLE POSITION PRESSER...
... of material with (5 mm 1/5 inch) overlapping on the fold, making the needle slightly to avoid fraying the edge of material. C) NOTE: Use the same color thread as shown in Fig. B) 3. Blind Stitch SITTCH LENGTH STITCH WIDTH NEEDLE POSITION PRESSER FOOT NEEDLE PRESSURE ADJUSTER A B Overlock STITCH LENGTH STITCH WIDTH NEEDLE POSITION PRESSER...
Users Manual - English
Page 30
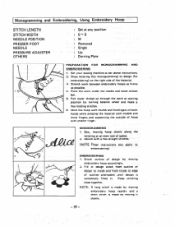
...) on the right side of design by moving embroidery hoop accordingly. 2. Place the work between embroidery hoops as firmly as per above instructions. 2. r. 5. Pull lower thread up through the work at an even rate of speed. 2. Sew, moving hoop slowly along the lettering at starting position by turning balance wheel and...
...) on the right side of design by moving embroidery hoop accordingly. 2. Place the work between embroidery hoops as firmly as per above instructions. 2. r. 5. Pull lower thread up through the work at an even rate of speed. 2. Sew, moving hoop slowly along the lettering at starting position by turning balance wheel and...
Users Manual - English
Page 31
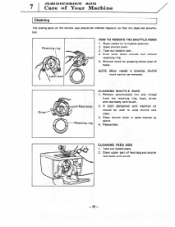
... levers outside and remove retaining ring. 5. Remove hook by grasping center post of feed dog and shuttle race body with brush. 2. Remove accumulated lint and thread from the retaining ring, hook, driver and race body with brush. - 29 - Raise needle to wipe shuttle race clean. 3. A cloth dampened with machine oil should...
... levers outside and remove retaining ring. 5. Remove hook by grasping center post of feed dog and shuttle race body with brush. 2. Remove accumulated lint and thread from the retaining ring, hook, driver and race body with brush. - 29 - Raise needle to wipe shuttle race clean. 3. A cloth dampened with machine oil should...
Users Manual - English
Page 32
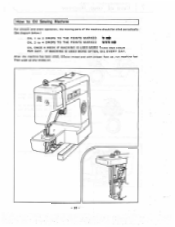
z - 30 - How to Oil Sewing Machine For smooth and silent operation, the moving parts of the machine should be oiled periodically. (See diagram below.) OIL 1 to 2 DROPS TO THE POINTS MARKED OIL 3 to 4 DROPS TO THE POINTS MARKED * 140. *VS OIL ONCE A WEEK IF MACHINE IS USED MORE THAN ONE HOUR PER DAY. After the machine has been oiled, remove thread and with presser toot up, run machine fast Then wipe up any excess oil. IF MACHINE IS USED MORE OFTEN, OIL EVERY DAY.
z - 30 - How to Oil Sewing Machine For smooth and silent operation, the moving parts of the machine should be oiled periodically. (See diagram below.) OIL 1 to 2 DROPS TO THE POINTS MARKED OIL 3 to 4 DROPS TO THE POINTS MARKED * 140. *VS OIL ONCE A WEEK IF MACHINE IS USED MORE THAN ONE HOUR PER DAY. After the machine has been oiled, remove thread and with presser toot up, run machine fast Then wipe up any excess oil. IF MACHINE IS USED MORE OFTEN, OIL EVERY DAY.


