
Users Manual - English
Page 7
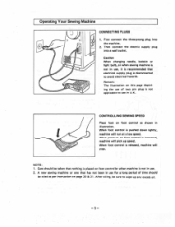
... not in U.K. NOTE: 1. When pressure on foot control as per instruction on foot controller when machine is increased, machine will pick up any excess oil. -5- Then connect the electric supply plug into the machine. 2. A new sewing machine or one that electrical supply plug is released, machine will run at a low speed. After oiling, be oiled as shown...
... not in U.K. NOTE: 1. When pressure on foot control as per instruction on foot controller when machine is increased, machine will pick up any excess oil. -5- Then connect the electric supply plug into the machine. 2. A new sewing machine or one that electrical supply plug is released, machine will run at a low speed. After oiling, be oiled as shown...
Users Manual - English
Page 10
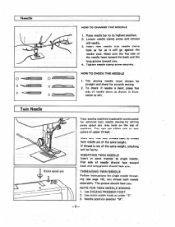
...flat side of upper thread. The sewing needle must always be faulty. Twin Needle tI 4 ) Extra spool pin Your sewing machine is specially constructed for single needle threading (see page 10), but thread each needle separately. NOTE FOR TWIN NEEDLE SEWING 1. Raise needle bar to thread ...of machine. INSERTING TWIN NEEDLE Insert in illustration at under "3". 3. Use stitch width knob at left. Insert new needle into hole on the top of needle should face toward you. 4. HOW TO CHECK THE NEEDLE 1. THREADING TWIN NEEDLE Follow instructions for optional twin needle sewing by...
...flat side of upper thread. The sewing needle must always be faulty. Twin Needle tI 4 ) Extra spool pin Your sewing machine is specially constructed for single needle threading (see page 10), but thread each needle separately. NOTE FOR TWIN NEEDLE SEWING 1. Raise needle bar to thread ...of machine. INSERTING TWIN NEEDLE Insert in illustration at under "3". 3. Use stitch width knob at left. Insert new needle into hole on the top of needle should face toward you. 4. HOW TO CHECK THE NEEDLE 1. THREADING TWIN NEEDLE Follow instructions for optional twin needle sewing by...
Users Manual - English
Page 23
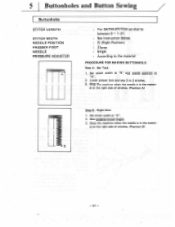
... stitches. (Position B) - 21 - Stop the machine when the needle is in the materi- Lower presser foot and sew 2 to the material PROCEDURE FOR MAKING BUTTONHOLE Step A: Bar Tack 1. Set stitch width at "Rn. 2. Sew predetermined length. 3. al at the right side of... Row 1. Set stitch width at "5" and needle position at "2". 2. 5 I Buttonholes and Button Sewing Buttonholes STITCH LENGTH STITCH WIDTH NEEDLE POSITION PRESSER FOOT NEEDLE PRESSURE ADJUSTER For SATIN STITCH set dial to between 0 - 1 (F) See Instruction Below R (Right Position) Zigzag Single According to 3 stitches. 3.
... stitches. (Position B) - 21 - Stop the machine when the needle is in the materi- Lower presser foot and sew 2 to the material PROCEDURE FOR MAKING BUTTONHOLE Step A: Bar Tack 1. Set stitch width at "Rn. 2. Sew predetermined length. 3. al at the right side of... Row 1. Set stitch width at "5" and needle position at "2". 2. 5 I Buttonholes and Button Sewing Buttonholes STITCH LENGTH STITCH WIDTH NEEDLE POSITION PRESSER FOOT NEEDLE PRESSURE ADJUSTER For SATIN STITCH set dial to between 0 - 1 (F) See Instruction Below R (Right Position) Zigzag Single According to 3 stitches. 3.
Users Manual - English
Page 30
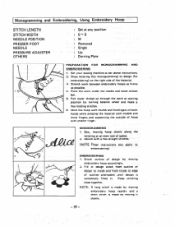
... design stitch from outline of outline alternately until design is made by turning balance wheel and make a few straight stitches. (NOTE: These instructions also apply to edge of design to inside and from inside to embroidering) --- ---..• : I EMBROIDERING 1. Keep stitching close together...position by moving embroidery hoop rapidly and a short stitch is completely filled in. r. 5. Secure with smaller finger. ... Set your sewing machine as possible. 4. Pull lower thread up through the work at an even rate of the material. 3. Stitch outline of hoop with a...
... design stitch from outline of outline alternately until design is made by turning balance wheel and make a few straight stitches. (NOTE: These instructions also apply to edge of design to inside and from inside to embroidering) --- ---..• : I EMBROIDERING 1. Keep stitching close together...position by moving embroidery hoop rapidly and a short stitch is completely filled in. r. 5. Secure with smaller finger. ... Set your sewing machine as possible. 4. Pull lower thread up through the work at an even rate of the material. 3. Stitch outline of hoop with a...
Users Manual - English
Page 35
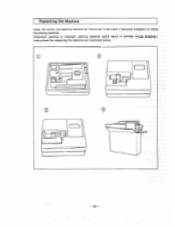
Repacking the Machine Keep the carton and packing material for future use in the event it becomes necessary to reship the sewing machine. (Improper packing or improper packing material could result in damage during shipping.) Instructions for repacking the machine are illustrated below. w O -33-
Repacking the Machine Keep the carton and packing material for future use in the event it becomes necessary to reship the sewing machine. (Improper packing or improper packing material could result in damage during shipping.) Instructions for repacking the machine are illustrated below. w O -33-


