
Accessory Catalog
Page 24
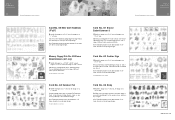
... for a 7" x 5" area, 45 designs for a 4" x 4" area Keep busy during summer, with the second collection of astrology. NO.60 Brother Embroidery Card Collection Brother Embroidery Accessories 46 Card No. 61 Blouse Embellishment II SA361: 4 designs for a 7" x 5" area, 32 designs for a 4" x 4" area ... 62 Zodiac Sign SA362: 2 designs for a 7" x 5" area, 49 designs for a 4" x 4" area Embellish your sign on hand. NO.58 Memory Floppy Disk No. 59 Blouse Embellishments (ULT only) SA359: 6 designs for a 10-1/4" x 6-1/4" area, 6 designs for a 7" x 5" area, 16 designs for a 4" x 4" area Here ...
... for a 7" x 5" area, 45 designs for a 4" x 4" area Keep busy during summer, with the second collection of astrology. NO.60 Brother Embroidery Card Collection Brother Embroidery Accessories 46 Card No. 61 Blouse Embellishment II SA361: 4 designs for a 7" x 5" area, 32 designs for a 4" x 4" area ... 62 Zodiac Sign SA362: 2 designs for a 7" x 5" area, 49 designs for a 4" x 4" area Embellish your sign on hand. NO.58 Memory Floppy Disk No. 59 Blouse Embellishments (ULT only) SA359: 6 designs for a 10-1/4" x 6-1/4" area, 6 designs for a 7" x 5" area, 16 designs for a 4" x 4" area Here ...
Users Manual - English
Page 10
... TO EMBROIDER 5-1 Before Beginning 5-1 s Copyright Information 5-1 s About the Embroidery Unit 5-1 s About Embroidery Cards (Sold Separately 5-1 s About Floppy Disks 5-2 BASIC EMBROIDERY 5-3 Attaching Embroidery Foot "Q 5-4 Attaching the Embroidery Unit 5-5 s Removing the Embroidery Unit ...... 5-7 SELECTING PATTERNS 5-8 One...Patterns 5-13 Frame Patterns 5-15 Selecting Patterns from an Embroidery Card 5-17 Selecting a Pattern from a Floppy Disk (Only for Machines with Floppy Disk Drives) .. 5-18 VIEWING THE SEWING SCREEN ....... 5-19 PREPARING THE EMBROIDERY FRAME 5-20 Attaching...
... TO EMBROIDER 5-1 Before Beginning 5-1 s Copyright Information 5-1 s About the Embroidery Unit 5-1 s About Embroidery Cards (Sold Separately 5-1 s About Floppy Disks 5-2 BASIC EMBROIDERY 5-3 Attaching Embroidery Foot "Q 5-4 Attaching the Embroidery Unit 5-5 s Removing the Embroidery Unit ...... 5-7 SELECTING PATTERNS 5-8 One...Patterns 5-13 Frame Patterns 5-15 Selecting Patterns from an Embroidery Card 5-17 Selecting a Pattern from a Floppy Disk (Only for Machines with Floppy Disk Drives) .. 5-18 VIEWING THE SEWING SCREEN ....... 5-19 PREPARING THE EMBROIDERY FRAME 5-20 Attaching...
Users Manual - English
Page 11
CLEANING THE MACHINE 8-2 s Cleaning the LCD Screen 8-2 s Cleaning the Machine Casing ......... 8-2 s Cleaning the Race and Shuttle ........ 8-2 CLEANING THE FLOPPY DISK DRIVE HEADS 8-4 Chapter 9 Troubleshooting ADJUSTING THE SCREEN 9-1 ADJUSTING THE TOUCH PANEL ........ 9-2 5 - 6 - 7 - Chapter 7 MY CUSTOM STITCH Index DESIGNING THE STITCH 7-1 Index USING THE "TROUBLESHOOTING" FUNCTION 9-4 ...
CLEANING THE MACHINE 8-2 s Cleaning the LCD Screen 8-2 s Cleaning the Machine Casing ......... 8-2 s Cleaning the Race and Shuttle ........ 8-2 CLEANING THE FLOPPY DISK DRIVE HEADS 8-4 Chapter 9 Troubleshooting ADJUSTING THE SCREEN 9-1 ADJUSTING THE TOUCH PANEL ........ 9-2 5 - 6 - 7 - Chapter 7 MY CUSTOM STITCH Index DESIGNING THE STITCH 7-1 Index USING THE "TROUBLESHOOTING" FUNCTION 9-4 ...
Users Manual - English
Page 12
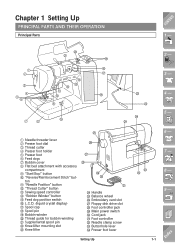
... Principal Parts CONTENTS 1 - J K I Bobbin winder J Thread guide for bobbin winding K Supplemental spool pin L Knee lifter mounting slot M Knee lifter P Q R S T U N Handle O Balance wheel P Embroidery card slot Q Floppy disk drive slot R Foot controller jack S Main power switch T Cord jack U Foot controller V Needle clamp screw W Buttonhole lever X Presser foot lever Setting Up W V 6 - 7 - 8 - 9 - ?! 1-1 Index L M 4 - 78...
... Principal Parts CONTENTS 1 - J K I Bobbin winder J Thread guide for bobbin winding K Supplemental spool pin L Knee lifter mounting slot M Knee lifter P Q R S T U N Handle O Balance wheel P Embroidery card slot Q Floppy disk drive slot R Foot controller jack S Main power switch T Cord jack U Foot controller V Needle clamp screw W Buttonhole lever X Presser foot lever Setting Up W V 6 - 7 - 8 - 9 - ?! 1-1 Index L M 4 - 78...
Users Manual - English
Page 177
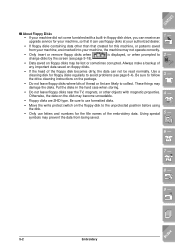
... a cleaning disk for your machine, so that it can not be lost or sometimes corrupted. Be sure to follow the drive cleaning instructions on the floppy disk to the unprotected position before using the disk. • Only use letters and numbers for the file names of thread or lint are likely... to use floppy disks at your machine, the machine may be read normally. Otherwise, the data on the disk may damage the disks. Be sure to collect. CONTENTS...
... a cleaning disk for your machine, so that it can not be lost or sometimes corrupted. Be sure to follow the drive cleaning instructions on the floppy disk to the unprotected position before using the disk. • Only use letters and numbers for the file names of thread or lint are likely... to use floppy disks at your machine, the machine may be read normally. Otherwise, the data on the disk may damage the disks. Be sure to collect. CONTENTS...

Users Manual - English
Page 183
... come furnished with a built-in the machine's computer memory. You can use patterns from the embroidery cards (sold separately) Floppy disk 7 - 8 - CONTENTS 1 - SELECTING PATTERNS There are many character and decorative embroidery patterns stored in floppy disk drive, you can receive an upgrade service for your machine, so that it can also use...
... come furnished with a built-in the machine's computer memory. You can use patterns from the embroidery cards (sold separately) Floppy disk 7 - 8 - CONTENTS 1 - SELECTING PATTERNS There are many character and decorative embroidery patterns stored in floppy disk drive, you can receive an upgrade service for your machine, so that it can also use...
Users Manual - English
Page 193
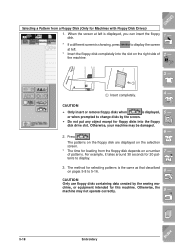
...correctly. 9 - ?! 5-18 Embroidery Index Press . 6 - CONTENTS 1 - * If a different screen is displayed, you can insert the floppy disk. Selecting a Pattern from the floppy disk depends on a number 7 - For example, it takes around 30 seconds for 20 patterns to change disks by the sewing machine, or ...equipment intended for floppy disks into the slot on the right side of patterns. When the screen at left is showing, press to 5-16. 8 - the machine....
...correctly. 9 - ?! 5-18 Embroidery Index Press . 6 - CONTENTS 1 - * If a different screen is displayed, you can insert the floppy disk. Selecting a Pattern from the floppy disk depends on a number 7 - For example, it takes around 30 seconds for 20 patterns to change disks by the sewing machine, or ...equipment intended for floppy disks into the slot on the right side of patterns. When the screen at left is showing, press to 5-16. 8 - the machine....
Users Manual - English
Page 224
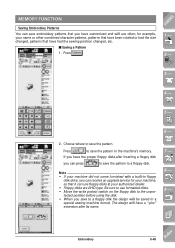
...combined character patterns, patterns that have been rotated or had the sewing position changed , patterns that you have customized and will be saved in floppy disk drive, you can receive an upgrade service for your machine, so that it can use formatted disks. • Move the write ...position before using the disk. • When you can save embroidery patterns that have had the size changed , etc. Be sure to use floppy disks at your machine did not come furnished with a built-in a special sewing machine format. MEMORY FUNCTION Saving Embroidery Patterns You can press to...
...combined character patterns, patterns that have been rotated or had the sewing position changed , patterns that you have customized and will be saved in floppy disk drive, you can receive an upgrade service for your machine, so that it can use formatted disks. • Move the write ...position before using the disk. • When you can save embroidery patterns that have had the size changed , etc. Be sure to use floppy disks at your machine did not come furnished with a built-in a special sewing machine format. MEMORY FUNCTION Saving Embroidery Patterns You can press to...

Users Manual - English
Page 225
.... 1 - CAUTION Do not turn off the power while the "Saving" screen is saved, the display returns to the machine's memory. 3 - Also, do not remove the floppy disk while the pattern is being saved. CONTENTS 3.
.... 1 - CAUTION Do not turn off the power while the "Saving" screen is saved, the display returns to the machine's memory. 3 - Also, do not remove the floppy disk while the pattern is being saved. CONTENTS 3.
Users Manual - English
Page 239
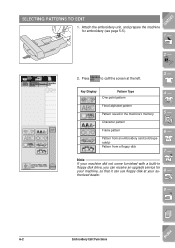
... Display Pattern Type One point pattern 4 - Character pattern Frame pattern Pattern from an embroidery card (sold separately) Pattern from a floppy disk 6 - 7 - Floral alphabet pattern Pattern saved in floppy disk drive, you can use floppy disk at the left. 3 - Press to call the screen at your machine, so that it can receive an upgrade...
... Display Pattern Type One point pattern 4 - Character pattern Frame pattern Pattern from an embroidery card (sold separately) Pattern from a floppy disk 6 - 7 - Floral alphabet pattern Pattern saved in floppy disk drive, you can use floppy disk at the left. 3 - Press to call the screen at your machine, so that it can receive an upgrade...

Users Manual - English
Page 269
... If your machine did not come furnished with a built-in the machine memory. Press to save the pattern in floppy disk drive, you press 7 - Press . CONTENTS 1 - 2 - 3 - 4 - 5 - 2. If you have the floppy disk drive on a floppy disk. MEMORY FUNCTIONS Saving Edited Patterns s Saving a Pattern You can save edited patterns for your machine, so that...
... If your machine did not come furnished with a built-in the machine memory. Press to save the pattern in floppy disk drive, you press 7 - Press . CONTENTS 1 - 2 - 3 - 4 - 5 - 2. If you have the floppy disk drive on a floppy disk. MEMORY FUNCTIONS Saving Edited Patterns s Saving a Pattern You can save edited patterns for your machine, so that...
Users Manual - English
Page 295
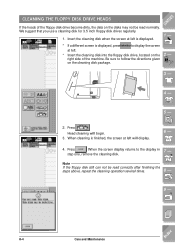
... read normally. Press . When the screen display returns to display the screen at left . * Insert the cleaning disk into the floppy disk drive, located on the cleaning disk package. 3 - 4 - 5 - 2. Be sure to follow the directions given on the 2 - CLEANING THE..., press to the display in 7 - step one, remove the cleaning disk. We suggest that you use a cleaning disk for 3.5 inch floppy disk drives regularly. 1. Note If the floppy disk still can not be read correctly after finishing the steps above, repeat the cleaning operation several times. 8 - 9 - ?! 8-4 Care...
... read normally. Press . When the screen display returns to display the screen at left . * Insert the cleaning disk into the floppy disk drive, located on the cleaning disk package. 3 - 4 - 5 - 2. Be sure to follow the directions given on the 2 - CLEANING THE..., press to the display in 7 - step one, remove the cleaning disk. We suggest that you use a cleaning disk for 3.5 inch floppy disk drives regularly. 1. Note If the floppy disk still can not be read correctly after finishing the steps above, repeat the cleaning operation several times. 8 - 9 - ?! 8-4 Care...
Users Manual - English
Page 308
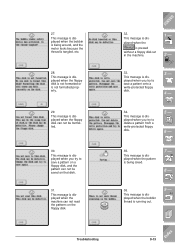
.... 3 - 4 - 34. This message is displayed when the pattern is displayed when the machine can not be saved on the floppy disk. This message is being wound, and the motor locks because the thread is running out. 9 - ?! 9-13 Index Troubleshooting 32. This message ...is displayed when you try to delete a pattern from a write-protected floppy disk. 5 - 6 - 35. This message is displayed when the floppy disk can not read the patterns on that disk. 31. 27. This message is displayed when the bobbin is being saved...
.... 3 - 4 - 34. This message is displayed when the pattern is displayed when the machine can not be saved on the floppy disk. This message is being wound, and the motor locks because the thread is running out. 9 - ?! 9-13 Index Troubleshooting 32. This message ...is displayed when you try to delete a pattern from a write-protected floppy disk. 5 - 6 - 35. This message is displayed when the floppy disk can not read the patterns on that disk. 31. 27. This message is displayed when the bobbin is being saved...
Users Manual - English
Page 309
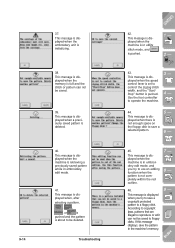
... is retrieving a previously saved pattern while in utility stitch mode, and is full and the stitch or pattern can not be saved to floppy disks. This message is displayed when the memory is pushed. This message is displayed when the machine is not completely within the red outline...control lever is set to control the zigzag stitch width, and the "Start/ Stop" button is not enough space on the floppy disk to save a selecting a pattern, copyright protected pattern to a floppy disk. , , According to save a selected pattern. 5 - 6 - 40. played when, after when you try to...
... is retrieving a previously saved pattern while in utility stitch mode, and is full and the stitch or pattern can not be saved to floppy disks. This message is displayed when the memory is pushed. This message is displayed when the machine is not completely within the red outline...control lever is set to control the zigzag stitch width, and the "Start/ Stop" button is not enough space on the floppy disk to save a selecting a pattern, copyright protected pattern to a floppy disk. , , According to save a selected pattern. 5 - 6 - 40. played when, after when you try to...
Users Manual - English
Page 310
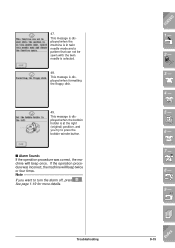
... displayed when the machine is in twin needle mode and a pattern that can not be sewn with the twin needle is displayed when formatting the floppy disk. 49. s Alarm Sounds If the operation procedure was incorrect, the machine will beep once. If the operation procedure was correct, the machine will beep...
... displayed when the machine is in twin needle mode and a pattern that can not be sewn with the twin needle is displayed when formatting the floppy disk. 49. s Alarm Sounds If the operation procedure was incorrect, the machine will beep once. If the operation procedure was correct, the machine will beep...

Users Manual - English
Page 314
... spacing 6-16 connecting characters 5-56 selecting for editing 6-5 Character spacing key 6-8, 6-16 Checking combined character/decorative stitch patterns 4-26 position of embroidery patterns 5-27 Cleaning floppy disk drive heads 8-4 LCD 8-2 machine casing 8-2 race and shuttle 8-2 Color changing color in character patterns 5-48, 6-17 changing thread color 6-13 Combining patterns character/decorative...
... spacing 6-16 connecting characters 5-56 selecting for editing 6-5 Character spacing key 6-8, 6-16 Checking combined character/decorative stitch patterns 4-26 position of embroidery patterns 5-27 Cleaning floppy disk drive heads 8-4 LCD 8-2 machine casing 8-2 race and shuttle 8-2 Color changing color in character patterns 5-48, 6-17 changing thread color 6-13 Combining patterns character/decorative...
Users Manual - English
Page 315
... sizes 3-64 F Fabric needle/fabric/thread combinations 1-45 setting in an embroidery frame 5-22 Fagoting 3-46 Feed dog position switch 1-6 Feed dogs 1-1 Flat bed attachment 1-8 Floppy disks 5-2, 5-18, 5-49, 6-32 cleaning 8-4 Floral alphabet patterns 5-13 Index CONTENTS 1 - 2 - 3 - 4 - 5 - 6 - 7 - 8 - 9 - ?! Index...
... sizes 3-64 F Fabric needle/fabric/thread combinations 1-45 setting in an embroidery frame 5-22 Fagoting 3-46 Feed dog position switch 1-6 Feed dogs 1-1 Flat bed attachment 1-8 Floppy disks 5-2, 5-18, 5-49, 6-32 cleaning 8-4 Floral alphabet patterns 5-13 Index CONTENTS 1 - 2 - 3 - 4 - 5 - 6 - 7 - 8 - 9 - ?! Index...


