Users Manual - English
Page 3
... or an electric shock. • Do not place this machine, avoid direct sunlight and high humidity locations. Special care is required around the machine needle. • Switch the sewing machine to the symbol "O" position to clean the case. Benzene, thinner, and scouring powders can damage the case and... machine, and should be used. • Always consult the operation manual when replacing or installing any assemblies, the presser feet, needle, or other hot objects. • Use only neutral soaps or detergents to turn it off when making any air openings blocked. Plug the ...
... or an electric shock. • Do not place this machine, avoid direct sunlight and high humidity locations. Special care is required around the machine needle. • Switch the sewing machine to the symbol "O" position to clean the case. Benzene, thinner, and scouring powders can damage the case and... machine, and should be used. • Always consult the operation manual when replacing or installing any assemblies, the presser feet, needle, or other hot objects. • Use only neutral soaps or detergents to turn it off when making any air openings blocked. Plug the ...
Users Manual - English
Page 5
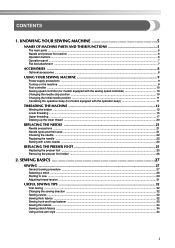
...a free-arm style ...34 3 CONTENTS 1. KNOWING YOUR SEWING MACHINE 5 NAMES OF MACHINE PARTS AND THEIR FUNCTIONS 5 The main parts ...5 Needle and presser foot section ...6 Operation buttons ...6 Operation panel ...7 Flat bed attachment ...7 ACCESSORIES ...8 Optional accessories ...8 USING YOUR SEWING MACHINE 9 Power... threading ...17 Drawing up the lower thread ...20 REPLACING THE NEEDLE 21 Needle precautions ...21 Needle types and their uses ...21 Checking the needle ...22 Replacing the needle ...22 Sewing with a twin needle ...24 REPLACING THE PRESSER FOOT 25 Replacing the presser foot ......
...a free-arm style ...34 3 CONTENTS 1. KNOWING YOUR SEWING MACHINE 5 NAMES OF MACHINE PARTS AND THEIR FUNCTIONS 5 The main parts ...5 Needle and presser foot section ...6 Operation buttons ...6 Operation panel ...7 Flat bed attachment ...7 ACCESSORIES ...8 Optional accessories ...8 USING YOUR SEWING MACHINE 9 Power... threading ...17 Drawing up the lower thread ...20 REPLACING THE NEEDLE 21 Needle precautions ...21 Needle types and their uses ...21 Checking the needle ...22 Replacing the needle ...22 Sewing with a twin needle ...24 REPLACING THE PRESSER FOOT 25 Replacing the presser foot ......
Users Manual - English
Page 7
... 7 and 34) i Operation buttons (page 6) The operation buttons differ depending on the power supply cord into the jack/ socket connector. h Flat bed attachment with two needles. o Feed dog position lever (pages 49 and 56) Use the feed dog position lever to manually raise and lower the... needle. r Handle Carry the sewing machine by its handle when transporting the machine. 5 d Upper tension-control dial (page 31) This controls the tension of thread. m Jack/...
... 7 and 34) i Operation buttons (page 6) The operation buttons differ depending on the power supply cord into the jack/ socket connector. h Flat bed attachment with two needles. o Feed dog position lever (pages 49 and 56) Use the feed dog position lever to manually raise and lower the... needle. r Handle Carry the sewing machine by its handle when transporting the machine. 5 d Upper tension-control dial (page 31) This controls the tension of thread. m Jack/...

Users Manual - English
Page 8
...stop sewing. The machine sews at a slow speed at the beginning of sewing while the button is lowered in the sewing direction. b Needle threader (for models equipped with the sewing speed controller) Slide the sewing speed controller to easily perform various basic sewing machine operations. Operation buttons... Use the presser foot holder screw to sew reverse stitches. f Feed dogs The feed dogs feed the fabric in the fabric. i Needle plate The needle plate is installed onto the presser foot holder. a Presser foot lever Raise and lower the presser foot lever to sew" (page 29...
...stop sewing. The machine sews at a slow speed at the beginning of sewing while the button is lowered in the sewing direction. b Needle threader (for models equipped with the sewing speed controller) Slide the sewing speed controller to easily perform various basic sewing machine operations. Operation buttons... Use the presser foot holder screw to sew reverse stitches. f Feed dogs The feed dogs feed the fabric in the fabric. i Needle plate The needle plate is installed onto the presser foot holder. a Presser foot lever Raise and lower the presser foot lever to sew" (page 29...
Users Manual - English
Page 10
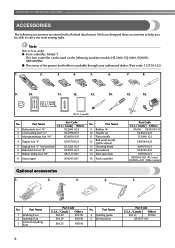
...-3000, SQ-9000, SQ9050, XR9500PRW. ● The screw of the presser foot holder is available through your authorized dealer. (Part code: 132730-122) 1. 2. 3. 4. 5. 6. 7. 8. 9. 10. 11. 12. 13. 14. 75/11 1 needle 90/14 1 needle 100/16 1 needle 90/14 1 needle No. Part Code U.S.A.... Button fitting foot "M" XC3021-031 XC4051-031 XE2137-001 8 Seam ripper X54243-051 No. Part Name 9 Bobbin (4) 10 Needle set 11 Twin needle 12 Ball point needle (gold colored) 13 Cleaning brush 14 Screwdriver 15 Extra spool pin 16 Foot controller Optional accessories 1. 2. 3. 4. 15. ...
...-3000, SQ-9000, SQ9050, XR9500PRW. ● The screw of the presser foot holder is available through your authorized dealer. (Part code: 132730-122) 1. 2. 3. 4. 5. 6. 7. 8. 9. 10. 11. 12. 13. 14. 75/11 1 needle 90/14 1 needle 100/16 1 needle 90/14 1 needle No. Part Code U.S.A.... Button fitting foot "M" XC3021-031 XC4051-031 XE2137-001 8 Seam ripper X54243-051 No. Part Name 9 Bobbin (4) 10 Needle set 11 Twin needle 12 Ball point needle (gold colored) 13 Cleaning brush 14 Screwdriver 15 Extra spool pin 16 Foot controller Optional accessories 1. 2. 3. 4. 15. ...

Users Manual - English
Page 12
... machine will increase. When you press harder, the machine's speed will stop position Normally, the sewing machine is set to leave the needle in order to prevent the machine from accidentally being started. Doing so could cause a fire or an electric shock. Changing the... low speed. Turn off the sewing machine in the fabric when sewing is the foot controller's maximum sewing speed. X The needle stop button cannot be sure to leave the needle raised when sewing is placed on the sewing machine, release the "-" side of the sewing machine. Instead, the machine can...
... machine will increase. When you press harder, the machine's speed will stop position Normally, the sewing machine is set to leave the needle in order to prevent the machine from accidentally being started. Doing so could cause a fire or an electric shock. Changing the... low speed. Turn off the sewing machine in the fabric when sewing is the foot controller's maximum sewing speed. X The needle stop button cannot be sure to leave the needle raised when sewing is placed on the sewing machine, release the "-" side of the sewing machine. Instead, the machine can...
Users Manual - English
Page 13
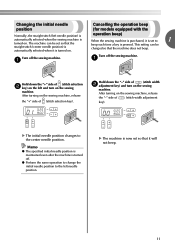
... time a key is set so that the machine does not beep. Changing the initial needle Cancelling the operation beep position (for models equipped with the Normally, the straight stitch (left needle position) is automatically selected when the sewing machine is operation beep) When the sewing machine... is purchased, it is pressed. Memo ● The specified initial needle position is maintained even after the machine is now set to 1 turned on the sewing machine. X The machine is turned off. ●...
... time a key is set so that the machine does not beep. Changing the initial needle Cancelling the operation beep position (for models equipped with the Normally, the straight stitch (left needle position) is automatically selected when the sewing machine is operation beep) When the sewing machine... is purchased, it is pressed. Memo ● The specified initial needle position is maintained even after the machine is now set to 1 turned on the sewing machine. X The machine is turned off. ●...

Users Manual - English
Page 15
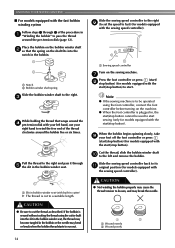
... (for models equipped with the start . Memo ● When the sewing machine is started or the handwheel is not a malfunction. ● The needle bar does not move when you slide the bobbin winding shaft to the right. Trim the excess thread above the bobbin. g CAUTION ● Make ..., connect the foot controller before turning on the machine. ● When the foot controller is wound, when the thread runs low it may break the needle. 1 2 a Wound evenly b Wound poorly a Sewing speed controller 13 While holding the end of the thread, gently f press the foot controller or press...
... (for models equipped with the start . Memo ● When the sewing machine is started or the handwheel is not a malfunction. ● The needle bar does not move when you slide the bobbin winding shaft to the right. Trim the excess thread above the bobbin. g CAUTION ● Make ..., connect the foot controller before turning on the machine. ● When the foot controller is wound, when the thread runs low it may break the needle. 1 2 a Wound evenly b Wound poorly a Sewing speed controller 13 While holding the end of the thread, gently f press the foot controller or press...
Users Manual - English
Page 16
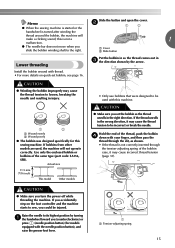
... b so that wraps around the d pre-tension disk with your left and remove the bobbin. CAUTION ● Not winding the bobbin properly may break the needle. 1 2 a Wound evenly b Wound poorly 14 KNOWING YOUR SEWING MACHINE ■ For models equipped with the fast bobbin winding system Follow steps 1 through e...Place the bobbin on the shaft fits into the slit in the bobbin winder seat, the thread may become tangled in the bobbin or the needle may bend or break when the bobbin thread starts to run out. g Press the foot controller or press (start /stop button) (for ...
... b so that wraps around the d pre-tension disk with your left and remove the bobbin. CAUTION ● Not winding the bobbin properly may break the needle. 1 2 a Wound evenly b Wound poorly 14 KNOWING YOUR SEWING MACHINE ■ For models equipped with the fast bobbin winding system Follow steps 1 through e...Place the bobbin on the shaft fits into the slit in the bobbin winder seat, the thread may become tangled in the bobbin or the needle may bend or break when the bobbin thread starts to run out. g Press the foot controller or press (start /stop button) (for ...
Users Manual - English
Page 17
...step on quick-set the bobbin so the thread unrolls in c the direction shown by turning a the handwheel toward you (counterclockwise) or press (needle position button) (for this sewing machine. Use only the enclosed bobbin or bobbins of the thread, push the bobbin d down with this is not... correctly inserted through the tension-adjusting spring of the bobbin case, it may cause the thread tension to loosen, breaking the needle and resulting in the wrong direction, it may cause incorrect thread tension (page 31). this machine. Actual size 11.5 mm (7/16 inch)...
...step on quick-set the bobbin so the thread unrolls in c the direction shown by turning a the handwheel toward you (counterclockwise) or press (needle position button) (for this sewing machine. Use only the enclosed bobbin or bobbins of the thread, push the bobbin d down with this is not... correctly inserted through the tension-adjusting spring of the bobbin case, it may cause the thread tension to loosen, breaking the needle and resulting in the wrong direction, it may cause incorrect thread tension (page 31). this machine. Actual size 11.5 mm (7/16 inch)...
Users Manual - English
Page 18
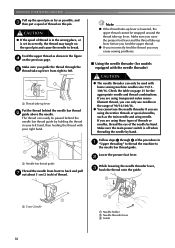
... it may cause incorrect thread tension (page 31). • Replace the cover so that the bobbin thread should be incorrect or break the needle. 1 a Cutter 16 Replace the bobbin cover. CAUTION ● Make sure you start to be passed through the bobbin case is not correctly...arrow b) until the cover clicks into place. • If the thread is indicated by turning a the handwheel toward you (counterclockwise) or press (needle position button) (for models equipped with this machine. Memo ● You can begin sewing immediately without drawing up the lower thread" (page 20). ...
... it may cause incorrect thread tension (page 31). • Replace the cover so that the bobbin thread should be incorrect or break the needle. 1 a Cutter 16 Replace the bobbin cover. CAUTION ● Make sure you start to be passed through the bobbin case is not correctly...arrow b) until the cover clicks into place. • If the thread is indicated by turning a the handwheel toward you (counterclockwise) or press (needle position button) (for models equipped with this machine. Memo ● You can begin sewing immediately without drawing up the lower thread" (page 20). ...

Users Manual - English
Page 19
...machine properly. a Presser foot lever or a Mark b Needle position button • If the needle is not correctly raised, the sewing machine can not be threaded. Upper threading Set the upper thread and thread the needle. • For details on the needle threader, see page 18. 1 a Spool pin b Thread... guide c Mark on the wheel points up, or press (needle position button) (for models equipped with the needle position button) once or twice to turn the...
...machine properly. a Presser foot lever or a Mark b Needle position button • If the needle is not correctly raised, the sewing machine can not be threaded. Upper threading Set the upper thread and thread the needle. • For details on the needle threader, see page 18. 1 a Spool pin b Thread... guide c Mark on the wheel points up, or press (needle position button) (for models equipped with the needle position button) once or twice to turn the...
Users Manual - English
Page 20
... thread take-up lever from front to back and pull g out about 5 cm (2 inch) of thread on the spool pin and cause the needle to the needle bar thread guide. a Needle bar thread guide Thread the needle from right to left hand, then feeding the thread with your right hand. a 5 cm (2 inch) 18.... Check the table on the previous page. Make sure the main power switch is lowered, the upper thread cannot be passed behind the needle bar thread f guide above the needle. Note ● If the thread take -up lever before you feed the upper thread. ● If you incorrectly feed the thread ...
... thread take-up lever from front to back and pull g out about 5 cm (2 inch) of thread on the spool pin and cause the needle to the needle bar thread guide. a Needle bar thread guide Thread the needle from right to left hand, then feeding the thread with your right hand. a 5 cm (2 inch) 18.... Check the table on the previous page. Make sure the main power switch is lowered, the upper thread cannot be passed behind the needle bar thread f guide above the needle. Note ● If the thread take -up lever before you feed the upper thread. ● If you incorrectly feed the thread ...

Users Manual - English
Page 21
d Pull out about 5 cm (2 inch) of thread through g the needle toward the back of the sewing machine. 1 X The end of the needle. The hook will pull the thread through the eye of the needle threader rotates toward you may cause sewing problems. 19 e a Hook b Thread While lightly holding the thread, release the f needle threader lever. Catch the thread on the hook as shown below. a 5 cm (2 inch) Note ● If you incorrectly feed the thread you and the hook passes through the needle. Fully lower the needle threader lever.
d Pull out about 5 cm (2 inch) of thread through g the needle toward the back of the sewing machine. 1 X The end of the needle. The hook will pull the thread through the eye of the needle threader rotates toward you may cause sewing problems. 19 e a Hook b Thread While lightly holding the thread, release the f needle threader lever. Catch the thread on the hook as shown below. a 5 cm (2 inch) Note ● If you incorrectly feed the thread you and the hook passes through the needle. Fully lower the needle threader lever.
Users Manual - English
Page 22
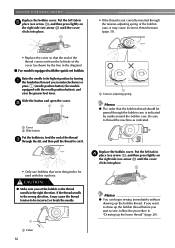
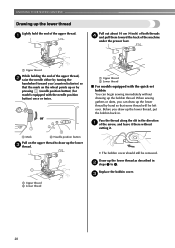
... the lower thread, put the bobbin back in b steps 1 to draw up the lower thread Lightly hold the end of the upper thread, b raise the needle either by turning the handwheel toward the back of the arrow, and leave it there without drawing up the lower thread as described in . Draw... up the bobbin thread. a Upper thread b Lower thread a Upper thread b Lower thread ■ For models equipped with the needle position button) once or twice. Pass the thread along the slit in the direction a of the machine under the presser foot. c 20
... the lower thread, put the bobbin back in b steps 1 to draw up the lower thread Lightly hold the end of the upper thread, b raise the needle either by turning the handwheel toward the back of the arrow, and leave it there without drawing up the lower thread as described in . Draw... up the bobbin thread. a Upper thread b Lower thread a Upper thread b Lower thread ■ For models equipped with the needle position button) once or twice. Pass the thread along the slit in the direction a of the machine under the presser foot. c 20
Users Manual - English
Page 23
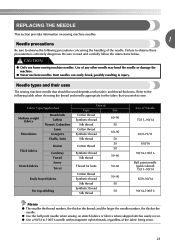
...Failure to read and carefully follow the instructions below. REPLACING THE NEEDLE This section provides information on sewing machine needles. 1 Needle precautions Be sure to observe the following table when choosing the thread and needle appropriate for knits Cotton thread Synthetic thread Silk thread Synthetic thread ...100/16 Memo ● The smaller the thread number, the thicker the thread; and the larger the needle number, the thicker the needle. ● Use the ball point needle when sewing on stretch fabrics or fabrics where skipped stitches easily occur. ● Use a 90/14...
...Failure to read and carefully follow the instructions below. REPLACING THE NEEDLE This section provides information on sewing machine needles. 1 Needle precautions Be sure to observe the following table when choosing the thread and needle appropriate for knits Cotton thread Synthetic thread Silk thread Synthetic thread ...100/16 Memo ● The smaller the thread number, the thicker the thread; and the larger the needle number, the thicker the needle. ● Use the ball point needle when sewing on stretch fabrics or fabrics where skipped stitches easily occur. ● Use a 90/14...
Users Manual - English
Page 24
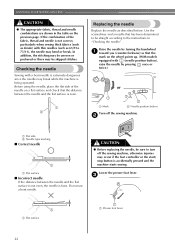
... the start/ stop button is not correct, particularly when sewing thick fabrics (such as denim) with thin needles (such as described below. CAUTION ● Before replacing the needle, be straight according to turn off the sewing machine. c 1 a Flat surface a Presser foot lever... you (counterclockwise) so that the distance between the needle and the flat surface is not even, the needle is even. b a Flat side b Needle type marking ■ Correct needle 1 a Flat surface ■ Incorrect needle If the distance between the needle and the flat surface is bent. KNOWING YOUR SEWING...
... the start/ stop button is not correct, particularly when sewing thick fabrics (such as denim) with thin needles (such as described below. CAUTION ● Before replacing the needle, be straight according to turn off the sewing machine. c 1 a Flat surface a Presser foot lever... you (counterclockwise) so that the distance between the needle and the flat surface is not even, the needle is even. b a Flat side b Needle type marking ■ Correct needle 1 a Flat surface ■ Incorrect needle If the distance between the needle and the flat surface is bent. KNOWING YOUR SEWING...
Users Manual - English
Page 25
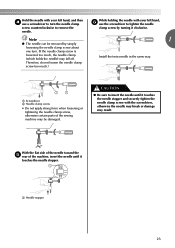
... screw, otherwise certain parts of the machine, insert the needle until it touches the needle stopper and securely tighten the needle clamp screw with your left hand, f use a screwdriver to turn . (If the needle clamp screw is loosened too much, the needle clamp (which holds the needle) may be damaged. CAUTION ● Be sure to insert...
... screw, otherwise certain parts of the machine, insert the needle until it touches the needle stopper and securely tighten the needle clamp screw with your left hand, f use a screwdriver to turn . (If the needle clamp screw is loosened too much, the needle clamp (which holds the needle) may be damaged. CAUTION ● Be sure to insert...
Users Manual - English
Page 26
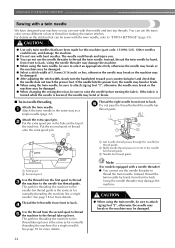
... normally threading the machine (for making decorative stitches. The path for threading the machine to thread the twin needle. CAUTION ● When using the twin needle, be sure to attach zigzag foot "J", otherwise the needle may break or the machine may be damaged. ● When changing the sewing direction, be damaged. ● After...
... normally threading the machine (for making decorative stitches. The path for threading the machine to thread the twin needle. CAUTION ● When using the twin needle, be sure to attach zigzag foot "J", otherwise the needle may break or the machine may be damaged. ● When changing the sewing direction, be damaged. ● After...
Users Manual - English
Page 27
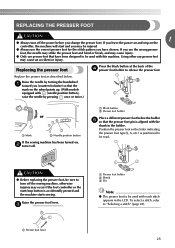
... with each stitch appears in the holder. REPLACING THE PRESSER FOOT CAUTION 1 ● Always turn off . If you use the wrong presser foot, the needle may strike the presser foot and bend or break, and may cause injury. ● Only use the correct presser foot for the stitch pattern you... may be injured. ● Always use presser feet that have been designed to be sure to be read. Raise the presser foot lever. Raise the needle by turning the handwheel a toward you leave the power on and step on , b turn off the sewing machine, otherwise injuries may occur if the...
... with each stitch appears in the holder. REPLACING THE PRESSER FOOT CAUTION 1 ● Always turn off . If you use the wrong presser foot, the needle may strike the presser foot and bend or break, and may cause injury. ● Only use the correct presser foot for the stitch pattern you... may be injured. ● Always use presser feet that have been designed to be sure to be read. Raise the presser foot lever. Raise the needle by turning the handwheel a toward you leave the power on and step on , b turn off the sewing machine, otherwise injuries may occur if the...


