
Users Manual - English
Page 2
... from the electrical outlet immediately after using and before using this machine, basic safety precautions should always be taken, including the following: Read all moving parts.
... from the electrical outlet immediately after using and before using this machine, basic safety precautions should always be taken, including the following: Read all moving parts.
Users Manual - English
Page 4
...Plug the machine directly into the wall. When storing this product are subject to keep your local authorized Brother dealer. Always consult the operation manual when replacing or installing any other parts • A power failure occurs during use • Maintaining the machine • Leaving the machine unattended...needle or any assemblies, the presser feet, needle, or other parts to clean the case. Be sure to change without notice. 2 For additional product information and updates, visit our web site at www.brother.com The contents of this manual and specifications of the most...
...Plug the machine directly into the wall. When storing this product are subject to keep your local authorized Brother dealer. Always consult the operation manual when replacing or installing any other parts • A power failure occurs during use • Maintaining the machine • Leaving the machine unattended...needle or any assemblies, the presser feet, needle, or other parts to clean the case. Be sure to change without notice. 2 For additional product information and updates, visit our web site at www.brother.com The contents of this manual and specifications of the most...
Users Manual - English
Page 5
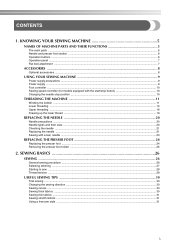
CONTENTS 1. KNOWING YOUR SEWING MACHINE 5 NAMES OF MACHINE PARTS AND THEIR FUNCTIONS 5 The main parts ...5 Needle and presser foot section ...6 Operation buttons ...6 Operation panel ...7 Flat bed attachment ...7 ACCESSORIES ...8 Optional accessories ...8 USING YOUR SEWING MACHINE 9 Power supply precautions ...9 Power supply ...9 Foot ...
CONTENTS 1. KNOWING YOUR SEWING MACHINE 5 NAMES OF MACHINE PARTS AND THEIR FUNCTIONS 5 The main parts ...5 Needle and presser foot section ...6 Operation buttons ...6 Operation panel ...7 Flat bed attachment ...7 ACCESSORIES ...8 Optional accessories ...8 USING YOUR SEWING MACHINE 9 Power supply precautions ...9 Power supply ...9 Foot ...
Users Manual - English
Page 7
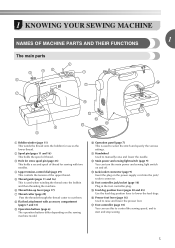
... raise and lower the presser foot. p Presser foot lever (page 16) Used to cut them. 1 KNOWING YOUR SEWING MACHINE 1 NAMES OF MACHINE PARTS AND THEIR FUNCTIONS The main parts a Bobbin winder (page 11) This winds the thread onto the bobbin for use this to control the sewing speed, and to start and...
... raise and lower the presser foot. p Presser foot lever (page 16) Used to cut them. 1 KNOWING YOUR SEWING MACHINE 1 NAMES OF MACHINE PARTS AND THEIR FUNCTIONS The main parts a Bobbin winder (page 11) This winds the thread onto the bobbin for use this to control the sewing speed, and to start and...
Users Manual - English
Page 10
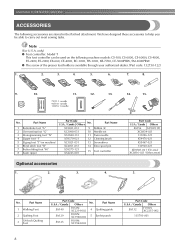
..., CS-4000, ES-2400, ES-2000, EX-660, CE-4000, BC-1000, HS-1000, XR-7700, CE-5000PRW, SM-6500PRW ● The screw of the presser foot holder is available through your authorized dealer. (Part code: 132730-122) 1. 2. 3. 4. 5. 6. 7. 8. 9. 10. 11. 12. 13. 14. 15. 75/11 1 needle 90...SA132 F016N: XC2215-002 135793-001 8 only) ● Foot controller: Model T This foot controller can be able to carry out most sewing tasks. Part Code U.S.A. / Canada Others SA156 XA5539-151 XC8834-021 131096-121 X59476-021 X55467-021 130920-021 XD0501-021 (EU area) XC8816-021 (Other areas...
..., CS-4000, ES-2400, ES-2000, EX-660, CE-4000, BC-1000, HS-1000, XR-7700, CE-5000PRW, SM-6500PRW ● The screw of the presser foot holder is available through your authorized dealer. (Part code: 132730-122) 1. 2. 3. 4. 5. 6. 7. 8. 9. 10. 11. 12. 13. 14. 15. 75/11 1 needle 90...SA132 F016N: XC2215-002 135793-001 8 only) ● Foot controller: Model T This foot controller can be able to carry out most sewing tasks. Part Code U.S.A. / Canada Others SA156 XA5539-151 XC8834-021 131096-121 X59476-021 X55467-021 130920-021 XD0501-021 (EU area) XC8816-021 (Other areas...
Users Manual - English
Page 13
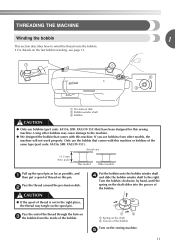
...; For details on the sewing machine. a Pre-tension disk b Bobbin winder shaft c Bobbin CAUTION ● Only use bobbins from the inside of the same type (part code: SA156, SFB: XA5539-151). If you use bobbins (part code: SA156, SFB: XA5539-151) that comes with this machine or bobbins of the bobbin.
...; For details on the sewing machine. a Pre-tension disk b Bobbin winder shaft c Bobbin CAUTION ● Only use bobbins from the inside of the same type (part code: SA156, SFB: XA5539-151). If you use bobbins (part code: SA156, SFB: XA5539-151) that comes with this machine or bobbins of the bobbin.
Users Manual - English
Page 16
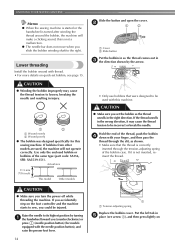
...; The bobbin was designed specifically for models equipped with your finger, and then pass the thread through the tension-adjusting spring of the same type (part code: SA156, SFB: XA5539-151). CAUTION ● Make sure you could be incorrect or break the needle.
...; The bobbin was designed specifically for models equipped with your finger, and then pass the thread through the tension-adjusting spring of the same type (part code: SA156, SFB: XA5539-151). CAUTION ● Make sure you could be incorrect or break the needle.

Users Manual - English
Page 24
... needle in the same way. a Screwdriver b Needle clamp screw • Do not apply strong force when loosening or tightening the needle clamp screw, otherwise certain parts of the machine, insert the needle until it to the needle bar. KNOWING YOUR SEWING MACHINE Hold the needle with your left hand, and then...
... needle in the same way. a Screwdriver b Needle clamp screw • Do not apply strong force when loosening or tightening the needle clamp screw, otherwise certain parts of the machine, insert the needle until it to the needle bar. KNOWING YOUR SEWING MACHINE Hold the needle with your left hand, and then...
Users Manual - English
Page 25
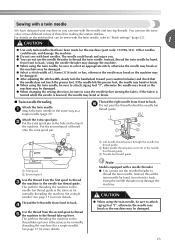
... two top threads. See page 17 for more details. b Right needle thread passes in the hole on the stitches that can sew with this machine (part code: 131096-121). Using the needle threader may bend or break. ■ Twin needle threading Attach the twin needle. Attach the extra spool pin. Instead...
... two top threads. See page 17 for more details. b Right needle thread passes in the hole on the stitches that can sew with this machine (part code: 131096-121). Using the needle threader may bend or break. ■ Twin needle threading Attach the twin needle. Attach the extra spool pin. Instead...

Users Manual - English
Page 28
... machine. Select the stitch appropriate for the stitch. General sewing procedure Follow the basic procedures below . In addition, keep your hands away from all moving parts such as the needle and handwheel, otherwise injuries may occur. ● Do not pull or push the fabric too hard while sewing, otherwise injuries may...
... machine. Select the stitch appropriate for the stitch. General sewing procedure Follow the basic procedures below . In addition, keep your hands away from all moving parts such as the needle and handwheel, otherwise injuries may occur. ● Do not pull or push the fabric too hard while sewing, otherwise injuries may...
Users Manual - English
Page 38
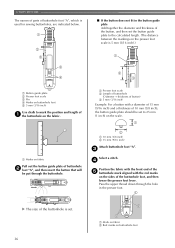
... the red marks on the sides of 10 mm (3/8 inch), the button guide plate should be put through the buttonhole. UTILITY STITCHES The names of parts of buttonhole foot "A", which is used for sewing buttonholes, are indicated below. 1 2 5 ■ If the button does not fit in the presser foot. 1 X The size...
... the red marks on the sides of 10 mm (3/8 inch), the button guide plate should be put through the buttonhole. UTILITY STITCHES The names of parts of buttonhole foot "A", which is used for sewing buttonholes, are indicated below. 1 2 5 ■ If the button does not fit in the presser foot. 1 X The size...
Users Manual - English
Page 40
..., gently pull the gimp f thread to remove any excess of a buttonhole foot "A" shown in the a button to be attached. With a seam ripper, cut the middle part of the h gimp thread remaining at the rear of the machine on stretch fabrics, use a gimp thread. X The feed dogs are lowered. Attach presser foot..., to (to the right as seen from the front of the fabric, and then tie it . Attach buttonhole foot "A". Hook the gimp thread onto the part of the gimp thread.
..., gently pull the gimp f thread to remove any excess of a buttonhole foot "A" shown in the a button to be attached. With a seam ripper, cut the middle part of the h gimp thread remaining at the rear of the machine on stretch fabrics, use a gimp thread. X The feed dogs are lowered. Attach presser foot..., to (to the right as seen from the front of the fabric, and then tie it . Attach buttonhole foot "A". Hook the gimp thread onto the part of the gimp thread.
Users Manual - English
Page 60
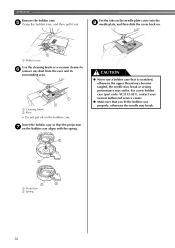
e Grasp the bobbin case, and then pull it out. For a new bobbin case (part code: XC3152-021), contact your nearest authorized service center. ● Make sure that the projection g on . 1 a Bobbin case Use the cleaning brush or a vacuum cleaner ...
e Grasp the bobbin case, and then pull it out. For a new bobbin case (part code: XC3152-021), contact your nearest authorized service center. ● Make sure that the projection g on . 1 a Bobbin case Use the cleaning brush or a vacuum cleaner ...
Users Manual - English
Page 65
i INDEX Numerics M 3-point zigzag stitch 32 main parts 5 main power switch 9 A , monogramming 49 51 accessories 8 appliqués 42 N needle 20 B bar tack 46 basic stitching 33 blind hem stitching 34 bobbin 14 , bobbin ...
i INDEX Numerics M 3-point zigzag stitch 32 main parts 5 main power switch 9 A , monogramming 49 51 accessories 8 appliqués 42 N needle 20 B bar tack 46 basic stitching 33 blind hem stitching 34 bobbin 14 , bobbin ...

