
Operation Manual
Page 6
... Function 54 Saving stitch patterns 55 Retrieving stitch patterns 55 Chapter 4 EMBROIDERY 57 Embroidering Preparation 57 Attaching the Embroidery Foot 57 Attaching the Embroidery Unit 58 Embroidery Attractive Finishes 59 Hooping the fabric in the embroidery frame 60 Attaching the Embroidery Frame 62 Embroidering 63 Selecting an embroidery pattern 63 Embroidering a pattern 65 Adjusting thread tension 67 Embroidering...
... Function 54 Saving stitch patterns 55 Retrieving stitch patterns 55 Chapter 4 EMBROIDERY 57 Embroidering Preparation 57 Attaching the Embroidery Foot 57 Attaching the Embroidery Unit 58 Embroidery Attractive Finishes 59 Hooping the fabric in the embroidery frame 60 Attaching the Embroidery Frame 62 Embroidering 63 Selecting an embroidery pattern 63 Embroidering a pattern 65 Adjusting thread tension 67 Embroidering...
Operation Manual
Page 10
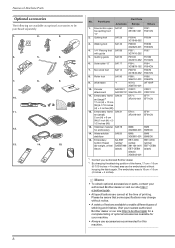
...-001 EF61CN 13. The embroidery area is 10 cm × 10 cm (4 inches × 4 inches). Memo • To obtain optional accessories or parts, contact your authorized Brother dealer or visit our site http:// s.brother/cpjab. • All specifications are available to be aware that some specifications may change without hooping the fabric again. Free...
...-001 EF61CN 13. The embroidery area is 10 cm × 10 cm (4 inches × 4 inches). Memo • To obtain optional accessories or parts, contact your authorized Brother dealer or visit our site http:// s.brother/cpjab. • All specifications are available to be aware that some specifications may change without hooping the fabric again. Free...

Operation Manual
Page 59
... it in place. 5 Fabric preparation Attach a stabilizer material to 60 the fabric, and hoop it in the embroidery frame. 6 Embroidery frame attachment Attach the embroidery frame 62 to the embroidery unit. 7 Pattern selection Turn the main power to on page 23. 4 EMBROIDERY Hold the embroidery foot "Q" with your right hand, as d shown. Press (Needle position button) to...
... it in place. 5 Fabric preparation Attach a stabilizer material to 60 the fabric, and hoop it in the embroidery frame. 6 Embroidery frame attachment Attach the embroidery frame 62 to the embroidery unit. 7 Pattern selection Turn the main power to on page 23. 4 EMBROIDERY Hold the embroidery foot "Q" with your right hand, as d shown. Press (Needle position button) to...

Operation Manual
Page 61
... are two important factors mentioned earlier. See the explanation of threads below . EMBROIDERY 4 → The embroidery carriage moves into beautiful embroidery. Embroidery Attractive Finishes → The carriage moves to "Removing the embroidery frame" on the bottom left . Press , and then press . Memo &#... • If [Opening Screen] is the appropriateness of the d embroidery unit, and slowly pull the embroidery unit to appear. c CAUTION • Always turn off the machine. Using the appropriate stabilizer (page 60) and hooping the fabric in the screen. Turn on . 59
... are two important factors mentioned earlier. See the explanation of threads below . EMBROIDERY 4 → The embroidery carriage moves into beautiful embroidery. Embroidery Attractive Finishes → The carriage moves to "Removing the embroidery frame" on the bottom left . Press , and then press . Memo &#... • If [Opening Screen] is the appropriateness of the d embroidery unit, and slowly pull the embroidery unit to appear. c CAUTION • Always turn off the machine. Using the appropriate stabilizer (page 60) and hooping the fabric in the screen. Turn on . 59

Operation Manual
Page 62
... difficult, position the stabilizer material under the fabric without fusing it, then position the fabric and stabilizer in the embroidery frame, or check with your authorized Brother dealer for embroidery when embroidering stretch fabrics, lightweight fabrics, fabrics with a basting stitch. Otherwise, the needle may cause the needle ... cannot be ironed onto the fabric, attach it with a coarse weave, or fabrics which is larger than the embroidery frame being careful not to distort hooped fabric. 60 Note • If the fabric is too small, the presser foot may strike the frame during ...
... difficult, position the stabilizer material under the fabric without fusing it, then position the fabric and stabilizer in the embroidery frame, or check with your authorized Brother dealer for embroidery when embroidering stretch fabrics, lightweight fabrics, fabrics with a basting stitch. Otherwise, the needle may cause the needle ... cannot be ironed onto the fabric, attach it with a coarse weave, or fabrics which is larger than the embroidery frame being careful not to distort hooped fabric. 60 Note • If the fabric is too small, the presser foot may strike the frame during ...
Operation Manual
Page 72
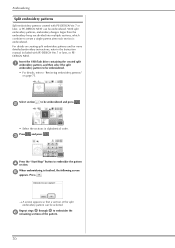
... e to create a single pattern after each section is finished, the following screen e appears. With split embroidery patterns, embroidery designs larger than the embroidery hoop are divided into multiple sections, which combine to embroider the f remaining sections of the split embroidery pattern can be selected. Select section to the Instruction manual included with PE-DESIGN Ver...
... e to create a single pattern after each section is finished, the following screen e appears. With split embroidery patterns, embroidery designs larger than the embroidery hoop are divided into multiple sections, which combine to embroider the f remaining sections of the split embroidery pattern can be selected. Select section to the Instruction manual included with PE-DESIGN Ver...


