Operation Manual
Page 1
We recommend that you keep this document before using the machine. Operation Manual Embroidery and Sewing Machine Product Code: 888-M20 Be sure to read this document nearby for future reference.
We recommend that you keep this document before using the machine. Operation Manual Embroidery and Sewing Machine Product Code: 888-M20 Be sure to read this document nearby for future reference.

Operation Manual
Page 3
... not store objects on the foot controller. • Never drop or insert foreign objects in this machine on the unit. Return the machine to the nearest authorized Brother dealer for examination, repair, electrical or mechanical adjustment. • While the machine is stored or in injuries. 6 Special care is a power failure. 3 Electrical Hazards: • This...
... not store objects on the foot controller. • Never drop or insert foreign objects in this machine on the unit. Return the machine to the nearest authorized Brother dealer for examination, repair, electrical or mechanical adjustment. • While the machine is stored or in injuries. 6 Special care is a power failure. 3 Electrical Hazards: • This...

Operation Manual
Page 4
... of the Operation Manual to clean the case. If the problem persists, please consult your local authorized Brother dealer. For additional product information and updates, visit our website at www.brother.com SAVE THESE INSTRUCTIONS This machine is intended for use by children aged from 8 years and above and persons with reduced physical...
... of the Operation Manual to clean the case. If the problem persists, please consult your local authorized Brother dealer. For additional product information and updates, visit our website at www.brother.com SAVE THESE INSTRUCTIONS This machine is intended for use by children aged from 8 years and above and persons with reduced physical...

Operation Manual
Page 6
...Saving embroidery patterns 75 Retrieving embroidery patterns 75 Chapter 5 APPENDIX 77 Care and Maintenance 77 Restrictions on oiling 77 Precautions on storing the machine 77 Cleaning the race 77 Touch panel is malfunctioning 78 Troubleshooting 78 Upper thread tightened up 79 Tangled thread on wrong side of ...fabric 79 Incorrect thread tension 79 Fabric is caught in the machine and cannot be removed ..... 80 If the thread becomes tangled under the bobbin winder seat 82 List of symptoms 83 Error messages ...
...Saving embroidery patterns 75 Retrieving embroidery patterns 75 Chapter 5 APPENDIX 77 Care and Maintenance 77 Restrictions on oiling 77 Precautions on storing the machine 77 Cleaning the race 77 Touch panel is malfunctioning 78 Troubleshooting 78 Upper thread tightened up 79 Tangled thread on wrong side of ...fabric 79 Incorrect thread tension 79 Fabric is caught in the machine and cannot be removed ..... 80 If the thread becomes tangled under the bobbin winder seat 82 List of symptoms 83 Error messages ...
Operation Manual
Page 7
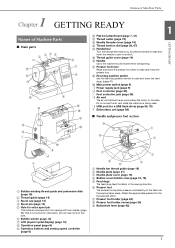
... This holds an extra spool pin for sewing with twin needle. (page 52) This is being used. Do not cover the air vent while the machine is not a hole for the selected stitch. 7 Presser foot holder (page 24) 8 Presser foot holder screw (page 24) 9 Buttonhole lever (page 42) 5 Do not ... (page 26) M Air vent The air vent allows the air surrounding the motor to sew one stitch. E Thread guide cover (page 14) F Handle Carry the machine by its handle when transporting. G Presser foot lever Raise and lower the presser foot lever to raise and lower the presser foot. Attach the appropriate...
... This holds an extra spool pin for sewing with twin needle. (page 52) This is being used. Do not cover the air vent while the machine is not a hole for the selected stitch. 7 Presser foot holder (page 24) 8 Presser foot holder screw (page 24) 9 Buttonhole lever (page 42) 5 Do not ... (page 26) M Air vent The air vent allows the air surrounding the motor to sew one stitch. E Thread guide cover (page 14) F Handle Carry the machine by its handle when transporting. G Presser foot lever Raise and lower the presser foot lever to raise and lower the presser foot. Attach the appropriate...

Operation Manual
Page 8
... exchange key Press this key to sew a utility stitch or decorative stitch. 8 Back key Press to return to the machine's operation mode. Red: The machine cannot sew. For details, refer to "LCD Operation" on page 10. 2 Previous page key Displays the previous screen when... displayed on the LCD. 4 Help key Press to get help on the LCD to start or stop position, the buzzer sound, and more . Names of Machine Parts ■ Operation buttons ■ Operation panel and operation keys b a a cd e 1 "Start/Stop" button Press the "Start/Stop" button to perform operations. i...
... exchange key Press this key to sew a utility stitch or decorative stitch. 8 Back key Press to return to the machine's operation mode. Red: The machine cannot sew. For details, refer to "LCD Operation" on page 10. 2 Previous page key Displays the previous screen when... displayed on the LCD. 4 Help key Press to get help on the LCD to start or stop position, the buzzer sound, and more . Names of Machine Parts ■ Operation buttons ■ Operation panel and operation keys b a a cd e 1 "Start/Stop" button Press the "Start/Stop" button to perform operations. i...
Operation Manual
Page 9
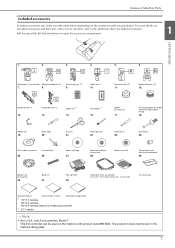
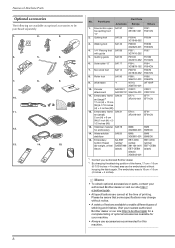
...Pre-wound bobbin (60 weight white embroidery bobbin thread) 18. only) Foot controller: Model T This foot controller can be used on machine) 30. For more details on machine) 28. Bobbin clip 19. Eyelet punch 23. Screwdriver 24. Spool cap (large) 27. The product code is mentioned on...ripper 20. Scissors 21. Cleaning brush 22. Extra spool pin 26. Spool cap (medium) (on included accessories and their part codes of your machine, refer to open the accessory compartment. 1 GETTING READY 1. 2. 3. 4. 5. 6. Spool cap (small) Thread spool insert (mini king thread spool) 29....
...Pre-wound bobbin (60 weight white embroidery bobbin thread) 18. only) Foot controller: Model T This foot controller can be used on machine) 30. For more details on machine) 28. Bobbin clip 19. Eyelet punch 23. Screwdriver 24. Spool cap (large) 27. The product code is mentioned on...ripper 20. Scissors 21. Cleaning brush 22. Extra spool pin 26. Spool cap (medium) (on included accessories and their part codes of your machine, refer to open the accessory compartment. 1 GETTING READY 1. 2. 3. 4. 5. 6. Spool cap (small) Thread spool insert (mini king thread spool) 29....
Operation Manual
Page 10
...SA185 with guide F057: F057 XC7416-252 5. Memo • To obtain optional accessories or parts, contact your authorized Brother dealer or visit our site http:// s.brother/cpjab. • All specifications are available to be embroidered without notice. • A variety of feet are correct... Brother dealer. *2 By changing the attaching position of the frame, 17 cm × 10 cm (6-7/10 inches × 4 inches) area can be purchased separately. 1. 2. 3. O 4. 5. 6. 7. 8. 9. 10. 11. 12. 13. 14. 15. Quilting foot SA129 F005N: F005N XC1948-052 3. Names of Machine ...
...SA185 with guide F057: F057 XC7416-252 5. Memo • To obtain optional accessories or parts, contact your authorized Brother dealer or visit our site http:// s.brother/cpjab. • All specifications are available to be embroidered without notice. • A variety of feet are correct... Brother dealer. *2 By changing the attaching position of the frame, 17 cm × 10 cm (6-7/10 inches × 4 inches) area can be purchased separately. 1. 2. 3. O 4. 5. 6. 7. 8. 9. 10. 11. 12. 13. 14. 15. Quilting foot SA129 F005N: F005N XC1948-052 3. Names of Machine ...

Operation Manual
Page 11
... modify the plug in the following circumstances: • When you first turn the main power to the machine. • Make sure that the machine is turned off the machine, press the left side of your authorized Brother dealer for the power source. Insert the plug of electrical shock, this... machine. • Do not use • When the machine does not operate correctly due to install the proper electrical ...
... modify the plug in the following circumstances: • When you first turn the main power to the machine. • Make sure that the machine is turned off the machine, press the left side of your authorized Brother dealer for the power source. Insert the plug of electrical shock, this... machine. • Do not use • When the machine does not operate correctly due to install the proper electrical ...

Operation Manual
Page 12
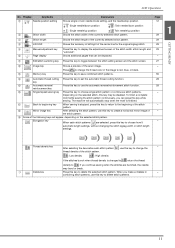
...%: Nearly the same size as zipper foot "I H G F J A Note • Some editing functions cannot be used with your finger to select the stitch pattern, to select a machine function, or to select an operation indicated on the operation panel. 1 Utility stitch 1 2 Decorative stitch 2 ■ Utility stitch screen 678 5 9 4 0 3 2 1E D BA ■ Decorative stitch...
...%: Nearly the same size as zipper foot "I H G F J A Note • Some editing functions cannot be used with your finger to select the stitch pattern, to select a machine function, or to select an operation indicated on the operation panel. 1 Utility stitch 1 2 Decorative stitch 2 ■ Utility stitch screen 678 5 9 4 0 3 2 1E D BA ■ Decorative stitch...
Operation Manual
Page 13
... width, stitch length and "L/R Shift". 0 Page display Shows additional pages that can press this key to choose single stitch pattern or continuous stitch patterns. The machine will appear, depending on the selected stitch, this key to return to the beginning of the sewn image. A Edit/stitch switching key Press this key...
... width, stitch length and "L/R Shift". 0 Page display Shows additional pages that can press this key to choose single stitch pattern or continuous stitch patterns. The machine will appear, depending on the selected stitch, this key to return to the beginning of the sewn image. A Edit/stitch switching key Press this key...

Operation Manual
Page 14
thread number, color name. (page 66) 9 When the thread number [#123] is the internal machine number for your machine. B Change the color of pattern thumbnails. G Select the display language. The files are saved in a folder labeled "bPocket". ■ Sewing settings 1 2 3 5 ... (Left)" or "1-03 Straight stitch (Middle)" as the utility stitch that you changed necessary settings. M Display the program version installed on your authorized Brother dealer for details.) K Display the total number of the input sensitivity for operation keys. (page 13) J Display the service count which is a ...
thread number, color name. (page 66) 9 When the thread number [#123] is the internal machine number for your machine. B Change the color of pattern thumbnails. G Select the display language. The files are saved in a folder labeled "bPocket". ■ Sewing settings 1 2 3 5 ... (Left)" or "1-03 Straight stitch (Middle)" as the utility stitch that you changed necessary settings. M Display the program version installed on your authorized Brother dealer for details.) K Display the total number of the input sensitivity for operation keys. (page 13) J Display the service count which is a ...

Operation Manual
Page 15
...the bobbin winder shaft to the right until it snaps into place. • The "Start/Stop" button lights up in the bobbin aligns with this machine. Slide the spool onto the spool pin so that the a notch in orange. 1 Notch 1 2 Bobbin winder shaft spring 2 Remove the spool cap... 13 Adjust the [Input Sensitivity] by pressing / . The bobbin's height is being used for the upper threading. • When winding bobbin for this machine or bobbins of the same type (SA156/SFB: XA5539-151/SFB). Press a to set desired level. SA156 is used . • While adjusting the input...
...the bobbin winder shaft to the right until it snaps into place. • The "Start/Stop" button lights up in the bobbin aligns with this machine. Slide the spool onto the spool pin so that the a notch in orange. 1 Notch 1 2 Bobbin winder shaft spring 2 Remove the spool cap... 13 Adjust the [Input Sensitivity] by pressing / . The bobbin's height is being used for the upper threading. • When winding bobbin for this machine or bobbins of the same type (SA156/SFB: XA5539-151/SFB). Press a to set desired level. SA156 is used . • While adjusting the input...

Operation Manual
Page 16
... thread spool insert (mini king thread spool). CAUTION • If the spool or the spool cap is 12 mm (1/2 inch) in the spool or the machine may become tangled around the spool pin, causing the needle to break. • Three spool cap sizes are available, allowing you to the front. For...
... thread spool insert (mini king thread spool). CAUTION • If the spool or the spool cap is 12 mm (1/2 inch) in the spool or the machine may become tangled around the spool pin, causing the needle to break. • Three spool cap sizes are available, allowing you to the front. For...

Operation Manual
Page 17
... damaged. Slide the sewing speed controller to start winding the i bobbin. CAUTION • When the bobbin winding becomes slow, stop the machine, otherwise the machine may stretch. 15 CAUTION • Be sure to cut the thread as possible Note • Make sure that the thread is wound.... Slide the controller to the right to desired sewing l speed position. Winding/Installing the Bobbin Pass the thread under the hook on the machine. Wind the thread clockwise around the bobbin winder shaft. When the foot controller is plugged in , remove your foot from the spool m pin...
... damaged. Slide the sewing speed controller to start winding the i bobbin. CAUTION • When the bobbin winding becomes slow, stop the machine, otherwise the machine may stretch. 15 CAUTION • Be sure to cut the thread as possible Note • Make sure that the thread is wound.... Slide the controller to the right to desired sewing l speed position. Winding/Installing the Bobbin Pass the thread under the hook on the machine. Wind the thread clockwise around the bobbin winder shaft. When the foot controller is plugged in , remove your foot from the spool m pin...

Operation Manual
Page 18
... finger and unwind the bobbin thread correctly, otherwise the thread may occur if the "Start/Stop" button or any other button is pressed and the machine starts. Turn on the operation panel to "Pulling up the bobbin thread by 2 in this illustration, then lightly pulling the thread at the beginning of... 20. Memo • If the threads will be pulled to create gathers or the thread at 3, the thread will be sure to press on the machine.
... finger and unwind the bobbin thread correctly, otherwise the thread may occur if the "Start/Stop" button or any other button is pressed and the machine starts. Turn on the operation panel to "Pulling up the bobbin thread by 2 in this illustration, then lightly pulling the thread at the beginning of... 20. Memo • If the threads will be pulled to create gathers or the thread at 3, the thread will be sure to press on the machine.

Operation Manual
Page 19
... bend or break. • Never use a thread weight of needles and threads, refer to the procedure in "Pulling up the bobbin thread" on the machine. j Insert the tab of the bobbin cover into the notch of the needle plate cover, and then lightly press down the bobbin with your left...placed in the slit in the needle plate cover, the bobbin thread will not be threaded. 17 If the upper threading is not raised, the machine cannot be correctly threaded, resulting in the correct combination. Memo • Be sure to complete the bobbin threading correctly according to raise the presser ...
... bend or break. • Never use a thread weight of needles and threads, refer to the procedure in "Pulling up the bobbin thread" on the machine. j Insert the tab of the bobbin cover into the notch of the needle plate cover, and then lightly press down the bobbin with your left...placed in the slit in the needle plate cover, the bobbin thread will not be threaded. 17 If the upper threading is not raised, the machine cannot be correctly threaded, resulting in the correct combination. Memo • Be sure to complete the bobbin threading correctly according to raise the presser ...

Operation Manual
Page 20
... may become tangled around the spool pin or the needle may occur if the "Start/Stop" button or any other button is pressed and the machine starts. Slide the thread behind the needle bar thread guide by holding the thread in the order h shown below . j The thread can easily be sure...
... may become tangled around the spool pin or the needle may occur if the "Start/Stop" button or any other button is pressed and the machine starts. Slide the thread behind the needle bar thread guide by holding the thread in the order h shown below . j The thread can easily be sure...

Operation Manual
Page 21
... performed, proceed to step o. • When using the thread cutter, pull out about 5 cm (approx. 2 inches) of thread toward the rear of the machine. Therefore, instead of using thread that quickly winds off the spool, such as possible to make the hook turn. 1 1 2 3 GETTING READY Pull the end...thread such as transparent nylon monofilament or specialty threads are compatible, continue with the next step. • The needle threader can be used with machine needles 75/11 through 100/16. • The needle threader cannot be used , insert the thread through the eye of the needle from the...
... performed, proceed to step o. • When using the thread cutter, pull out about 5 cm (approx. 2 inches) of thread toward the rear of the machine. Therefore, instead of using thread that quickly winds off the spool, such as possible to make the hook turn. 1 1 2 3 GETTING READY Pull the end...thread such as transparent nylon monofilament or specialty threads are compatible, continue with the next step. • The needle threader can be used with machine needles 75/11 through 100/16. • The needle threader cannot be used , insert the thread through the eye of the needle from the...

Operation Manual
Page 22
Follow steps a to f "Installing the bobbin" on page 17 to a thread the machine with the upper thread and thread the needle. Press d to "Threading the upper thread" on b page 16 for example, when free motion quilting, first pull ...; The bobbin thread is looped around the upper thread and can be finished, for installing the bobbin and to pull out the f end of the machine, making it will be pulled up the bobbin thread. Refer to unlock all keys and buttons.
Follow steps a to f "Installing the bobbin" on page 17 to a thread the machine with the upper thread and thread the needle. Press d to "Threading the upper thread" on b page 16 for example, when free motion quilting, first pull ...; The bobbin thread is looped around the upper thread and can be finished, for installing the bobbin and to pull out the f end of the machine, making it will be pulled up the bobbin thread. Refer to unlock all keys and buttons.


