Operation Manual
Page 2
... outlet immediately after using the machine immediately and unplug the power cord. • When transporting the sewing machine, be careful not to make any other part may damage the machine or result in the machine falling, which could cause injuries. • When lifting the sewing machine, be sure to carry it...
... outlet immediately after using the machine immediately and unplug the power cord. • When transporting the sewing machine, be careful not to make any other part may damage the machine or result in the machine falling, which could cause injuries. • When lifting the sewing machine, be sure to carry it...
Operation Manual
Page 3
... supplied in the needle area. • Do not use extension cords. Keep ventilation openings of the sewing machine and foot control free from all moving parts. Never allow children to play with any adjustments in should never be kept out of the reach of children or disposed of. Do not use... "O" position to turn it could cause the needle to clean the case. Do not use the machine near a space heater, iron, halogen lamp, or other parts to the needle. Special care is not a toy: • Your close attention to assure correct installation. 1
... supplied in the needle area. • Do not use extension cords. Keep ventilation openings of the sewing machine and foot control free from all moving parts. Never allow children to play with any adjustments in should never be kept out of the reach of children or disposed of. Do not use... "O" position to turn it could cause the needle to clean the case. Do not use the machine near a space heater, iron, halogen lamp, or other parts to the needle. Special care is not a toy: • Your close attention to assure correct installation. 1
Operation Manual
Page 5
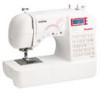
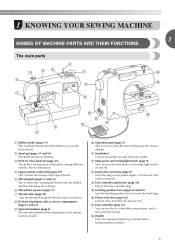
KNOWING YOUR SEWING MACHINE 5 NAMES OF MACHINE PARTS AND THEIR FUNCTIONS 5 The main parts ...5 Needle and presser foot section ...6 Operation buttons ...6 Operation panel ...7 Flat bed attachment ...7 ACCESSORIES ...8 Optional accessories ...8 USING YOUR SEWING MACHINE 9 Power supply precautions ...9 Power supply ...9 Foot ...
KNOWING YOUR SEWING MACHINE 5 NAMES OF MACHINE PARTS AND THEIR FUNCTIONS 5 The main parts ...5 Needle and presser foot section ...6 Operation buttons ...6 Operation panel ...7 Flat bed attachment ...7 ACCESSORIES ...8 Optional accessories ...8 USING YOUR SEWING MACHINE 9 Power supply precautions ...9 Power supply ...9 Foot ...
Operation Manual
Page 7
... 29) Pass the threads through the thread cutter to manually raise and lower the needle. 1 KNOWING YOUR SEWING MACHINE 1 NAMES OF MACHINE PARTS AND THEIR FUNCTIONS The main parts a Bobbin winder (page 11) This winds the thread onto the bobbin for use this to control the sewing speed, and to raise and...
... 29) Pass the threads through the thread cutter to manually raise and lower the needle. 1 KNOWING YOUR SEWING MACHINE 1 NAMES OF MACHINE PARTS AND THEIR FUNCTIONS The main parts a Bobbin winder (page 11) This winds the thread onto the bobbin for use this to control the sewing speed, and to raise and...
Operation Manual
Page 10
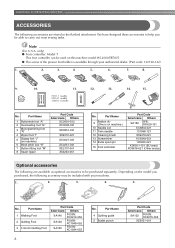
... separately. We have designed these accessories to be used on this machine model HS-2000/SB700T. ● The screw of the presser foot holder is on machine) 6 Blind stitch foot "R" 7 Button fitting foot "M" 8 Seam ripper Part Code Americans Others XC2691-033 XC3098-031 XD0810-031 X59370-021 XC3021-031 XC4051-031 XE2137...
... separately. We have designed these accessories to be used on this machine model HS-2000/SB700T. ● The screw of the presser foot holder is on machine) 6 Blind stitch foot "R" 7 Button fitting foot "M" 8 Seam ripper Part Code Americans Others XC2691-033 XC3098-031 XD0810-031 X59370-021 XC3021-031 XC4051-031 XE2137...
Operation Manual
Page 13
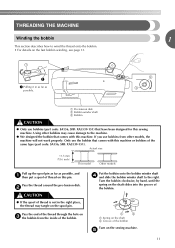
.... Pass the end of the thread through the hole on c the bobbin from other bobbins may tangle on the shaft b Groove of the same type (part code: SA156, SFB: XA5539-151). e 11 If you use bobbins from the inside of thread on this machine or bobbins of the bobbin Turn on... bobbin clockwise, by hand, until the spring on the shaft slides into the groove of the bobbin. 1 2 a Spring on the spool pin. Only use bobbins (part code: SA156, SFB: XA5539-151) that comes with this sewing machine. THREADING THE MACHINE Winding the bobbin 1 This section describes how to wind the thread...
.... Pass the end of the thread through the hole on c the bobbin from other bobbins may tangle on the shaft b Groove of the same type (part code: SA156, SFB: XA5539-151). e 11 If you use bobbins from the inside of thread on this machine or bobbins of the bobbin Turn on... bobbin clockwise, by hand, until the spring on the shaft slides into the groove of the bobbin. 1 2 a Spring on the spool pin. Only use bobbins (part code: SA156, SFB: XA5539-151) that comes with this sewing machine. THREADING THE MACHINE Winding the bobbin 1 This section describes how to wind the thread...
Operation Manual
Page 16
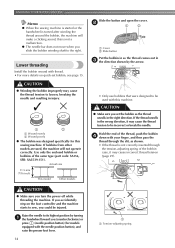
..., breaking the needle and resulting in the wrong direction, it may cause the thread tension to the right. Hold the end of the same type (part code: SA156, SFB: XA5539-151).
..., breaking the needle and resulting in the wrong direction, it may cause the thread tension to the right. Hold the end of the same type (part code: SA156, SFB: XA5539-151).
Operation Manual
Page 24
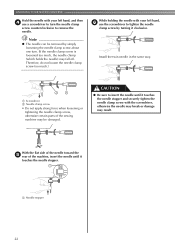
... the needle) may fall off. a Screwdriver b Needle clamp screw • Do not apply strong force when loosening or tightening the needle clamp screw, otherwise certain parts of the machine, insert the needle until it touches the needle stopper and securely tighten the needle clamp screw with your left hand, f use a screwdriver...
... the needle) may fall off. a Screwdriver b Needle clamp screw • Do not apply strong force when loosening or tightening the needle clamp screw, otherwise certain parts of the machine, insert the needle until it touches the needle stopper and securely tighten the needle clamp screw with your left hand, f use a screwdriver...

Operation Manual
Page 25
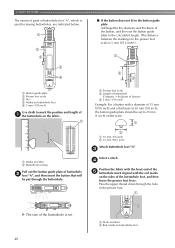
... more details. See page 17 for threading the machine to the needle bar thread guide. c Needle bar thread guide Note Models equipped with this machine (part code: 131096-121). Thread the left needle from the first spool to thread c the machine to the thread take -up lever is the same as...
... more details. See page 17 for threading the machine to the needle bar thread guide. c Needle bar thread guide Note Models equipped with this machine (part code: 131096-121). Thread the left needle from the first spool to thread c the machine to the thread take -up lever is the same as...

Operation Manual
Page 28
... sewing machine, read the following precautions. CAUTION ● While the machine is finished, cut the threads. In addition, keep your hands away from all moving parts such as the needle and handwheel, otherwise injuries may occur. ● Do not pull or push the fabric too hard while sewing, otherwise injuries may...
... sewing machine, read the following precautions. CAUTION ● While the machine is finished, cut the threads. In addition, keep your hands away from all moving parts such as the needle and handwheel, otherwise injuries may occur. ● Do not pull or push the fabric too hard while sewing, otherwise injuries may...

Operation Manual
Page 39
... of fabric b Fold of hem c Guide Adjust the stitch width until the needle 3 k slightly catches the fold of fabric Attach blind hem foot "R". Slide the part that the fabric feeds correctly, and then start sewing. 1 a Needle drop point When you change the needle drop point, raise the needle, and then change...
... of fabric b Fold of hem c Guide Adjust the stitch width until the needle 3 k slightly catches the fold of fabric Attach blind hem foot "R". Slide the part that the fabric feeds correctly, and then start sewing. 1 a Needle drop point When you change the needle drop point, raise the needle, and then change...
Operation Manual
Page 42
... together the diameter and thickness of the button, and then set . 2 A 2 a Mark on fabric b Red marks on buttonhole foot 40 UTILITY STITCHES The names of parts of buttonhole foot "A", which is 5 mm (3/16 inch).) 1 3 4 A a Button guide plate b Presser foot scale c Pin d Marks on buttonhole foot e 5 mm (3/16 inch) Use chalk to...
... together the diameter and thickness of the button, and then set . 2 A 2 a Mark on fabric b Red marks on buttonhole foot 40 UTILITY STITCHES The names of parts of buttonhole foot "A", which is 5 mm (3/16 inch).) 1 3 4 A a Button guide plate b Presser foot scale c Pin d Marks on buttonhole foot e 5 mm (3/16 inch) Use chalk to...

Operation Manual
Page 44
... "M" 42 c Adjust the stitch width to the thickness of a buttonhole foot "A" shown in the a button to be attached. Hook the gimp thread onto the part of the d gimp thread. b Select a stitch or . When sewing is finished, gently pull the gimp f thread to the wrong side of the machine).... Trim off any slack. X The feed dogs are lowered. With a seam ripper, cut the middle part of the h gimp thread remaining at the**rear o*f the machine on stretch fabrics, use a gimp thread. Attach buttonhole foot "A". Attach presser foot "M". Button ...
... "M" 42 c Adjust the stitch width to the thickness of a buttonhole foot "A" shown in the a button to be attached. Hook the gimp thread onto the part of the d gimp thread. b Select a stitch or . When sewing is finished, gently pull the gimp f thread to the wrong side of the machine).... Trim off any slack. X The feed dogs are lowered. With a seam ripper, cut the middle part of the h gimp thread remaining at the**rear o*f the machine on stretch fabrics, use a gimp thread. Attach buttonhole foot "A". Attach presser foot "M". Button ...
Operation Manual
Page 64
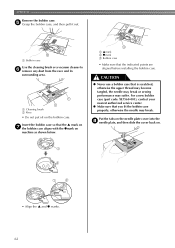
... surrounding area. a Smark b zmark c Bobbin case • Make sure that you fit the bobbin case properly, otherwise the needle may suffer. For a new bobbin case (part code: XE7560-001), contact your nearest authorized service center. ● Make sure that the indicated points are aligned before installing the bobbin case. APPENDIX Remove...
... surrounding area. a Smark b zmark c Bobbin case • Make sure that you fit the bobbin case properly, otherwise the needle may suffer. For a new bobbin case (part code: XE7560-001), contact your nearest authorized service center. ● Make sure that the indicated points are aligned before installing the bobbin case. APPENDIX Remove...
Operation Manual
Page 69
... stitch length 27 J joining 55 , joining stitch 46 52 stitch selection key 7 stitch settings 56 stitch width 27 straight stitch 35 M stretch fabrics 33 main parts 5 main power switch 9 , monogramming 53 55 67
... stitch length 27 J joining 55 , joining stitch 46 52 stitch selection key 7 stitch settings 56 stitch width 27 straight stitch 35 M stretch fabrics 33 main parts 5 main power switch 9 , monogramming 53 55 67

