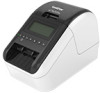
Users Guide
Page 2
...the box 2 PDF manual on the country. i This guide provides basic information about using the Label Printer, make changes without notice. Brother reserves the right to download the latest manuals. Product Safety Guide 1 Quick Setup Guide 1 User's... the Label Printer along with the Label Printer for information about the Label Printer settings and operations, network connection and settings, troubleshooting tips, and maintenance instructions. Available Manuals Visit the Brother support website at support.brother.com and click Manuals on your Label Printer. ...
...the box 2 PDF manual on the country. i This guide provides basic information about using the Label Printer, make changes without notice. Brother reserves the right to download the latest manuals. Product Safety Guide 1 Quick Setup Guide 1 User's... the Label Printer along with the Label Printer for information about the Label Printer settings and operations, network connection and settings, troubleshooting tips, and maintenance instructions. Available Manuals Visit the Brother support website at support.brother.com and click Manuals on your Label Printer. ...
Users Guide
Page 3
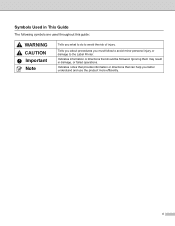
Ignoring them may result in This Guide The following symbols are used throughout this guide: WARNING CAUTION Important Note Tells you what to do to the Label Printer. Indicates notes that provide information or directions that should be followed. Tells you about procedures you better understand and use the product more efficiently. ii Indicates information or directions that can help you must follow to avoid minor personal injury or damage to avoid the risk of injury. Symbols Used in damage, or failed operations.
Ignoring them may result in This Guide The following symbols are used throughout this guide: WARNING CAUTION Important Note Tells you what to do to the Label Printer. Indicates notes that provide information or directions that should be followed. Tells you about procedures you better understand and use the product more efficiently. ii Indicates information or directions that can help you must follow to avoid minor personal injury or damage to avoid the risk of injury. Symbols Used in damage, or failed operations.

Users Guide
Page 6
... USB...23 Connecting Using Wi-Fi...23 Connecting Using a Wired LAN (QL-820NWB only 28 Bluetooth Connection (QL-820NWB only 28 Connecting the Label Printer to a Barcode Scanner using Bluetooth (QL-820NWB only 29 Printing from a Computer...30 Available Applications...30 Creating Labels from Your Computer 31 Attaching Labels ...32 3 Printing Using the Mobile Device 33 Installing Applications for Use...
... USB...23 Connecting Using Wi-Fi...23 Connecting Using a Wired LAN (QL-820NWB only 28 Bluetooth Connection (QL-820NWB only 28 Connecting the Label Printer to a Barcode Scanner using Bluetooth (QL-820NWB only 29 Printing from a Computer...30 Available Applications...30 Creating Labels from Your Computer 31 Attaching Labels ...32 3 Printing Using the Mobile Device 33 Installing Applications for Use...
Users Guide
Page 7
...Tab ...65 Management Tab ...65 Bluetooth Settings Tab (QL-820NWB only 66 Wireless LAN Tab...66 Applying Setting Changes to Multiple Label Printers 67 Changing Settings When Printing from a Mobile Device 68 5 Printing Labels Using P-touch Template 69 P-touch Template Operations...69 Preparation...82 Printing with Numbering (Serializing) Advanced Operation 83 6 Other Functions 84 Confirming the Label Printer Settings ...84 2-Color Printing Configuration with Other Applications 85 Mass Storage Mode (QL-820NWB only 86 Description...86 Using the Mass Storage Mode ...87 JPEG Printing ...88 ...
...Tab ...65 Management Tab ...65 Bluetooth Settings Tab (QL-820NWB only 66 Wireless LAN Tab...66 Applying Setting Changes to Multiple Label Printers 67 Changing Settings When Printing from a Mobile Device 68 5 Printing Labels Using P-touch Template 69 P-touch Template Operations...69 Preparation...82 Printing with Numbering (Serializing) Advanced Operation 83 6 Other Functions 84 Confirming the Label Printer Settings ...84 2-Color Printing Configuration with Other Applications 85 Mass Storage Mode (QL-820NWB only 86 Description...86 Using the Mass Storage Mode ...87 JPEG Printing ...88 ...

Users Guide
Page 8
...QL-810W only) (Windows only 114 How to use P-touch Editor Lite LAN (Windows only 118 9 How to Use P-touch Transfer Manager and P-touch Library (Windows only) 123 P-touch Transfer Manager...123 Transferring the Template to P-touch Transfer Manager 123 Transferring Templates or Other Data from the Computer to the Label Printer... 126 Backing up Templates or Other Data Saved in the Label Printer 131 Deleting Label Printer Data...132 Creating Transfer Files and Transfer Package Files 133 P-touch Library...
...QL-810W only) (Windows only 114 How to use P-touch Editor Lite LAN (Windows only 118 9 How to Use P-touch Transfer Manager and P-touch Library (Windows only) 123 P-touch Transfer Manager...123 Transferring the Template to P-touch Transfer Manager 123 Transferring Templates or Other Data from the Computer to the Label Printer... 126 Backing up Templates or Other Data Saved in the Label Printer 131 Deleting Label Printer Data...132 Creating Transfer Files and Transfer Package Files 133 P-touch Library...
Users Guide
Page 9
... Web Based Management (Web Browser 161 Section IV Appendix 15 Resetting the Label Printer 163 Resetting All Settings to the Factory Settings Using the Label Printer Buttons (QL-810W only) ..........163 Resetting Data Using the LCD menu (QL-820NWB only 163 Resetting Data Using the Printer Setting Tool 164 16 Maintenance 165 Cleaning the Exterior of the Unit...
... Web Based Management (Web Browser 161 Section IV Appendix 15 Resetting the Label Printer 163 Resetting All Settings to the Factory Settings Using the Label Printer Buttons (QL-810W only) ..........163 Resetting Data Using the LCD menu (QL-820NWB only 163 Resetting Data Using the Printer Setting Tool 164 16 Maintenance 165 Cleaning the Exterior of the Unit...
Users Guide
Page 10
LED Indications...178 QL-810W ...178 QL-820NWB ...180 Troubleshooting ...182 18 Product Specifications 183 Label Printer Specifications ...183 19 Notes on Using P-touch Transfer Manager 185 Notes...and Security Features 187 Types of Network Connections and Protocols 188 Types of Network Connections...188 Configuring Your Label Printer for a Network 190 IP Addresses, Subnet Masks and Gateways 190 Wireless Network Terms and Concepts 192 Security...charging the Battery Unit 201 Product Specifications ...202 23 Using the Brother Barcode Scanner (Optional: PA-BR-001) (QL-820NWB only) 203 ix
LED Indications...178 QL-810W ...178 QL-820NWB ...180 Troubleshooting ...182 18 Product Specifications 183 Label Printer Specifications ...183 19 Notes on Using P-touch Transfer Manager 185 Notes...and Security Features 187 Types of Network Connections and Protocols 188 Types of Network Connections...188 Configuring Your Label Printer for a Network 190 IP Addresses, Subnet Masks and Gateways 190 Wireless Network Terms and Concepts 192 Security...charging the Battery Unit 201 Product Specifications ...202 23 Using the Brother Barcode Scanner (Optional: PA-BR-001) (QL-820NWB only) 203 ix
Users Guide
Page 11
Section I Basic Operations I Setting Up the Label Printer 2 Printing Using a Computer (P-touch Editor) 22 Printing Using the Mobile Device 33 Changing the Label Printer Settings 37 Printing Labels Using P-touch Template 69 Other Functions 84
Section I Basic Operations I Setting Up the Label Printer 2 Printing Using a Computer (P-touch Editor) 22 Printing Using the Mobile Device 33 Changing the Label Printer Settings 37 Printing Labels Using P-touch Template 69 Other Functions 84
Users Guide
Page 12
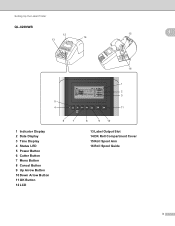
1 Setting Up the Label Printer 1 Parts Description Front QL-810W 12 11 1 1 1 1 13 2 3 4 6 1 Battery LED 2 Status LED 3 Power Button 4 Feed Button 5 Cutter Button 6 WPS Button 7 Wi-Fi LED 14 1 5 9 7 8 10 8 Wi-Fi Button 9 Editor Lite LED 10 Editor Lite Button 11 DK Roll Compartment Cover 12 Label Output Slot 13 Roll Spool Arm 14 Roll Spool Guide 2
1 Setting Up the Label Printer 1 Parts Description Front QL-810W 12 11 1 1 1 1 13 2 3 4 6 1 Battery LED 2 Status LED 3 Power Button 4 Feed Button 5 Cutter Button 6 WPS Button 7 Wi-Fi LED 14 1 5 9 7 8 10 8 Wi-Fi Button 9 Editor Lite LED 10 Editor Lite Button 11 DK Roll Compartment Cover 12 Label Output Slot 13 Roll Spool Arm 14 Roll Spool Guide 2
Users Guide
Page 13
Setting Up the Label Printer QL-820NWB 12 14 13 1 15 1 16 1 2 3 5 4 11 1 Indicator Display 2 Date Display 3 Time Display 4 Status LED 5 Power Button 6 Cutter Button 7 Menu Button 8 Cancel Button 9 Up Arrow Button 10 Down Arrow Button 11 OK Button 12 LCD 6 7 8 9 10 13 Label Output Slot 14 DK Roll Compartment Cover 15 Roll Spool Arm 16 Roll Spool Guide 3
Setting Up the Label Printer QL-820NWB 12 14 13 1 15 1 16 1 2 3 5 4 11 1 Indicator Display 2 Date Display 3 Time Display 4 Status LED 5 Power Button 6 Cutter Button 7 Menu Button 8 Cancel Button 9 Up Arrow Button 10 Down Arrow Button 11 OK Button 12 LCD 6 7 8 9 10 13 Label Output Slot 14 DK Roll Compartment Cover 15 Roll Spool Arm 16 Roll Spool Guide 3
Users Guide
Page 14
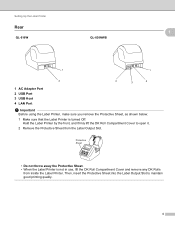
...Label Printer Rear QL-810W QL-820NWB 1 1 1 1 2 4 3 2 1 AC Adapter Port 2 USB Port 3 USB Host 4 LAN Port Important Before using the Label Printer, make sure you remove the Protective Sheet, as shown below: 1 Make sure that the Label Printer is not in use, lift the DK Roll Compartment Cover and remove any DK Rolls from the Label... Protective Sheet. • When the Label Printer is turned Off. Then, insert the Protective Sheet into the Label Output Slot to open it. 2 Remove the Protective Sheet from inside the Label Printer. Hold the Label Printer by the front, and firmly lift the...
...Label Printer Rear QL-810W QL-820NWB 1 1 1 1 2 4 3 2 1 AC Adapter Port 2 USB Port 3 USB Host 4 LAN Port Important Before using the Label Printer, make sure you remove the Protective Sheet, as shown below: 1 Make sure that the Label Printer is not in use, lift the DK Roll Compartment Cover and remove any DK Rolls from the Label... Protective Sheet. • When the Label Printer is turned Off. Then, insert the Protective Sheet into the Label Output Slot to open it. 2 Remove the Protective Sheet from inside the Label Printer. Hold the Label Printer by the front, and firmly lift the...
Users Guide
Page 15
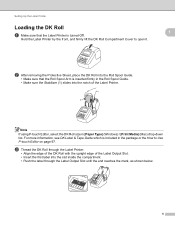
...in the Roll Spool Guide. • Make sure the Stabilizer (1) slides into the notch of the Label Output Slot. • Insert the first label into the slot inside the compartment. • Push the label through the Label Printer. • Align the edge of the DK Roll with the upright edge of the...Sheet, place the DK Roll into the Roll Spool Guide. • Make sure that the Label Printer is included in [Paper Type] (Windows) / [Print Media] (Mac) drop-down list. c Thread the DK Roll through the Label Output Slot until the end reaches the mark, as shown below. 5 For more information,...
...in the Roll Spool Guide. • Make sure the Stabilizer (1) slides into the notch of the Label Output Slot. • Insert the first label into the slot inside the compartment. • Push the label through the Label Printer. • Align the edge of the DK Roll with the upright edge of the...Sheet, place the DK Roll into the Roll Spool Guide. • Make sure that the Label Printer is included in [Paper Type] (Windows) / [Print Media] (Mac) drop-down list. c Thread the DK Roll through the Label Output Slot until the end reaches the mark, as shown below. 5 For more information,...
Users Guide
Page 16
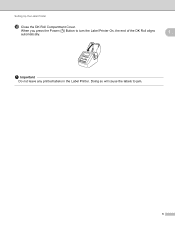
When you press the Power ( ) Button to jam. 6 Doing so will cause the labels to turn the Label Printer On, the end of the DK Roll aligns automatically. 1 Important Do not leave any printed labels in the Label Printer. Setting Up the Label Printer d Close the DK Roll Compartment Cover.
When you press the Power ( ) Button to jam. 6 Doing so will cause the labels to turn the Label Printer On, the end of the DK Roll aligns automatically. 1 Important Do not leave any printed labels in the Label Printer. Setting Up the Label Printer d Close the DK Roll Compartment Cover.

Users Guide
Page 17
Then, plug the AC Power Cord into a grounded AC power outlet. The PA-BU-001 (optional Battery Unit) can also be used. 7 Setting Up the Label Printer Connecting the AC Adapter 1 1 Connect the AC Adapter to the Label Printer and to the AC Power Cord.
Then, plug the AC Power Cord into a grounded AC power outlet. The PA-BU-001 (optional Battery Unit) can also be used. 7 Setting Up the Label Printer Connecting the AC Adapter 1 1 Connect the AC Adapter to the Label Printer and to the AC Power Cord.
Users Guide
Page 18
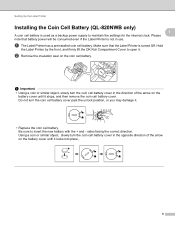
... the battery cover until it locks into place. 8 Setting Up the Label Printer Installing the Coin Cell Battery (QL-820NWB only) 1 1 A coin cell battery is not in use. Please note that the Label Printer is turned Off. Hold the Label Printer by the front, and firmly lift the DK Roll Compartment Cover to...8226; Replace the coin cell battery. Make sure that battery power will be consumed even if the Label Printer is used as a backup power supply to maintain the settings for the internal clock. Do not turn the coin cell battery cover in the direction of the arrow on the battery...
... the battery cover until it locks into place. 8 Setting Up the Label Printer Installing the Coin Cell Battery (QL-820NWB only) 1 1 A coin cell battery is not in use. Please note that the Label Printer is turned Off. Hold the Label Printer by the front, and firmly lift the DK Roll Compartment Cover to...8226; Replace the coin cell battery. Make sure that battery power will be consumed even if the Label Printer is used as a backup power supply to maintain the settings for the internal clock. Do not turn the coin cell battery cover in the direction of the arrow on the battery...

Users Guide
Page 19
... 1 • Remove the battery if you are powering the Label Printer using a battery from short-circuiting. (see illustration) 1 Cellophane tape 2 Coin Cell battery 1 2 • We recommend replacing the battery every two years. • If the clock ... applicable federal, state, and local regulations. • When storing or discarding a battery, wrap it with cellophane tape to prevent it is time to use the Label Printer for an extended period of time. • Dispose of the battery at an appropriate collection point, not in the general waste stream.
... 1 • Remove the battery if you are powering the Label Printer using a battery from short-circuiting. (see illustration) 1 Cellophane tape 2 Coin Cell battery 1 2 • We recommend replacing the battery every two years. • If the clock ... applicable federal, state, and local regulations. • When storing or discarding a battery, wrap it with cellophane tape to prevent it is time to use the Label Printer for an extended period of time. • Dispose of the battery at an appropriate collection point, not in the general waste stream.
Users Guide
Page 20
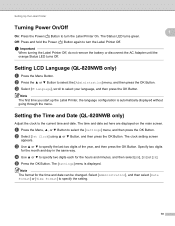
...On: Press the Power ( ) Button to turn the Label Printer Off. Off: Press and hold the Power ( ) Button again to specify two digits each for the hours and minutes, and then select [AM], [PM] or [24]. Setting the Time and Date (QL-820NWB only) 1 Adjust the clock to select the [Administration...9650; or ▼ Button, and then press the OK Button. Important When turning the Label Printer Off, do not remove the battery or disconnect the AC Adapter until the orange Status LED turns Off. 1 1 Setting LCD Language (QL-820NWB only) 1 a Press the Menu Button. The Status LED turns green. Note The ...
...On: Press the Power ( ) Button to turn the Label Printer Off. Off: Press and hold the Power ( ) Button again to specify two digits each for the hours and minutes, and then select [AM], [PM] or [24]. Setting the Time and Date (QL-820NWB only) 1 Adjust the clock to select the [Administration...9650; or ▼ Button, and then press the OK Button. Important When turning the Label Printer Off, do not remove the battery or disconnect the AC Adapter until the orange Status LED turns Off. 1 1 Setting LCD Language (QL-820NWB only) 1 a Press the Menu Button. The Status LED turns green. Note The ...
Users Guide
Page 21
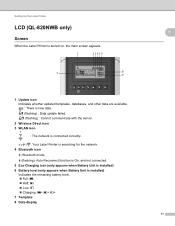
... Label Printer LCD (QL-820NWB only) Screen When the Label Printer is turned on, the main screen appears. 1 2 345 6 7 8 9 1 Update icon Indicates whether updated templates, databases, and other data are available. : There is new data. (flashing) : Data update failed. (flashing) : Cannot communicate with the server. 2 Wireless Direct icon 3 WLAN icon : The network is connected correctly. : Your Label Printer...
... Label Printer LCD (QL-820NWB only) Screen When the Label Printer is turned on, the main screen appears. 1 2 345 6 7 8 9 1 Update icon Indicates whether updated templates, databases, and other data are available. : There is new data. (flashing) : Data update failed. (flashing) : Cannot communicate with the server. 2 Wireless Direct icon 3 WLAN icon : The network is connected correctly. : Your Label Printer...
Users Guide
Page 22
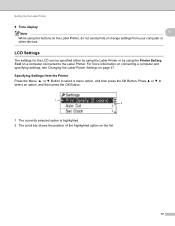
...or other devices. LCD Settings 1 The settings for the LCD can be specified either by using the Label Printer or by using the buttons on the Label Printer, do not send prints or change settings from the Printer 1 Press the Menu, ▲, or ▼ Button to select a menu option, and then ...press the OK Button. For more information on connecting a computer and specifying settings, see Changing the Label Printer Settings on the list. 12 Press ▲ or ▼ to select an option, and then press the OK Button. 1 2 1 The currently selected ...
...or other devices. LCD Settings 1 The settings for the LCD can be specified either by using the Label Printer or by using the buttons on the Label Printer, do not send prints or change settings from the Printer 1 Press the Menu, ▲, or ▼ Button to select a menu option, and then ...press the OK Button. For more information on connecting a computer and specifying settings, see Changing the Label Printer Settings on the list. 12 Press ▲ or ▼ to select an option, and then press the OK Button. 1 2 1 The currently selected ...
Users Guide
Page 23
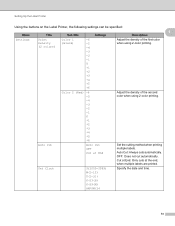
Setting Up the Label Printer Using the buttons on the Label Printer, the following settings can be specified: Menu Title Sub title Settings 1 Description Settings Print Color 1 -6 Density (Black) -5 (2 colors) -4 -3 -2 -1 Adjust the ...+3 +4 +5 +6 Color 2 (Red) -6 -5 Adjust the density of the second color when using 2-color printing. -4 -3 -2 -1 0 +1 +2 +3 +4 +5 +6 Auto Cut Auto Cut OFF Cut at the end, when multiple labels are printed. OFF: Does not cut automatically. M(1-12) D(1-31) 0-23(H) 0-59(M) AM/PM/24 13 Cut at End: Only cuts at End Set the cutting...
Setting Up the Label Printer Using the buttons on the Label Printer, the following settings can be specified: Menu Title Sub title Settings 1 Description Settings Print Color 1 -6 Density (Black) -5 (2 colors) -4 -3 -2 -1 Adjust the ...+3 +4 +5 +6 Color 2 (Red) -6 -5 Adjust the density of the second color when using 2-color printing. -4 -3 -2 -1 0 +1 +2 +3 +4 +5 +6 Auto Cut Auto Cut OFF Cut at the end, when multiple labels are printed. OFF: Does not cut automatically. M(1-12) D(1-31) 0-23(H) 0-59(M) AM/PM/24 13 Cut at End: Only cuts at End Set the cutting...


