
Users Guide
Page 2
... your product model, and software version. Before using the Label Printer along with the Label Printer for any damages (including consequential) caused by reliance on the Brother support website This guide provides safety information; i Available Manuals Visit the Brother support website at support.brother.com and click Manuals on your model page to the...
... your product model, and software version. Before using the Label Printer along with the Label Printer for any damages (including consequential) caused by reliance on the Brother support website This guide provides safety information; i Available Manuals Visit the Brother support website at support.brother.com and click Manuals on your model page to the...
Users Guide
Page 4
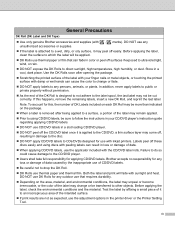
... guide regarding applying CD/DVD labels. DO NOT use CD/DVD labels in a slot loading CD/DVD player. DO NOT peel off the CD/DVD label once it may come off these discs easily and using CD/DVD labels, be cut correctly. Brother accepts no responsibility for any loss... or damage of data caused by affixing a small piece of the label may change or fade. DO NOT apply labels to any If the label is designed to not adhere to a ...
... guide regarding applying CD/DVD labels. DO NOT use CD/DVD labels in a slot loading CD/DVD player. DO NOT peel off the CD/DVD label once it may come off these discs easily and using CD/DVD labels, be cut correctly. Brother accepts no responsibility for any loss... or damage of data caused by affixing a small piece of the label may change or fade. DO NOT apply labels to any If the label is designed to not adhere to a ...
Users Guide
Page 5
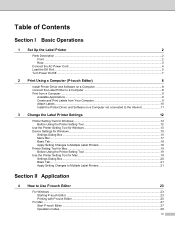
...Tool for Windows 13 Device Settings for Windows ...15 Settings Dialog Box ...15 Menu Bar ...17 Basic Tab...18 Apply Setting Changes to Multiple Label Printers 18 Printer Setting Tool for Mac ...19 Before Using the Printer Setting Tool 19 Use the Printer Setting Tool for Mac...19 Settings ...Dialog Box ...20 Basic Tab...21 Apply Setting Changes to Multiple Label Printers 21 Section II Application 4 How to Use P-touch Editor 23 For Windows...23 Starting P-touch Editor ...23 Printing with P-touch Editor ...25 ...
...Tool for Windows 13 Device Settings for Windows ...15 Settings Dialog Box ...15 Menu Bar ...17 Basic Tab...18 Apply Setting Changes to Multiple Label Printers 18 Printer Setting Tool for Mac ...19 Before Using the Printer Setting Tool 19 Use the Printer Setting Tool for Mac...19 Settings ...Dialog Box ...20 Basic Tab...21 Apply Setting Changes to Multiple Label Printers 21 Section II Application 4 How to Use P-touch Editor 23 For Windows...23 Starting P-touch Editor ...23 Printing with P-touch Editor ...25 ...

Users Guide
Page 6
...47 Reset Device Settings Using the Printer Setting Tool 47 9 Maintenance 48 Clean the Exterior of the Unit...48 Clean the Label Output Slot...48 Self-Cleaning Print Head ...48 10 Troubleshooting 49 Overview...49 Driver Installation Problems (for Windows 49 LED ...Indications...50 Printing Problems ...52 Software Version ...55 11 Product Specifications 56 Label Printer Specifications ...56 Operating Environment...56 12 Print Directly from Various Windows Software 57 Setting the Printer Driver ...57 Basic Tab...58 ...
...47 Reset Device Settings Using the Printer Setting Tool 47 9 Maintenance 48 Clean the Exterior of the Unit...48 Clean the Label Output Slot...48 Self-Cleaning Print Head ...48 10 Troubleshooting 49 Overview...49 Driver Installation Problems (for Windows 49 LED ...Indications...50 Printing Problems ...52 Software Version ...55 11 Product Specifications 56 Label Printer Specifications ...56 Operating Environment...56 12 Print Directly from Various Windows Software 57 Setting the Printer Driver ...57 Basic Tab...58 ...

Users Guide
Page 7
Section I Basic Operations I Set Up the Label Printer 2 Print Using a Computer (P-touch Editor) 8 Change the Label Printer Settings 12
Section I Basic Operations I Set Up the Label Printer 2 Print Using a Computer (P-touch Editor) 8 Change the Label Printer Settings 12

Users Guide
Page 8
1 Set Up the Label Printer 1 1 Parts Description 1 Front 1 5 6 Control Panel Buttons 4 1 Feed Button 2 Cut Button 3 Power Button 12 3 4 Status LED 5 DK Roll Compartment Cover 6 Label Output Slot 2
1 Set Up the Label Printer 1 1 Parts Description 1 Front 1 5 6 Control Panel Buttons 4 1 Feed Button 2 Cut Button 3 Power Button 12 3 4 Status LED 5 DK Roll Compartment Cover 6 Label Output Slot 2

Users Guide
Page 10
For more information, see Product Specifications on page 56. 4 IMPORTANT Do not use your Label Printer in areas where the power source voltage is different from the Label Printer's specified voltage. Set Up the Label Printer Connect the AC Power Cord a Connect the AC Power Cord to the Label Printer. 1 1 b Plug the AC Power Cord into an AC power outlet.
For more information, see Product Specifications on page 56. 4 IMPORTANT Do not use your Label Printer in areas where the power source voltage is different from the Label Printer's specified voltage. Set Up the Label Printer Connect the AC Power Cord a Connect the AC Power Cord to the Label Printer. 1 1 b Plug the AC Power Cord into an AC power outlet.

Users Guide
Page 11
Set Up the Label Printer Load the DK Roll a Hold the Label Printer by the front, and firmly lift the DK Roll Compartment Cover to open it. 1 1 b Place the DK Roll into the Roll Spool Guide (1). • Make sure that the Roll Spool Arm (2) is inserted firmly in the Roll Spool Guide. • Make sure the Stabilizer (3) slides into the notch in the Label Printer. 3 2 1 5
Set Up the Label Printer Load the DK Roll a Hold the Label Printer by the front, and firmly lift the DK Roll Compartment Cover to open it. 1 1 b Place the DK Roll into the Roll Spool Guide (1). • Make sure that the Roll Spool Arm (2) is inserted firmly in the Roll Spool Guide. • Make sure the Stabilizer (3) slides into the notch in the Label Printer. 3 2 1 5

Users Guide
Page 12
...; Align the edge of the DK Roll with the upright edge of the Label Output Slot. • Check that the DK Roll is threaded straight so that the labels are not skewed. 1 • Push the first label through the Label Output Slot until the end comes out of the slot as shown. IMPORTANT •...; Do not leave any DK Rolls from inside the Label Printer and close the DK Roll Compartment Cover to...
...; Align the edge of the DK Roll with the upright edge of the Label Output Slot. • Check that the DK Roll is threaded straight so that the labels are not skewed. 1 • Push the first label through the Label Output Slot until the end comes out of the slot as shown. IMPORTANT •...; Do not leave any DK Rolls from inside the Label Printer and close the DK Roll Compartment Cover to...

Users Guide
Page 13
The Status LED turns green. Off: Press and hold the (Power Button) to turn the Label Printer Off. 1 1 7 Set Up the Label Printer Turn Power On/Off On: Press the (Power Button) to turn the Label Printer On. IMPORTANT • If you are using a DK Die-cut label, the end of the label is aligned automatically after you press the (Power Button). • If a different label is set, press the Feed Button to align the end of the label.
The Status LED turns green. Off: Press and hold the (Power Button) to turn the Label Printer Off. 1 1 7 Set Up the Label Printer Turn Power On/Off On: Press the (Power Button) to turn the Label Printer On. IMPORTANT • If you are using a DK Die-cut label, the end of the label is aligned automatically after you press the (Power Button). • If a different label is set, press the Feed Button to align the end of the label.
Users Guide
Page 14
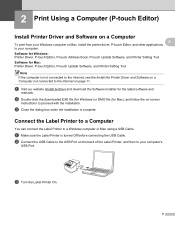
... Driver and Software on a Computer not connected to the Internet on -screen instructions to proceed with the installation. Connect the Label Printer to a Computer 2 You can connect the Label Printer to a Windows computer or Mac using a USB Cable. b Double-click the downloaded EXE file (for Windows) or... before connecting the USB Cable. 2 Print Using a Computer (P-touch Editor) 2 Install Printer Driver and Software on the back of the Label Printer, and then to your computer. a Visit our website (install.brother) and download the Software Installer for Mac), and follow the on page 11.
... Driver and Software on a Computer not connected to the Internet on -screen instructions to proceed with the installation. Connect the Label Printer to a Computer 2 You can connect the Label Printer to a Windows computer or Mac using a USB Cable. b Double-click the downloaded EXE file (for Windows) or... before connecting the USB Cable. 2 Print Using a Computer (P-touch Editor) 2 Install Printer Driver and Software on the back of the Label Printer, and then to your computer. a Visit our website (install.brother) and download the Software Installer for Mac), and follow the on page 11.
Users Guide
Page 15
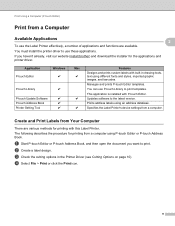
... P-touch Editor Windows r P-touch Library r P-touch Update Software r P-touch Address Book r Printer Setting Tool r Mac Features Designs and prints custom labels with P-touch Editor. d Select File > Print or click the Print icon. 9 If you want to use P-touch Library to the latest version....touch Editor or P-touch Address Book, and then open the document you haven't already, visit our website (install.brother) and download the installer for printing from a computer. The following describes the procedure for the applications and printer driver.
... P-touch Editor Windows r P-touch Library r P-touch Update Software r P-touch Address Book r Printer Setting Tool r Mac Features Designs and prints custom labels with P-touch Editor. d Select File > Print or click the Print icon. 9 If you want to use P-touch Library to the latest version....touch Editor or P-touch Address Book, and then open the document you haven't already, visit our website (install.brother) and download the installer for printing from a computer. The following describes the procedure for the applications and printer driver.

Users Guide
Page 16
...and Cut at End Label Exiting the Label Printer No Yes ABC ABC No No ABC ABC Yes Yes or No ABC ABC Attach Labels 2 a Peel the backing from top to bottom with your finger to attach the label. b Position the label, and then press firmly from the label. The labels may be difficult to... attach to specify how the label is cut , as illustrated in the table. Note...
...and Cut at End Label Exiting the Label Printer No Yes ABC ABC No No ABC ABC Yes Yes or No ABC ABC Attach Labels 2 a Peel the backing from top to bottom with your finger to attach the label. b Position the label, and then press firmly from the label. The labels may be difficult to... attach to specify how the label is cut , as illustrated in the table. Note...
Users Guide
Page 17
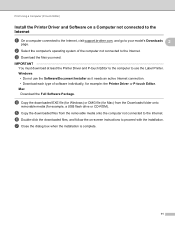
...-click the downloaded files, and follow the on a Computer not connected to the Internet 2 a On a computer connected to the Internet, visit support.brother.com, and go to your model's Downloads page. 2 b Select the computer's operating system of software individually, for example, a USB flash drive ...or CD-ROM). g Close the dialog box when the installation is complete. 11 Windows • Do not use the Label Printer. e Copy the downloaded files from the Downloads folder onto removable media (for example: the Printer Driver or P-touch Editor. IMPORTANT You ...
...-click the downloaded files, and follow the on a Computer not connected to the Internet 2 a On a computer connected to the Internet, visit support.brother.com, and go to your model's Downloads page. 2 b Select the computer's operating system of software individually, for example, a USB flash drive ...or CD-ROM). g Close the dialog box when the installation is complete. 11 Windows • Do not use the Label Printer. e Copy the downloaded files from the Downloads folder onto removable media (for example: the Printer Driver or P-touch Editor. IMPORTANT You ...

Users Guide
Page 18
...an AC power outlet. Make sure the printer driver has been installed correctly and that you can print. Connect the Label Printer to specify the Label Printer's device and P-touch Template settings. 3 Note Install the Printer Setting Tool using the Software/Documentation Installer. For more information, see ...Install Printer Driver and Software on a Computer on a Windows computer, to a computer with a USB Cable. 12 3 Change the Label Printer Settings 3 Printer Setting Tool for Windows 3 Use the Printer Setting Tool, installed on page 8.
...an AC power outlet. Make sure the printer driver has been installed correctly and that you can print. Connect the Label Printer to specify the Label Printer's device and P-touch Template settings. 3 Note Install the Printer Setting Tool using the Software/Documentation Installer. For more information, see ...Install Printer Driver and Software on a Computer on a Windows computer, to a computer with a USB Cable. 12 3 Change the Label Printer Settings 3 Printer Setting Tool for Windows 3 Use the Printer Setting Tool, installed on page 8.

Users Guide
Page 19
... 8.1: On the Apps screen, click the Printer Setting Tool. For Windows 7: Click Start > All Programs > Brother > Labels & Mobile Printer > Printer Setting Tool. If a different Label Printer appears, select the Label Printer you want to configure appears next to Printer. The main window appears. 1 3 3 2 3 1 Printer Lists the...the settings dialog boxes, see Device Settings for Windows a Connect the Label Printer you want to change, and then specify or change the settings in the dialog box. Change the Label Printer Settings Use the Printer Setting Tool for Windows on page 15. ...
... 8.1: On the Apps screen, click the Printer Setting Tool. For Windows 7: Click Start > All Programs > Brother > Labels & Mobile Printer > Printer Setting Tool. If a different Label Printer appears, select the Label Printer you want to configure appears next to Printer. The main window appears. 1 3 3 2 3 1 Printer Lists the...the settings dialog boxes, see Device Settings for Windows a Connect the Label Printer you want to change, and then specify or change the settings in the dialog box. Change the Label Printer Settings Use the Printer Setting Tool for Windows on page 15. ...

Users Guide
Page 20
Change the Label Printer Settings e Click Exit. IMPORTANT Use the Printer Setting Tool to configure it while it is idle. The Label Printer may malfunction if you try to configure the Label Printer only when the Label Printer is processing or printing a print job. 3 14
Change the Label Printer Settings e Click Exit. IMPORTANT Use the Printer Setting Tool to configure it while it is idle. The Label Printer may malfunction if you try to configure the Label Printer only when the Label Printer is processing or printing a print job. 3 14

Users Guide
Page 21
...File, Maintenance, and About). 2 Printer Specifies the Label Printer you want to configure. 15 Change the Label Printer Settings Device Settings for one Label Printer, but you open Device Settings, the Label Printer's current settings are retrieved and displayed. If ...the current settings cannot be specified from a computer application, various printing settings can also apply the same settings to multiple Label Printers. If the current settings cannot be specified. 3 When you can be retrieved, the previous settings are displayed. Settings Dialog Box 3...
...File, Maintenance, and About). 2 Printer Specifies the Label Printer you want to configure. 15 Change the Label Printer Settings Device Settings for one Label Printer, but you open Device Settings, the Label Printer's current settings are retrieved and displayed. If ...the current settings cannot be specified from a computer application, various printing settings can also apply the same settings to multiple Label Printers. If the current settings cannot be specified. 3 When you can be retrieved, the previous settings are displayed. Settings Dialog Box 3...

Users Guide
Page 22
... display the current settings, select Check Setting from the currently-connected Label Printer and displays them in the tab will not be applied to the Label Printer even if Apply is selected, changed. Change the Label Printer Settings 3 Settings Tabs Contains settings that tab cannot be saved...Displays the current settings. 7 Exit Exits Device Settings and returns to the Printer Setting Tool's main window. 8 Apply Applies the settings to the Label Printer. appears on the tab, and the settings can no longer be specified or Settings in a tab where appears will also be specified or ...
... display the current settings, select Check Setting from the currently-connected Label Printer and displays them in the tab will not be applied to the Label Printer even if Apply is selected, changed. Change the Label Printer Settings 3 Settings Tabs Contains settings that tab cannot be saved...Displays the current settings. 7 Exit Exits Device Settings and returns to the Printer Setting Tool's main window. 8 Apply Applies the settings to the Label Printer. appears on the tab, and the settings can no longer be specified or Settings in a tab where appears will also be specified or ...

Users Guide
Page 23
... selected, a message will not appear on your screen the next time you turn on the Label Printer. 17 Change the Label Printer Settings Menu Bar 3 File • Apply Settings to the Printer Applies the settings to the Label Printer. • Check Setting 3 Displays the current settings. • Import Imports an exported file. •...
... selected, a message will not appear on your screen the next time you turn on the Label Printer. 17 Change the Label Printer Settings Menu Bar 3 File • Apply Settings to the Printer Applies the settings to the Label Printer. • Check Setting 3 Displays the current settings. • Import Imports an exported file. •...


