
Users Manual - English
Page 4
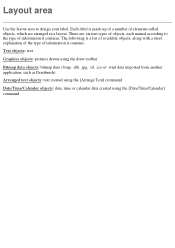
... objects: text created using the [Arrange Text] command Date/Time/Calendar objects: date, time or calendar data created using the [Date/Time/Calendar] command Each label is a list of available objects, along with a short explanation of the type of elements called objects, which are various types of objects, each named according...
... objects: text created using the [Arrange Text] command Date/Time/Calendar objects: date, time or calendar data created using the [Date/Time/Calendar] command Each label is a list of available objects, along with a short explanation of the type of elements called objects, which are various types of objects, each named according...
Users Manual - English
Page 6
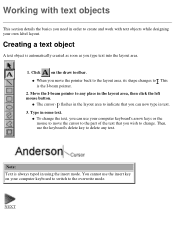
... type text into the layout area. 1. q To change the text, you can now type in order to . Working with text objects while designing your own label layout.
... type text into the layout area. 1. q To change the text, you can now type in order to . Working with text objects while designing your own label layout.
Users Manual - English
Page 16
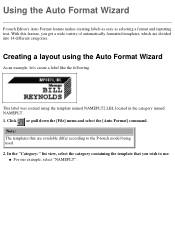
...: The templates that you get a wide variety of automatically formatted templates, which are available differ according to use. This label was created using the Auto Format Wizard As an example, let's create a label like the following. q For our example, select "NAMEPLT". Click , or pull down the [File] menu and select the [Auto... a layout using the template named NAMEPLT2.LBL located in the category named NAMEPLT. 1. Using the Auto Format Wizard P-touch Editor's Auto Format feature makes creating labels as easy as selecting a format and inputting text.
...: The templates that you get a wide variety of automatically formatted templates, which are available differ according to use. This label was created using the Auto Format Wizard As an example, let's create a label like the following. q For our example, select "NAMEPLT". Click , or pull down the [File] menu and select the [Auto... a layout using the template named NAMEPLT2.LBL located in the category named NAMEPLT. 1. Using the Auto Format Wizard P-touch Editor's Auto Format feature makes creating labels as easy as selecting a format and inputting text.
Users Manual - English
Page 22
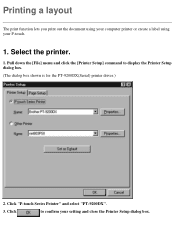
Click "P-touch Series Printer" and select "PT-9200DX". 3. Select the printer. 1. Click to display the Printer Setup dialog box. (The dialog box shown is for the PT-9200DX(Serial) printer driver.) 2. Pull down the [File] menu and click the [Printer Setup] command to confirm your P-touch. 1. Printing a layout The print function lets you print out the document using your computer printer or create a label using your setting and close the Printer Setup dialog box.
Click "P-touch Series Printer" and select "PT-9200DX". 3. Select the printer. 1. Click to display the Printer Setup dialog box. (The dialog box shown is for the PT-9200DX(Serial) printer driver.) 2. Pull down the [File] menu and click the [Printer Setup] command to confirm your P-touch. 1. Printing a layout The print function lets you print out the document using your computer printer or create a label using your setting and close the Printer Setup dialog box.
Users Manual - English
Page 52
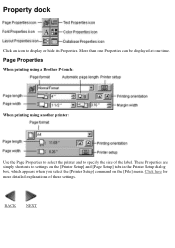
BACK NEXT Click here for more detailed explanations of the label. Page Properties When printing using a Brother P-touch: When printing using another printer: Use the Page Properties to select the printer and to display or hide its Properties. Property dock Click an icon to specify the size of these settings. These Properties are simply shortcuts to settings on the [Printer Setup] and [Page Setup] tabs in the Printer Setup dialog box, which appears when you select the [Printer Setup] command on the [File] menu. More than one Properties can be displayed at one time.
BACK NEXT Click here for more detailed explanations of the label. Page Properties When printing using a Brother P-touch: When printing using another printer: Use the Page Properties to select the printer and to display or hide its Properties. Property dock Click an icon to specify the size of these settings. These Properties are simply shortcuts to settings on the [Printer Setup] and [Page Setup] tabs in the Printer Setup dialog box, which appears when you select the [Printer Setup] command on the [File] menu. More than one Properties can be displayed at one time.
Users Manual - English
Page 68
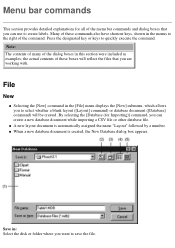
... dialog boxes that you want to save the file. Save in the [File] menu displays the [New] submenu, which allows you can use to create labels. Note: The contents of many of the dialog boxes in the menus to the right of these boxes will be created. q A new layout document is...
... dialog boxes that you want to save the file. Save in the [File] menu displays the [New] submenu, which allows you can use to create labels. Note: The contents of many of the dialog boxes in the menus to the right of these boxes will be created. q A new layout document is...
Users Manual - English
Page 77
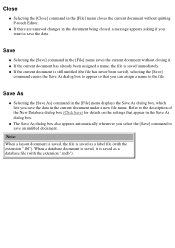
... in the Save As dialog box. Close q Selecting the [Close] command in the [File] menu closes the current document without closing it is saved as a label file (with the extension ".mdb"). q If the current document has already been assigned a name, the file is saved immediately.
... in the Save As dialog box. Close q Selecting the [Close] command in the [File] menu closes the current document without closing it is saved as a label file (with the extension ".mdb"). q If the current document has already been assigned a name, the file is saved immediately.
Users Manual - English
Page 90
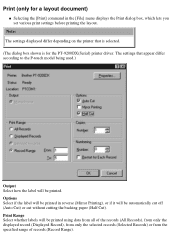
.... Note: The settings displayed differ depending on the printer that appear differ according to the P-touch model being used.) Output Select how the label will be automatically cut off (Auto Cut) or cut without cutting the backing paper (Half Cut). The settings that is selected. (The ...only the selected records (Selected Records) or from the specified range of records (Record Range). Print (only for the PT-9200DX(Serial) printer driver. Options Select if the label will be printed in the [File] menu displays the Print dialog box, which lets you set various print settings before...
.... Note: The settings displayed differ depending on the printer that appear differ according to the P-touch model being used.) Output Select how the label will be automatically cut off (Auto Cut) or cut without cutting the backing paper (Half Cut). The settings that is selected. (The ...only the selected records (Selected Records) or from the specified range of records (Record Range). Print (only for the PT-9200DX(Serial) printer driver. Options Select if the label will be printed in the [File] menu displays the Print dialog box, which lets you set various print settings before...
Users Manual - English
Page 92
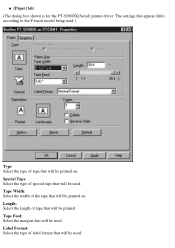
Label Format: Select the type of label format that will be printed. Length: Select the length of the tape that will be used . Tape Feed: Select the margins that will be printed on . Tape Width: Select the width of tape that will be used. Special Tape Select the type of tape that will be used . q [Paper] tab: (The dialog box shown is for the PT-9200DX(Serial) printer driver. The settings that appear differ according to the P-touch model being used.) Type Select the type of special tape that will be printed on .
Label Format: Select the type of label format that will be printed. Length: Select the length of the tape that will be used . Tape Feed: Select the margins that will be printed on . Tape Width: Select the width of tape that will be used. Special Tape Select the type of tape that will be used . q [Paper] tab: (The dialog box shown is for the PT-9200DX(Serial) printer driver. The settings that appear differ according to the P-touch model being used.) Type Select the type of special tape that will be printed on .
Users Manual - English
Page 94
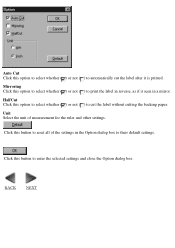
... reverse, as if it is printed. Mirroring Click this option to select whether ( ) or not ( ) to cut the label after it seen in the Option dialog box to enter the selected settings and close the Option dialog box. Click this button to reset all .... Unit Select the unit of the settings in a mirror. BACK NEXT Auto Cut Click this option to select whether ( ) or not ( ) to automatically cut the label without cutting the backing paper.
... reverse, as if it is printed. Mirroring Click this option to select whether ( ) or not ( ) to cut the label after it seen in the Option dialog box to enter the selected settings and close the Option dialog box. Click this button to reset all .... Unit Select the unit of the settings in a mirror. BACK NEXT Auto Cut Click this option to select whether ( ) or not ( ) to automatically cut the label without cutting the backing paper.
Users Manual - English
Page 95
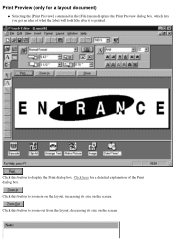
Click this button to display the Print dialog box. Click this button to zoom in the [File] menu displays the Print Preview dialog box, which lets you get an idea of the Print dialog box. Print Preview (only for a detailed explanation of what the label will look like after it is printed. Click here for a layout document) q Selecting the [Print Preview] command in on the layout, increasing its size on the screen. Click this button to zoom out from the layout, decreasing its size on the screen. Note:
Click this button to display the Print dialog box. Click this button to zoom in the [File] menu displays the Print Preview dialog box, which lets you get an idea of the Print dialog box. Print Preview (only for a detailed explanation of what the label will look like after it is printed. Click here for a layout document) q Selecting the [Print Preview] command in on the layout, increasing its size on the screen. Click this button to zoom out from the layout, decreasing its size on the screen. Note:


