Users Manual - English and Spanish
Page 2
...measures: - Good luck! This equipment generates, uses, and can be determined by one or more of colorful tape cartridges, you read this machine make it can print labels with the limits for any application. See GENERAL PRECAUTIONS on , the user is easy to radio communications. ... USP5009530 USP5069557 USP5120147 Use only the adaptor designed exclusively for this manual in a handy place for help you enjoy making beautiful custom labels. Increase the separation between the equipment and receiver. - Although this machine is encouraged to try to worry about rushing tasks that...
...measures: - Good luck! This equipment generates, uses, and can be determined by one or more of colorful tape cartridges, you read this machine make it can print labels with the limits for any application. See GENERAL PRECAUTIONS on , the user is easy to radio communications. ... USP5009530 USP5069557 USP5120147 Use only the adaptor designed exclusively for this manual in a handy place for help you enjoy making beautiful custom labels. Increase the separation between the equipment and receiver. - Although this machine is encouraged to try to worry about rushing tasks that...
Users Manual - English and Spanish
Page 3
CONTENTS CONTENTS ...1 OVERVIEW...2 GENERAL PRECAUTIONS 5 BEFORE YOU START 6 INSERTING A TAPE CASSETTE 6 INSERTING BATTERIES 7 CHANGING THE CUTTER UNIT 8 STARTING 9 CREATING A MESSAGE 10 DISPLAY 10 MOVING THE CURSOR 10 CLEARING THE DISPLAY 11 KEY OPERATIONS 12 INPUT...... INSERTING 22 SETTING THE FORMAT 24 SIZE ...24 BIG SIZE FONT 27 STYLE...28 UNDERLINE/FRAME 30 PRINTING A LABEL 32 PRINTING 32 CUTTING 33 REPEAT PRINTING 34 NUMBERING 35 MIRROR PRINTING 38 TAPE FEED 39 PHRASE MEMORY OPERATION 42 PHRASE MEMORY 42 MEMORY SIZE 42 STORING THE MESSAGE 42 RECALLING FROM PHRASE...
CONTENTS CONTENTS ...1 OVERVIEW...2 GENERAL PRECAUTIONS 5 BEFORE YOU START 6 INSERTING A TAPE CASSETTE 6 INSERTING BATTERIES 7 CHANGING THE CUTTER UNIT 8 STARTING 9 CREATING A MESSAGE 10 DISPLAY 10 MOVING THE CURSOR 10 CLEARING THE DISPLAY 11 KEY OPERATIONS 12 INPUT...... INSERTING 22 SETTING THE FORMAT 24 SIZE ...24 BIG SIZE FONT 27 STYLE...28 UNDERLINE/FRAME 30 PRINTING A LABEL 32 PRINTING 32 CUTTING 33 REPEAT PRINTING 34 NUMBERING 35 MIRROR PRINTING 38 TAPE FEED 39 PHRASE MEMORY OPERATION 42 PHRASE MEMORY 42 MEMORY SIZE 42 STORING THE MESSAGE 42 RECALLING FROM PHRASE...

Users Manual - English and Spanish
Page 4
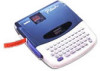
... ¢ 6 Y STORE RECALL M. DEL WORD OUT CLEAR & * ( ) DEL 7 8 9 0 MEMORY U I O P ü í ó á ALT A SYMBOL S D F G H J K L : ¿ é ú ; '' SHIFT Z X C V B N M / ? LCD display Tape cutter lever -2- CAPS Ç ç Ñ ñ ,- .´ PRINT MIRROR CODE SPACE SET FEED ON TOP RELOC OFF PRINT key CODE key SET key ON/...
... ¢ 6 Y STORE RECALL M. DEL WORD OUT CLEAR & * ( ) DEL 7 8 9 0 MEMORY U I O P ü í ó á ALT A SYMBOL S D F G H J K L : ¿ é ú ; '' SHIFT Z X C V B N M / ? LCD display Tape cutter lever -2- CAPS Ç ç Ñ ñ ,- .´ PRINT MIRROR CODE SPACE SET FEED ON TOP RELOC OFF PRINT key CODE key SET key ON/...

Users Manual - English and Spanish
Page 5
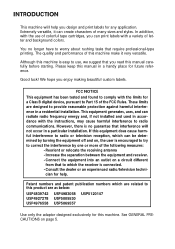
Print head Tape cutter unit Tape release lever -3-
Print head Tape cutter unit Tape release lever -3-
Users Manual - English and Spanish
Page 7
...q Use only Brother TZ tapes with alcohol or other organic solvents. q Do not pull the tape. q Do not clean the machine with this machine. q Do not leave any rubber or vinyl on the dashboard or in the back of any messages in dusty places. Doing so may damage the tape cassettes. q ... direct sunlight and rain. Keep it immediately with a soft wipe (e.g.cotton swab) to high temperatures or high humidity. q After inserting a new tape cassette, advance the tape by holding down the CODE key and pressing the FEED key once. q Do not expose the machine to avoid permanent damage.
...q Use only Brother TZ tapes with alcohol or other organic solvents. q Do not pull the tape. q Do not clean the machine with this machine. q Do not leave any rubber or vinyl on the dashboard or in the back of any messages in dusty places. Doing so may damage the tape cassettes. q ... direct sunlight and rain. Keep it immediately with a soft wipe (e.g.cotton swab) to high temperatures or high humidity. q After inserting a new tape cassette, advance the tape by holding down the CODE key and pressing the FEED key once. q Do not expose the machine to avoid permanent damage.
Users Manual - English and Spanish
Page 8
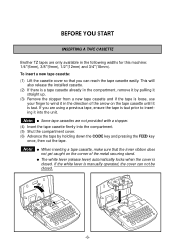
BEFORE YOU START INSERTING A TAPE CASSETTE Brother TZ tapes are not provided with a stopper. (4) Insert the tape cassette firmly into the unit. If you can not be closed . Note: q When inserting a tape cassette, make sure that you are using a previous tape, ensure the tape is taut prior to wind ...lever) automatically locks when the cover is manually operated, the cover can reach the tape cassette easily. This will also release the installed cassette. (2) If there is taut. To insert a new tape cassette: (1) Lift the cassette cover so that the inner ribbon does not get ...
BEFORE YOU START INSERTING A TAPE CASSETTE Brother TZ tapes are not provided with a stopper. (4) Insert the tape cassette firmly into the unit. If you can not be closed . Note: q When inserting a tape cassette, make sure that you are using a previous tape, ensure the tape is taut prior to wind ...lever) automatically locks when the cover is manually operated, the cover can reach the tape cassette easily. This will also release the installed cassette. (2) If there is taut. To insert a new tape cassette: (1) Lift the cassette cover so that the inner ribbon does not get ...
Users Manual - English and Spanish
Page 10
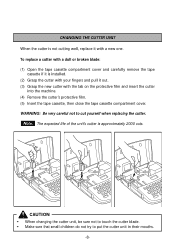
To replace a cutter with a dull or broken blade: (1) Open the tape cassette compartment cover and carefully remove the tape cassette if it is approximately 2000 cuts. Note: The expected life of the unit's cutter is installed. (2) Grasp the cutter with your fingers and ... new cutter with the tab on the protective film and insert the cutter into the machine. (4) Remove the cutter's protective film. (5) Insert the tape cassette, then close the tape cassette compartment cover.
To replace a cutter with a dull or broken blade: (1) Open the tape cassette compartment cover and carefully remove the tape cassette if it is approximately 2000 cuts. Note: The expected life of the unit's cutter is installed. (2) Grasp the cutter with your fingers and ... new cutter with the tab on the protective film and insert the cutter into the machine. (4) Remove the cutter's protective film. (5) Insert the tape cassette, then close the tape cassette compartment cover.
Users Manual - English and Spanish
Page 26
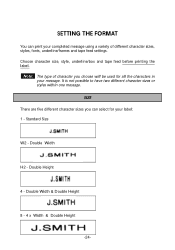
... used for your message. Note: The type of different character sizes, styles, fonts, underline/frames and tape feed settings. Double Height 4 - Standard Size W2 - Choose character size, style, underline/box and tape feed before printing the label. SETTING THE FORMAT You can print your completed message using a variety of character you can select...
... used for your message. Note: The type of different character sizes, styles, fonts, underline/frames and tape feed settings. Double Height 4 - Standard Size W2 - Choose character size, style, underline/box and tape feed before printing the label. SETTING THE FORMAT You can print your completed message using a variety of character you can select...
Users Manual - English and Spanish
Page 28
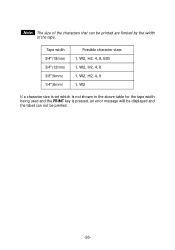
Note: The size of the tape. Tape width 3/4"(18mm) 3/4"(12mm) 3/8"(9mm) 1/4"(6mm) Possible character sizes 1, W2, H2, 4, 8, BIG 1, W2, H2, 4, 8 1, W2, H2, 4, 8 1, W2 If a character size is set which is not shown in the above table for the tape width being used and the PRINT key is pressed, an error message will be displayed and the label can be printed are limited by the width of the characters that can not be printed. -26-
Note: The size of the tape. Tape width 3/4"(18mm) 3/4"(12mm) 3/8"(9mm) 1/4"(6mm) Possible character sizes 1, W2, H2, 4, 8, BIG 1, W2, H2, 4, 8 1, W2, H2, 4, 8 1, W2 If a character size is set which is not shown in the above table for the tape width being used and the PRINT key is pressed, an error message will be displayed and the label can be printed are limited by the width of the characters that can not be printed. -26-

Users Manual - English and Spanish
Page 29
... size font is chosen, all lower case characters are printed in addition to the normal font. The normal size font can only be set when tape with a 3/4" (18 mm) width is the currently selected font size. (2) Pressing the BIG key while holding down the CODE key, press the BIG key. To...
... size font is chosen, all lower case characters are printed in addition to the normal font. The normal size font can only be set when tape with a 3/4" (18 mm) width is the currently selected font size. (2) Pressing the BIG key while holding down the CODE key, press the BIG key. To...

Users Manual - English and Spanish
Page 31
STYLE q Press @ 2 until the display reads "OUTL". The style indicator turns on. q Vertical printing can be used with some tape width and character size combinations. Note: q Only Normal style characters can not be printed vertically. A A A AA OUTL CAPS STL UNDL/FRM q Release CODE . -29- Example To use Outline print: q Hold down CODE .
STYLE q Press @ 2 until the display reads "OUTL". The style indicator turns on. q Vertical printing can be used with some tape width and character size combinations. Note: q Only Normal style characters can not be printed vertically. A A A AA OUTL CAPS STL UNDL/FRM q Release CODE . -29- Example To use Outline print: q Hold down CODE .

Users Manual - English and Spanish
Page 32
... CAPS STL UNDL/FRM A A A A AA AA A A A AA AA A A A BOX1 BOX2 CAPS STL UNDL/FRM CAPS STL UNDL/FRM Note: q Underline & Box are limited by the tape width and character size setting. -30- q Printing of the underline or frame are not available simultaneously. To add Underline or Box around the text. It...
... CAPS STL UNDL/FRM A A A A AA AA A A A AA AA A A A BOX1 BOX2 CAPS STL UNDL/FRM CAPS STL UNDL/FRM Note: q Underline & Box are limited by the tape width and character size setting. -30- q Printing of the underline or frame are not available simultaneously. To add Underline or Box around the text. It...

Users Manual - English and Spanish
Page 33
Box 1 Box 3 Box 2 Box 4 -31- Tape width Possible character sizes 3/4" (18 mm) 1, W2, H2, 4, 8, BIG 1/2" (12 mm) 1, W2, H2, 4, 8 3/8" (9 mm) 1, W2, H2, 4, 8 1/4" (6 mm) 1, W2 A triangle indicator on the display appears whether Underline or Frame is set on.
Box 1 Box 3 Box 2 Box 4 -31- Tape width Possible character sizes 3/4" (18 mm) 1, W2, H2, 4, 8, BIG 1/2" (12 mm) 1, W2, H2, 4, 8 3/8" (9 mm) 1, W2, H2, 4, 8 1/4" (6 mm) 1, W2 A triangle indicator on the display appears whether Underline or Frame is set on.
Users Manual - English and Spanish
Page 34
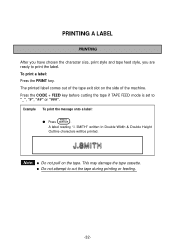
... ready to or "###". This may damage the tape cassette. To print a label: Press the PRINT key. The printed label comes out of the tape exit slot on the tape. A label reading "J. Example To print the message onto a label: q Press PRINT MIRROR . Press the CODE + FEED key before cutting the tape if TAPE FEED mode is set to print the...
... ready to or "###". This may damage the tape cassette. To print a label: Press the PRINT key. The printed label comes out of the tape exit slot on the tape. A label reading "J. Example To print the message onto a label: q Press PRINT MIRROR . Press the CODE + FEED key before cutting the tape if TAPE FEED mode is set to print the...
Users Manual - English and Spanish
Page 35
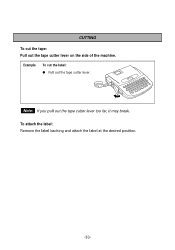
CUTTING To cut the label: q Pull out the tape cutter lever. MITH J.SMITH Note: If you pull out the tape cutter lever too far, it may break. To attach the label: Remove the label backing and attach the label at the desired position. -33- Example To cut the tape: Pull out the tape cutter lever on the side of the machine.
CUTTING To cut the label: q Pull out the tape cutter lever. MITH J.SMITH Note: If you pull out the tape cutter lever too far, it may break. To attach the label: Remove the label backing and attach the label at the desired position. -33- Example To cut the tape: Pull out the tape cutter lever on the side of the machine.

Users Manual - English and Spanish
Page 36
For example, if you want . REPEAT PRINTING The Repeat function allows you want nine labels to be printed. Press the CODE + FEED keys before cutting the tape if the TAPE FEED mode is not done automatically. the previous screen reappears. CLEAR Note: q Press DEL before all the ...printing is recommended to set to nine times. q A maximum of labels you to repeatedly print the same label up to or "###". CAPS STL...
For example, if you want . REPEAT PRINTING The Repeat function allows you want nine labels to be printed. Press the CODE + FEED keys before cutting the tape if the TAPE FEED mode is not done automatically. the previous screen reappears. CLEAR Note: q Press DEL before all the ...printing is recommended to set to nine times. q A maximum of labels you to repeatedly print the same label up to or "###". CAPS STL...

Users Manual - English and Spanish
Page 37
... increment numbers included in a single print operation. Printing will exit the NUMBERING mode. To use the AUTO COUNT function when printing: It is set the TAPE FEED mode to "#", "##" or "###". (Please refer to page 39.) (1) Type in the text to the next number. Press the CODE + FEED keys... before cutting the tape if the TAPE FEED mode is recommend to set to or "###". "JULY 5, 1962"; For example, when printing text with the number specified incremented to be...
... increment numbers included in a single print operation. Printing will exit the NUMBERING mode. To use the AUTO COUNT function when printing: It is set the TAPE FEED mode to "#", "##" or "###". (Please refer to page 39.) (1) Type in the text to the next number. Press the CODE + FEED keys... before cutting the tape if the TAPE FEED mode is recommend to set to or "###". "JULY 5, 1962"; For example, when printing text with the number specified incremented to be...
Users Manual - English and Spanish
Page 40
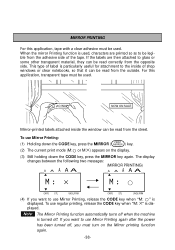
... power has been turned off . This type of shop windows or clear notebooks, so that it can be read from the adhesive side of the tape. The display changes between the following two messages: (MIRROR PRINTING) A A A AA A A A AA M: × M : CAPS STL UNDL/FRM CAPS STL UNDL/FRM ...;) appears on the Mirror printing function again. -38- Note: The Mirror Printing function automatically turns off when the machine is displayed. If the labels are then attached to use regular printing, release the CODE key when "M: ×" is used, characters are printed so as to be read from...
... power has been turned off . This type of shop windows or clear notebooks, so that it can be read from the adhesive side of the tape. The display changes between the following two messages: (MIRROR PRINTING) A A A AA A A A AA M: × M : CAPS STL UNDL/FRM CAPS STL UNDL/FRM ...;) appears on the Mirror printing function again. -38- Note: The Mirror Printing function automatically turns off when the machine is displayed. If the labels are then attached to use regular printing, release the CODE key when "M: ×" is used, characters are printed so as to be read from...
Users Manual - English and Spanish
Page 41
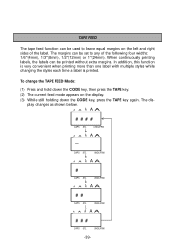
...this function is very convenient when printing more than one label with multiple styles while changing the styles each time a label is printed. To change the TAPE FEED Mode: (1) Press and hold down the CODE key, then press the TAPE key. (2) The current feed mode appears on the ...left and right sides of the following four widths: 1/6"(4mm), 1/3"(8mm), 1/2"(12mm) or 1"(24mm). play changes as shown below. When continuously printing labels, the labels can be printed without extra margins. The dis-...
...this function is very convenient when printing more than one label with multiple styles while changing the styles each time a label is printed. To change the TAPE FEED Mode: (1) Press and hold down the CODE key, then press the TAPE key. (2) The current feed mode appears on the ...left and right sides of the following four widths: 1/6"(4mm), 1/3"(8mm), 1/2"(12mm) or 1"(24mm). play changes as shown below. When continuously printing labels, the labels can be printed without extra margins. The dis-...
Users Manual - English and Spanish
Page 42
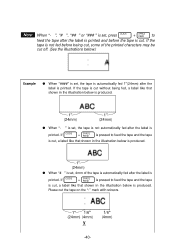
...CODE + SPACE FEED is pressed to feed the tape after the label is printed and before being fed, a label like that shown in the illustration below is produced. 1" (24mm) q When "# " is set , the tape is automatically fed 1"(24mm) after the label is printed. " is set , press CODE... + SPACE FEED to feed the tape and the tape is cut off. (See the illustrations below is produced. 1" (24mm) 1" (24mm) q When ...
...CODE + SPACE FEED is pressed to feed the tape after the label is printed and before being fed, a label like that shown in the illustration below is produced. 1" (24mm) q When "# " is set , the tape is automatically fed 1"(24mm) after the label is printed. " is set , press CODE... + SPACE FEED to feed the tape and the tape is cut off. (See the illustrations below is produced. 1" (24mm) 1" (24mm) q When ...


