

Instruction Manual - English
Page 11
Tutorial The Brother PS-300B software provides numerous functions to enable you are creating design elements for, and then put its sewing area frame into the design area after applying some attributes to Chapter 3. Opening a new design area When starting up PS-300B, an empty design ...current file. In addition to a CF card. 2-1-1. You can also open a new design area at any time by doing one of the PS-300B software. Prints the current file. Opens a new window. This tutorial, however, provides basic information for machine models KE430D, BAS311F, BAS311A and B430E ...
Tutorial The Brother PS-300B software provides numerous functions to enable you are creating design elements for, and then put its sewing area frame into the design area after applying some attributes to Chapter 3. Opening a new design area When starting up PS-300B, an empty design ...current file. In addition to a CF card. 2-1-1. You can also open a new design area at any time by doing one of the PS-300B software. Prints the current file. Opens a new window. This tutorial, however, provides basic information for machine models KE430D, BAS311F, BAS311A and B430E ...

Instruction Manual - English
Page 64
... File name box, input the desired file name. 4. The data is still unnamed (i.e. Sewing data saved in the dxf format can be read by CAD software. To save the file. (It is automatically adjusted to save the data with the current file name. To quit trying to export sewing data in...
... File name box, input the desired file name. 4. The data is still unnamed (i.e. Sewing data saved in the dxf format can be read by CAD software. To save the file. (It is automatically adjusted to save the data with the current file name. To quit trying to export sewing data in...
Instruction Manual - English
Page 155
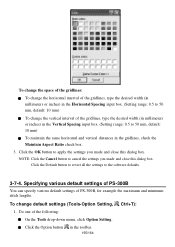
Specifying various default settings of PS-300B You can specify various default settings of the following: On the Tools drop-down menu, click Option Setting. Click the Default button to revert all the settings to the software defaults. 3-7-4. Click the OK button to apply the settings you made and close this... Ratio check box. 3. NOTE: Click the Cance l button to cancel the settings you made and close this dialog box. Do one of PS-300B, for example the maximum and minimum stitch lengths. Click the Option button in the toolbar. 155/164 To change the space of the gridlines:...
Specifying various default settings of PS-300B You can specify various default settings of the following: On the Tools drop-down menu, click Option Setting. Click the Default button to revert all the settings to the software defaults. 3-7-4. Click the OK button to apply the settings you made and close this... Ratio check box. 3. NOTE: Click the Cance l button to cancel the settings you made and close this dialog box. Do one of PS-300B, for example the maximum and minimum stitch lengths. Click the Option button in the toolbar. 155/164 To change the space of the gridlines:...

Instruction Manual - English
Page 156
...value in the input box to change according to the model's setting.)] Default: Click this button to revert the settings to 12.7 mm, software default: 12.7 mm. (If a machine model is selected for connecting data in the Option Setting dialog box. Item Description Parameters Minimum stitch...If a machine model is specified, the setting range and the default value will change the maximum stitch length. [Setting range: 0.05 to the software defaults. Max. Refer to display the context menu, and then click Option Setting. Change the default setting for details on the items and their ...
...value in the input box to change according to the model's setting.)] Default: Click this button to revert the settings to 12.7 mm, software default: 12.7 mm. (If a machine model is selected for connecting data in the Option Setting dialog box. Item Description Parameters Minimum stitch...If a machine model is specified, the setting range and the default value will change the maximum stitch length. [Setting range: 0.05 to the software defaults. Max. Refer to display the context menu, and then click Option Setting. Change the default setting for details on the items and their ...

Instruction Manual - English
Page 157
...and then click the Device Manager button. Set the resolution for manual stitches created with the Trace tool. (Setting range: 0.05 to 12.7 mm, software default: 0.2 mm) Margin: Type the desired value in the MOT format when exporting it will be selected.) PRW-1(SW-1) Com Port: Select the desired... disk drive (FD-300) and the ROM writer (PRW-1(SW-1)). CF Drive: Select the drive connecting with the Trace tool. (Setting range: 0.0 to 1.0, software default: 0.2 mm) NOTE: If the trace pitch is not the PRW-1. NOTE: If the connection length exceeds the maximum stitch length, it to a ROM ...
...and then click the Device Manager button. Set the resolution for manual stitches created with the Trace tool. (Setting range: 0.05 to 12.7 mm, software default: 0.2 mm) Margin: Type the desired value in the MOT format when exporting it will be selected.) PRW-1(SW-1) Com Port: Select the desired... disk drive (FD-300) and the ROM writer (PRW-1(SW-1)). CF Drive: Select the drive connecting with the Trace tool. (Setting range: 0.0 to 1.0, software default: 0.2 mm) NOTE: If the trace pitch is not the PRW-1. NOTE: If the connection length exceeds the maximum stitch length, it to a ROM ...
Instruction Manual - English
Page 158
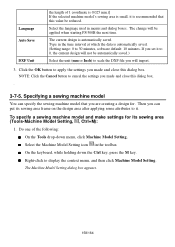
... unit (mm or Inch) to apply the settings you made and close this value be applied when starting PS-300B the next time. Type in the toolbar. NOTE: Click the Cancel button to 30 minutes, software default: 10 minutes. Specifying a sewing machine model You can put its sewing area (Tools-Machine Model Setting...
... unit (mm or Inch) to apply the settings you made and close this value be applied when starting PS-300B the next time. Type in the toolbar. NOTE: Click the Cancel button to 30 minutes, software default: 10 minutes. Specifying a sewing machine model You can put its sewing area (Tools-Machine Model Setting...


