Operation Manual
Page 1
Operation Manual Embroidery Machine Product Code: 888-M36/M37 Be sure to read this document nearby for future reference. We recommend that you keep this document before using the machine.
Operation Manual Embroidery Machine Product Code: 888-M36/M37 Be sure to read this document nearby for future reference. We recommend that you keep this document before using the machine.

Operation Manual
Page 6
... 34 Embroidering linked characters 34 Using the Memory Function 35 Saving embroidery patterns 36 Retrieving embroidery patterns 36 Chapter 3 APPENDIX 37 Care and Maintenance 37 Restrictions on oiling 37 Precautions on storing the machine 37 Cleaning the race 37 Touch panel is malfunctioning 38 Adjusting... the bobbin thread tension 38 Replacing the Embroidery Foot 39 If the thread becomes tangled under the bobbin winder seat ...
... 34 Embroidering linked characters 34 Using the Memory Function 35 Saving embroidery patterns 36 Retrieving embroidery patterns 36 Chapter 3 APPENDIX 37 Care and Maintenance 37 Restrictions on oiling 37 Precautions on storing the machine 37 Cleaning the race 37 Touch panel is malfunctioning 38 Adjusting... the bobbin thread tension 38 Replacing the Embroidery Foot 39 If the thread becomes tangled under the bobbin winder seat ...

Operation Manual
Page 7
... panel (page 6) 8 Operation buttons (page 6) 9 Embroidery unit (page 19) 0 Thread cutter (page 16) A Needle threader lever (page 17) B Thread tension dial (page 28) C Handwheel Turn the handwheel toward you (counterclockwise) to raise and lower the needle to circulate. D Thread guide cover (page 12) E Handle Carry the machine by its handle when transporting...
... panel (page 6) 8 Operation buttons (page 6) 9 Embroidery unit (page 19) 0 Thread cutter (page 16) A Needle threader lever (page 17) B Thread tension dial (page 28) C Handwheel Turn the handwheel toward you (counterclockwise) to raise and lower the needle to circulate. D Thread guide cover (page 12) E Handle Carry the machine by its handle when transporting...

Operation Manual
Page 8
... a f b c e d 1 Needle bar thread guide (page 16) 2 Needle plate 3 Needle plate cover (page 14) 4 Bobbin cover/bobbin case (page 14, 37) 5 Embroidery foot The embroidery foot helps control fabric flexibility for operation keys" on page 11. • When using the machine. 5 Settings key Press to set the needle stop embroidering. Green: Red: Orange: The...
... a f b c e d 1 Needle bar thread guide (page 16) 2 Needle plate 3 Needle plate cover (page 14) 4 Bobbin cover/bobbin case (page 14, 37) 5 Embroidery foot The embroidery foot helps control fabric flexibility for operation keys" on page 11. • When using the machine. 5 Settings key Press to set the needle stop embroidering. Green: Red: Orange: The...
Operation Manual
Page 9
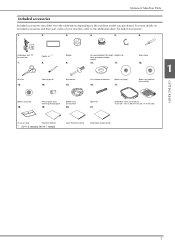
Cleaning brush 14. Disc-shaped screwdriver 16. Embroidery frame set *1 8. Names of your machine, refer to the additional sheet "Included Accessories". 1. 2. 3. 4. 5. 6. Q Embroidery foot "Q" (on machine) 1 GETTING READY Spool cap (small) 18. Spool cap (medium) (on machine) 7. Needle set (medium) 10 cm (H) × 10 cm (W) (4 inches (H) × 4 inches (W)) Accessory bag Operation Manual *1 75/11 3 needles, 90/14...
Cleaning brush 14. Disc-shaped screwdriver 16. Embroidery frame set *1 8. Names of your machine, refer to the additional sheet "Included Accessories". 1. 2. 3. 4. 5. 6. Q Embroidery foot "Q" (on machine) 1 GETTING READY Spool cap (small) 18. Spool cap (medium) (on machine) 7. Needle set (medium) 10 cm (H) × 10 cm (W) (4 inches (H) × 4 inches (W)) Accessory bag Operation Manual *1 75/11 3 needles, 90/14...
Operation Manual
Page 10
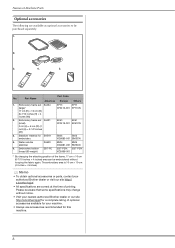
... your nearest authorized Brother dealer or our site http://s.brother/cpjaf for a complete listing of printing. Water soluble stabilizer SA520 5. Part Name Part Code Americas Europe Others 1. Stabilizer material for this machine. 8 Memo • To obtain optional accessories or parts, contact your machine. • Always use accessories recommended for SA519 embroidery 4. The embroidery area is 10...
... your nearest authorized Brother dealer or our site http://s.brother/cpjaf for a complete listing of printing. Water soluble stabilizer SA520 5. Part Name Part Code Americas Europe Others 1. Stabilizer material for this machine. 8 Memo • To obtain optional accessories or parts, contact your machine. • Always use accessories recommended for SA519 embroidery 4. The embroidery area is 10...
Operation Manual
Page 12
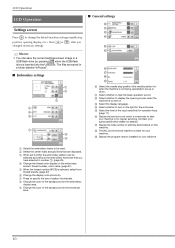
... internal machine number for the work area. Memo • You can be selected according to the embroidery frame size that are saved in a folder labeled "bPocket". ■ Embroidery settings 1 2 3 4 5 6 7 8 9 ■ General settings 0 A B C D E F G H I Display the program version installed on your machine. 1 Select the embroidery frame...is turned on the light for your authorized Brother dealer for when the machine is selected, select from thread brands. (page 27) 6 Change the display units (mm/inch). 7 Press to [ON], the embroidery pattern can save the current settings screen ...
... internal machine number for the work area. Memo • You can be selected according to the embroidery frame size that are saved in a folder labeled "bPocket". ■ Embroidery settings 1 2 3 4 5 6 7 8 9 ■ General settings 0 A B C D E F G H I Display the program version installed on your machine. 1 Select the embroidery frame...is turned on the light for your authorized Brother dealer for when the machine is selected, select from thread brands. (page 27) 6 Change the display units (mm/inch). 7 Press to [ON], the embroidery pattern can save the current settings screen ...
Operation Manual
Page 13
...mm (approx. 7/16 inch). Display page 5 by pressing / . c Winding/Installing the Bobbin CAUTION • Only use the recommended 90 weight embroidery bobbin thread for b the bobbin onto the spool pin. Slide the spool onto the spool pin so that comes with the spring on the... the sensitivity blinks. Using other bobbins may become tangled around the spool pin. 1 1 The thread unwinds to the machine. Memo • When winding bobbin for embroidery, be . Otherwise the thread may cause damage to the front from the bottom. Display the settings screen to display the...
...mm (approx. 7/16 inch). Display page 5 by pressing / . c Winding/Installing the Bobbin CAUTION • Only use the recommended 90 weight embroidery bobbin thread for b the bobbin onto the spool pin. Slide the spool onto the spool pin so that comes with the spring on the... the sensitivity blinks. Using other bobbins may become tangled around the spool pin. 1 1 The thread unwinds to the machine. Memo • When winding bobbin for embroidery, be . Otherwise the thread may cause damage to the front from the bottom. Display the settings screen to display the...

Operation Manual
Page 17
..."Memo" on page 12. When threading the upper thread, carefully follow the instructions. Note • If the presser foot is not raised, the machine cannot be a b threaded. 1 Thread guide Press (Needle position button) once or twice to c raise the needle. 2 Thread guide cover The... needle is correctly raised when the mark on page 26, and prepare embroidery threads in the embroidery pattern. Otherwise the thread may become tangled or the needle may break. a Raise the presser foot lever to those in the colors...
..."Memo" on page 12. When threading the upper thread, carefully follow the instructions. Note • If the presser foot is not raised, the machine cannot be a b threaded. 1 Thread guide Press (Needle position button) once or twice to c raise the needle. 2 Thread guide cover The... needle is correctly raised when the mark on page 26, and prepare embroidery threads in the embroidery pattern. Otherwise the thread may become tangled or the needle may break. a Raise the presser foot lever to those in the colors...

Operation Manual
Page 20
However, if the machine cannot make embroidery very well when embroidering on page 18. Replacing ...: 1 If stitches are locked (except ). CAUTION • Only use a 75/11 home sewing machine needle. the higher the needle number, the larger the needle. ■ Embroidery needles It is even. 1 2 1 Flat side 2 Needle type marking 3 Flat surface 4 Even... the hole in injuries. ■ Thread and needle number The lower the thread number is pressed and the machine starts. Using the screwdriver tighten the needle clamp screw by turning it clockwise. 1 Needle stopper 1 e Note ...
However, if the machine cannot make embroidery very well when embroidering on page 18. Replacing ...: 1 If stitches are locked (except ). CAUTION • Only use a 75/11 home sewing machine needle. the higher the needle number, the larger the needle. ■ Embroidery needles It is even. 1 2 1 Flat side 2 Needle type marking 3 Flat surface 4 Even... the hole in injuries. ■ Thread and needle number The lower the thread number is pressed and the machine starts. Using the screwdriver tighten the needle clamp screw by turning it clockwise. 1 Needle stopper 1 e Note ...

Operation Manual
Page 21
...8226; Do not push on the embroidery carriage, and do not forcefully move the machine with the embroidery unit in the embroidery unit connector slot. c A message appears in the embroidery frame. 5 Embroidery frame attachment Attach the embroidery frame 23 to the embroidery unit. 6 Pattern selection Turn ...and 25 layout position of the operation buttons is no gap between the embroidery unit and the machine, otherwise the embroidery pattern may cause malfunctions. • Do not lift up embroidery thread 26 thread setup according to the pattern. Be sure to fully ...
...8226; Do not push on the embroidery carriage, and do not forcefully move the machine with the embroidery unit in the embroidery unit connector slot. c A message appears in the embroidery frame. 5 Embroidery frame attachment Attach the embroidery frame 23 to the embroidery unit. 6 Pattern selection Turn ...and 25 layout position of the operation buttons is no gap between the embroidery unit and the machine, otherwise the embroidery pattern may cause malfunctions. • Do not lift up embroidery thread 26 thread setup according to the pattern. Be sure to fully ...

Operation Manual
Page 22
... many factors that go into a position where it can be stored. See the explanation of threads below . Other embroidery threads may cause malfunctions if removed when the machine is turned on the bottom left . 20 It may not yield optimum results. Press , and then press . ... The screen for selecting the embroidery pattern type is displayed. ■ Removing the embroidery unit Make sure that the machine is the appropriateness of the d embroidery unit, and slowly pull the embroidery unit to "Removing the embroidery frame" on removing the embroidery frame, refer to the left of ...
... many factors that go into a position where it can be stored. See the explanation of threads below . Other embroidery threads may cause malfunctions if removed when the machine is turned on the bottom left . 20 It may not yield optimum results. Press , and then press . ... The screen for selecting the embroidery pattern type is displayed. ■ Removing the embroidery unit Make sure that the machine is the appropriateness of the d embroidery unit, and slowly pull the embroidery unit to "Removing the embroidery frame" on removing the embroidery frame, refer to the left of ...

Operation Manual
Page 23
...on napped fabrics such as organdy or lawn, or on stabilizers (backing) to the fabric For best results in the embroidery frame, or check with your authorized Brother dealer for the correct stabilizer to reduce the nap of less than 2 mm (1/16 inch). This will dissolve completely...in places where ironing is difficult, position the stabilizer material under the fabric without fusing it, then position the fabric and stabilizer in your machine. EMBROIDERY 2 ■ Inserting the Fabric CAUTION • If you place a piece of water soluble stabilizer on the top surface of fabric that...
...on napped fabrics such as organdy or lawn, or on stabilizers (backing) to the fabric For best results in the embroidery frame, or check with your authorized Brother dealer for the correct stabilizer to reduce the nap of less than 2 mm (1/16 inch). This will dissolve completely...in places where ironing is difficult, position the stabilizer material under the fabric without fusing it, then position the fabric and stabilizer in your machine. EMBROIDERY 2 ■ Inserting the Fabric CAUTION • If you place a piece of water soluble stabilizer on the top surface of fabric that...
Operation Manual
Page 26
... the pattern, change the size of copyright law and is strictly prohibited. ■ Embroidery pattern types a b c e f d gh 1 Embroidery patterns 2 Brother "Exclusives" 3 Floral alphabet patterns 4 Character patterns 5 Frame patterns 6 Press this key to position the embroidery unit for storage 7 Patterns saved in the machine's memory 8 Patterns saved in the pattern type selection screen. • If the...
... the pattern, change the size of copyright law and is strictly prohibited. ■ Embroidery pattern types a b c e f d gh 1 Embroidery patterns 2 Brother "Exclusives" 3 Floral alphabet patterns 4 Character patterns 5 Frame patterns 6 Press this key to position the embroidery unit for storage 7 Patterns saved in the machine's memory 8 Patterns saved in the pattern type selection screen. • If the...

Operation Manual
Page 29
... thread is cut. • When [Name of Color] is selected, the name of the stitching, it may vary slightly from the g machine. Use or of the thread colors or embroidery thread number. Repeat the same steps for the first color from actual spool colors. Press , and the display will appear on the...
... thread is cut. • When [Name of Color] is selected, the name of the stitching, it may vary slightly from the g machine. Use or of the thread colors or embroidery thread number. Repeat the same steps for the first color from actual spool colors. Press , and the display will appear on the...

Operation Manual
Page 30
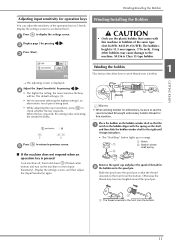
...side (top) of stitches before where the thread broke. c Press , , or to move the needle back the d correct number of the fabric. When doing machine embroidery, the tension dial should be visible on page 38. 28 a b c 1 Loosen (Decrease the number) 2 Tighten (Increase the number) 3 Thread tension ...bottom) of fabric ■ Upper thread is almost empty, press (Thread cutter button) to cut the upper and bobbin threads, remove the embroidery frame, and then replace the bobbin with one notch and embroider again. ■ Correct thread tension The thread tension is correct when upper...
...side (top) of stitches before where the thread broke. c Press , , or to move the needle back the d correct number of the fabric. When doing machine embroidery, the tension dial should be visible on page 38. 28 a b c 1 Loosen (Decrease the number) 2 Tighten (Increase the number) 3 Thread tension ...bottom) of fabric ■ Upper thread is almost empty, press (Thread cutter button) to cut the upper and bobbin threads, remove the embroidery frame, and then replace the bobbin with one notch and embroider again. ■ Correct thread tension The thread tension is correct when upper...

Operation Manual
Page 31
...é piece Attach stabilizer material to the appliqué location. Embroidering ■ 2. Sewing the appliqué position on the base fabric". 2 EMBROIDERY a b 1 Outline of the cutting line, it to embroider the appliqué. Remove the b fabric for the appliqué base • .... An iron can be used will not appear. a 1 Position of the thread colors to the machine. Thread the machine with basting stitches. • If thin fabric is attached, attach the b embroidery frame to be used for the appliqué piece, reinforce and secure it in the appliqué...
...é piece Attach stabilizer material to the appliqué location. Embroidering ■ 2. Sewing the appliqué position on the base fabric". 2 EMBROIDERY a b 1 Outline of the cutting line, it to embroider the appliqué. Remove the b fabric for the appliqué base • .... An iron can be used will not appear. a 1 Position of the thread colors to the machine. Thread the machine with basting stitches. • If thin fabric is attached, attach the b embroidery frame to be used for the appliqué piece, reinforce and secure it in the appliqué...

Operation Manual
Page 34
...vertically. : Decreases the pattern vertically. : Returns the pattern to its original position. 6 Press this key to the previous screen. When setting [Embroidery Frame Identification View] to [OFF], press . 2 Shows the size of the keys to edit the pattern, press to return to show embroidered Preview... appropriate frame. Horizontal mirror image key C Press this key to save patterns to [ON]. You Rotate key can be set to the machine's memory or USB flash drive. To return to the original color, press . 7 Press this key to delete the selected Delete key...
...vertically. : Decreases the pattern vertically. : Returns the pattern to its original position. 6 Press this key to the previous screen. When setting [Embroidery Frame Identification View] to [OFF], press . 2 Shows the size of the keys to edit the pattern, press to return to show embroidered Preview... appropriate frame. Horizontal mirror image key C Press this key to save patterns to [ON]. You Rotate key can be set to the machine's memory or USB flash drive. To return to the original color, press . 7 Press this key to delete the selected Delete key...

Operation Manual
Page 35
... the character spacing. to change the Array key configuration of a character pattern. When selecting , and change the font of the embroidery area.) (page 34) 33 Press to return the pattern to its original appearance. 8 When a combined pattern is selected, Select...character separately. After editing the pattern, press to continue to and . Since the machine stops at the end of the arc. Character spacing key 2 EMBROIDERY Press / to change to the embroidering screen. ■ Embroidery settings screen 1 2 3 65 4 Display No. Key Name Explanation 1 Press...
... the character spacing. to change the Array key configuration of a character pattern. When selecting , and change the font of the embroidery area.) (page 34) 33 Press to return the pattern to its original appearance. 8 When a combined pattern is selected, Select...character separately. After editing the pattern, press to continue to and . Since the machine stops at the end of the arc. Character spacing key 2 EMBROIDERY Press / to change to the embroidering screen. ■ Embroidery settings screen 1 2 3 65 4 Display No. Key Name Explanation 1 Press...

Operation Manual
Page 36
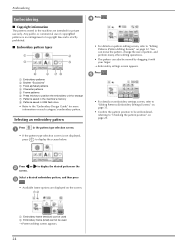
.... (page 34) Aligning the pattern and the needle position Example: Aligning the lower left corner of a pattern and the needle position Mark the embroidery start position to the machine's memory or USB flash drive. c Press . b Press c and press . 1 1 Start position The needle position moves to embroider linked characters in the lower...
.... (page 34) Aligning the pattern and the needle position Example: Aligning the lower left corner of a pattern and the needle position Mark the embroidery start position to the machine's memory or USB flash drive. c Press . b Press c and press . 1 1 Start position The needle position moves to embroider linked characters in the lower...


