

Accessory Catalog
Page 5
...fabrics. Baste the seam closed and press. 3. Cut the basting stitches in half with wrong sides together. 2. Edge Joining Foot Brother General Sewing Accessories 08 Edge Joining Foot This foot is perfect for edge stitching, attaching lace, and fabric edge joining. Joining two... fabrics: 1. Edge stitching: 1. Pin tucks: 1. SA184 All Brother home-use sewing machines Ring Bearer Pillow & Hankerchief Innov-is great for details.) www.brother.com Blind hem: 1. Fold the fabric up to install concealed zippers easily. 1. Position the fabric with the wrong side facing up...
...fabrics. Baste the seam closed and press. 3. Cut the basting stitches in half with wrong sides together. 2. Edge Joining Foot Brother General Sewing Accessories 08 Edge Joining Foot This foot is perfect for edge stitching, attaching lace, and fabric edge joining. Joining two... fabrics: 1. Edge stitching: 1. Pin tucks: 1. SA184 All Brother home-use sewing machines Ring Bearer Pillow & Hankerchief Innov-is great for details.) www.brother.com Blind hem: 1. Fold the fabric up to install concealed zippers easily. 1. Position the fabric with the wrong side facing up...

Accessory Catalog
Page 7
...marked "V" foot is models. SA160 ABCDEFGHJKLMNO Straight Stitch Foot Straight Stitch Foot and Straight Stitch Needle Plate Vertical Stitching Alignment Foot Brother General Sewing Accessories 12 Straight Stitch Foot For precise straight stitching on thin fabrics or on thin fabrics or small pieces of ...foot can be used for the Side Cutter allows you measure the distance from the needle to accomplish perfect straight stitching. Installing the Straight Stitch Needle Plate automatically sets the needle position to the center straight stitching position on both straight and curved ...
...marked "V" foot is models. SA160 ABCDEFGHJKLMNO Straight Stitch Foot Straight Stitch Foot and Straight Stitch Needle Plate Vertical Stitching Alignment Foot Brother General Sewing Accessories 12 Straight Stitch Foot For precise straight stitching on thin fabrics or on thin fabrics or small pieces of ...foot can be used for the Side Cutter allows you measure the distance from the needle to accomplish perfect straight stitching. Installing the Straight Stitch Needle Plate automatically sets the needle position to the center straight stitching position on both straight and curved ...

Accessory Catalog
Page 13
... with this presser foot. 1. The intervals of the presser foot is Project Book (See pages 16 and 17 for most consistent results. Brother Embellishment Feet 23 Bed Runner & Pillowcase Innov-is moved forward, its teeth catch a fabric and force it forward into the slot, and stitch... slowly. 3. Install and manually thread a twin needle. 2. Sew slowly for details.) Brother Embellishment Feet Pin Tuck Foot 24 Ruffler Foot Pin Tuck Foot This presser foot has 7 grooves and produces perfect pin ...
... with this presser foot. 1. The intervals of the presser foot is Project Book (See pages 16 and 17 for most consistent results. Brother Embellishment Feet 23 Bed Runner & Pillowcase Innov-is moved forward, its teeth catch a fabric and force it forward into the slot, and stitch... slowly. 3. Install and manually thread a twin needle. 2. Sew slowly for details.) Brother Embellishment Feet Pin Tuck Foot 24 Ruffler Foot Pin Tuck Foot This presser foot has 7 grooves and produces perfect pin ...
Users Manual - English
Page 4
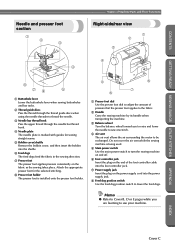
.... Do not cover the air vent while the sewing machine is marked with guides for the selected stitching. 8 Presser foot holder The presser foot is installed onto the presser foot holder. 5 6 8 7 1 Presser foot dial Use the presser foot dial to adjust the amount of the foot controller cable into the power...
.... Do not cover the air vent while the sewing machine is marked with guides for the selected stitching. 8 Presser foot holder The presser foot is installed onto the presser foot holder. 5 6 8 7 1 Presser foot dial Use the presser foot dial to adjust the amount of the foot controller cable into the power...
Users Manual - English
Page 6
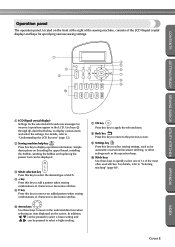
... Press this key to display operation information. For details, refer to display various items and select the settings. Simple descriptions on threading the upper thread, installing the bobbin, winding the bobbin and replacing the presser foot can be displayed. 3 Stitch selection key Press this key to select the desired type of...
... Press this key to display operation information. For details, refer to display various items and select the settings. Simple descriptions on threading the upper thread, installing the bobbin, winding the bobbin and replacing the presser foot can be displayed. 3 Stitch selection key Press this key to select the desired type of...
Users Manual - English
Page 8
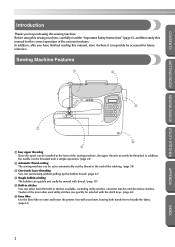
In addition, after you for future reference. Sewing Machine Features 1 4 5 2 6 3 1 Easy upper threading Since the spool can be installed at the end of the most often used utility stitches can quickly be wound with thread. (page 18) 5 Built-in stitches available, including utility stitches, ...
In addition, after you for future reference. Sewing Machine Features 1 4 5 2 6 3 1 Easy upper threading Since the spool can be installed at the end of the most often used utility stitches can quickly be wound with thread. (page 18) 5 Built-in stitches available, including utility stitches, ...
Users Manual - English
Page 9
... ...14 Changing the needle stop position ...16 Adjusting the brightness of the LCD ...16 Changing the screen language ...17 Winding/Installing the Bobbin 18 Bobbin precautions ...18 Winding the bobbin ...18 Installing the bobbin ...22 Upper Threading ...24 Threading the upper thread ...24 Threading the needle ...27 Using the twin needle ...28...
... ...14 Changing the needle stop position ...16 Adjusting the brightness of the LCD ...16 Changing the screen language ...17 Winding/Installing the Bobbin 18 Bobbin precautions ...18 Winding the bobbin ...18 Installing the bobbin ...22 Upper Threading ...24 Threading the upper thread ...24 Threading the needle ...27 Using the twin needle ...28...
Users Manual - English
Page 14
...or other hot objects. 2. Plug the machine directly into the wall. For additional product information and updates, visit our web site at www.brother.com 8 APPENDIX INDEX Do not use • Maintaining the machine • Leaving the machine unattended 3. Do not use or store the machine... take- Do not store anything on the needle while sewing. Use only neutral soaps or detergents to assure correct installation. Be sure to keep your local authorized Brother dealer. For a longer service life 1. When storing this machine, avoid direct sunlight and high humidity locations. To...
...or other hot objects. 2. Plug the machine directly into the wall. For additional product information and updates, visit our web site at www.brother.com 8 APPENDIX INDEX Do not use • Maintaining the machine • Leaving the machine unattended 3. Do not use or store the machine... take- Do not store anything on the needle while sewing. Use only neutral soaps or detergents to assure correct installation. Be sure to keep your local authorized Brother dealer. For a longer service life 1. When storing this machine, avoid direct sunlight and high humidity locations. To...
Users Manual - English
Page 15
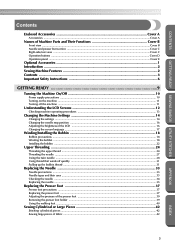
Turning the Machine On/Off 10 Understanding the LCD Screens 12 Changing the Machine Settings 14 Winding/Installing the Bobbin 18 Upper Threading ...24 Replacing the Needle 33 Replacing the Presser Foot 37 Sewing Cylindrical or Large Pieces 42 APPENDIX INDEX CONTENTS GETTING READY SEWING BASICS UTILITY STITCHES 1 GETTING READY The various preparations required before starting to sew are described in this chapter.
Turning the Machine On/Off 10 Understanding the LCD Screens 12 Changing the Machine Settings 14 Winding/Installing the Bobbin 18 Upper Threading ...24 Replacing the Needle 33 Replacing the Presser Foot 37 Sewing Cylindrical or Large Pieces 42 APPENDIX INDEX CONTENTS GETTING READY SEWING BASICS UTILITY STITCHES 1 GETTING READY The various preparations required before starting to sew are described in this chapter.

Users Manual - English
Page 17
In addition, before transporting the sewing machine to another location, be sure to install the proper outlet. Note ● When the sewing machine is turned off, all stitch settings are finished using the sewing machine, turn it off. If ...
In addition, before transporting the sewing machine to another location, be sure to install the proper outlet. Note ● When the sewing machine is turned off, all stitch settings are finished using the sewing machine, turn it off. If ...

Users Manual - English
Page 19
... return to the corresponding page in this Operation Manual. 3 4 1 Replacing the presser foot 2 Threading the upper thread 3 Winding the bobbin 4 Installing the bobbin Press (OK key). 4 X The first screen describing the procedure for the selected topic appears. X The sewing machine help key) in ...2 Note ● For details on . Turn on replacing the presser foot, threading the upper thread, winding the bobbin and installing the bobbin can be displayed in the 2 operation panel. CONTENTS GETTING READY SEWING BASICS UTILITY STITCHES Checking machine operating procedures Simple ...
... return to the corresponding page in this Operation Manual. 3 4 1 Replacing the presser foot 2 Threading the upper thread 3 Winding the bobbin 4 Installing the bobbin Press (OK key). 4 X The first screen describing the procedure for the selected topic appears. X The sewing machine help key) in ...2 Note ● For details on . Turn on replacing the presser foot, threading the upper thread, winding the bobbin and installing the bobbin can be displayed in the 2 operation panel. CONTENTS GETTING READY SEWING BASICS UTILITY STITCHES Checking machine operating procedures Simple ...
Users Manual - English
Page 24
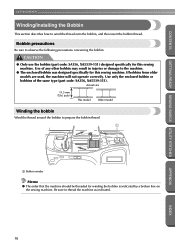
.... Be sure to wind the thread onto the bobbin, and then insert the bobbin thread. GETTING READY SEWING BASICS UTILITY STITCHES GETTING READY CONTENTS Winding/Installing the Bobbin This section describes how to thread the machine as indicated. CAUTION ● Only use the bobbin (part code: SA156, XA5539-151) designed specifically...
.... Be sure to wind the thread onto the bobbin, and then insert the bobbin thread. GETTING READY SEWING BASICS UTILITY STITCHES GETTING READY CONTENTS Winding/Installing the Bobbin This section describes how to thread the machine as indicated. CAUTION ● Only use the bobbin (part code: SA156, XA5539-151) designed specifically...

Users Manual - English
Page 25
... than the diameter of the spool. Use the spool cap with some space between the cap and the spool. 1 2 3 1 Spool 2 Gap 3 Spool cap (small) Winding/Installing the Bobbin 19 INDEX Slide the spool cap onto the spool pin. 7 With the rounded side of the spool cap positioned toward the left, slide... is inserted onto the 5 spool pin. 1 2 1 Spool pin 2 Spool cap 3 1 Spool cap (large) 2 Spool cap (medium) 3 Spool • When using a spool of cross-wound thread, install the small spool cap with a diameter that is horizontal and the thread unrolls from the bottom front of the spool.
... than the diameter of the spool. Use the spool cap with some space between the cap and the spool. 1 2 3 1 Spool 2 Gap 3 Spool cap (small) Winding/Installing the Bobbin 19 INDEX Slide the spool cap onto the spool pin. 7 With the rounded side of the spool cap positioned toward the left, slide... is inserted onto the 5 spool pin. 1 2 1 Spool pin 2 Spool cap 3 1 Spool cap (large) 2 Spool cap (medium) 3 Spool • When using a spool of cross-wound thread, install the small spool cap with a diameter that is horizontal and the thread unrolls from the bottom front of the spool.

Users Manual - English
Page 27
... bobbin winder shaft to its i original position. g Remove the bobbin from the shaft. Press e (start /stop button) once. 1 1 Start/stop button) once. APPENDIX INDEX Winding/Installing the Bobbin 21 Slide the sewing speed controller to the right c (so that has been correctly wound, otherwise the needle may bend or break when...
... bobbin winder shaft to its i original position. g Remove the bobbin from the shaft. Press e (start /stop button) once. 1 1 Start/stop button) once. APPENDIX INDEX Winding/Installing the Bobbin 21 Slide the sewing speed controller to the right c (so that has been correctly wound, otherwise the needle may bend or break when...
Users Manual - English
Page 28
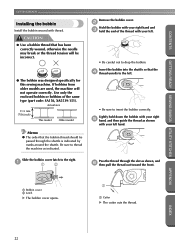
... bobbin was designed specifically for this sewing machine. Be sure to insert the bobbin correctly. GETTING READY SEWING BASICS UTILITY STITCHES GETTING READY CONTENTS Installing the bobbin Install the bobbin wound with your left hand. Actual size 11.5 mm (7/16 inch) This model Older model Remove the bobbin cover. 2 Hold the bobbin...
... bobbin was designed specifically for this sewing machine. Be sure to insert the bobbin correctly. GETTING READY SEWING BASICS UTILITY STITCHES GETTING READY CONTENTS Installing the bobbin Install the bobbin wound with your left hand. Actual size 11.5 mm (7/16 inch) This model Older model Remove the bobbin cover. 2 Hold the bobbin...

Users Manual - English
Page 29
... next page). Continue with your finger and unroll the bobbin thread correctly, otherwise the thread may break or the thread tension will be incorrect. Winding/Installing the Bobbin 23 APPENDIX INDEX CONTENTS GETTING READY SEWING BASICS UTILITY STITCHES CAUTION ● Be sure to the procedure in "Pulling up the bobbin thread...
... next page). Continue with your finger and unroll the bobbin thread correctly, otherwise the thread may break or the thread tension will be incorrect. Winding/Installing the Bobbin 23 APPENDIX INDEX CONTENTS GETTING READY SEWING BASICS UTILITY STITCHES CAUTION ● Be sure to the procedure in "Pulling up the bobbin thread...

Users Manual - English
Page 31
..., the sewing machine cannot be threaded correctly. Press (needle position button) once 3 or twice to raise the needle before using a spool of cross-wound thread, install the small spool cap with a diameter that is horizontal and the thread unrolls from the bottom front of the spool. • If the presser foot...
..., the sewing machine cannot be threaded correctly. Press (needle position button) once 3 or twice to raise the needle before using a spool of cross-wound thread, install the small spool cap with a diameter that is horizontal and the thread unrolls from the bottom front of the spool. • If the presser foot...

Users Manual - English
Page 34
...pull out about 5 cm (2 inch) of thread toward the rear of the machine. 1 1 5 cm (2 inch) X The lower threading is finished. For details on installing a needle, refer to use the twin needle, the extra spool pin and the spool cap. GETTING READY SEWING BASICS UTILITY STITCHES GETTING READY CONTENTS Raise... the presser foot lever, pass the thread 7 through a of "Threading the upper thread" (page 24). Note ● If the needle is installed, the needle threader cannot be sewn with two different threads. CAUTION ● Only use bent needles. APPENDIX INDEX 28...
...pull out about 5 cm (2 inch) of thread toward the rear of the machine. 1 1 5 cm (2 inch) X The lower threading is finished. For details on installing a needle, refer to use the twin needle, the extra spool pin and the spool cap. GETTING READY SEWING BASICS UTILITY STITCHES GETTING READY CONTENTS Raise... the presser foot lever, pass the thread 7 through a of "Threading the upper thread" (page 24). Note ● If the needle is installed, the needle threader cannot be sewn with two different threads. CAUTION ● Only use bent needles. APPENDIX INDEX 28...

Users Manual - English
Page 37
Pass the bobbin thread through 5 of "Installing the bobbin" (page 22). Carefully pull the upper thread upward to fit the size of the spool. 1 2 Pulling up the bobbin thread When making gathers ...
Pass the bobbin thread through 5 of "Installing the bobbin" (page 22). Carefully pull the upper thread upward to fit the size of the spool. 1 2 Pulling up the bobbin thread When making gathers ...
Users Manual - English
Page 40
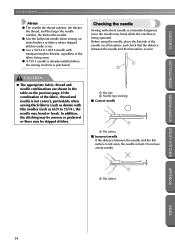
... needle may bend or break. Checking the needle Sewing with transparent nylon threads, regardless of the fabric being sewn. ● A 75/11 needle is already installed when the sewing machine is being operated. CAUTION ● The appropriate fabric, thread and needle combinations are shown in the table on a flat surface and...
... needle may bend or break. Checking the needle Sewing with transparent nylon threads, regardless of the fabric being sewn. ● A 75/11 needle is already installed when the sewing machine is being operated. CAUTION ● The appropriate fabric, thread and needle combinations are shown in the table on a flat surface and...


