Operation Manual
Page 3
... Your close attention is necessary when the machine is required when sewing: • Always pay close attention to inspect and adjust the machine yourself. The machine may start unexpectedly and cause personal injury or damage to the machine. • Switch the machine to the symbol "O" position to turn on... of the operation manual to the needle. Benzene, thinner, and scouring powders can damage the case and machine, and should never be replaced by authorized Brother Service Center. • In the event a malfunction occurs or adjustment is required, first follow careful instruction...
... Your close attention is necessary when the machine is required when sewing: • Always pay close attention to inspect and adjust the machine yourself. The machine may start unexpectedly and cause personal injury or damage to the machine. • Switch the machine to the symbol "O" position to turn on... of the operation manual to the needle. Benzene, thinner, and scouring powders can damage the case and machine, and should never be replaced by authorized Brother Service Center. • In the event a malfunction occurs or adjustment is required, first follow careful instruction...

Operation Manual
Page 5
... PARTS 6 Flat bed attachment 6 USING YOUR SEWING MACHINE 7 Connecting plugs 7 Main power and sewing light switch 8 Foot controller 8 Checking the needle 8 Replacing the needle 8 Changing the presser foot 10 THE CONTROLS 11 Pattern selection dial 11 Patterns and stitch names 11 Reverse sewing lever 12 THREADING THE MACHINE 13 Winding the bobbin 13 Lower threading...
... PARTS 6 Flat bed attachment 6 USING YOUR SEWING MACHINE 7 Connecting plugs 7 Main power and sewing light switch 8 Foot controller 8 Checking the needle 8 Replacing the needle 8 Changing the presser foot 10 THE CONTROLS 11 Pattern selection dial 11 Patterns and stitch names 11 Reverse sewing lever 12 THREADING THE MACHINE 13 Winding the bobbin 13 Lower threading...
Operation Manual
Page 6
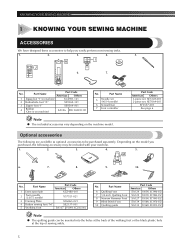
... Others 3-piece set: XE5328-001 2-piece set (90/14 needle) 6 Screwdriver 7 Foot controller Note ● The included accessories vary depending on machine) SA156 SFB: XA5539-151 No. No. A A I I " XE9369-001 4 Bobbin (One is on the machine model. No. KNOWING YOUR SEWING MACHINE 1 KNOWING YOUR SEWING MACHINE ACCESSORIES We have designed these accessories to be purchased separately.
... Others 3-piece set: XE5328-001 2-piece set (90/14 needle) 6 Screwdriver 7 Foot controller Note ● The included accessories vary depending on machine) SA156 SFB: XA5539-151 No. No. A A I I " XE9369-001 4 Bobbin (One is on the machine model. No. KNOWING YOUR SEWING MACHINE 1 KNOWING YOUR SEWING MACHINE ACCESSORIES We have designed these accessories to be purchased separately.
Operation Manual
Page 7
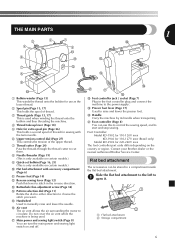
... transporting. E Handwheel Used to the power supply. K Foot controller (Page 8) You can be stored in the foot controller plug and connect the machine to manually raise and lower the needle. F Air vent The air vent allows the air surrounding the motor to 1 open it. 1 2 1... (Page 13) This winds the thread onto the bobbin for use this lever to start and stop sewing. Slide the flat bed attachment to the left to circulate. Contact your Brother dealer or the nearest authorized Brother Service Center. I K G H H Foot controller jack / socket (Page 7) Plug in a compartment...
... transporting. E Handwheel Used to the power supply. K Foot controller (Page 8) You can be stored in the foot controller plug and connect the machine to manually raise and lower the needle. F Air vent The air vent allows the air surrounding the motor to 1 open it. 1 2 1... (Page 13) This winds the thread onto the bobbin for use this lever to start and stop sewing. Slide the flat bed attachment to the left to circulate. Contact your Brother dealer or the nearest authorized Brother Service Center. I K G H H Foot controller jack / socket (Page 7) Plug in a compartment...
Operation Manual
Page 8
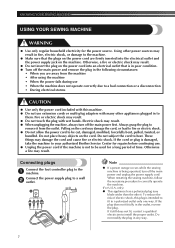
...the machine to your authorized Brother Service Center for repairs before continuing use. ● Unplug the power cord if the machine is intended to be cut, damaged, modified, forcefully bent, pulled, twisted, or bundled. Note ● If a power outage occurs while the sewing machine is...Otherwise a fire may damage the cord and cause fire or electric shock. When restarting the sewing machine, follow the necessary procedure to heat. KNOWING YOUR SEWING MACHINE USING YOUR SEWING MACHINE WARNING ● Use only regular household electricity for a long period of electric shock, this...
...the machine to your authorized Brother Service Center for repairs before continuing use. ● Unplug the power cord if the machine is intended to be cut, damaged, modified, forcefully bent, pulled, twisted, or bundled. Note ● If a power outage occurs while the sewing machine is...Otherwise a fire may damage the cord and cause fire or electric shock. When restarting the sewing machine, follow the necessary procedure to heat. KNOWING YOUR SEWING MACHINE USING YOUR SEWING MACHINE WARNING ● Use only regular household electricity for a long period of electric shock, this...

Operation Manual
Page 9
... foot lever. 3 1 1 Presser foot lever 8 Check the needle from the top and the sides. The product code is accidentally pressed and the machine starts sewing. ● Only use sewing machine needles for smooth sewing. 1 2 1 Turn on (toward the 'I' mark) 2 Turn off (toward you change the needle. Other needles may start unexpectedly and cause personal injury...
... foot lever. 3 1 1 Presser foot lever 8 Check the needle from the top and the sides. The product code is accidentally pressed and the machine starts sewing. ● Only use sewing machine needles for smooth sewing. 1 2 1 Turn on (toward the 'I' mark) 2 Turn off (toward you change the needle. Other needles may start unexpectedly and cause personal injury...
Operation Manual
Page 10
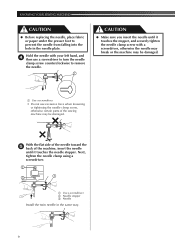
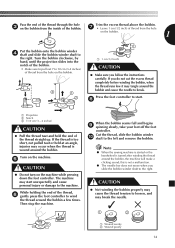
KNOWING YOUR SEWING MACHINE CAUTION ● Before replacing the needle, place..., and 4 then use excessive force when loosening or tightening the needle clamp screw, otherwise certain parts of the machine, insert the needle until it touches the needle stopper. Next, tighten the needle clamp using a screwdriver. 2 ...machine may be damaged. 1 Use a screwdriver • Do not use a screwdriver to turn the needle clamp screw counterclockwise to prevent the needle from falling into the hole in the same way. 9 With the flat side of the needle toward the 5 back of the sewing machine...
KNOWING YOUR SEWING MACHINE CAUTION ● Before replacing the needle, place..., and 4 then use excessive force when loosening or tightening the needle clamp screw, otherwise certain parts of the machine, insert the needle until it touches the needle stopper. Next, tighten the needle clamp using a screwdriver. 2 ...machine may be damaged. 1 Use a screwdriver • Do not use a screwdriver to turn the needle clamp screw counterclockwise to prevent the needle from falling into the hole in the same way. 9 With the flat side of the needle toward the 5 back of the sewing machine...
Operation Manual
Page 11
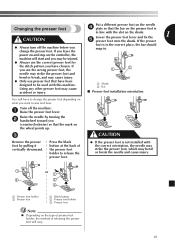
...or | 1 2 |2 | | 3 | 1 Presser foot holder 2 Presser foot | | 1 2 Black button Presser foot holder | 3 Presser foot CAUTION ● If the presser foot is not installed with this machine. If you use the wrong presser foot, the 1 2 needle may strike the presser foot and bend or break, and may cause injury. ● Only use... change the presser foot depending on what you may be injured. ● Always use presser feet that have been designed to sew and how. Using any other presser foot may bend or break the needle and cause injury. Lower the presser foot lever and...
...or | 1 2 |2 | | 3 | 1 Presser foot holder 2 Presser foot | | 1 2 Black button Presser foot holder | 3 Presser foot CAUTION ● If the presser foot is not installed with this machine. If you use the wrong presser foot, the 1 2 needle may strike the presser foot and bend or break, and may cause injury. ● Only use... change the presser foot depending on what you may be injured. ● Always use presser feet that have been designed to sew and how. Using any other presser foot may bend or break the needle and cause injury. Lower the presser foot lever and...

Operation Manual
Page 12
..., 35, 36, 38, 39 11 If the needle is in the down position when you (counterclockwise) so that the mark on certain models. KNOWING YOUR SEWING MACHINE THE CONTROLS Pattern selection dial CAUTION ● When you use the pattern selection dial to choose a pattern, raise the needle by turning the handwheel toward...
..., 35, 36, 38, 39 11 If the needle is in the down position when you (counterclockwise) so that the mark on certain models. KNOWING YOUR SEWING MACHINE THE CONTROLS Pattern selection dial CAUTION ● When you use the pattern selection dial to choose a pattern, raise the needle by turning the handwheel toward...
Operation Manual
Page 13
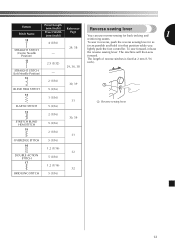
...machine will then sew forward. 11 2.5 (3/32) The length of reverse stitches is fixed at 2 mm (1/16 inch). 29, 36, 38 STRAIGHT STITCH (Left Needle Position) - 12 2 (1/16) 30, 39 1 BLIND HEM STITCH 5 (3/16) 13 1 (1/16) 31 ELASTIC STITCH 5 (3/16) 1 Reverse sewing ...5 (3/16) 1.2 (1/16) 5 (3/16) 30, 39 31 32 32 12 To sew forward, release the reverse sewing lever. Pattern Preset Length (mm (inch)) Reference Reverse sewing lever Stitch Name Preset Width (mm (inch)) Page You can use reverse sewing for back tacking and 1 10 STRAIGHT STITCH (Center Needle Position) 4 (3/16) - ...
...machine will then sew forward. 11 2.5 (3/32) The length of reverse stitches is fixed at 2 mm (1/16 inch). 29, 36, 38 STRAIGHT STITCH (Left Needle Position) - 12 2 (1/16) 30, 39 1 BLIND HEM STITCH 5 (3/16) 13 1 (1/16) 31 ELASTIC STITCH 5 (3/16) 1 Reverse sewing ...5 (3/16) 1.2 (1/16) 5 (3/16) 30, 39 31 32 32 12 To sew forward, release the reverse sewing lever. Pattern Preset Length (mm (inch)) Reference Reverse sewing lever Stitch Name Preset Width (mm (inch)) Page You can use reverse sewing for back tacking and 1 10 STRAIGHT STITCH (Center Needle Position) 4 (3/16) - ...

Operation Manual
Page 14
...9679; If the spool of the same type (part code: SA156, SFB: XA5539-151). Using other models, the machine will not work properly. KNOWING YOUR SEWING MACHINE THREADING THE MACHINE Winding the bobbin CAUTION ● We designed the bobbin that comes with your right hand, pass the thread toward ...you use the bobbin that comes with this machine or bobbins of thread is in the groove on this pin....
...9679; If the spool of the same type (part code: SA156, SFB: XA5539-151). Using other models, the machine will not work properly. KNOWING YOUR SEWING MACHINE THREADING THE MACHINE Winding the bobbin CAUTION ● We designed the bobbin that comes with your right hand, pass the thread toward ...you use the bobbin that comes with this machine or bobbins of thread is in the groove on this pin....
Operation Manual
Page 15
... (1/2 inch) of the thread straight up. Cut the thread, slide the bobbin winder 0 shaft to the machine. If you slide the bobbin winder shaft to the right. Note ● When the sewing machine is started or the handwheel is wound around the bobbin and cause the needle to the right. Press... the foot controller to start unexpectedly and cause personal injury or damage to the left and remove the bobbin. Turn on the machine. 5 CAUTION ● Do...
... (1/2 inch) of the thread straight up. Cut the thread, slide the bobbin winder 0 shaft to the machine. If you slide the bobbin winder shaft to the right. Note ● When the sewing machine is started or the handwheel is wound around the bobbin and cause the needle to the right. Press... the foot controller to start unexpectedly and cause personal injury or damage to the left and remove the bobbin. Turn on the machine. 5 CAUTION ● Do...
Operation Manual
Page 16
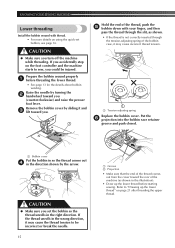
...Put the bobbin in so the thread comes out 4 in the right direction. CAUTION ● Make sure you turn off the machine while threading. KNOWING YOUR SEWING MACHINE Lower threading Install the bobbin wound with your finger, and then pass the thread through the slit, as shown in the illustration)....inserted through the tension-adjusting spring of the thread comes out from the cover toward you accidentally step on the foot controller and the machine starts to be injured. If you (counterclockwise) and raise the presser foot lever. Raise the needle by the arrow. Prepare the ...
...Put the bobbin in so the thread comes out 4 in the right direction. CAUTION ● Make sure you turn off the machine while threading. KNOWING YOUR SEWING MACHINE Lower threading Install the bobbin wound with your finger, and then pass the thread through the slit, as shown in the illustration)....inserted through the tension-adjusting spring of the thread comes out from the cover toward you accidentally step on the foot controller and the machine starts to be injured. If you (counterclockwise) and raise the presser foot lever. Raise the needle by the arrow. Prepare the ...
Operation Manual
Page 18
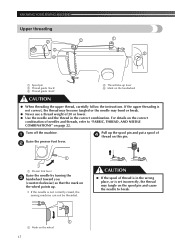
...bend or break. ● Never use a thread weight of needles and threads, refer to break. 1 1 Mark on page 22. Turn off the machine. 1 Raise the presser foot lever. 2 Pull up . • If the needle is in the correct combination. CAUTION ● If the spool of... the 3 handwheel toward you (counterclockwise) so that the mark on the handwheel CAUTION ● When threading the upper thread, carefully follow the instructions. KNOWING YOUR SEWING MACHINE Upper threading 2 2 3 4 1 5 1 Spool pin 2 Thread guide (back) 3 Thread guide (front) 4 Thread take-up lever 5 Mark on the ...
...bend or break. ● Never use a thread weight of needles and threads, refer to break. 1 1 Mark on page 22. Turn off the machine. 1 Raise the presser foot lever. 2 Pull up . • If the needle is in the correct combination. CAUTION ● If the spool of... the 3 handwheel toward you (counterclockwise) so that the mark on the handwheel CAUTION ● When threading the upper thread, carefully follow the instructions. KNOWING YOUR SEWING MACHINE Upper threading 2 2 3 4 1 5 1 Spool pin 2 Thread guide (back) 3 Thread guide (front) 4 Thread take-up lever 5 Mark on the ...

Operation Manual
Page 19
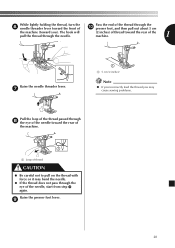
... lever Memo ● If the thread take -up lever before you feed the upper thread. ● If you incorrectly feed the thread you may cause sewing problems. 18 toward you (counterclockwise) so that the spring in the groove catches the thread. thread in your left as shown in the groove on... sure that the mark on the thread guide. • The thread can easily be wrapped around the thread take-up lever is equipped with your sewing machine is lowered, the upper thread can not be passed behind the guide above the 8 needle. Make sure you raise the presser foot lever and the...
... lever Memo ● If the thread take -up lever before you feed the upper thread. ● If you incorrectly feed the thread you may cause sewing problems. 18 toward you (counterclockwise) so that the spring in the groove catches the thread. thread in your left as shown in the groove on... sure that the mark on the thread guide. • The thread can easily be wrapped around the thread take-up lever is equipped with your sewing machine is lowered, the upper thread can not be passed behind the guide above the 8 needle. Make sure you raise the presser foot lever and the...

Operation Manual
Page 20
... refer to make sure that the hook grabs it. 19 Lower the presser foot lever. 2 Make sure that the hook passes through 100/16 home sewing machine needle. Make sure that the mark on the wheel 1 12 1 Hook 2 Thread • Hold the thread in the following illustration. 1 While... to "Upper threading" on certain models. When using the needle threader. However, the needle threader cannot be used with a 65/9 home sewing machine needle. KNOWING YOUR SEWING MACHINE Using the needle threader (for models equipped with a needle threader) This feature is only available on page 17.
... refer to make sure that the hook grabs it. 19 Lower the presser foot lever. 2 Make sure that the hook passes through 100/16 home sewing machine needle. Make sure that the mark on the wheel 1 12 1 Hook 2 Thread • Hold the thread in the following illustration. 1 While... to "Upper threading" on certain models. When using the needle threader. However, the needle threader cannot be used with a 65/9 home sewing machine needle. KNOWING YOUR SEWING MACHINE Using the needle threader (for models equipped with a needle threader) This feature is only available on page 17.
Operation Manual
Page 21
... hook will pull the thread through the needle. (2 inches) of thread toward the rear of the machine. 1 Raise the needle threader lever. 7 1 1 5 cm (2 inches) Note ● If you incorrectly feed the thread you may cause sewing problems. Pull the loop of the thread passed through the eye of the needle toward you...
... hook will pull the thread through the needle. (2 inches) of thread toward the rear of the machine. 1 Raise the needle threader lever. 7 1 1 5 cm (2 inches) Note ● If you incorrectly feed the thread you may cause sewing problems. Pull the loop of the thread passed through the eye of the needle toward you...

Operation Manual
Page 22
... steps 1 to 3. Pull on the upper thread to lower and then raise the needle. ■ For models equipped with a quick-set bobbin You can begin sewing immediately without cutting it. Draw up the lower thread as described in the 2 direction of the arrow, and leave it there without drawing up the... can draw up the lower thread by hand to draw up the 2 lower thread. 1 2 1 • The bobbin cover should still be left over. KNOWING YOUR SEWING MACHINE Drawing up the lower thread While lightly holding the end of the upper 1 thread, slowly turn the handwheel toward the back of the...
... steps 1 to 3. Pull on the upper thread to lower and then raise the needle. ■ For models equipped with a quick-set bobbin You can begin sewing immediately without cutting it. Draw up the lower thread as described in the 2 direction of the arrow, and leave it there without drawing up the... can draw up the lower thread by hand to draw up the 2 lower thread. 1 2 1 • The bobbin cover should still be left over. KNOWING YOUR SEWING MACHINE Drawing up the lower thread While lightly holding the end of the upper 1 thread, slowly turn the handwheel toward the back of the...
Operation Manual
Page 23
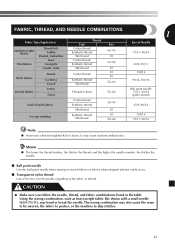
The wrong combination may also cause the seam to be uneven, the fabric to pucker, or the machine to 100/16 needle, regardless of Needle 75/11-90/14 65/9-75/11 100/16 90/14-... the needle. and the higher the needle number, the thicker the needle. ■ Ball point needle Use the ball point needle when sewing on stretch fabrics or fabrics where skipped stitches easily occur. ■ Transparent nylon thread Use a 90/14 to skip stitches. 22 CAUTION...; Using the wrong combination, such as heavyweight fabric like denim with a small needle (65/9-75/11), may cause machine malfunction.
The wrong combination may also cause the seam to be uneven, the fabric to pucker, or the machine to 100/16 needle, regardless of Needle 75/11-90/14 65/9-75/11 100/16 90/14-... the needle. and the higher the needle number, the thicker the needle. ■ Ball point needle Use the ball point needle when sewing on stretch fabrics or fabrics where skipped stitches easily occur. ■ Transparent nylon thread Use a 90/14 to skip stitches. 22 CAUTION...; Using the wrong combination, such as heavyweight fabric like denim with a small needle (65/9-75/11), may cause machine malfunction.
Operation Manual
Page 24
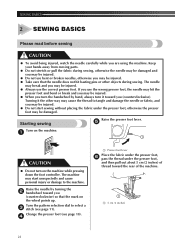
... needle may break and you turn the handwheel by turning the 2 handwheel toward you may start sewing without placing the fabric under the presser foot, and then pull out about 5 cm (2 inches) of the machine. 1 1 5 cm (2 inches) 23 Change the presser foot (see page 11). If... (counterclockwise). Turning it toward the rear of thread toward you are using the machine. Starting sewing Raise the presser foot lever. 5 Turn on the machine. 1 1 CAUTION ● Do not turn it the other objects during sewing, otherwise the needle may be damaged and you may be injured. ●...
... needle may break and you turn the handwheel by turning the 2 handwheel toward you may start sewing without placing the fabric under the presser foot, and then pull out about 5 cm (2 inches) of the machine. 1 1 5 cm (2 inches) 23 Change the presser foot (see page 11). If... (counterclockwise). Turning it toward the rear of thread toward you are using the machine. Starting sewing Raise the presser foot lever. 5 Turn on the machine. 1 1 CAUTION ● Do not turn it the other objects during sewing, otherwise the needle may be damaged and you may be injured. ●...


