
Operation Manual
Page 2
...8226; Never drop or insert any object into the electrical outlet. Do not use the machine. Return the machine to the nearest authorized Brother dealer or service center for use extension cords. If you are not sure what kind of power source you are being administered. 1 IMPORTANT...careless movements, otherwise you notice anything unusual, such as an odor, heat, discoloration or deformation, stop using , when cleaning, when making any other part may injure your back or knees. 5 Always keep your machine if the power is cut. 3 Electrical Hazards: • This machine should be ...
...8226; Never drop or insert any object into the electrical outlet. Do not use the machine. Return the machine to the nearest authorized Brother dealer or service center for use extension cords. If you are not sure what kind of power source you are being administered. 1 IMPORTANT...careless movements, otherwise you notice anything unusual, such as an odor, heat, discoloration or deformation, stop using , when cleaning, when making any other part may injure your back or knees. 5 Always keep your machine if the power is cut. 3 Electrical Hazards: • This machine should be ...
Operation Manual
Page 3
... the machine near a space heater, iron, halogen lamp, or other parts to assure correct installation. 9 For repair or adjustment: • If the light unit (light-emitting diode) is damaged, it must be replaced by authorized Brother Service Center. • In the event a malfunction occurs or adjustment ...8226; When storing this manual. Use this product are subject to the needle. If the problem persists, please consult your local authorized Brother Service Center. Use accessories recommended by or near children. • The plastic bag that you do not deflect the needle and ...
... the machine near a space heater, iron, halogen lamp, or other parts to assure correct installation. 9 For repair or adjustment: • If the light unit (light-emitting diode) is damaged, it must be replaced by authorized Brother Service Center. • In the event a malfunction occurs or adjustment ...8226; When storing this manual. Use this product are subject to the needle. If the problem persists, please consult your local authorized Brother Service Center. Use accessories recommended by or near children. • The plastic bag that you do not deflect the needle and ...

Operation Manual
Page 5
...;s 36 USING OPTIONAL ACCESSORIES 37 Sewing buttons 37 Darning 38 Using the blind stitch foot 39 6. KNOWING YOUR SEWING MACHINE 5 ACCESSORIES 5 Optional accessories 5 THE MAIN PARTS 6 Flat bed attachment 6 USING YOUR SEWING MACHINE 7 Connecting plugs 7 Main power and sewing light switch 8 Foot controller 8 Checking the needle 8 Replacing the needle 8 Changing the...
...;s 36 USING OPTIONAL ACCESSORIES 37 Sewing buttons 37 Darning 38 Using the blind stitch foot 39 6. KNOWING YOUR SEWING MACHINE 5 ACCESSORIES 5 Optional accessories 5 THE MAIN PARTS 6 Flat bed attachment 6 USING YOUR SEWING MACHINE 7 Connecting plugs 7 Main power and sewing light switch 8 Foot controller 8 Checking the needle 8 Replacing the needle 8 Changing the...
Operation Manual
Page 6
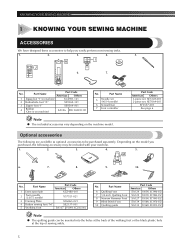
...: XC1976-052 SA132 F016N: XC2215-052 Note ● The quilting guide can be included with your machine. 1. 2. 3. 4. 5. Part Name Part Code Americas Others 1 Extra spool pin XG3488-001 2 Twin needle (2.0/75 needle) X57521-021 3 Darning Plate XC6063-021 4 Button sewing... foot "M" XE2137-001 5 Walking Foot SA107 F034N: XC2165-002 No. Part Name Part Code Americas Others 1 Zigzag foot "J" (on machine) XC4901-121 2 Buttonhole foot "A" X59369-321 3 Zipper foot "I JJ 6. 7. KNOWING...
...: XC1976-052 SA132 F016N: XC2215-052 Note ● The quilting guide can be included with your machine. 1. 2. 3. 4. 5. Part Name Part Code Americas Others 1 Extra spool pin XG3488-001 2 Twin needle (2.0/75 needle) X57521-021 3 Darning Plate XC6063-021 4 Button sewing... foot "M" XE2137-001 5 Walking Foot SA107 F034N: XC2165-002 No. Part Name Part Code Americas Others 1 Zigzag foot "J" (on machine) XC4901-121 2 Buttonhole foot "A" X59369-321 3 Zipper foot "I JJ 6. 7. KNOWING...
Operation Manual
Page 7
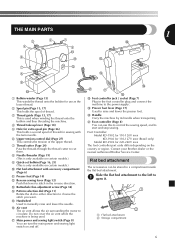
... for 110-120V area KD-1902 for 110-127V area (Brazil only) Model KD-2902 for 220-240V area The foot controller part code differs depending on and off. Flat bed attachment The accessories can turn the main power and sewing light switch on the country... or region. Contact your Brother dealer or the nearest authorized Brother Service Center. THE MAIN PARTS 3 2 1 1 J 4 5 D 6 C E 7 B 8 F 9 0 A 1 Bobbin winder (Page 13) This winds the thread onto the bobbin for use this ...
... for 110-120V area KD-1902 for 110-127V area (Brazil only) Model KD-2902 for 220-240V area The foot controller part code differs depending on and off. Flat bed attachment The accessories can turn the main power and sewing light switch on the country... or region. Contact your Brother dealer or the nearest authorized Brother Service Center. THE MAIN PARTS 3 2 1 1 J 4 5 D 6 C E 7 B 8 F 9 0 A 1 Bobbin winder (Page 13) This winds the thread onto the bobbin for use this ...
Operation Manual
Page 10
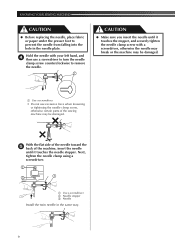
... of the sewing machine may be damaged. 1 Use a screwdriver • Do not use excessive force when loosening or tightening the needle clamp screw, otherwise certain parts of the machine, insert the needle until it touches the needle stopper.
... of the sewing machine may be damaged. 1 Use a screwdriver • Do not use excessive force when loosening or tightening the needle clamp screw, otherwise certain parts of the machine, insert the needle until it touches the needle stopper.

Operation Manual
Page 14
... the thread guide. If you , in completely. 2 3 1 Pre-tension disk 2 Bobbin winder shaft Pull up the spool pin and put a spool of the same type (part code: SA156, SFB: XA5539-151).
... the thread guide. If you , in completely. 2 3 1 Pre-tension disk 2 Bobbin winder shaft Pull up the spool pin and put a spool of the same type (part code: SA156, SFB: XA5539-151).
Operation Manual
Page 24
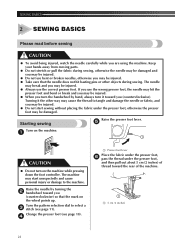
... placing the fabric under the presser foot, and then pull out about 5 cm (2 inches) of thread toward you (counterclockwise). Keep your hands away from moving parts. ● Do not stretch or pull the fabric during sewing. If you use the wrong presser foot, the needle may hit the presser foot and...
... placing the fabric under the presser foot, and then pull out about 5 cm (2 inches) of thread toward you (counterclockwise). Keep your hands away from moving parts. ● Do not stretch or pull the fabric during sewing. If you use the wrong presser foot, the needle may hit the presser foot and...
Operation Manual
Page 26
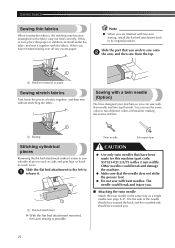
... fabrics When sewing thin fabrics, the stitching may become misaligned or the fabric may not feed correctly. The flat side of thread for this machine (part code: X57521-021:2.0/75 with a 2 mm width). When you have been made for making decorative stitches. 1 1 Basting Twin needle Extra spool pin Stitching ... under the fabric and sew it . 1 1 Flat bed attachment With the flat bed attachment removed, free-arm sewing is possible. Slide the part that the needle does not strike the presser foot. ● Do not sew with the fabric. If this needle and two top threads.
... fabrics When sewing thin fabrics, the stitching may become misaligned or the fabric may not feed correctly. The flat side of thread for this machine (part code: X57521-021:2.0/75 with a 2 mm width). When you have been made for making decorative stitches. 1 1 Basting Twin needle Extra spool pin Stitching ... under the fabric and sew it . 1 1 Flat bed attachment With the flat bed attachment removed, free-arm sewing is possible. Slide the part that the needle does not strike the presser foot. ● Do not sew with the fabric. If this needle and two top threads.

Operation Manual
Page 32
... presser foot. • If the seam allowance is wider than the stitch pattern, trim away any excess fabric after stitching. BUILT-IN STITCHES Slide the part that you (counterclockwise) until the needle slightly catches the fold of the hem when the needle comes to the left end of the stitch. 1 Wrong...
... presser foot. • If the seam allowance is wider than the stitch pattern, trim away any excess fabric after stitching. BUILT-IN STITCHES Slide the part that you (counterclockwise) until the needle slightly catches the fold of the hem when the needle comes to the left end of the stitch. 1 Wrong...
Operation Manual
Page 42
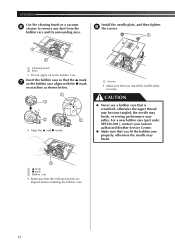
... • Do not apply oil to remove any dust from the bobbin race and its surrounding area. For a new bobbin case (part code: XE9326-001), contact your nearest authorized Brother Service Center. ● Make sure that the indicated points are aligned before installing the bobbin case. 41 otherwise the upper thread may...
... • Do not apply oil to remove any dust from the bobbin race and its surrounding area. For a new bobbin case (part code: XE9326-001), contact your nearest authorized Brother Service Center. ● Make sure that the indicated points are aligned before installing the bobbin case. 41 otherwise the upper thread may...
Operation Manual
Page 46
... F Fabric, thread, and needle combinations ...... 22 Flat bed attachment 6 Foot controller 8 Free-arm style 25 G Gathering 36 H Handwheel 17 L Light switch 8 Lower threading 15 M Main parts 6 Main power 8 Maintenance 40 N Needle checking 8 combinations with fabric and thread ......... 22 replacing 8 Needle threader 19 O Overedge stitching 31 P Pattern selection dial 11 Patterns 11...
... F Fabric, thread, and needle combinations ...... 22 Flat bed attachment 6 Foot controller 8 Free-arm style 25 G Gathering 36 H Handwheel 17 L Light switch 8 Lower threading 15 M Main parts 6 Main power 8 Maintenance 40 N Needle checking 8 combinations with fabric and thread ......... 22 replacing 8 Needle threader 19 O Overedge stitching 31 P Pattern selection dial 11 Patterns 11...


