
Operation Manual
Page 2
... the proper needle plate. IMPORTANT SAFETY INSTRUCTIONS When using the sewing machine, basic safety precautions should never be followed, including the following: "Read all moving parts. To reduce the risk of lint, dust and loose cloth. 5. Always unplug before cleaning. 2. WARNING - Use only accessories recommended by pulling on the cord. Do...
... the proper needle plate. IMPORTANT SAFETY INSTRUCTIONS When using the sewing machine, basic safety precautions should never be followed, including the following: "Read all moving parts. To reduce the risk of lint, dust and loose cloth. 5. Always unplug before cleaning. 2. WARNING - Use only accessories recommended by pulling on the cord. Do...

Operation Manual
Page 3
...the plug fuse, use . Always consult the operation manual when replacing or installing any other moving parts. 2. For additional product information and updates, visit our web site at www.brother.com The contents of this machine, avoid direct sunlight and high humidity locations. Be sure to... is not intended for use by a person responsible for their safety. Do not touch the handwheel, thread take- up lever, needle, or other parts • A power failure occurs during use extension cords. Do not store anything on the foot controller. 4. For a longer service life 1. If...
...the plug fuse, use . Always consult the operation manual when replacing or installing any other moving parts. 2. For additional product information and updates, visit our web site at www.brother.com The contents of this machine, avoid direct sunlight and high humidity locations. Be sure to... is not intended for use by a person responsible for their safety. Do not touch the handwheel, thread take- up lever, needle, or other parts • A power failure occurs during use extension cords. Do not store anything on the foot controller. 4. For a longer service life 1. If...

Operation Manual
Page 4
... thick fabrics ...25 Sewing thin fabrics ...26 Sewing stretch fabrics ...26 Using a free-arm style ...26 3. KNOWING YOUR SEWING MACHINE 5 NAMES OF MACHINE PARTS AND THEIR FUNCTIONS 5 The main parts ...5 Needle and presser foot section ...6 Flat bed attachment ...6 ACCESSORIES ...7 OPTIONAL ACCESSORIES 7 USING YOUR SEWING MACHINE 8 Power supply precautions ...8 Power supply ...8 Foot controller...
... thick fabrics ...25 Sewing thin fabrics ...26 Sewing stretch fabrics ...26 Using a free-arm style ...26 3. KNOWING YOUR SEWING MACHINE 5 NAMES OF MACHINE PARTS AND THEIR FUNCTIONS 5 The main parts ...5 Needle and presser foot section ...6 Flat bed attachment ...6 ACCESSORIES ...7 OPTIONAL ACCESSORIES 7 USING YOUR SEWING MACHINE 8 Power supply precautions ...8 Power supply ...8 Foot controller...

Operation Manual
Page 6
...tension disc is not uniform. i Bobbin winder (page 10) The bobbin winder winds thread onto the bobbin for 220-240V area The foot controller part code differs depending on and off the main power and sewing light. j Handwheel Use the handwheel to cut them. b Pattern selection dial (page... sewing speed and to raise and lower the presser foot. KNOWING YOUR SEWING MACHINE 1 KNOWING YOUR SEWING MACHINE NAMES OF MACHINE PARTS AND THEIR FUNCTIONS The main parts a Buttonhole fine-adjusting screw (page 32) Turn the buttonhole fine-adjusting screw to select the number of thread. c Thread ...
...tension disc is not uniform. i Bobbin winder (page 10) The bobbin winder winds thread onto the bobbin for 220-240V area The foot controller part code differs depending on and off the main power and sewing light. j Handwheel Use the handwheel to cut them. b Pattern selection dial (page... sewing speed and to raise and lower the presser foot. KNOWING YOUR SEWING MACHINE 1 KNOWING YOUR SEWING MACHINE NAMES OF MACHINE PARTS AND THEIR FUNCTIONS The main parts a Buttonhole fine-adjusting screw (page 32) Turn the buttonhole fine-adjusting screw to select the number of thread. c Thread ...

Operation Manual
Page 8
...LX3014. ● The screw of the presser foot holder is available through your authorized dealer. (Part code: 132730-122) ● A replacement for the factory-installed presser foot is available through your authorized dealer. (Part number: 138135-122) 1. 2. 3. 4. 5. 6. 7. 90/14 needle No. Part Name Part...Darning plate XA3442-121 OPTIONAL ACCESSORIES 1. 2. No. Part Name 1 Extra spool pin 2 Twin needle 7 Part Code Americas Others 130920-021 X57521-021 Part Name 5 Bobbin 6 Needle set 7 Oval screwdriver Part Code Americas Others SA156 SFB:XA5539-151 XE5328-001 ...
...LX3014. ● The screw of the presser foot holder is available through your authorized dealer. (Part code: 132730-122) ● A replacement for the factory-installed presser foot is available through your authorized dealer. (Part number: 138135-122) 1. 2. 3. 4. 5. 6. 7. 90/14 needle No. Part Name Part...Darning plate XA3442-121 OPTIONAL ACCESSORIES 1. 2. No. Part Name 1 Extra spool pin 2 Twin needle 7 Part Code Americas Others 130920-021 X57521-021 Part Name 5 Bobbin 6 Needle set 7 Oval screwdriver Part Code Americas Others SA156 SFB:XA5539-151 XE5328-001 ...

Operation Manual
Page 11
... spring on the sewing machine. Turn the bobbin clockwise, by hand, until the spring on the shaft slides into the groove of the same type (part code: SA156, SFB: XA5539-151).
... spring on the sewing machine. Turn the bobbin clockwise, by hand, until the spring on the shaft slides into the groove of the same type (part code: SA156, SFB: XA5539-151).

Operation Manual
Page 12
... thread runs low it may cause the thread tension to loosen, breaking the needle and resulting in injury. If you could be injured. ● Moving parts - To reduce the risk of thread from supply circuit before servicing. Disconnect from the hole on the foot controller and the machine starts to the...
... thread runs low it may cause the thread tension to loosen, breaking the needle and resulting in injury. If you could be injured. ● Moving parts - To reduce the risk of thread from supply circuit before servicing. Disconnect from the hole on the foot controller and the machine starts to the...

Operation Manual
Page 18
... by turning it clockwise. a Oval screwdriver b Needle clamp screw • Do not apply strong force when loosening or tightening the needle clamp screw, otherwise certain parts of the needle bar, and then tighten the needle clamp screw. a Needle bar b Needle holder c Needle clamp screw d Align 17 Note ● The needle can...
... by turning it clockwise. a Oval screwdriver b Needle clamp screw • Do not apply strong force when loosening or tightening the needle clamp screw, otherwise certain parts of the needle bar, and then tighten the needle clamp screw. a Needle bar b Needle holder c Needle clamp screw d Align 17 Note ● The needle can...
Operation Manual
Page 19
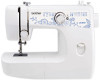
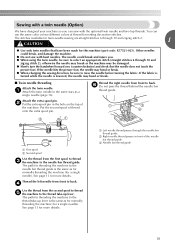
... the needle does not touch the presser foot. f Do not pass the thread behind the needle bar thread guide. The stitches available for this machine (part code: X57521-021). You can sew with bent needles. Attach the extra spool pin. See page 13 for making decorative stitches.
... the needle does not touch the presser foot. f Do not pass the thread behind the needle bar thread guide. The stitches available for this machine (part code: X57521-021). You can sew with bent needles. Attach the extra spool pin. See page 13 for making decorative stitches.
Operation Manual
Page 22
... sew. 1 Turn on selecting a stitch, refer to "Replacing the presser foot" (page 19). ↓ 4 Start sewing. In addition, keep your hands away from all moving parts such as the needle and handwheel, otherwise injuries may occur. ● Do not pull or push the fabric too hard while sewing, otherwise injuries may...
... sew. 1 Turn on selecting a stitch, refer to "Replacing the presser foot" (page 19). ↓ 4 Start sewing. In addition, keep your hands away from all moving parts such as the needle and handwheel, otherwise injuries may occur. ● Do not pull or push the fabric too hard while sewing, otherwise injuries may...
Operation Manual
Page 30
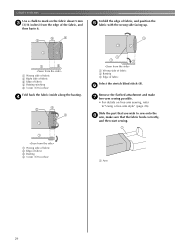
...-arm sewing possible. • For details on the fabric about 5 mm c (3/16 inches) from the edge of the fabric, and then baste it. Slide the part that the fabric feeds correctly, and then start sewing. a Wrong side of fabric b Edge of fabric Select the stretch blind stitch (8). d a Wrong side of fabric...
...-arm sewing possible. • For details on the fabric about 5 mm c (3/16 inches) from the edge of the fabric, and then baste it. Slide the part that the fabric feeds correctly, and then start sewing. a Wrong side of fabric b Edge of fabric Select the stretch blind stitch (8). d a Wrong side of fabric...
Operation Manual
Page 32
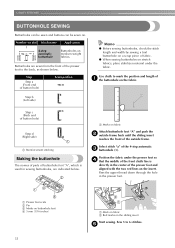
... of the 4-step automatic c buttonhole (1). Step b 1 (Left side) Step c (Back end of button hole) Step d (Right side) a Reinforcement stitching Making the buttonhole The names of parts of buttonhole foot "A", which is directly in the presser foot. Select stitch "a" of fabric. ● When sewing buttonholes on the fabric. Pass the upper thread...
... of the 4-step automatic c buttonhole (1). Step b 1 (Left side) Step c (Back end of button hole) Step d (Right side) a Reinforcement stitching Making the buttonhole The names of parts of buttonhole foot "A", which is directly in the presser foot. Select stitch "a" of fabric. ● When sewing buttonholes on the fabric. Pass the upper thread...

Operation Manual
Page 37
... g forefingers of both hands while pressing the fabric with the middle and third fingers, and support the outside of the hoop with stitches by moving parts, especially needles. Put the fabric in the embroidery hoop with d the surface of the fabric facing up the lower thread through the project f at a constant...
... g forefingers of both hands while pressing the fabric with the middle and third fingers, and support the outside of the hoop with stitches by moving parts, especially needles. Put the fabric in the embroidery hoop with d the surface of the fabric facing up the lower thread through the project f at a constant...
Operation Manual
Page 42
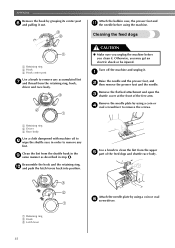
... . a Retaining ring b Driver c Race body Use a cloth dampened with machine oil to h wipe the shuttle race in order to clean the lint from the upper e part of the free arm. Otherwise, you clean it. Use a brush to remove any accumulated lint g and thread from the shuttle hook in the i same manner...
... . a Retaining ring b Driver c Race body Use a cloth dampened with machine oil to h wipe the shuttle race in order to clean the lint from the upper e part of the free arm. Otherwise, you clean it. Use a brush to remove any accumulated lint g and thread from the shuttle hook in the i same manner...

Operation Manual
Page 47
... extra spool pin 18 F feed dogs flat bed attachment 66,, 41 26 foot controller 23 free-arm style 26 G gathering 37 H handwheel 5 J joining 38 M main parts 5 main power switch 9 monogramming 35 N needle 15 needle needle needle pbcllaaarmtethpr.e.s.ac..dr.e..wg..u..i..d....e...66..,,...14. 716 O oiling 39 overcasting stitches 27 P pattern presser presser...
... extra spool pin 18 F feed dogs flat bed attachment 66,, 41 26 foot controller 23 free-arm style 26 G gathering 37 H handwheel 5 J joining 38 M main parts 5 main power switch 9 monogramming 35 N needle 15 needle needle needle pbcllaaarmtethpr.e.s.ac..dr.e..wg..u..i..d....e...66..,,...14. 716 O oiling 39 overcasting stitches 27 P pattern presser presser...


