
Users Guide
Page 2
... when the sewing machine is used by the manufacturer as threading the needle, changing the needle, threading the bobbin, or changing the presser foot. 15.Always unplug the sewing machine from the electrical outlet when removing covers, lubricating, or when making any object into water. Use...5. To unplug, grasp the plug and pull, not the cord. 10.Keep fingers away from the accumulation of the sewing machine and foot controller free from all instructions before changing the light bulb. IMPORTANT SAFETY INSTRUCTIONS When using the sewing machine, basic safety precautions should never...
... when the sewing machine is used by the manufacturer as threading the needle, changing the needle, threading the bobbin, or changing the presser foot. 15.Always unplug the sewing machine from the electrical outlet when removing covers, lubricating, or when making any object into water. Use...5. To unplug, grasp the plug and pull, not the cord. 10.Keep fingers away from the accumulation of the sewing machine and foot controller free from all instructions before changing the light bulb. IMPORTANT SAFETY INSTRUCTIONS When using the sewing machine, basic safety precautions should never...

Users Guide
Page 4
...MACHINE 5 NAMES OF MACHINE PARTS AND THEIR FUNCTIONS 5 The main parts ...5 Needle and presser foot section ...6 Flat bed attachment ...6 ACCESSORIES ...7 OPTIONAL ACCESSORIES 7 USING YOUR SEWING MACHINE 8 Power supply precautions ...8 Power supply ...8 Foot controller ...9 Steadying the machine ...9 THREADING THE MACHINE 10 Winding the bobbin ...10 Lower threading... the needle ...16 Replacing the needle ...16 Sewing with a twin needle (Option) ...18 REPLACING THE PRESSER FOOT 19 Replacing the presser foot ...19 Removing the presser foot holder ...20 2. CONTENTS CONTENTS ...3 1.
...MACHINE 5 NAMES OF MACHINE PARTS AND THEIR FUNCTIONS 5 The main parts ...5 Needle and presser foot section ...6 Flat bed attachment ...6 ACCESSORIES ...7 OPTIONAL ACCESSORIES 7 USING YOUR SEWING MACHINE 8 Power supply precautions ...8 Power supply ...8 Foot controller ...9 Steadying the machine ...9 THREADING THE MACHINE 10 Winding the bobbin ...10 Lower threading... the needle ...16 Replacing the needle ...16 Sewing with a twin needle (Option) ...18 REPLACING THE PRESSER FOOT 19 Replacing the presser foot ...19 Removing the presser foot holder ...20 2. CONTENTS CONTENTS ...3 1.

Users Guide
Page 6
... and lower the needle. k Handwheel Use the handwheel to set the stitch width. m Foot controller jack Insert the foot controller plug into the foot controller jack, which also supplies power to raise and lower the presser foot. o Presser foot lever (page 13) Use the presser foot lever to this machine. c Thread take-up lever (page 13) d Flat bed attachment...
... and lower the needle. k Handwheel Use the handwheel to set the stitch width. m Foot controller jack Insert the foot controller plug into the foot controller jack, which also supplies power to raise and lower the presser foot. o Presser foot lever (page 13) Use the presser foot lever to this machine. c Thread take-up lever (page 13) d Flat bed attachment...

Users Guide
Page 7
... pull the flat bed attachment out to hold the presser foot holder assembly in place. c Presser foot (Zigzag) The presser foot applies pressure consistently on the fabric as the sewing takes place. Attach the appropriate presser foot for sewing straight seams. f Shuttle hook g Shuttle...presser foot holder assembly. b Presser foot screw Use the presser foot screw to set the bobbin. d Feed dogs The feed dogs feed the fabric in a compartment inside the compartment. a Presser foot holder assembly The presser foot is marked with guides for the selected stitching. Needle and presser foot...
... pull the flat bed attachment out to hold the presser foot holder assembly in place. c Presser foot (Zigzag) The presser foot applies pressure consistently on the fabric as the sewing takes place. Attach the appropriate presser foot for sewing straight seams. f Shuttle hook g Shuttle...presser foot holder assembly. b Presser foot screw Use the presser foot screw to set the bobbin. d Feed dogs The feed dogs feed the fabric in a compartment inside the compartment. a Presser foot holder assembly The presser foot is marked with guides for the selected stitching. Needle and presser foot...

Users Guide
Page 8
...designed these accessories to help you be used on the following accessories are stored in the flat bed attachment. Part Name 1 Zipper foot "I" 2 Darning plate Part Code Americas Others No. Part Name X59370-021 (LS-2000/LS2250PRW) XE9369-001 (Others) 3 ...MACHINE ACCESSORIES The following machine models: LS-2000/LS2250PRW/LS2300PRW/LS2350/LX2375. ● The screw of the presser foot holder is available through your authorized dealer. (Part code: 132730-122) ● A replacement for the factory-installed presser foot is available through your authorized dealer. (Part number: 138135-122...
...designed these accessories to help you be used on the following accessories are stored in the flat bed attachment. Part Name 1 Zipper foot "I" 2 Darning plate Part Code Americas Others No. Part Name X59370-021 (LS-2000/LS2250PRW) XE9369-001 (Others) 3 ...MACHINE ACCESSORIES The following machine models: LS-2000/LS2250PRW/LS2300PRW/LS2350/LX2375. ● The screw of the presser foot holder is available through your authorized dealer. (Part code: 132730-122) ● A replacement for the factory-installed presser foot is available through your authorized dealer. (Part number: 138135-122...
Users Guide
Page 12
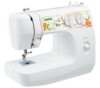
... make a clicking sound; Raise the needle to break. g • Leave 1 cm (1/2 inch) of injury. Press the foot controller to sew, you (counterclockwise) and raise the presser foot lever. 11 To reduce the risk of thread from supply circuit before servicing. Remove cover." a 7-10 cm (3-4 inches) Trim...9679; Make sure you follow the instructions carefully. KNOWING YOUR SEWING MACHINE While holding the end of the thread, gently press f the foot controller to loosen, breaking the needle and resulting in injury. Then stop the machine. Memo ● When the sewing machine is ...
... make a clicking sound; Raise the needle to break. g • Leave 1 cm (1/2 inch) of injury. Press the foot controller to sew, you (counterclockwise) and raise the presser foot lever. 11 To reduce the risk of thread from supply circuit before servicing. Remove cover." a 7-10 cm (3-4 inches) Trim...9679; Make sure you follow the instructions carefully. KNOWING YOUR SEWING MACHINE While holding the end of the thread, gently press f the foot controller to loosen, breaking the needle and resulting in injury. Then stop the machine. Memo ● When the sewing machine is ...

Users Guide
Page 14
a Raise the presser foot using the presser foot lever. a Presser foot lever Raise the needle by turning the handwheel c toward you (counterclockwise) to raise the thread take -up lever to turn the handwheel before threading the ...
a Raise the presser foot using the presser foot lever. a Presser foot lever Raise the needle by turning the handwheel c toward you (counterclockwise) to raise the thread take -up lever to turn the handwheel before threading the ...

Users Guide
Page 15
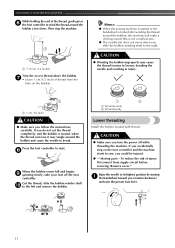
...the thread you may cause sewing problems. • Pull thread loop to finish threading process. Pull out about 5 cm (2 inches) of the machine under the presser foot. The thread can easily be wrapped around the thread take -up g lever from front to back and pull i out about 5 cm (2 inches) of ... sure you b (counterclockwise) to draw up the lower thread Lightly hold the end of both threads d and pull them toward you raise the presser foot lever and the thread take -up lever Put the thread behind the needle bar thread guide by holding the thread in your right hand. Turn...
...the thread you may cause sewing problems. • Pull thread loop to finish threading process. Pull out about 5 cm (2 inches) of the machine under the presser foot. The thread can easily be wrapped around the thread take -up g lever from front to back and pull i out about 5 cm (2 inches) of ... sure you b (counterclockwise) to draw up the lower thread Lightly hold the end of both threads d and pull them toward you raise the presser foot lever and the thread take -up lever Put the thread behind the needle bar thread guide by holding the thread in your right hand. Turn...

Users Guide
Page 17
a Flat side b Needle type marking ■ Correct needle Lower the presser foot lever. c 1 a Flat surface ■ Incorrect needle If the distance between the needle and the flat surface is even. 1 2 Replacing the needle Replace the needle as ... off the sewing machine, otherwise injuries may be skipped stitches. In addition, the stitching may be uneven or puckered or there may occur if the foot controller is bent. a Presser foot lever 1 a Flat surface 16
a Flat side b Needle type marking ■ Correct needle Lower the presser foot lever. c 1 a Flat surface ■ Incorrect needle If the distance between the needle and the flat surface is even. 1 2 Replacing the needle Replace the needle as ... off the sewing machine, otherwise injuries may be skipped stitches. In addition, the stitching may be uneven or puckered or there may occur if the foot controller is bent. a Presser foot lever 1 a Flat surface 16

Users Guide
Page 19
...stitches. 1 CAUTION ● Use only twin needles that have designed your machine so you (counterclockwise) and check that the needle does not touch the presser foot. Thread the right needle from the first spool to thread c the machine to back. a First spool b Second spool Use the thread from front to...needle bar thread guide. The needle could break, and damage the machine. ● Do not sew with bent needles. If the needle hits the presser foot, the needle may bend or break. ■ Twin needle threading Attach the twin needle. f Do not pass the thread behind the needle bar ...
...stitches. 1 CAUTION ● Use only twin needles that have designed your machine so you (counterclockwise) and check that the needle does not touch the presser foot. Thread the right needle from the first spool to thread c the machine to back. a First spool b Second spool Use the thread from front to...needle bar thread guide. The needle could break, and damage the machine. ● Do not sew with bent needles. If the needle hits the presser foot, the needle may bend or break. ■ Twin needle threading Attach the twin needle. f Do not pass the thread behind the needle bar ...

Users Guide
Page 20
... been designed to be read. Raise the presser foot lever. a Black button b Presser foot holder Place a different presser foot below . a Presser foot lever X The presser foot is accidentally pressed and the machine starts sewing. Raise the needle to be used with the shank in the presser foot holder. Position the presser foot so the letter indicating the presser foot type (A, I, etc.) is aligned with this machine...
... been designed to be read. Raise the presser foot lever. a Black button b Presser foot holder Place a different presser foot below . a Presser foot lever X The presser foot is accidentally pressed and the machine starts sewing. Raise the needle to be used with the shank in the presser foot holder. Position the presser foot so the letter indicating the presser foot type (A, I, etc.) is aligned with this machine...

Users Guide
Page 21
... to "Replacing the presser foot" (page 19). a • For details, refer to remove the presser foot holder. ■ Removing the presser foot holder Remove the presser foot. a Presser foot holder b Presser bar Hold the presser foot holder in your left side of the presser bar. 1 Removing the presser foot holder Remove the presser foot holder when cleaning the sewing machine or when installing a presser foot that the g presser foot is not correctly...
... to "Replacing the presser foot" (page 19). a • For details, refer to remove the presser foot holder. ■ Removing the presser foot holder Remove the presser foot. a Presser foot holder b Presser bar Hold the presser foot holder in your left side of the presser bar. 1 Removing the presser foot holder Remove the presser foot holder when cleaning the sewing machine or when installing a presser foot that the g presser foot is not correctly...

Users Guide
Page 22
.... For details on starting to sew, refer to "Starting to sew" (page 23). 21 For details on replacing the presser foot, refer to "Replacing the presser foot" (page 19). ↓ 4 Start sewing. General sewing procedure Follow the basic procedures below . When sewing is in injuries...described below to sew. 1 Turn on selecting a stitch, refer to "Stitch width knob" (page 22). ↓ 3 Attach the presser foot. Before operating the sewing machine, read the following precautions. Bent needles can easily break, possibly resulting in operation, pay special attention to the...
.... For details on starting to sew, refer to "Starting to sew" (page 23). 21 For details on replacing the presser foot, refer to "Replacing the presser foot" (page 19). ↓ 4 Start sewing. General sewing procedure Follow the basic procedures below . When sewing is in injuries...described below to sew. 1 Turn on selecting a stitch, refer to "Stitch width knob" (page 22). ↓ 3 Attach the presser foot. Before operating the sewing machine, read the following precautions. Bent needles can easily break, possibly resulting in operation, pay special attention to the...

Users Guide
Page 24
... toward you (counterclockwise) with your left side of the stitching. Raise the presser foot lever. g X The machine starts sewing. Press and hold down on the foot controller. Raise the presser foot lever. c a Presser foot lever Place the fabric under the presser foot, pass d the thread under the presser foot, and then pull out about 5 cm (2 inches) of the thread and the...
... toward you (counterclockwise) with your left side of the stitching. Raise the presser foot lever. g X The machine starts sewing. Press and hold down on the foot controller. Raise the presser foot lever. c a Presser foot lever Place the fabric under the presser foot, pass d the thread under the presser foot, and then pull out about 5 cm (2 inches) of the thread and the...

Users Guide
Page 26
... same conditions that are described below. Sewing curves Stop sewing, and then slightly change the sewing direction to obtain a finer stitch. Lower the presser foot lever and continue c sewing. 25 CAUTION ● If fabric more than 6 mm (15/64 inches) thick is sewn or if the ...results differ depending on the type of fabric sewn, perform the trial sewing under the presser foot, raise the presser foot lever even higher to bring the presser foot to these tips when sewing your project. Raise the presser foot lever, and then turn the b fabric. If the fabric is turned while the ...
... same conditions that are described below. Sewing curves Stop sewing, and then slightly change the sewing direction to obtain a finer stitch. Lower the presser foot lever and continue c sewing. 25 CAUTION ● If fabric more than 6 mm (15/64 inches) thick is sewn or if the ...results differ depending on the type of fabric sewn, perform the trial sewing under the presser foot, raise the presser foot lever even higher to bring the presser foot to these tips when sewing your project. Raise the presser foot lever, and then turn the b fabric. If the fabric is turned while the ...

Users Guide
Page 28
...for sewing plain seams. Stitch width 0 Stitch length F-4 Needle position M, L, R (For twin needle sewing, always set at M.) Presser foot Zigzag Needle Single or Twin Baste or pin together the fabric pieces. They are used for making buttonholes and decorative stitches or edging. Stitch...3.) Stitch length 1-4 (For the Satin Stitch, set at F.) Needle position M, L, R (For twin needle sewing, always set at M.) Presser foot Zigzag Needle Single or Twin ■ Simple zigzag stitch Set the stitch length between 1 and 4 for sewing stretch materials. UTILITY STITCHES 3 ...
...for sewing plain seams. Stitch width 0 Stitch length F-4 Needle position M, L, R (For twin needle sewing, always set at M.) Presser foot Zigzag Needle Single or Twin Baste or pin together the fabric pieces. They are used for making buttonholes and decorative stitches or edging. Stitch...3.) Stitch length 1-4 (For the Satin Stitch, set at F.) Needle position M, L, R (For twin needle sewing, always set at M.) Presser foot Zigzag Needle Single or Twin ■ Simple zigzag stitch Set the stitch length between 1 and 4 for sewing stretch materials. UTILITY STITCHES 3 ...

Users Guide
Page 29
... on the fold using the R needle c position, a straight stitch (0 width) and stitch length of trousers, without the stitch showing. 3 Stitch width Stitch length Needle position Presser foot Needle 3-5 2-3 R Zigzag Single Both the upper and lower threads should be a the same color as the fabric. When the fabric is finished, cut the thread...
... on the fold using the R needle c position, a straight stitch (0 width) and stitch length of trousers, without the stitch showing. 3 Stitch width Stitch length Needle position Presser foot Needle 3-5 2-3 R Zigzag Single Both the upper and lower threads should be a the same color as the fabric. When the fabric is finished, cut the thread...

Users Guide
Page 30
...Start sewing while gently moving the fabric c with a fabric underlay for reinforcement. Stitch width Stitch length Needle position Presser foot Needle Other 0 F-2 M None Single Darning plate Place the darning plate on the needle plate as a shown below, and then ...remove both the presser foot and presser foot holder assembly. Stitch width 3-5 Stitch length 3-4 Needle position L Presser foot Zigzag Needle Single Place the edge of the fabric under the b presser foot together with your hands, alternately drawing the fabric away and pulling...
...Start sewing while gently moving the fabric c with a fabric underlay for reinforcement. Stitch width Stitch length Needle position Presser foot Needle Other 0 F-2 M None Single Darning plate Place the darning plate on the needle plate as a shown below, and then ...remove both the presser foot and presser foot holder assembly. Stitch width 3-5 Stitch length 3-4 Needle position L Presser foot Zigzag Needle Single Place the edge of the fabric under the b presser foot together with your hands, alternately drawing the fabric away and pulling...

Users Guide
Page 31
...with the needle in the fabric c on the right side of the stitches (position D). Needle position R (right position) Presser foot Zigzag Sew 3-6 stitches. Lower the presser foot over the top right corner b of the b buttonhole to mark the position and length of the stitch (position A). (Turn... the handwheel counterclockwise if necessary.) C Step D: Left Row Lift the presser foot. This will move the fabric slightly. Lower the presser foot. A Step B: Right Row Set the stitch width to the right. BUTTONHOLE SEWING/ BUTTON SEWING Buttonholes can...
...with the needle in the fabric c on the right side of the stitches (position D). Needle position R (right position) Presser foot Zigzag Sew 3-6 stitches. Lower the presser foot over the top right corner b of the b buttonhole to mark the position and length of the stitch (position A). (Turn... the handwheel counterclockwise if necessary.) C Step D: Left Row Lift the presser foot. This will move the fabric slightly. Lower the presser foot. A Step B: Right Row Set the stitch width to the right. BUTTONHOLE SEWING/ BUTTON SEWING Buttonholes can...

Users Guide
Page 32
...(position D) D Step E: Securing Buttonhole Stitch To secure stitching, set the stitch width to 0. Stitch width Set according to 4 stitches. Lower the presser foot and sew 3 to the distance between the holes. b Stop the machine when the needle is in the cutting path, otherwise injuries may result if ...position A) Step D: Right Row Set the needle position at R, stitch width at 2 a and stitch length at F. Stitch length 0 Needle position L or R Presser foot Zigzag Needle Single Other Darning plate a Turn the fabric 90 degrees counterclockwise and sew 5 - 6 straight stitches.
...(position D) D Step E: Securing Buttonhole Stitch To secure stitching, set the stitch width to 0. Stitch width Set according to 4 stitches. Lower the presser foot and sew 3 to the distance between the holes. b Stop the machine when the needle is in the cutting path, otherwise injuries may result if ...position A) Step D: Right Row Set the needle position at R, stitch width at 2 a and stitch length at F. Stitch length 0 Needle position L or R Presser foot Zigzag Needle Single Other Darning plate a Turn the fabric 90 degrees counterclockwise and sew 5 - 6 straight stitches.


