
Users Guide
Page 2
... instruction manual. 16.This sewing machine is required around the sewing machine needle. 11.Always use as threading the needle, changing the needle, threading the bobbin, or changing the presser foot. 15.Always unplug the sewing machine from the electrical outlet when removing covers, lubricating, or when making any other user...
... instruction manual. 16.This sewing machine is required around the sewing machine needle. 11.Always use as threading the needle, changing the needle, threading the bobbin, or changing the presser foot. 15.Always unplug the sewing machine from the electrical outlet when removing covers, lubricating, or when making any other user...

Users Guide
Page 4
... bed attachment ...6 ACCESSORIES ...7 OPTIONAL ACCESSORIES 7 USING YOUR SEWING MACHINE 8 Power supply precautions ...8 Power supply ...8 Foot controller ...9 Steadying the machine ...9 THREADING THE MACHINE 10 Winding the bobbin ...10 Lower threading ...11 Upper threading ...13 Drawing up the lower thread ...14 REPLACING THE NEEDLE 15 Needle precautions ...15 Selecting the needle depending on...
... bed attachment ...6 ACCESSORIES ...7 OPTIONAL ACCESSORIES 7 USING YOUR SEWING MACHINE 8 Power supply precautions ...8 Power supply ...8 Foot controller ...9 Steadying the machine ...9 THREADING THE MACHINE 10 Winding the bobbin ...10 Lower threading ...11 Upper threading ...13 Drawing up the lower thread ...14 REPLACING THE NEEDLE 15 Needle precautions ...15 Selecting the needle depending on...

Users Guide
Page 5
... storing the machine ...38 Oiling ...38 Changing the bulb ...38 Cleaning the machine surface ...39 Cleaning the shuttle race ...39 Cleaning the feed dogs ...40 Bobbin case tension adjustment ...41 TROUBLESHOOTING ...42 When the thread is entangled ...45 INDEX ...46 4 3. UTILITY STITCHES 27 USEFUL STITCHES ...27 Zigzag stitches ...27 Basic stitching...
... storing the machine ...38 Oiling ...38 Changing the bulb ...38 Cleaning the machine surface ...39 Cleaning the shuttle race ...39 Cleaning the feed dogs ...40 Bobbin case tension adjustment ...41 TROUBLESHOOTING ...42 When the thread is entangled ...45 INDEX ...46 4 3. UTILITY STITCHES 27 USEFUL STITCHES ...27 Zigzag stitches ...27 Basic stitching...

Users Guide
Page 6
...switch (page 8) Use this knob to set the stitch width. p Bobbin winding pre-tension disc/thread guide (page 10 and 13) The thread guide/bobbin winding pre-tension disc is used when winding the thread onto the bobbin and threading the machine. Contact your dealer or the nearest authorized service ... g Reverse sewing lever (page 23) Press and hold down the reverse sewing lever to start and stop sewing. j Bobbin winder (page 10) The bobbin winder winds thread onto the bobbin for 220-240V area The foot controller part code differs depending on and off the main power and sewing light. m Foot...
...switch (page 8) Use this knob to set the stitch width. p Bobbin winding pre-tension disc/thread guide (page 10 and 13) The thread guide/bobbin winding pre-tension disc is used when winding the thread onto the bobbin and threading the machine. Contact your dealer or the nearest authorized service ... g Reverse sewing lever (page 23) Press and hold down the reverse sewing lever to start and stop sewing. j Bobbin winder (page 10) The bobbin winder winds thread onto the bobbin for 220-240V area The foot controller part code differs depending on and off the main power and sewing light. m Foot...

Users Guide
Page 7
... presser foot screw to hold the presser foot holder assembly in place. e Needle plate The needle plate is installed onto the presser foot holder assembly. h Bobbin case i Needle j Needle bar thread guide k Needle clamp screw Use the needle clamp screw to hold the needle in place. Attach the appropriate presser foot... cover to remove it. Lift the bottom of the flat bed attachment 1 a toward you, and then pull the flat bed attachment out to set the bobbin. a Presser foot holder assembly The presser foot is marked with guides for the selected stitching.
... presser foot screw to hold the presser foot holder assembly in place. e Needle plate The needle plate is installed onto the presser foot holder assembly. h Bobbin case i Needle j Needle bar thread guide k Needle clamp screw Use the needle clamp screw to hold the needle in place. Attach the appropriate presser foot... cover to remove it. Lift the bottom of the flat bed attachment 1 a toward you, and then pull the flat bed attachment out to set the bobbin. a Presser foot holder assembly The presser foot is marked with guides for the selected stitching.

Users Guide
Page 8
Note (For U.S.A. Part Name X59370-021 (LS-2000/LS2250PRW) XE9369-001 (Others) 3 Bobbin XA3442-121 4 Needle set Part Code Americas Others SA156 (Americas) SFB: SABOBBIN (U.S.A. No. only) ● Foot controller: Model KD-1902 This foot controller... on the following accessories are stored in the flat bed attachment. KNOWING YOUR SEWING MACHINE ACCESSORIES The following machine models: LS-2000/LS2250PRW/LS2300PRW/LS2350/LX2375. ● The screw of the presser foot holder is available through your authorized dealer. (Part code: 132730-122) ● A replacement for the ...
Note (For U.S.A. Part Name X59370-021 (LS-2000/LS2250PRW) XE9369-001 (Others) 3 Bobbin XA3442-121 4 Needle set Part Code Americas Others SA156 (Americas) SFB: SABOBBIN (U.S.A. No. only) ● Foot controller: Model KD-1902 This foot controller... on the following accessories are stored in the flat bed attachment. KNOWING YOUR SEWING MACHINE ACCESSORIES The following machine models: LS-2000/LS2250PRW/LS2300PRW/LS2350/LX2375. ● The screw of the presser foot holder is available through your authorized dealer. (Part code: 132730-122) ● A replacement for the ...
Users Guide
Page 11
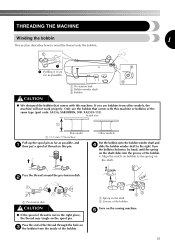
...as far as possible, and a then put a spool of thread on this machine or bobbins of the bobbin. a Spring on the shaft b Groove of the bobbin. • Align the notch on bobbin to the spring on the shaft. THREADING THE MACHINE Winding the bobbin 1 This section describes how to wind the thread onto the... it in the right place, the thread may tangle on the spool pin. If you use the bobbin that comes with this pin. Other models Put the bobbin onto the bobbin winder shaft and d slide the bobbin winder shaft to the right. b Click! Pass the end of the thread through the hole on c...
...as far as possible, and a then put a spool of thread on this machine or bobbins of the bobbin. a Spring on the shaft b Groove of the bobbin. • Align the notch on bobbin to the spring on the shaft. THREADING THE MACHINE Winding the bobbin 1 This section describes how to wind the thread onto the... it in the right place, the thread may tangle on the spool pin. If you use the bobbin that comes with this pin. Other models Put the bobbin onto the bobbin winder shaft and d slide the bobbin winder shaft to the right. b Click! Pass the end of the thread through the hole on c...
Users Guide
Page 12
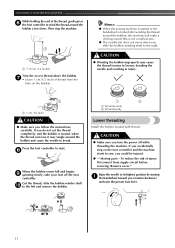
...clicking sound; To reduce the risk of thread from supply circuit before servicing. a 7-10 cm (3-4 inches) Trim the excess thread above the bobbin. h When the bobbin seems full and begins i spinning slowly, take your foot off while threading the machine. If you could be injured. ● -" Moving parts... - Cut the thread, slide the bobbin winder shaft j to wind the thread around the bobbin and cause the needle to loosen, breaking the needle and resulting in injury. Remove cover." If you follow the ...
...clicking sound; To reduce the risk of thread from supply circuit before servicing. a 7-10 cm (3-4 inches) Trim the excess thread above the bobbin. h When the bobbin seems full and begins i spinning slowly, take your foot off while threading the machine. If you could be injured. ● -" Moving parts... - Cut the thread, slide the bobbin winder shaft j to wind the thread around the bobbin and cause the needle to loosen, breaking the needle and resulting in injury. Remove cover." If you follow the ...
Users Guide
Page 13
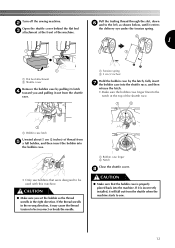
... is incorrectly installed, it may cause the thread tension to sew. 12 a Tension spring b 5 cm (2 inches) Hold the bobbin case by pulling its latch d toward you set the bobbin so the thread unrolls in the wrong direction, it will fall out from the shuttle when the machine starts to be used with... this machine. CAUTION ● Make sure you and pulling it out from e a full bobbin, and then insert the bobbin into the machine. b Open the shuttle cover behind the flat bed c attachment at the top of the machine...
... is incorrectly installed, it may cause the thread tension to sew. 12 a Tension spring b 5 cm (2 inches) Hold the bobbin case by pulling its latch d toward you set the bobbin so the thread unrolls in the wrong direction, it will fall out from the shuttle when the machine starts to be used with... this machine. CAUTION ● Make sure you and pulling it out from e a full bobbin, and then insert the bobbin into the machine. b Open the shuttle cover behind the flat bed c attachment at the top of the machine...

Users Guide
Page 16
.... CAUTION ● Only use bent needles. Refer to observe the following table when choosing the thread and needle appropriate for the upper (spool) and lower (bobbin) threads. Sewing fabrics Needle sizes Thread sizes Very thin Fine tricot, Fine lace, Thin linen, Silk, 65/9 Organza, Chiffon Cotton: 80 Synthetic/ Polyester Long Fiber...
.... CAUTION ● Only use bent needles. Refer to observe the following table when choosing the thread and needle appropriate for the upper (spool) and lower (bobbin) threads. Sewing fabrics Needle sizes Thread sizes Very thin Fine tricot, Fine lace, Thin linen, Silk, 65/9 Organza, Chiffon Cotton: 80 Synthetic/ Polyester Long Fiber...

Users Guide
Page 25
... thread may appear on the surface of the fabric when sewing thin fabric with a screwdriver. control dial to "Lower threading" (page 11) and reinsert the bobbin. 1 2 3 a Wrong side b Surface c Upper thread d Lower thread e Loops appear on surface of fabric Solution Reduce the tension by turning the upper ... on wrong side of fabric Solution Increase the tension by turning the screw clockwise with thin thread. 1 Note ● If the bobbin thread was incorrectly threaded, the upper thread may need to adjust it when you change tension adjustments make sure the upper thread and...
... thread may appear on the surface of the fabric when sewing thin fabric with a screwdriver. control dial to "Lower threading" (page 11) and reinsert the bobbin. 1 2 3 a Wrong side b Surface c Upper thread d Lower thread e Loops appear on surface of fabric Solution Reduce the tension by turning the upper ... on wrong side of fabric Solution Increase the tension by turning the screw clockwise with thin thread. 1 Note ● If the bobbin thread was incorrectly threaded, the upper thread may need to adjust it when you change tension adjustments make sure the upper thread and...

Users Guide
Page 33
...often needed when 3 sewing on the button as b shown below. Place a button between the presser foot and c the fabric. ■ Button fitting with the bobbin thread. You will narrow or widen the "swing" of the stitch to accommodate most buttons. CAUTION ● When sewing, be attached. Start sewing. Place a ... in order to form a thread shank. Pull the fabric to the left side of the machine, g and then cut the upper thread and the bobbin thread at a low speed, press and hold down the reverse sewing lever to sew a few reinforcement stitches. 32 Use scissors to cut the upper and...
...often needed when 3 sewing on the button as b shown below. Place a button between the presser foot and c the fabric. ■ Button fitting with the bobbin thread. You will narrow or widen the "swing" of the stitch to accommodate most buttons. CAUTION ● When sewing, be attached. Start sewing. Place a ... in order to form a thread shank. Pull the fabric to the left side of the machine, g and then cut the upper thread and the bobbin thread at a low speed, press and hold down the reverse sewing lever to sew a few reinforcement stitches. 32 Use scissors to cut the upper and...

Users Guide
Page 37
... foot control at M.) 3 Presser foot Zigzag Needle Single or Twin Sew a single or multiple parallel rows of less than for the Satin Stitch. Pull the bobbin threads to "Thread tension" (page 24). Note ● When using a twin needle, be sure to 0 while depressing the foot control at an even speed. Gathering...
... foot control at M.) 3 Presser foot Zigzag Needle Single or Twin Sew a single or multiple parallel rows of less than for the Satin Stitch. Pull the bobbin threads to "Thread tension" (page 24). Note ● When using a twin needle, be sure to 0 while depressing the foot control at an even speed. Gathering...
Users Guide
Page 40
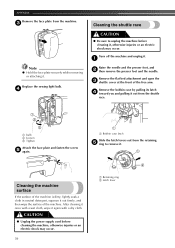
...machine and unplug it out from the shuttle race. a bulb b Loosen c Tighten Attach the face plate and fasten the screw e again. Remove the bobbin case by pulling its latch d toward you and pulling it . Cleaning the machine surface If the surface of the machine is dirty, lightly soak a cloth...may occur. 39 a Retaining ring b Latch lever a Raise the needle and the presser foot, and b then remove the presser foot and the needle. a Bobbin case latch Slide the latch levers out from the machine. c Cleaning the shuttle race Note ● Hold the face plate securely while removing or attaching...
...machine and unplug it out from the shuttle race. a bulb b Loosen c Tighten Attach the face plate and fasten the screw e again. Remove the bobbin case by pulling its latch d toward you and pulling it . Cleaning the machine surface If the surface of the machine is dirty, lightly soak a cloth...may occur. 39 a Retaining ring b Latch lever a Raise the needle and the presser foot, and b then remove the presser foot and the needle. a Bobbin case latch Slide the latch levers out from the machine. c Cleaning the shuttle race Note ● Hold the face plate securely while removing or attaching...

Users Guide
Page 41
... remove the screws. a Retaining ring b Hook c Latch lever Attach the needle plate by using the machine. Turn off the machine and unplug it . Attach the bobbin case, the presser foot and k the needle before you clean it . CAUTION ● Make sure you may get an electric shock or be injured. a Raise...
... remove the screws. a Retaining ring b Hook c Latch lever Attach the needle plate by using the machine. Turn off the machine and unplug it . Attach the bobbin case, the presser foot and k the needle before you clean it . CAUTION ● Make sure you may get an electric shock or be injured. a Raise...
Users Guide
Page 42
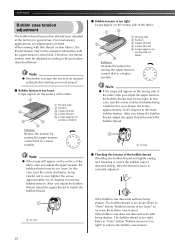
... thread e Loops appear on wrong side of fabric Solution Increase the tension by turning the upper tension- control dial to reduce the bobbin case tension. 41 In this case, turn the screw counterclockwise being careful not to over -loosen the screw, approximately 30-45 degrees...side b Surface c Upper thread d Lower thread e Loops appear on thin fabrics, the thread tension may be too loose. If the bobbin case descends without being shaken: The bobbin thread is correctly adjusted. Refer to "Note" below . Note ● If the loops still appear on the surface of the fabric...
... thread e Loops appear on wrong side of fabric Solution Increase the tension by turning the upper tension- control dial to reduce the bobbin case tension. 41 In this case, turn the screw counterclockwise being careful not to over -loosen the screw, approximately 30-45 degrees...side b Surface c Upper thread d Lower thread e Loops appear on thin fabrics, the thread tension may be too loose. If the bobbin case descends without being shaken: The bobbin thread is correctly adjusted. Refer to "Note" below . Note ● If the loops still appear on the surface of the fabric...

Users Guide
Page 43
... ". Insert the needle properly. Lightly guide the fabric. Contact your dealer or the nearest authorized service center. Only use a bobbin that you need additional help, the Brother Solutions Center offers the latest FAQs and troubleshooting tips. If the problem persists, contact your retailer or the nearest authorized service center. page 16 The...
... ". Insert the needle properly. Lightly guide the fabric. Contact your dealer or the nearest authorized service center. Only use a bobbin that you need additional help, the Brother Solutions Center offers the latest FAQs and troubleshooting tips. If the problem persists, contact your retailer or the nearest authorized service center. page 16 The...
Users Guide
Page 44
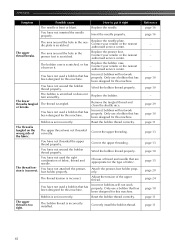
... designed for this machine. Adjust the tension of fabric. Reset the bobbin thread correctly. You have not used a bobbin that has been designed for this machine. Wind the bobbin thread properly. Remove the tangled thread and clean the shuttle race.... attached the presserfoot holder properly. The lower thread is incorrect. Bobbin is set incorrectly. The upper thread was not threaded correctly. Replace the bobbin case. Bobbin is set incorrectly. The bobbin thread is tangled. Insert the needle properly. The upper thread ...
... designed for this machine. Adjust the tension of fabric. Reset the bobbin thread correctly. You have not used a bobbin that has been designed for this machine. Wind the bobbin thread properly. Remove the tangled thread and clean the shuttle race.... attached the presserfoot holder properly. The lower thread is incorrect. Bobbin is set incorrectly. The upper thread was not threaded correctly. Replace the bobbin case. Bobbin is set incorrectly. The bobbin thread is tangled. Insert the needle properly. The upper thread ...

Users Guide
Page 45
... the upper thread properly. page 15 The needle is a highpitched noise while sewing. Replace the needle. page 24 You have not used bobbin that you are sewing thin fabric, the stitch is tangled in the shuttle race. appropriate for example, in the shuttle race. page 16 4... Dust has accumulated under the fabric. Correct the upper threading. page 13 There is bent or blunt. Incorrect bobbins will not work properly. Remove the tangle thread. page 39 The fabric does not feed. Remove the tangle thread. Fit the spool properly. -...
... the upper thread properly. page 15 The needle is a highpitched noise while sewing. Replace the needle. page 24 You have not used bobbin that you are sewing thin fabric, the stitch is tangled in the shuttle race. appropriate for example, in the shuttle race. page 16 4... Dust has accumulated under the fabric. Correct the upper threading. page 13 There is bent or blunt. Incorrect bobbins will not work properly. Remove the tangle thread. page 39 The fabric does not feed. Remove the tangle thread. Fit the spool properly. -...

Users Guide
Page 46
... the entangled thread with small scissors c above the needle plate and then gently remove the thread and fabric. 45 And then look to be sure bobbin winding shaft is locked. a CAUTION ● Unplug the power supply cord, otherwise injuries or an electric shock may bend the needle causing it . CAUTION ●...
... the entangled thread with small scissors c above the needle plate and then gently remove the thread and fabric. 45 And then look to be sure bobbin winding shaft is locked. a CAUTION ● Unplug the power supply cord, otherwise injuries or an electric shock may bend the needle causing it . CAUTION ●...


