Users Manual - English
Page 2
... needle, threading the bobbin, or changing the presser foot. 15. Use this manual. 3. "IMPORTANT SAFETY INSTRUCTIONS" When using the sewing machine, basic safety precautions should always be followed, including the following: "Read all moving parts. Do not use the proper needle plate....air openings blocked. Always use this manual. Do not use by or near children. 2. This sewing machine is intended for its intended use ." "SAVE THESE INSTRUCTIONS" "This sewing machine is not intended for examination, repair, electrical or mechanical adjustment. 4. To reduce the risk of ...
... needle, threading the bobbin, or changing the presser foot. 15. Use this manual. 3. "IMPORTANT SAFETY INSTRUCTIONS" When using the sewing machine, basic safety precautions should always be followed, including the following: "Read all moving parts. Do not use the proper needle plate....air openings blocked. Always use this manual. Do not use by or near children. 2. This sewing machine is intended for its intended use ." "SAVE THESE INSTRUCTIONS" "This sewing machine is not intended for examination, repair, electrical or mechanical adjustment. 4. To reduce the risk of ...
Users Manual - English
Page 6
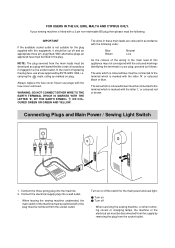
...main leads must be removed from the socket outlet. Never use a fuse approved by removing the plug from the socket outlet. When leaving the sewing machine unattended, the main switch of replacing the plug fuse, use plugs with the letter 'L' or coloured red or brown. When servicing the... sewing machine, or when removing covers or changing lamps, the machine or the electrical set must be disconnected from the supply by ASTA to the terminal which is coloured brown must be...
...main leads must be removed from the socket outlet. Never use a fuse approved by removing the plug from the socket outlet. When leaving the sewing machine unattended, the main switch of replacing the plug fuse, use plugs with the letter 'L' or coloured red or brown. When servicing the... sewing machine, or when removing covers or changing lamps, the machine or the electrical set must be disconnected from the supply by ASTA to the terminal which is coloured brown must be...
Users Manual - English
Page 7
CONTENTS KNOWING YOUR SEWING MACHINE PRINCIPAL PARTS 2 ACCESSORIES 3 OPERATING YOUR SEWING MACHINE 4 Connecting Plugs 4 Main Power and Sewing Light Switches 5 Foot Controller 5 Inserting the Needle 6 Checking the Needle 6 Changing the Presser Foot 7 Converting to Free-Arm Style 8 Steadying the Machine 8 VARIOUS CONTROLS 9 Stitch Length Knob 9 Reverse Sewing Lever 10 Stitch Width Knob 11 Needle Position Selector 12 THREADING...
CONTENTS KNOWING YOUR SEWING MACHINE PRINCIPAL PARTS 2 ACCESSORIES 3 OPERATING YOUR SEWING MACHINE 4 Connecting Plugs 4 Main Power and Sewing Light Switches 5 Foot Controller 5 Inserting the Needle 6 Checking the Needle 6 Changing the Presser Foot 7 Converting to Free-Arm Style 8 Steadying the Machine 8 VARIOUS CONTROLS 9 Stitch Length Knob 9 Reverse Sewing Lever 10 Stitch Width Knob 11 Needle Position Selector 12 THREADING...
Users Manual - English
Page 67
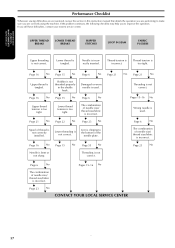
...not correct. M Page 15 M No Page 55 No M Threading is incorrect. If you to make sure you are correctly using the machine. Needle is tangled. Lower thread is incorrectly inserted. M Page 6 No M Damaged or worn needle is not threaded properly in this ...instruction manual that details the operation you are performing to improve the operation. MAINTENANCE ENTRETIEN MANTENIMIENTO MANUTENÇÃO Performance Checklist Whenever sewing difficulties are encountered, review the section in the shuttle hook. M Page 15 No M Lower thread tension is used . M ...
...not correct. M Page 15 M No Page 55 No M Threading is incorrect. If you to make sure you are correctly using the machine. Needle is tangled. Lower thread is incorrectly inserted. M Page 6 No M Damaged or worn needle is not threaded properly in this ...instruction manual that details the operation you are performing to improve the operation. MAINTENANCE ENTRETIEN MANTENIMIENTO MANUTENÇÃO Performance Checklist Whenever sewing difficulties are encountered, review the section in the shuttle hook. M Page 15 No M Lower thread tension is used . M ...
Users Manual - English
Page 76
... Replacement 7 Principal Parts 2 R Repacking 65 S Sewing Direction 26 Sewing Fabric Edges 27 Sewing Light Bulb Replacement 53 Switch 5 Sewing on Very Thin Fabric 29 Shuttle Hook Removal 55 Shuttle Race Cleaning 55 Spool Installing 16 Steadying the Machine 8 Stitch Length Knob 9 Stitch Width Knob 11 ...Straight Stitching 25 T Threading Bobbin 15 Needle 16 Thread Tension 21 Troubleshooting 57-58 Twin-Needle Sewing 19 U Upper Tension Control Dial 21 Upper Threading...
... Replacement 7 Principal Parts 2 R Repacking 65 S Sewing Direction 26 Sewing Fabric Edges 27 Sewing Light Bulb Replacement 53 Switch 5 Sewing on Very Thin Fabric 29 Shuttle Hook Removal 55 Shuttle Race Cleaning 55 Spool Installing 16 Steadying the Machine 8 Stitch Length Knob 9 Stitch Width Knob 11 ...Straight Stitching 25 T Threading Bobbin 15 Needle 16 Thread Tension 21 Troubleshooting 57-58 Twin-Needle Sewing 19 U Upper Tension Control Dial 21 Upper Threading...


